


版权声明:转载注明出处,谢谢合作。
Android新特性之RecyclerView的简单使用
RecyclerView是安卓5.0版本中的一个新控件,目的是来取代使用多年的ListView。RecyclerView的灵活性远超ListView,所以RecyclerView扩展性非常高,下面就让我们一起来看看RecyclerView的简单使用。
简介
RecyclerView的设计非常灵活,它通过LayoutManager、ItemDecoration、ItemAnimator这三个类进行所有的布局控制,绑定数据依旧是使用Adapter进行绑定。所以我们只需要掌握这三个类的使用即可。
环境配置
RecyclerView是Android系统提供的新控件,自然按照谷歌的一贯作风,我们需要下载一个支持库。android.support.v7。所以使用该控件,我们需要添加v7包的引用。v7下载地址。
下载完成后,我们需要在开发环境中添加该包的引用。简要介绍在Eclipse和Android Studio中的引用方式。
Eclipse添加V7包
1、在eclipse的工作控件将v7包导入到我们的工程中。注意:此时应将我们下载好的v7包放到我们工程目录下,不然后面导入后会出问题。
2、选中我们的项目,右键properties属性,进入如下图,我们点击add,系统就会在我们的工作目录下,找到Library类库,供我们添加,我们选择v7即可。这样我们就可以使用RecyclerView了。

注意:如果你添加到v7包到eclipse了,但是找不到该library,你选中v7包工程右键属性选择Library,然后勾选上图中的isLibrary,点击确定即可。
AndroidStudio中添加v7包
1、要确保已经将Android Support Libraries升级到最新。
2、打开我们的module对应的build.gradle文件,在dependencies中添加
compile 'com.android.support:recyclerview-v7:21.0.+'
3、重新Build一下工程即可。
相关类介绍
一、RecyclerView
我们打开源码,看到
public class RecyclerView extends ViewGroup
- 1

- 1
所以这也就是我们常见的自定义ViewGroup,只不过这个玩意比较牛逼罢了。通过源码,我们看到这玩意有很多方法,但是我们仅仅挑选几个常用的来说说。
1、public void setAdapter(Adapter adapter)
根据我们使用的经验,显然这个方法是让我们绑定数据的,只不过这个Adapter是
public static abstract class Adapter<VH extends ViewHolder>
- 1

- 1
类型的。
2、 public void setLayoutManager(LayoutManager layout)
看到layout开头,显然是跟布局有关,又有manager,所以这个LayoutManager肯定就是负责RecyclerView的布局的类。
3、public void addItemDecoration(ItemDecoration decor, int index)
为每个item附加的子视图,这个方法可用于添加分割线,这点和我们使用ListView的setDivider()有点类似,此时,我们只要传入一个ItemDecoration对象。
4、 public void setItemAnimator(ItemAnimator animator)
这个方法很牛逼,可以设置动画。先来看看官方文档对此方法的注释。
* Sets the {@link ItemAnimator} that will handle animations involving changes
     * to the items in this RecyclerView. By default, RecyclerView instantiates and
     * uses an instance of {@link DefaultItemAnimator}. Whether item animations are
     * enabled for the RecyclerView depends on the ItemAnimator and whether
     * the LayoutManager {@link LayoutManager#supportsPredictiveItemAnimations()
     * supports item animations}.
     */
- 1
- 2
- 3
- 4
- 5
- 6
- 7
- 1
- 2
- 3
- 4
- 5
- 6
- 7
这段话的大概意思就是通过此方法设置ItemAnimator对象来实现RecyclerView的item的动画,默认情况下,使用DefaultItemAnimator动画。动画是否有效取决于ItemAnimator和LayoutManager的类对象。
以上就是众多方法中比较常用的四个,这四个方法的灵活性很高,所以也铸就了RecyclerView的高度灵活性,看了上面的四个方法,我们可以肯定RecyclerView类的内部肯定有对应的四个类对象来处理所需的效果。
二、LayoutManager
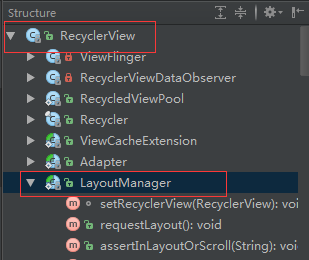
上面也分析了,这个LayoutManager就是我们的布局管理器。我们下来看看一张类的组织结构图。
我们先来看看该类的定义源码来一睹风采。
public static abstract class LayoutManager
看到源码,吓了一跳,原来是一个抽象类,那我们setLayoutManager(LayoutManager layout)时难道要我们自定义一个LayoutManager对象么?哈哈!不会的,如果真是那样,我估计RecyclerView就变的极其复杂了,为什么?且看源码对该类的注释。
 /**
     * A <code>LayoutManager</code> is responsible for measuring and positioning item views
     * within a <code>RecyclerView</code> as well as determining the policy for when to recycle
     * item views that are no longer visible to the user. By changing the <code>LayoutManager</code>
     * a <code>RecyclerView</code> can be used to implement a standard vertically scrolling list,
     * a uniform grid, staggered grids, horizontally scrolling collections and more. Several stock
     * layout managers are provided for general use.
 */
- 1
- 2
- 3
- 4
- 5
- 6
- 7
- 8
- 1
- 2
- 3
- 4
- 5
- 6
- 7
- 8
意思就是:LayoutManager负责RecyclerView中item的测量以及放置,同时也管理着item的回收。通过改变LayoutManager可以让RecyclerView形成垂直滚动的效果(ListView),统一网格效果(GridView)、交错网格效果(瀑布流)、横向滚动效果(HorizontalListView)等等。
所以说,这么复杂的东西怎么能让开发者完全实现呢?安卓肯定会给我们提供几个实现好的类。
- LinearLayoutManager:线性布局管理器,支持横向和纵向形式。
- GridLayoutManager: 网格布局管理器。
- StaggeredGridLayoutManager:瀑布就式布局管理器
所以在实际开发中,我们可以根据实际需要进行使用,一般情况下,这三个子类能完全满足我们的需求,更高需求,请自定义LayoutManager对象。
三、ItemDecoration
为每个item附加的子视图,这个类可用于我们设置分割线,同样也是RecyclerView类的内部类,那么我们看看它的定义形式:
public static abstract class ItemDecoration
- 1
- 1
又是一个抽象类,所以注定了它是不平凡的,即我们需要自定义它的子类来实现绚丽的分割效果,官方现在好像还没有吧!以后估计可能有。
四、ItemAnimator
一看,跟Animator沾边,八成就是搞动画的出身。同样该类也是RecyclerView类的内部类,我们看看它的定义吧!
public static abstract class ItemAnimator
- 1
- 1
所以注定了不平凡有不平凡的伟大,我们需要自定义子类来实现动画,系统也提供默认的。
关于RecyclerView的基本要素,我们简要说了下,总体来说,功能很强大,能玩多6全看自身水平多高,涉及的方面比较多,上手比较容易,想精通这个控件,还是需要下很大功夫的。下面就开始学习使用这个控件了。
RecyclerView的使用
1、基本使用步骤:
View view = inflater.inflate(R.layout.fragment_linear_layout_manager, container, false);
    //RecyclerView的初始化
    mRecyclerView = (RecyclerView)view.findViewById(R.id.recycler_view);
    //创建现行LinearLayoutManager
    mLayoutManager = new LinearLayoutManager(getActivity());
    //设置LayoutMananger
    mRecyclerView.setLayoutManager(mLayoutManager);
    //设置item的动画,可以不设置
    mRecyclerView.setItemAnimator(new DefaultItemAnimator());
    MyAdapter adapter = new MyAdapter(initDate());
    //设置Adapter
    mRecyclerView.setAdapter(adapter);
- 1
- 2
- 3
- 4
- 5
- 6
- 7
- 8
- 9
- 10
- 11
- 12
- 1
- 2
- 3
- 4
- 5
- 6
- 7
- 8
- 9
- 10
- 11
- 12
以上就是使用的几个步骤,很简单,所以我们就开始学习使用。由于演示功能较多,所以我们采用在Fragment中进行。
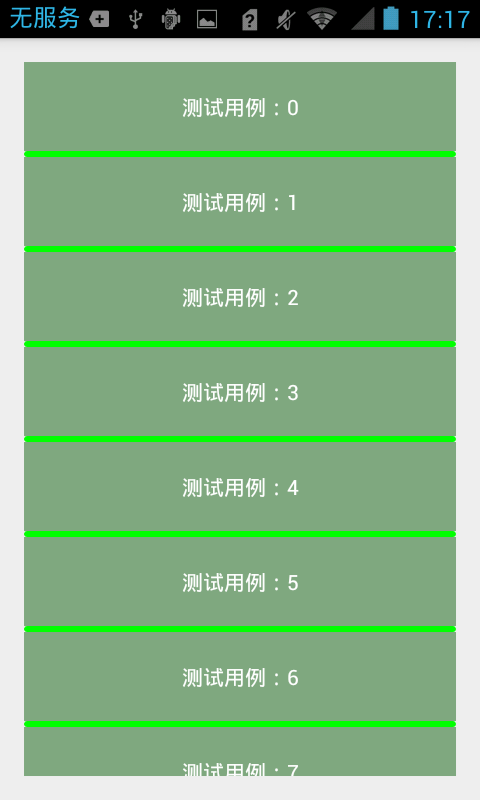
ListView效果
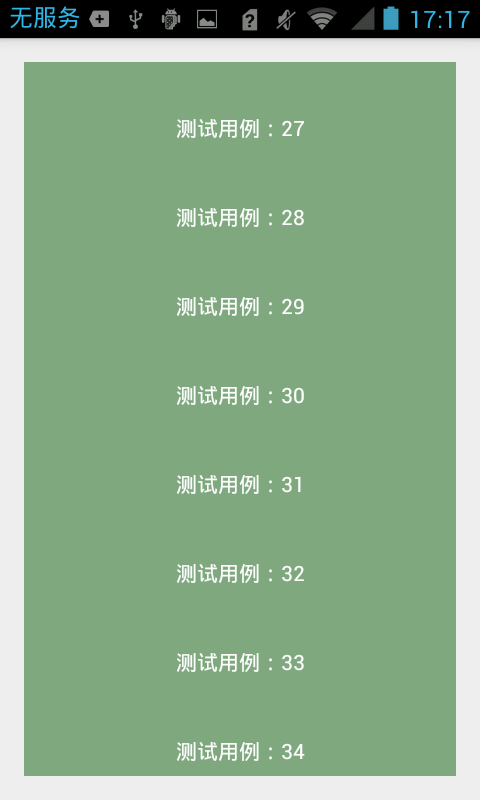
1、首先我们创建名称为LinearLayoutManagerFragment的Fragment,用于展示线性的布局,然后创建对应的xml布局。在AndroidStudio中我们创建该fragment时系统已经默认帮我们创建好了,Eclipse中就不会。我们直接看xml布局中的RecyclerView的使用吧!
<FrameLayout xmlns:android="http://schemas.android.com/apk/res/android"
        android:layout_width="match_parent"
        android:layout_height="match_parent">
        <android.support.v7.widget.RecyclerView
            android:id="@+id/recycler_view"
            android:layout_width="match_parent"
            android:layout_height="match_parent"
            android:scrollbars="vertical"
            />
    </FrameLayout>
- 1
- 2
- 3
- 4
- 5
- 6
- 7
- 8
- 9
- 10
- 1
- 2
- 3
- 4
- 5
- 6
- 7
- 8
- 9
- 10
使用很简单,下面看看我们在Fragment中的使用代码:
public class LinearLayoutManagerFragment extends Fragment {
    private RecyclerView mRecyclerView;
    private RecyclerView.LayoutManager mLayoutManager;

    @Override
    public View onCreateView(LayoutInflater inflater, ViewGroup container,
                             Bundle savedInstanceState) {
        View view = inflater.inflate(R.layout.fragment_linear_layout_manager, container, false);
        //RecyclerView的初始化
        mRecyclerView = (RecyclerView)view.findViewById(R.id.recycler_view);
        //创建现行LinearLayoutManager
        mLayoutManager = new LinearLayoutManager(getActivity());
        //设置LayoutMananger
        mRecyclerView.setLayoutManager(mLayoutManager);
        //设置item的动画,可以不设置
        mRecyclerView.setItemAnimator(new DefaultItemAnimator());
        MyAdapter adapter = new MyAdapter(initDate());
        //设置Adapter
        mRecyclerView.setAdapter(adapter);
        return view;
    }

    private List<String> initDate(){
        List<String> list = new ArrayList<>();
        for(int i=0;i<50;i++){
            list.add("测试用例:" + i);
        }
        return list;
    }

    class MyAdapter  extends RecyclerView.Adapter<MyAdapter.ViewHolder>{
        private List<String> items;

        public MyAdapter(List<String> items) {
            this.items = items;
        }

        /**
         * 创建ViewHolder的布局
         * @param parent
         * @param viewType
         * @return
         */
        @Override
        public MyAdapter.ViewHolder onCreateViewHolder(ViewGroup parent, int viewType) {
            View view = LayoutInflater.from(parent.getContext()).inflate(R.layout.item,parent,false);
            return new ViewHolder(view);
        }

        /**
         * 通过ViewHolder将数据绑定到界面上进行显示
         * @param holder
         * @param position
         */
        @Override
        public void onBindViewHolder(MyAdapter.ViewHolder holder, int position) {
            holder.mTextView.setText(items.get(position));
        }

        @Override
        public int getItemCount() {
            return items.size();
        }

        public class ViewHolder extends RecyclerView.ViewHolder{
            public TextView mTextView;
            public ViewHolder(View itemView) {
                super(itemView);
                mTextView = (TextView) itemView.findViewById(R.id.textView);
            }
        }
    }
    }
- 1
- 2
- 3
- 4
- 5
- 6
- 7
- 8
- 9
- 10
- 11
- 12
- 13
- 14
- 15
- 16
- 17
- 18
- 19
- 20
- 21
- 22
- 23
- 24
- 25
- 26
- 27
- 28
- 29
- 30
- 31
- 32
- 33
- 34
- 35
- 36
- 37
- 38
- 39
- 40
- 41
- 42
- 43
- 44
- 45
- 46
- 47
- 48
- 49
- 50
- 51
- 52
- 53
- 54
- 55
- 56
- 57
- 58
- 59
- 60
- 61
- 62
- 63
- 64
- 65
- 66
- 67
- 68
- 69
- 70
- 71
- 72
- 73
item的布局,仅仅包含一个TextView用于展示。
<LinearLayout xmlns:android="http://schemas.android.com/apk/res/android"
    android:orientation="vertical" android:layout_width="match_parent"
    android:layout_height="match_parent">
     <TextView
        android:id="@+id/textView"
        android:layout_width="match_parent"
        android:layout_height="wrap_content"
        android:padding="20dp"
        android:background="#7fa87f"
        android:textColor="#ffffff"
        android:gravity="center_horizontal"/>
    </LinearLayout>
- 1
- 2
- 3
- 4
- 5
- 6
- 7
- 8
- 9
- 10
- 11
- 12
- 1
- 2
- 3
- 4
- 5
- 6
- 7
- 8
- 9
- 10
- 11
- 12
使用步骤与我们开篇说的一样,其实和ListView的使用差异不大,初始化控件,然后设置控件的相关属性,接着绑定数据,只不Recyclerview的属性设置有些复杂罢了。比较明显的变化就数Adapter的变化了。以前在使用ListView时,我们继承BaseAdapter来自定义Adatper适配器,然后使用ViewHolder进行复用Item。现在我们在看看RecyclerView.Adapter。
public static abstract class Adapter<VH extends ViewHolder>
- 1
- 1
看到这个类的定义确实吓一跳,Adapter里面都是ViewHolder类型,难道系统有ViewHolder,猜对了,系统中已经带了ViewHolder类型,
public static abstract class ViewHolder
- 1
- 1
所以我们我们要继承此ViewHolder来自定义我们的ViewHolder。就有了上面的写法,来发效果图!
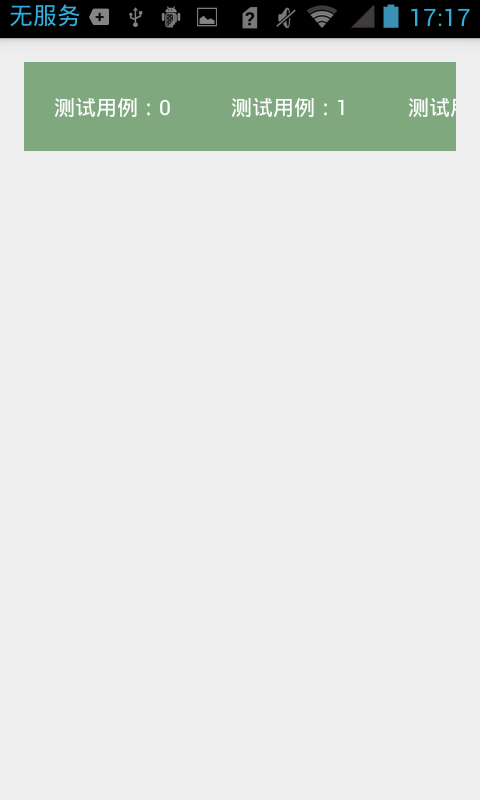
ok,简单的使用已经完成,我们前面也分析了,RecyclerView可以实现横向的ListView,那么我们来看看效果,我们创建名为HorrizontalManagerFragment的fragment。内容可以完全复制LinearLayoutManagerFragment的内容,只需要做以下几点修改:
 private LinearLayoutManager mLayoutManager;
    mLayoutManager.setOrientation(LinearLayoutManager.HORIZONTAL);
- 1
- 2
- 1
- 2
即可。效果图:
上面的效果实现了,但是感觉是不是很别扭,少了点什么。就是分割线,下面我们来给我们的RecyclerView添加分割线。当我们调用mRecyclerView.addItemDecoration()方法添加decoration的时候,RecyclerView在绘制的时候,去会绘制decorator,即调用该类的onDraw和onDrawOver方法,
- onDraw方法先于drawChildren
- onDrawOver在drawChildren之后,一般我们选择复写其中一个即可。
- getItemOffsets 可以通过outRect.set()为每个Item设置一定的偏移量,主要用于绘制Decorator。
我们建一个包用来放我们的ItemDecoration,我们先找一个现成的例子,来试试。
public class DividerItemDecoration extends RecyclerView.ItemDecoration{
    private static final int[] ATTRS = new int[]{
            android.R.attr.listDivider
    };

    public static final int HORIZONTAL_LIST = LinearLayoutManager.HORIZONTAL;

    public static final int VERTICAL_LIST = LinearLayoutManager.VERTICAL;

    private Drawable mDivider;

    private int mOrientation;

    public DividerItemDecoration(Context context, int orientation) {
        final TypedArray a = context.obtainStyledAttributes(ATTRS);
        mDivider = a.getDrawable(0);
        a.recycle();
        setOrientation(orientation);
    }

    public void setOrientation(int orientation) {
        if (orientation != HORIZONTAL_LIST && orientation != VERTICAL_LIST) {
            throw new IllegalArgumentException("invalid orientation");
        }
        mOrientation = orientation;
    }

    @Override
    public void onDraw(Canvas c, RecyclerView parent) {
        Log.v("recyclerview - itemdecoration", "onDraw()");

        if (mOrientation == VERTICAL_LIST) {
            drawVertical(c, parent);
        } else {
            drawHorizontal(c, parent);
        }

    }


    public void drawVertical(Canvas c, RecyclerView parent) {
        final int left = parent.getPaddingLeft();
        final int right = parent.getWidth() - parent.getPaddingRight();

        final int childCount = parent.getChildCount();
        for (int i = 0; i < childCount; i++) {
            final View child = parent.getChildAt(i);
            android.support.v7.widget.RecyclerView v = new android.support.v7.widget.RecyclerView(parent.getContext());
            final RecyclerView.LayoutParams params = (RecyclerView.LayoutParams) child
                    .getLayoutParams();
            final int top = child.getBottom() + params.bottomMargin;
            final int bottom = top + mDivider.getIntrinsicHeight();
            mDivider.setBounds(left, top, right, bottom);
            mDivider.draw(c);
        }
    }

    public void drawHorizontal(Canvas c, RecyclerView parent) {
        final int top = parent.getPaddingTop();
        final int bottom = parent.getHeight() - parent.getPaddingBottom();

        final int childCount = parent.getChildCount();
        for (int i = 0; i < childCount; i++) {
            final View child = parent.getChildAt(i);
            final RecyclerView.LayoutParams params = (RecyclerView.LayoutParams) child
                    .getLayoutParams();
            final int left = child.getRight() + params.rightMargin;
            final int right = left + mDivider.getIntrinsicHeight();
            mDivider.setBounds(left, top, right, bottom);
            mDivider.draw(c);
        }
    }

    @Override
    public void getItemOffsets(Rect outRect, int itemPosition, RecyclerView parent) {
        if (mOrientation == VERTICAL_LIST) {
            outRect.set(0, 0, 0, mDivider.getIntrinsicHeight());
        } else {
            outRect.set(0, 0, mDivider.getIntrinsicWidth(), 0);
        }
    }
    }
- 1
- 2
- 3
- 4
- 5
- 6
- 7
- 8
- 9
- 10
- 11
- 12
- 13
- 14
- 15
- 16
- 17
- 18
- 19
- 20
- 21
- 22
- 23
- 24
- 25
- 26
- 27
- 28
- 29
- 30
- 31
- 32
- 33
- 34
- 35
- 36
- 37
- 38
- 39
- 40
- 41
- 42
- 43
- 44
- 45
- 46
- 47
- 48
- 49
- 50
- 51
- 52
- 53
- 54
- 55
- 56
- 57
- 58
- 59
- 60
- 61
- 62
- 63
- 64
- 65
- 66
- 67
- 68
- 69
- 70
- 71
- 72
- 73
- 74
- 75
- 76
- 77
- 78
- 79
- 80
- 81
- 82
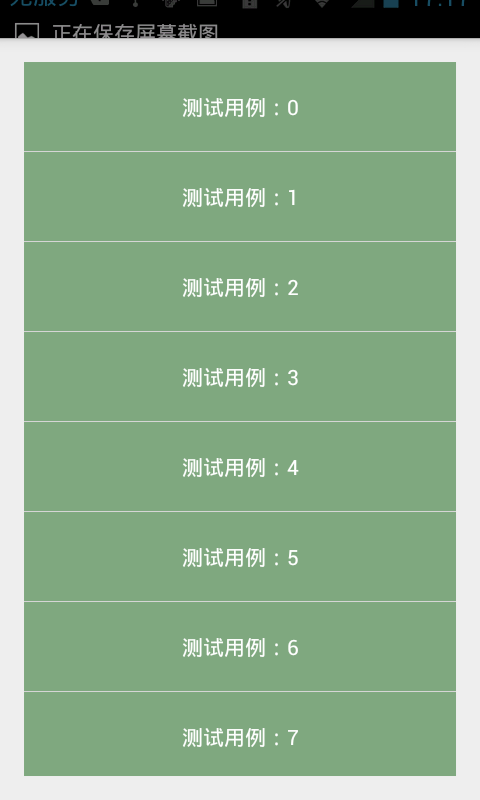
在Fragment中只需增加
mRecyclerView.addItemDecoration(new DividerItemDecoration(getActivity(),LinearLayoutManager.VERTICAL));
- 1
- 1
来看看效果图:
通过上面的实例,线条已经画出来了,我们只需要改变Draw的实例就可以了,所以这个玩的空间就比较大了。比如:
    <shape xmlns:android="http://schemas.android.com/apk/res/android"
    android:shape="rectangle" >
        <solid android:color="#00ff00"/>
        <corners android:radius="20dp"/>
        <size android:height="4dp"/>
    </shape>
- 1
- 2
- 3
- 4
- 5
- 6
- 1
- 2
- 3
- 4
- 5
- 6
效果图:
总之不单单添加分割线,其它用处也很多,样式更加随心所欲。
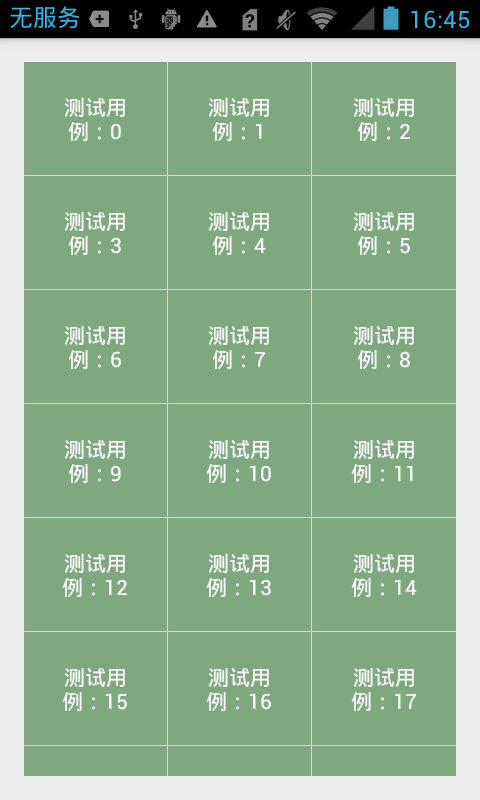
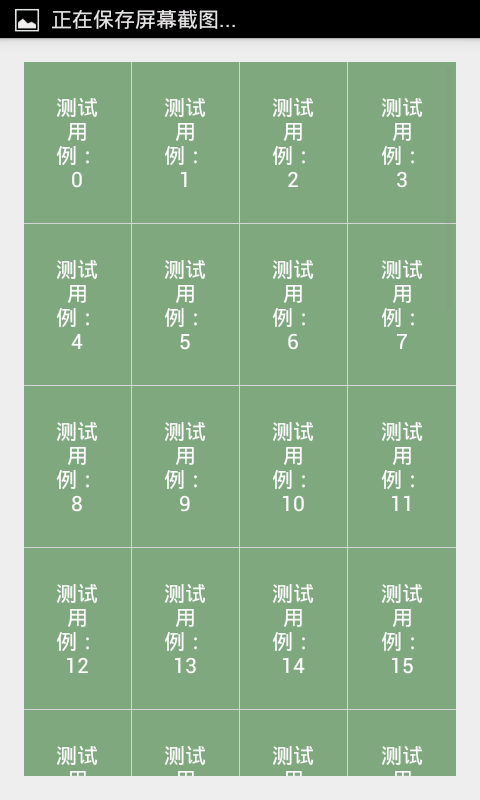
GridView效果
步骤如上,我们只需要更改LayoutManager所指向的对象即可。
mLayoutManager = new GridLayoutManager(getActivity(),4);
- 1
- 1
这样就能实现一个GridView效果,我们要处理的就是ItemDecrator的处理。
下面引自张鸿洋写的一个效果:
/**
     *
     * @author zhy
     *
     */
    public class DividerGridItemDecoration extends RecyclerView.ItemDecoration
    {

        private static final int[] ATTRS = new int[] { android.R.attr.listDivider };
        private Drawable mDivider;

        public DividerGridItemDecoration(Context context)
        {
            final TypedArray a = context.obtainStyledAttributes(ATTRS);
            mDivider = a.getDrawable(0);
            a.recycle();
        }

        @Override
        public void onDraw(Canvas c, RecyclerView parent, State state)
        {

            drawHorizontal(c, parent);
            drawVertical(c, parent);

        }

        private int getSpanCount(RecyclerView parent)
        {
            // 列数
            int spanCount = -1;
            LayoutManager layoutManager = parent.getLayoutManager();
            if (layoutManager instanceof GridLayoutManager)
            {

                spanCount = ((GridLayoutManager) layoutManager).getSpanCount();
            } else if (layoutManager instanceof StaggeredGridLayoutManager)
            {
                spanCount = ((StaggeredGridLayoutManager) layoutManager)
                        .getSpanCount();
            }
            return spanCount;
        }

        public void drawHorizontal(Canvas c, RecyclerView parent)
        {
            int childCount = parent.getChildCount();
            for (int i = 0; i < childCount; i++)
            {
                final View child = parent.getChildAt(i);
                final RecyclerView.LayoutParams params = (RecyclerView.LayoutParams) child
                        .getLayoutParams();
                final int left = child.getLeft() - params.leftMargin;
                final int right = child.getRight() + params.rightMargin
                        + mDivider.getIntrinsicWidth();
                final int top = child.getBottom() + params.bottomMargin;
                final int bottom = top + mDivider.getIntrinsicHeight();
                mDivider.setBounds(left, top, right, bottom);
                mDivider.draw(c);
            }
        }

        public void drawVertical(Canvas c, RecyclerView parent)
        {
            final int childCount = parent.getChildCount();
            for (int i = 0; i < childCount; i++)
            {
                final View child = parent.getChildAt(i);

                final RecyclerView.LayoutParams params = (RecyclerView.LayoutParams) child
                        .getLayoutParams();
                final int top = child.getTop() - params.topMargin;
                final int bottom = child.getBottom() + params.bottomMargin;
                final int left = child.getRight() + params.rightMargin;
                final int right = left + mDivider.getIntrinsicWidth();

                mDivider.setBounds(left, top, right, bottom);
                mDivider.draw(c);
            }
        }

        private boolean isLastColum(RecyclerView parent, int pos, int spanCount,
                int childCount)
        {
            LayoutManager layoutManager = parent.getLayoutManager();
            if (layoutManager instanceof GridLayoutManager)
            {
                if ((pos + 1) % spanCount == 0)// 如果是最后一列,则不需要绘制右边
                {
                    return true;
                }
            } else if (layoutManager instanceof StaggeredGridLayoutManager)
            {
                int orientation = ((StaggeredGridLayoutManager) layoutManager)
                        .getOrientation();
                if (orientation == StaggeredGridLayoutManager.VERTICAL)
                {
                    if ((pos + 1) % spanCount == 0)// 如果是最后一列,则不需要绘制右边
                    {
                        return true;
                    }
                } else
                {
                    childCount = childCount - childCount % spanCount;
                    if (pos >= childCount)// 如果是最后一列,则不需要绘制右边
                        return true;
                }
            }
            return false;
        }

        private boolean isLastRaw(RecyclerView parent, int pos, int spanCount,
                int childCount)
        {
            LayoutManager layoutManager = parent.getLayoutManager();
            if (layoutManager instanceof GridLayoutManager)
            {
                childCount = childCount - childCount % spanCount;
                if (pos >= childCount)// 如果是最后一行,则不需要绘制底部
                    return true;
            } else if (layoutManager instanceof StaggeredGridLayoutManager)
            {
                int orientation = ((StaggeredGridLayoutManager) layoutManager)
                        .getOrientation();
                // StaggeredGridLayoutManager 且纵向滚动
                if (orientation == StaggeredGridLayoutManager.VERTICAL)
                {
                    childCount = childCount - childCount % spanCount;
                    // 如果是最后一行,则不需要绘制底部
                    if (pos >= childCount)
                        return true;
                } else
                // StaggeredGridLayoutManager 且横向滚动
                {
                    // 如果是最后一行,则不需要绘制底部
                    if ((pos + 1) % spanCount == 0)
                    {
                        return true;
                    }
                }
            }
            return false;
        }

        @Override
        public void getItemOffsets(Rect outRect, int itemPosition,
                RecyclerView parent)
        {
            int spanCount = getSpanCount(parent);
            int childCount = parent.getAdapter().getItemCount();
            if (isLastRaw(parent, itemPosition, spanCount, childCount))// 如果是最后一行,则不需要绘制底部
            {
                outRect.set(0, 0, mDivider.getIntrinsicWidth(), 0);
            } else if (isLastColum(parent, itemPosition, spanCount, childCount))// 如果是最后一列,则不需要绘制右边
            {
                outRect.set(0, 0, 0, mDivider.getIntrinsicHeight());
            } else
            {
                outRect.set(0, 0, mDivider.getIntrinsicWidth(),
                        mDivider.getIntrinsicHeight());
            }
        }
    }
- 1
- 2
- 3
- 4
- 5
- 6
- 7
- 8
- 9
- 10
- 11
- 12
- 13
- 14
- 15
- 16
- 17
- 18
- 19
- 20
- 21
- 22
- 23
- 24
- 25
- 26
- 27
- 28
- 29
- 30
- 31
- 32
- 33
- 34
- 35
- 36
- 37
- 38
- 39
- 40
- 41
- 42
- 43
- 44
- 45
- 46
- 47
- 48
- 49
- 50
- 51
- 52
- 53
- 54
- 55
- 56
- 57
- 58
- 59
- 60
- 61
- 62
- 63
- 64
- 65
- 66
- 67
- 68
- 69
- 70
- 71
- 72
- 73
- 74
- 75
- 76
- 77
- 78
- 79
- 80
- 81
- 82
- 83
- 84
- 85
- 86
- 87
- 88
- 89
- 90
- 91
- 92
- 93
- 94
- 95
- 96
- 97
- 98
- 99
- 100
- 101
- 102
- 103
- 104
- 105
- 106
- 107
- 108
- 109
- 110
- 111
- 112
- 113
- 114
- 115
- 116
- 117
- 118
- 119
- 120
- 121
- 122
- 123
- 124
- 125
- 126
- 127
- 128
- 129
- 130
- 131
- 132
- 133
- 134
- 135
- 136
- 137
- 138
- 139
- 140
- 141
- 142
- 143
- 144
- 145
- 146
- 147
- 148
- 149
- 150
- 151
- 152
- 153
- 154
- 155
- 156
- 157
- 158
- 159
- 160
- 161
- 162
- 163
效果图:
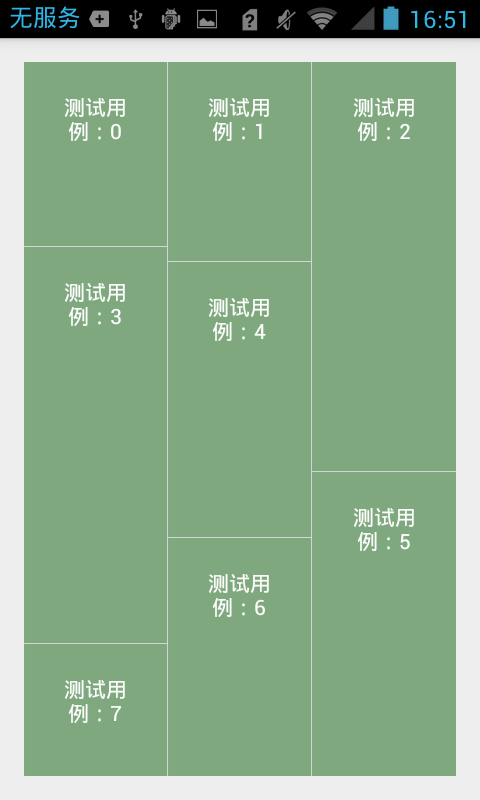
瀑布流效果
同样,我们只需要修改LayoutManager来实现效果:
mLayoutManager = new StaggeredGridLayoutManager(3, StaggeredGridLayoutManager.VERTICAL);
- 1
- 1
效果图:
我们发现,每个item都很整齐,但是瀑布流的效果不是这样的啊!那我们怎么搞,就是在onBindViewHolder方法中修改每个view的大小。
 @Override
        public void onBindViewHolder(MyAdapter.ViewHolder holder, int position) {
            ViewGroup.LayoutParams params= holder.mTextView.getLayoutParams();
            params.height = (int) (100 + Math.random() * 400);
            holder.mTextView.setLayoutParams(params);
            holder.mTextView.setText(items.get(position));
        }
- 1
- 2
- 3
- 4
- 5
- 6
- 7
- 1
- 2
- 3
- 4
- 5
- 6
- 7
效果图:
至此,所有的展示工作已经完成,那么我们进行点击事件处理。
点击效果处理
RecyclerView没有像ListView有setOnItemClick的事件,那么只有我们通过回调接口进行设置。
public interface OnItemClick {
    public void onItemClick(int position);
    }

     public void setOnItemClick(OnItemClick onItemClick){
            this.onItemClick = onItemClick;
     }

    public void onBindViewHolder(final MyAdapter.ViewHolder holder, int position) {
            holder.mTextView.setText(items.get(position));
            if(onItemClick != null){
                holder.itemView.setOnClickListener(new View.OnClickListener() {
                    @Override
                    public void onClick(View v) {
                        onItemClick.onItemClick(holder.getPosition());
                    }
                });
            }
        }
- 1
- 2
- 3
- 4
- 5
- 6
- 7
- 8
- 9
- 10
- 11
- 12
- 13
- 14
- 15
- 16
- 17
- 18
- 19
- 1
- 2
- 3
- 4
- 5
- 6
- 7
- 8
- 9
- 10
- 11
- 12
- 13
- 14
- 15
- 16
- 17
- 18
- 19
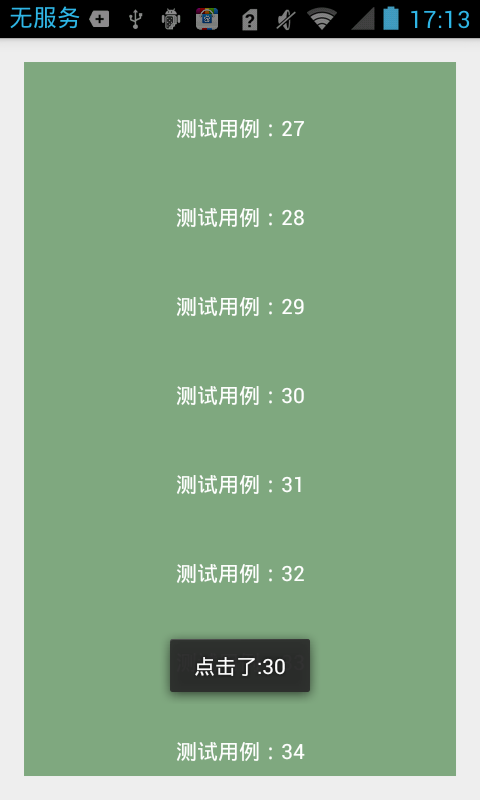
这样我们就能进行点击事件的处理了。效果图:
至此,关于RecyclerView的基本用法讲解完毕,还是要多练习,比如分割线的处理以及动画的处理,这部分是个亮点也是难点。
参考文档:
http://www.devstore.cn/new/newInfo/868.html
http://blog.jobbole.com/74208/
http://www.jcodecraeer.com/a/anzhuokaifa/androidkaifa/2014/1118/2004.html
http://blog.csdn.net/lmj623565791/article/details/45059587
http://blog.csdn.net/guxiao1201/article/details/40399777
作者:mr_dsw 欢迎转载,与人分享是进步的源泉!
转载请保留地址:http://blog.csdn.net/mr_dsw
-
顶
- 2
-
踩
- 0
我的同类文章
- •常见的广告切换动画2015-12-20
- •Material Design控件之FloatingActionButton2015-10-31
- •Android新特性之CardView的简单使用2015-10-03
- •CoordinatorLayout嵌套AppBarLayout的使用2015-11-08
- •Android控件SwipeRefreshLayout解析2015-10-21


 635
635


 被折叠的 条评论
为什么被折叠?
被折叠的 条评论
为什么被折叠?
 到【灌水乐园】发言


