


UI基础-第四天
人生就像卫生纸,没事的时候尽量少扯;时间就像卫生纸,看着挺多,用着挺少…
plist文件
什么是Plist文件
.直接将数据直接写在代码里面,不是一种合理的做法。如果数据经常改,就要经常翻开对应的代码进行修改,造成代码扩展性低
.因此,可以考虑将经常变的数据放到文件中进行存储,程序启动后从文件中读取最新数据。如果要变动数据,直接修改数据文件即可,不用修改代码
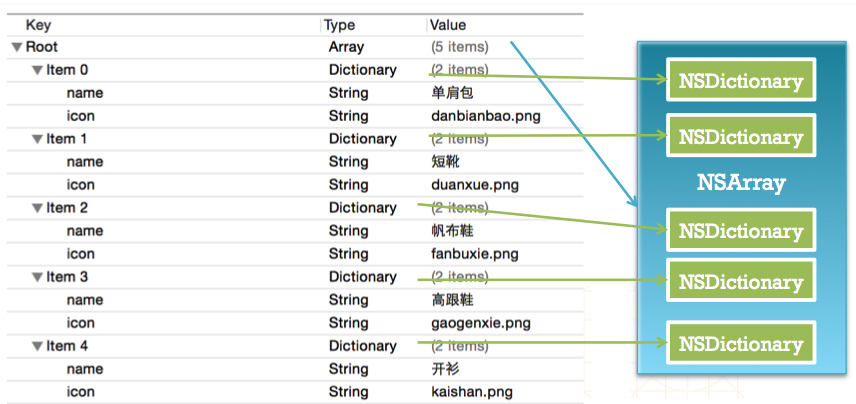
.一般可以使用属性列表文件存储NSArray或者NSDictionary之类的数据,这种“属性列表文件”的扩展名是plist,因此也称为“plist文件”
创建Plist文件
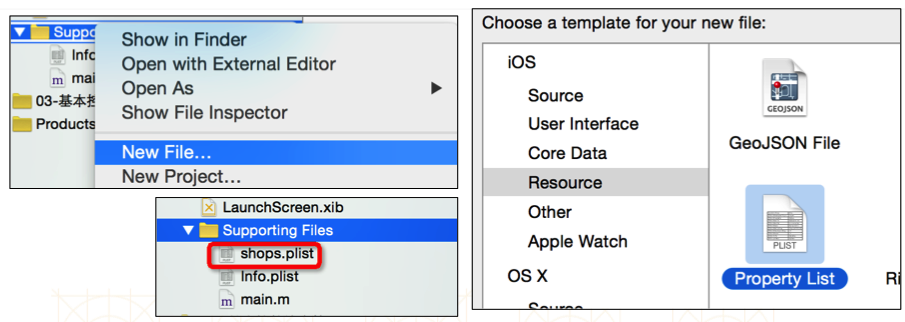
解析Plist文件
.接下来通过代码来解析Plist文件中的数据
获得Plist文件的全路径
NSBundle *bundle = [NSBundle mainBundle];
NSString *path = [bundle pathForResource:@”shops” ofType:@”plist”];
.加载plist文件
_shops = [NSArray arrayWithContentsOfFile:path];
Plist文件的解析过程
Plist的使用注意

懒加载
懒加载
.接下来通过代码来解析Plist文件中的数据
获得Plist文件的全路径
NSBundle *bundle = [NSBundle mainBundle];
NSString *path = [bundle pathForResource:@”shops” ofType:@”plist”];
.加载plist文件
_shops = [NSArray arrayWithContentsOfFile:path];
模型
用模型取代字典的好处
.使用字典的坏处
一般情况下,设置数据和取出数据都使用“字符串类型的key”,编写这些key时,编辑器没有智能提示,需要手敲
dict[@”name”] = @”Jack”;
NSString *name = dict[@”name”];
手敲字符串key,key容易写错
Key如果写错了,编译器不会有任何警告和报错,造成设错数据或者取错数据
.使用模型的好处
所谓模型,其实就是数据模型,专门用来存放数据的对象,用它来表示数据会更加专业
模型设置数据和去除数据都是通过它的属性,属性名如果写错了,编译器会马上报错,因此,保证了数据的正确性
使用模型访问属性时,编译器会提供一系列的提示,提高编码效率
app.name = @”Jack”;
NSString *name = app.name;
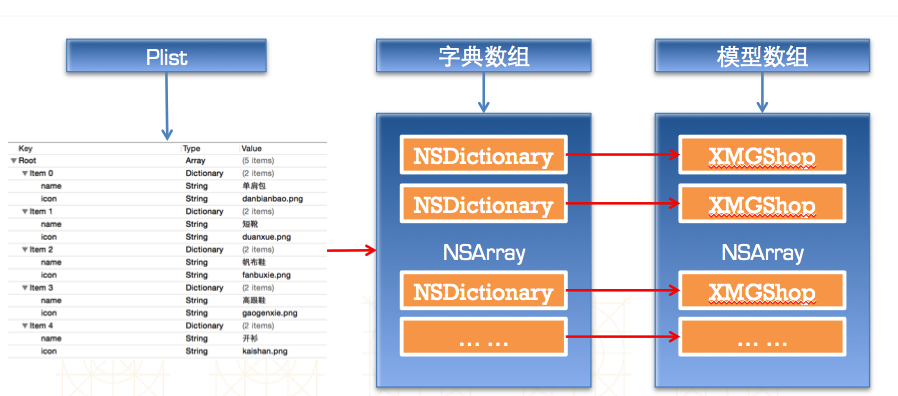
字典转模型
.字典转模型的过程最好封装在模型内部
.模型应该提供一个可以传入字典参数的构造方法
. -(instancetype)initWithDict:(NSDictionary *)dict;
. +(instancetype)xxxWithDict:(NSDictionary *)dict;
instancetype
. instancetype在类型表示上,跟id一样,可以表示任何对象类型
.instancetype只能用在返回值类型上,不能像id一样用在参数类型上
.instancetype比id多一个好处:编译器会检测instancetype的真实类型
类前缀
.使用Objective-C开发IOS程序是,最好每个类名前面加一个前缀,用来标识这个类的“老家”在哪
.目的是防止N个人开发了一样的类,冲突了
.不如Jake Will、Kate
Room在同一个项目中都各自开发了个Button类,这样的程序是不能运行起来的
*解决方法:Jake Will的类名叫做JWButton,KateRoom的类名叫做KRButton
字典转模型的过程
view的封装
view的封装
.如果一个view内部的子控件比较多,一般会考虑自定义一个view,把它内部子控件的创建屏蔽起来,不让外界关心
.外界可以传入对应的模型数据给view,view拿到模型数据后给内部的子控件设置对应的数据
.封装控件的基本步骤
.在initWithFram:方法中添加子控件,提供便利构造方法
.在layoutSubviews方法中设置子控件的frame(一定要调用super的layoutSubviews)
.增加模型属性,在模型属性set方法中色获知数据到子控件上
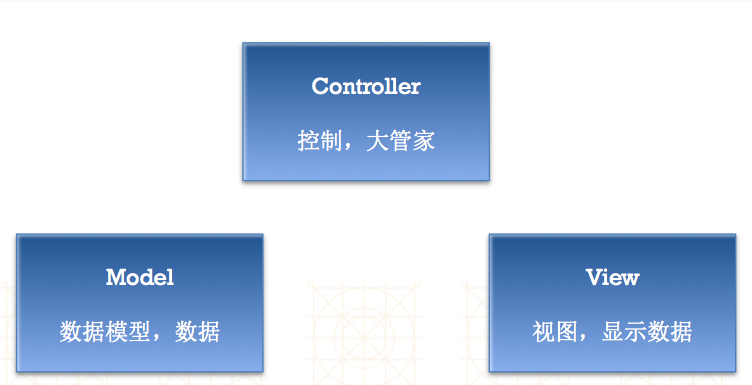
简单的MVC
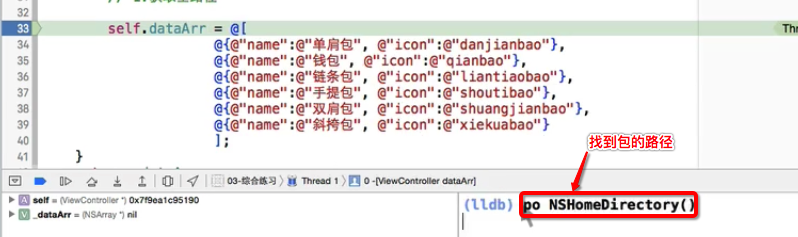
找到生成包的路径
查看UI界面的结构
代码知识部分
综合练习之(添加子控件和加载数据)
之前的代码在IOS开发-基础篇-Three中有
添加子控件设置数据
 //创建UIImageView对象
    UIImageView *iconView = [[UIImageView alloc]init];
    //设置frame
    iconView.frame = CGRectMake(0, 0, width, width);
    //设置背景颜色
    iconView.backgroundColor = [UIColor blueColor];
    //添加到商品View中
    [sView addSubview:iconView];
    //创建UIlabel对象
    UILabel *label = [[UILabel alloc]init];
    //设置文字居中
    label.textAlignment = NSTextAlignmentCenter;
    //设置frame
    label.frame = CGRectMake(0, width, width, height - width);
    //设置背景颜色
    label.backgroundColor = [UIColor grayColor];
    //添加到商品view中
    [sView addSubview:label];
添加数据 — 方式一
    //方式一:(不可取:数据都是一样)
    iconView.image = [UIImage imageNamed:@"danjianbao"];
    label.text = @"单肩包";
添加数据 — 方式二
//方式二:(不可取,太冗余)
    if (index == 0) {
        iconView.image = [UIImage imageNamed:@"danjianbao"];
        label.text = @"单肩包";
    }else if (index == 1)
    {
        iconView.image = [UIImage imageNamed:@"danjianbao"];
        label.text = @"单肩包";
    }else if (index == 2)
    {
        iconView.image = [UIImage imageNamed:@"danjianbao"];
        label.text = @"单肩包";
    }else if (index == 3)
    {
        iconView.image = [UIImage imageNamed:@"danjianbao"];
        label.text = @"单肩包";
    }else if (index == 4)
    {
        iconView.image = [UIImage imageNamed:@"danjianbao"];
        label.text = @"单肩包";
    }else if (index == 5)
    {
        iconView.image = [UIImage imageNamed:@"danjianbao"];
        label.text = @"单肩包";
    }else if (index == 6)
    {
        iconView.image = [UIImage imageNamed:@"danjianbao"];
        label.text = @"单肩包";
    }
添加数据 — 方式三
//方式三(数组:连个数组之间没有任何联系,容易出错)
    NSArray<NSString *> *imageName = @[@"danjianbao",@"qianbao",@"liantiaobao",@"xiekuabao",@"shuangjianbao",@"shoutibao"];
    NSArray<NSString *> *labelName = @[@"手提包",@"钱包",@"链条包",@"斜挎包",@"手提包",@"双肩包"];
    //设置数据
    iconView.image = [UIImage imageNamed:imageName[index]];
    label.text = labelName[index];
添加数据 — 方式四
 //方式四(数组+字典)
    NSArray<NSDictionary *> *dataArr = @[
                                        @{@"icon":@"danjianbao",@"name":@"单肩包"},
                                        @{@"icon":@"qianbao",@"name":@"钱包"},
                                        @{@"icon":@"xiekuabao",@"name":@"斜挎包"},
                                        @{@"icon":@"liantiaobao",@"name":@"链条包"},
                                        @{@"icon":@"shoutibao",@"name":@"手提包"},
                                        @{@"icon":@"shuangjianbang",@"name":@"双肩包"}
                                        ];
    //设置数据
    NSDictionary *dict = dataArr[index];
    iconView.image = [UIImage imageNamed:dict[@"icon"]];
    label.text = dict[@"name"];
懒加载
添加数据数组
@interface ViewController ()
/**数据模型*/
@property (nonatomic,strong)NSArray *dataArr;
@end
再重写它的get方法
/*
 懒加载
 1.作用:
 1>用到的时候再加载
 2>全局只会被加载一次
 3>全局都可以使用

 过程:
 1.重写成员变了的get方法
 2.在get方法中判断
    1>如果为空,加载数据
    2>如果不为空,就直接返回数据
 */


- (NSArray *)dataArr
{
    if (_dataArr == nil) {
        self.dataArr = @[
                         @{@"icon":@"danjianbao",@"name":@"单肩包"},
                         @{@"icon":@"qianbao",@"name":@"钱包"},
                         @{@"icon":@"xiekuabao",@"name":@"斜挎包"},
                         @{@"icon":@"liantiaobao",@"name":@"链条包"},
                         @{@"icon":@"shoutibao",@"name":@"手提包"},
                         @{@"icon":@"shuangjianbang",@"name":@"双肩包"}
                         ];
    }
    return _dataArr;
}
调用
//设置数据
    NSDictionary *dict = self.dataArr[index];
    iconView.image = [UIImage imageNamed:dict[@"icon"]];
    label.text = dict[@"name"];
Plist创建
将数组写到plist中
      //将数组写到plist中
    NSArray *names = @[@"cjm",@"dnt",@"px",@"mxs",@"xhy",@"yw"];
    BOOL flag =  [names writeToFile:@"/Users/apple/Desktop/names.plist" atomically:YES];
        if (flag) {
            NSLog(@"写入成功");
        }
将字典写到plist中
  //字典
        NSDictionary *person = @{
                                 @"name":@"xhy",
                                 @"age":@25,
                                 @"height":@1.88};
        BOOL flag = [person writeToFile:@"/Users/apple/Desktop/person.plist" atomically:YES];
       if (flag) {
            NSLog(@"写入成功");
        }
将数组(字典在里面)写到plist中
//数组
        NSArray *person = @[
                            @{@"name":@"xyh",@"age":@18},
                            @{@"name":@"dnt",@"age":@28,@"friends":@[@"px",@"zp"]}
                            ];
       BOOL flag  =  [person writeToFile:@"/Users/apple/Desktop/Persons.plist" atomically:YES];
        if (flag) {
            NSLog(@"写入成功");
        }
从plist中读取数据和字典转模型
创建数据模型
JMShop.h
#import <Foundation/Foundation.h>

@interface JMShop : NSObject
/**商品的名称*/
@property (nonatomic ,copy)NSString *name;
/**图片的名称*/
@property (nonatomic ,copy)NSString *icon;
//提供构造方法
//- (instancetype)initWithIcon:(NSString*)icon name:(NSString *)name;
//+ (instancetype)shopWithIcon:(NSString*)icon name:(NSString *)name;

- (instancetype)initWithDict:(NSDictionary *)dict;
+ (instancetype)shopWithDict:(NSDictionary *)dict;
@end
JMShop.m
#import "JMShop.h"

@implementation JMShop
//- (instancetype)initWithIcon:(NSString *)icon name:(NSString *)name
//{
//    if (self = [super init]) {
//        self.icon = icon;
//        self.name = name;
//    }
//    return self;
//}
//
//+ (instancetype)shopWithIcon:(NSString *)icon name:(NSString *)name
//{
//    return [[self alloc]initWithIcon:icon name:name];
//}

- (instancetype)initWithDict:(NSDictionary *)dict
{
    if (self = [super init]) {
        self.icon = dict[@"icon"];
        self.name = dict[@"name"];
    }
    return self;
}
+ (instancetype)shopWithDict:(NSDictionary *)dict
{
    return [[self alloc]initWithDict:dict];
}
@end
修改ViewController中的懒加载方法
别忘了引入头文件
- (NSArray *)dataArr
{
    if (_dataArr == nil) {
//        self.dataArr = @[
//                         @{@"icon":@"danjianbao",@"name":@"单肩包"},
//                         @{@"icon":@"qianbao",@"name":@"钱包"},
//                         @{@"icon":@"xiekuabao",@"name":@"斜挎包"},
//                         @{@"icon":@"liantiaobao",@"name":@"链条包"},
//                         @{@"icon":@"shoutibao",@"name":@"手提包"},
//                         @{@"icon":@"shuangjianbang",@"name":@"双肩包"}
//                         ];
        NSString *path = [[NSBundle mainBundle]pathForResource:@"dataArr.plist" ofType:nil];
        self.dataArr = [NSArray arrayWithContentsOfFile:path];

        NSMutableArray *arrayM = [NSMutableArray array];
        for (NSDictionary *dict in _dataArr) {
//            JMShop *shop = [JMShop shopWithIcon:dict[@"icon"] name:dict[@"name"]];
//            JMShop *shop = [[JMShop alloc]initWithIcon:dict[@"icon"] name:dict[@"name"]];
            JMShop *shop = [JMShop shopWithDict:dict];
            [arrayM addObject:shop];
        }
        _dataArr = arrayM;
    }
    return _dataArr;
}
同时设置数据也要改
//设置数据
    JMShop *shop = self.dataArr[index];
    iconView.image = [UIImage imageNamed:shop.icon];
    label.text = shop.name;
自定义view(这里还要改)
创建JMShopView继承自UIView
JMShopView.h
#import <UIKit/UIKit.h>

@interface JMShopView : UIView
@property (weak, nonatomic) UIImageView *iconView;
@property (weak, nonatomic) UILabel *titleLabel;
@end
JMShopView.m
#import "JMShopView.h"

@interface JMShopView()

@end

@implementation JMShopView

- (instancetype)init
{
    if (self = [super init]) {
        //创建UIImageView对象
        UIImageView *iconView = [[UIImageView alloc]init];
        //设置frame
//        iconView.frame = CGRectMake(0, 0, self.bounds.size.width, self.bounds.size.height);
        //设置背景颜色
        iconView.backgroundColor = [UIColor blueColor];
        //添加到商品View中
        [self addSubview:iconView];
        self.iconView = iconView;
        //创建UIlabel对象
        UILabel *label = [[UILabel alloc]init];
        //设置文字居中
        label.textAlignment = NSTextAlignmentCenter;
        //设置frame
//        label.frame = CGRectMake(0, self.bounds.size.width, self.bounds.size.width, self.bounds.size.height - self.bounds.size.width);
        //设置背景颜色
        label.backgroundColor = [UIColor grayColor];
        //添加到商品view中
        [self addSubview:label];
        self.titleLabel = label;
    }
    return self;
}

- (void)layoutSubviews
{
    //1.一定要调用super
    [super layoutSubviews];

    //获取当前控件的尺寸
    CGFloat width = self.frame.size.width;
    CGFloat height = self.frame.size.height;

    //设置控件的frame
    self.iconView.frame = CGRectMake(0, 0, width, height);
    self.titleLabel.frame = CGRectMake(0, width, width, height-width);
}
修改ViewController.m中的view的创建,别忘了引入头文件
JMShopView *shopView = [[JMShopView alloc]init];
    shopView.frame = CGRectMake(x, y, width, height);
    [self.shopView addSubview:shopView];
设置数据
 //设置数据
    JMShop *shop = self.dataArr[index];

    shopView.iconView.image = [UIImage imageNamed:shop.icon];
    shopView.titleLabel.text = shop.name;
方式二
在JMShop.h中
#import <UIKit/UIKit.h>

@interface JMShopView : UIView
//readonly只会调用get方法
/*图片控件*/
//@property (weak, nonatomic,readonly) UIImageView *iconView;
/*标题控件*/
//@property (weak, nonatomic,readonly) UILabel *titleLabel;

//提供接口方法
- (void)setIcon:(NSString *)icon;
- (void)setName:(NSString *)name;
@end
在JMShop.m中
#import "JMShopView.h"

@interface JMShopView()
/*图片控件*/
@property (weak, nonatomic) UIImageView *iconView;
/*标题控件*/
@property (weak, nonatomic) UILabel *titleLabel;
@end

@implementation JMShopView

//初始化子控件不要设置frame
- (instancetype)init
{
    if (self = [super init]) {
        //创建UIImageView对象
        UIImageView *iconView = [[UIImageView alloc]init];
        //设置frame
//        iconView.frame = CGRectMake(0, 0, self.bounds.size.width, self.bounds.size.height);
        //设置背景颜色
        iconView.backgroundColor = [UIColor blueColor];
        //添加到商品View中
        [self addSubview:iconView];
        self.iconView = iconView;
        //创建UIlabel对象
        UILabel *label = [[UILabel alloc]init];
        //设置文字居中
        label.textAlignment = NSTextAlignmentCenter;
        //设置frame
//        label.frame = CGRectMake(0, self.bounds.size.width, self.bounds.size.width, self.bounds.size.height - self.bounds.size.width);
        //设置背景颜色
        label.backgroundColor = [UIColor grayColor];
        //添加到商品view中
        [self addSubview:label];
        self.titleLabel = label;
    }
    return self;
}

- (void)layoutSubviews
{
    //1.一定要调用super
    [super layoutSubviews];

    //获取当前控件的尺寸
    CGFloat width = self.frame.size.width;
    CGFloat height = self.frame.size.height;

    //设置控件的frame
    self.iconView.frame = CGRectMake(0, 0, width, height);
    self.titleLabel.frame = CGRectMake(0, width, width, height-width);
}

- (void)setName:(NSString *)name
{
    self.titleLabel.text = name;
}

- (void)setIcon:(NSString *)icon
{
    self.iconView.image = [UIImage imageNamed:icon];
}

@end
在viewController.m中设置数据
//设置数据
    JMShop *shop = self.dataArr[index];
    [shopView setIcon:shop.icon];
    [shopView setName:shop.name];
方式3
在JMShopView.h中
#import <UIKit/UIKit.h>

@class JMShop;

@interface JMShopView : UIView

//商品模型
@property (nonatomic,strong)JMShop *shop;

//构造方法
- (instancetype)initWithShop:(JMShop *)shop;
+ (instancetype)shopViewWithShop:(JMShop *)shop;
@end
在JMShop.m中
#import "JMShopView.h"
#import "JMShop.h"

@interface JMShopView()
/*图片控件*/
@property (weak, nonatomic) UIImageView *iconView;
/*标题控件*/
@property (weak, nonatomic) UILabel *titleLabel;
@end

@implementation JMShopView

//初始化子控件不要设置frame
- (instancetype)init
{
    if (self = [super init]) {
        [self setUp];
           }
    return self;
}

- (instancetype)initWithShop:(JMShop *)shop
{
    if (self = [super init]) {
        [self setUp];
        self.shop = shop;
    }
    return self;
}

+ (instancetype)shopViewWithShop:(JMShop *)shop
{
    return [[self alloc]initWithShop:shop];
}

//初始化
- (void)setUp
{
    //创建UIImageView对象
    UIImageView *iconView = [[UIImageView alloc]init];
    //设置frame
    //        iconView.frame = CGRectMake(0, 0, self.bounds.size.width, self.bounds.size.height);
    //设置背景颜色
    iconView.backgroundColor = [UIColor blueColor];
    //添加到商品View中
    [self addSubview:iconView];
    self.iconView = iconView;
    //创建UIlabel对象
    UILabel *label = [[UILabel alloc]init];
    //设置文字居中
    label.textAlignment = NSTextAlignmentCenter;
    //设置frame
    //        label.frame = CGRectMake(0, self.bounds.size.width, self.bounds.size.width, self.bounds.size.height - self.bounds.size.width);
    //设置背景颜色
    label.backgroundColor = [UIColor grayColor];
    //添加到商品view中
    [self addSubview:label];
    self.titleLabel = label;

}

- (void)layoutSubviews
{
    //1.一定要调用super
    [super layoutSubviews];

    //获取当前控件的尺寸
    CGFloat width = self.frame.size.width;
    CGFloat height = self.frame.size.height;

    //设置控件的frame
    self.iconView.frame = CGRectMake(0, 0, width, height);
    self.titleLabel.frame = CGRectMake(0, width, width, height-width);
}

//set放:只要外边传数据就会调用
//作用:设置数据
- (void)setShop:(JMShop *)shop
{
    _shop = shop;

    //设置数据
    self.iconView.image = [UIImage imageNamed:shop.icon];
    self.titleLabel.text = shop.name;
}


@end
这样的话,在ViewController.m中创建view和设置数据在一起了
 //设置数据
    JMShop *shop = self.dataArr[index];
    JMShopView *shopView = [JMShopView shopViewWithShop:shop];
    shopView.frame = CGRectMake(x, y, width, height);
    [self.shopView addSubview:shopView];


 1715
1715


 被折叠的 条评论
为什么被折叠?
被折叠的 条评论
为什么被折叠?
 到【灌水乐园】发言


