


1.YII中对于SwiftMailer的默认配置
在common\config\main.php中,有如下代码:
        'mailer' => [
            'class' => 'yii\swiftmailer\Mailer',
            'viewPath' => '@common/mail',
            // send all mails to a file by default. You have to set
            // 'useFileTransport' to false and configure a transport
            // for the mailer to send real emails.
            'useFileTransport' => true,
        ],
此时,如果使用SwiftMailer发送邮件,会在runtime/application/mail目录下,或者runtime/console/mail目录下,生成*.eml文件,类似20161130-180407-3682-3319.eml。
2.YII中对于SwiftMailer的官方说明
Usage
To use this extension, simply add the following code in your application configuration:
return [
    //....
    'components' => [
        'mailer' => [
            'class' => 'yii\swiftmailer\Mailer',
        ],
    ],
];
You can then send an email as follows:
Yii::$app->mailer->compose('contact/html')
     ->setFrom('from@domain.com')
     ->setTo($form->email)
     ->setSubject($form->subject)
     ->send();
For further instructions refer to the related section in the Yii Definitive Guide.3.众多网上的例子讨论的是如何对SwiftMailer配置外部邮件服务器,比如这里
配置
'mail' => [
            'class' => 'yii\swiftmailer\Mailer',
            'viewPath' => '@common/mail',
            //'useFileTransport' => true, //放在本地的邮件列表,测试邮件的时候可以开启这个

                        'transport' => [
                                    'class' => 'Swift_SmtpTransport',
                                    'host' => 'smtp.126.com',
                                    'username' => 'your email',
                                    'password' => 'password',
                                    'port' => '465',
                                    'encryption' => 'ssl',

                            ],

        ],
发送
public function sendEmail()
    {
        /** @var User $user */
        $user = User::find([
            'status' => User::STATUS_ACTIVE,
            'email' => $this->email,
        ]);

        if (!$user) {
            return false;
        }

        $user->generatePasswordResetToken();
        if ($user->save()) {
            return \Yii::$app->mail->compose()
                ->setFrom('from email')
                ->setTo('to email')
                ->setSubject('subject ')
                ->setTextBody('内容')
                ->send();

        }

        return false;
    }
4.还有说使用php mail()函数来发送邮件,这里
配置就是把官方默认配置的useFileTransport改为false,并且增加一个transport
return [
    'components' => [
        ...
        'mailer' => [
            'class' => 'yii\swiftmailer\Mailer',
            'viewPath' => '@common/mail',
            'transport' => [
                'class' => 'Swift_MailTransport',
            ],
            'useFileTransport' => false,
        ],

    ],
];
测试,发现是可以发送邮件的。
5. 上述4中是php mail()函数起作用了吗
首先,我在SwiftMailer代码中没有发现php mail()函数的使用。php mail()函数起作用是在php.ini中配置了sendmail_path
sendmail_path = /usr/sbin/sendmail -t -i那么,我们把这行注释掉,然后再试,发现仍然可以发送。而直接测试PHP mail()函数,发现mail()函数失效了。可见,并不是php mail()函数起作用。
注意,php cli和php web服务器读取的php.ini可能是不同的,如果是php cli模式,可以先用如下命令查看:
php -i | grep -i php.ini6. 结论,SwiftMailer默认支持使用Shell中SendMail。
- 如果没有配置php.ini中的sendmail_path,php的mail()函数没有启用,swiftmailer默认直接使用系统中的sendmail命令。
此时YII2的/common/config/main-local.php中的配置如下:
return [
    'components' => [
        ...
        'mailer' => [
            'class' => 'yii\swiftmailer\Mailer',
            'viewPath' => '@common/mail',
            'useFileTransport' => false,
        ],

    ],
];- 如果配置了php的mail()函数,则需要在YII配置文件中指定transport类型,也就是4.上的例子
return [
    'components' => [
        ...
        'mailer' => [
            'class' => 'yii\swiftmailer\Mailer',
            'viewPath' => '@common/mail',
            'transport' => [
                'class' => 'Swift_MailTransport',
            ],
            'useFileTransport' => false,
        ],

    ],
];
不管是用何种sendmail,比如smtp、sendmail、mail(),只与配置文件相关,代码中的使用都是一样的。
7.SwitftMailer对transport的说明
\vendor\swiftmailer\swiftmailer\doc\overview.rst
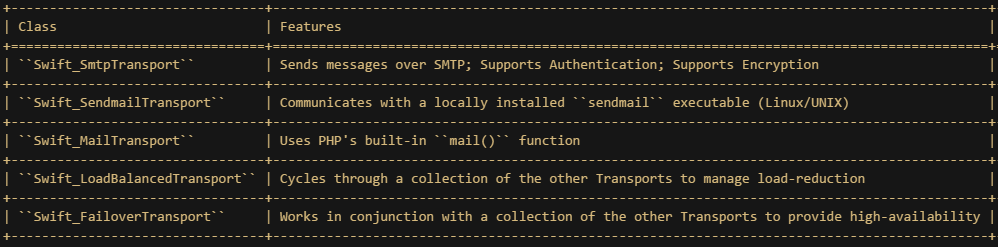
Transports
~~~~~~
Transports are the classes in Swift Mailer that are responsible for
communicating with a service in order to deliver a Message. There are several
types of Transport in Swift Mailer, all of which implement the Swift_Transport
interface and offer underlying start(), stop() and send() methods.
Typically you will not need to know how a Transport works under-the-surface,
you will only need to know how to create an instance of one, and which one to
use for your environment.
8.SwiftMailer对于各种transport使用的例子
\vendor\swiftmailer\swiftmailer\doc\sending.rst
 require_once 'lib/swift_required.php';

    // Create the Transport
    $transport = Swift_SmtpTransport::newInstance('smtp.example.org', 25)
      ->setUsername('your username')
      ->setPassword('your password')
      ;

    /*
    You could alternatively use a different transport such as Sendmail or Mail:

    // Sendmail
    $transport = Swift_SendmailTransport::newInstance('/usr/sbin/sendmail -bs');

    // Mail
    $transport = Swift_MailTransport::newInstance();
    */

    // Create the Mailer using your created Transport
    $mailer = Swift_Mailer::newInstance($transport);

    // Create a message
    $message = Swift_Message::newInstance('Wonderful Subject')
      ->setFrom(array('john@doe.com' => 'John Doe'))
      ->setTo(array('receiver@domain.org', 'other@domain.org' => 'A name'))
      ->setBody('Here is the message itself')
      ;

    // Send the message
    $result = $mailer->send($message);


 1696
1696


 被折叠的 条评论
为什么被折叠?
被折叠的 条评论
为什么被折叠?
 到【灌水乐园】发言


