


文章主要讲解 springmvc 应用程序的实现,环境部署等参考博客其他文章。
1、首先自己在虚拟机安装linux操作系统,这里我的版本的是(centos 6.4 x86_64)
1.1、同时部署 hadoop 单机伪集群环境,这里我的版本是 2.6 ,配置教程:点击打开链接
1.2、部署nginx 服务器,并且配置 flv 文件格式的点播服务,部署教程:点击打开链接
1.3、因为这里转码是直接在 java 程序中调用本地 ffmpeg 可执行程序的 shell 命令,这里使用静态 ffmpeg 程序,不需要其他依赖库,下载地址:点击打开链接
1.4、为了方便在windows的eclipse下开发关于 HDFS 的程序,这里我们使用 eclipse 的 hadoop 插件,安装配置教程:点击打开链接
2、现在我们讲解详细的程序,首先新建一个基于 springmvc 框架的项目,因为项目运行在tomcat 6上,所以在新建web动态项目的时候记得选择2.5版本反正就是跟自己tomcat的运行环境对应就好,demo在这,之后项目的代码在此基础上相应增加:点击打开链接
3、项目的文件结构如下:


4、现在依次从上到下贴出代码部分,首先是调用本地 ffmpeg 经行转码的类,说明一下,这里的转码只测试过 avi 转 flv 格式,如果有其他需求的话,可以在次类中添加:
package com.busymonkey.ffmpeg;

import java.io.File;
import java.util.ArrayList;
import java.util.List;

public class ConvertVideo {

    public static boolean processFLV(String ffmpegPath, String oldFilePath, String newFilePath) {
        if (!checkfile(ffmpegPath)) {
            System.out.println(ffmpegPath + " is not found FFmpeg!");
            return false;
        }
        if (!checkfile(oldFilePath)) {
            System.out.println(oldFilePath + " is not found the file!");
            return false;
        }

        List<String> commend = new ArrayList<String>();
        commend.add(ffmpegPath);
        commend.add("-i");
        commend.add(oldFilePath);
        commend.add("-y");
        commend.add("-ab");
        commend.add("32");
        commend.add("-ar");
        commend.add("22050");
        commend.add("-b");
        commend.add("800000");
        commend.add("-s");
        commend.add("640*480");
        commend.add(newFilePath);

        try {
            Runtime runtime = Runtime.getRuntime();
            Process proce = null;
            String cutCmd = ffmpegPath + " -i" + " " + oldFilePath +" -y -ab 32 -ar 22050 -b 800000 -s 640*480" + " " + newFilePath;
            proce = runtime.exec(cutCmd);
            ProcessBuilder builder = new ProcessBuilder(commend);
            builder.command(commend);
            builder.start();
            return true;
        } catch (Exception e) {
            e.printStackTrace();
            return false;
        }
    }

    private static boolean checkfile(String path) {
        File file = new File(path);
        if (!file.isFile()) {
            return false;
        }
        return true;
    }
}
5、HDFS 文件操作类,这里只有关于次demo用到的几个功能,如果有其他需求,可以在次类中添加:
package com.busymonkey.hadoop;

import java.io.BufferedInputStream;
import java.io.File;
import java.io.FileInputStream;
import java.io.IOException;
import java.io.InputStream;
import java.net.URI;
import java.util.HashMap;
import java.util.Map;

import org.apache.hadoop.conf.Configuration;
import org.apache.hadoop.fs.FSDataOutputStream;
import org.apache.hadoop.fs.FileStatus;
import org.apache.hadoop.fs.FileSystem;
import org.apache.hadoop.fs.Path;
import org.apache.hadoop.io.IOUtils;

public class HdfsFileSystem {
    /**
     * 按路径上传文件到hdfs
     * @param conf
     * @param local
     * @param remote
     * @throws IOException
     */
    public static void copyFile(String local, String remote) throws IOException {
    	String uri="hdfs://192.168.241.149:9000/";
    	Configuration conf = new Configuration();
    	FileSystem fs = FileSystem.get(URI.create(uri), conf);
        fs.copyFromLocalFile(new Path(local), new Path(remote));
        System.out.println("copy from: " + local + " to " + remote);
        fs.close();
    }

    /**
     * 按路径下载hdfs上的文件
     * @param conf
     * @param uri
     * @param remote
     * @param local
     * @throws IOException
     */
    public static void download(String remote, String local) throws IOException {
    	String uri="hdfs://192.168.241.149:9000/";
    	Configuration conf = new Configuration();
    	Path path = new Path(remote);
    	FileSystem fs = FileSystem.get(URI.create(uri), conf);
    	fs.copyToLocalFile(path, new Path(local));
    	System.out.println("download: from" + remote + " to " + local);
    	fs.close();
   }

    /**
     * File对象上传到hdfs
     * @param conf
     * @param uri
     * @param remote
     * @param local
     * @throws IOException
     */
    public static void createFile(File localPath, String hdfsPath) throws IOException {
        InputStream in = null;
        try {
            Configuration conf = new Configuration();
            FileSystem fileSystem = FileSystem.get(URI.create(hdfsPath), conf);
            FSDataOutputStream out = fileSystem.create(new Path(hdfsPath));
            in = new BufferedInputStream(new FileInputStream(localPath));
            IOUtils.copyBytes(in, out, 4096, false);
            out.hsync();
            out.close();
            System.out.println("create file in hdfs:" + hdfsPath);
        } finally {
            IOUtils.closeStream(in);
        }
    }

    /**
     * 查看目录下面的文件
     * @param conf
     * @param uri
     * @param folder
     * @throws IOException
     */
    public static Map<String, String> ls(String folder) throws IOException {
    	String uri="hdfs://192.168.241.149:9000/";
    	int count = 1;
    	Map<String, String> data = new HashMap<String, String>();
    	Configuration conf = new Configuration();
    	Path path = new Path(folder);
    	FileSystem fs = FileSystem.get(URI.create(uri), conf);
    	FileStatus[] list = fs.listStatus(path);
    	for (FileStatus f : list) {
    		String temp = "";
    		temp += f.getPath();
    		data.put("name" + Integer.toString(count), temp);
    		count ++;
    	}
    	fs.close();
    	return data;
   }
}
6、springmvc 的核心控制器类,HDFS的地址路径和ffmpeg的路径自己相应修改:
package net.spring.controller;

import java.io.File;
import java.io.IOException;
import java.util.Iterator;
import java.util.Map;
import javax.servlet.http.HttpServletRequest;
import org.apache.commons.fileupload.disk.DiskFileItem;
import org.springframework.stereotype.Controller;
import org.springframework.web.bind.annotation.RequestMapping;
import org.springframework.web.multipart.MultipartFile;
import org.springframework.web.multipart.MultipartHttpServletRequest;
import org.springframework.web.multipart.commons.CommonsMultipartFile;
import org.springframework.web.multipart.commons.CommonsMultipartResolver;

import com.busymonkey.hadoop.*;
import com.busymonkey.ffmpeg.*;

@Controller
public class HelloWorldController {
	private String videofilename = "";

    @RequestMapping("/home")
    public String home() {
    	//返回欢迎页面
        return "../../index";
    }

    @RequestMapping("/flowplayer")
    public String flowplayer(HttpServletRequest request, Map<String, String> fileName) {
    	//获取key为name的参数
    	String n = request.getParameter("name");
    	String name = n.substring(0,n.lastIndexOf(".")) + ".flv";
    	//将需要传递的参数插入map中
    	fileName.put("filename", name);
        return "/flowplayer";
    }

    @RequestMapping("/catalog")
    public String catalog(HttpServletRequest request) throws IOException {
    	Map<String, String> fileNames
    				= HdfsFileSystem.ls("hdfs://192.168.241.149:9000/upload/");
    	//将 map进行参数传递
    	request.setAttribute("feedbackmap",fileNames);
        return "/hdfsCatalog";
    }

    @RequestMapping("/upload")
    public String upLoad(HttpServletRequest request) throws IllegalStateException, IOException{
    	//解析器解析request的上下文
    	CommonsMultipartResolver multipartResolver =
    			new CommonsMultipartResolver(request.getSession().getServletContext());
    	//先判断request中是否包涵multipart类型的数据,
    	if(multipartResolver.isMultipart(request)) {
    		//再将request中的数据转化成multipart类型的数据
    		MultipartHttpServletRequest multiRequest = (MultipartHttpServletRequest) request;
    		Iterator<String> iter = multiRequest.getFileNames();
    		while(iter.hasNext()) {
    			MultipartFile file = multiRequest.getFile((String)iter.next());
    			String hdfsUpLoadPath = "hdfs://192.168.241.149:9000/upload/"
    									+ file.getOriginalFilename();
    			videofilename = file.getOriginalFilename();
    			if(file != null) { //直接上传文件到 HDFS 不通过本地文件中转
    				CommonsMultipartFile cf= (CommonsMultipartFile)file;
    		        DiskFileItem fi = (DiskFileItem)cf.getFileItem();
    		        File inputFile = fi.getStoreLocation();
    		        HdfsFileSystem.createFile(inputFile, hdfsUpLoadPath);
    			}
    		}
    	}
    	return "/result";
    }

    @RequestMapping("/convertvideo")
    public String convertvideo(HttpServletRequest request) throws IOException {
    	String remotePath = "hdfs://192.168.241.149:9000/upload/" + videofilename;
    	//获取去掉扩展名的文件名
    	String name = videofilename.substring(0,videofilename.lastIndexOf("."));
    	//获取tomcat下的项目绝对路径
    	String localPath = request.getSession().getServletContext().getRealPath("/") + "tempvideos/";
    	String convertPath = "/usr/share/nginx/html/flv_file/";
    	HdfsFileSystem.download(remotePath, localPath);
    	System.out.println(convertPath+name+".flv");
    	System.out.println(localPath+videofilename);
    	ConvertVideo.processFLV("/usr/local/ffmpeg-3.0-64bit-static/ffmpeg"
    							, localPath+videofilename
    							, convertPath+name+".flv");
        return "/result";
    }
}
7、这里是用到的 flash 播放器,就是 js 文件夹的文件下载:点击打开链接
8、下面是 flowplayer.jsp 的代码:
<%@ page language="java" contentType="text/html; charset=ISO-8859-1"
    pageEncoding="ISO-8859-1"%>
<!DOCTYPE html PUBLIC "-//W3C//DTD HTML 4.01 Transitional//EN" "http://www.w3.org/TR/html4/loose.dtd">
<html>
<head>
<meta http-equiv="Content-Type" content="text/html; charset=ISO-8859-1">
<title>Flowplayer</title>
</head>
<body>
	<h1>FlowPlayer</h1>
	<a
		 href="http://192.168.241.149/${filename}"
		 style="display:block;width:520px;height:330px"
		 id="player">
	</a>
	<!-- this will install flowplayer inside previous A- tag. -->
	<script type="text/javascript" src="./js/flowplayer-3.2.8.min.js"></script>
	<script>
        flowplayer("player", "./js/flowplayer-3.2.8.swf");
	</script>
</body>
</html>
9、下面是 hdfsCatalog.jsp 的代码:
<%@ page language="java" contentType="text/html; charset=ISO-8859-1"
    pageEncoding="ISO-8859-1"%>
<!DOCTYPE html PUBLIC "-//W3C//DTD HTML 4.01 Transitional//EN" "http://www.w3.org/TR/html4/loose.dtd">
<%@ taglib prefix="c" uri="http://java.sun.com/jsp/jstl/core" %>
<html>
<head>
<meta http-equiv="Content-Type" content="text/html; charset=ISO-8859-1">
<title>HDFSCatalog</title>
</head>
<body>
	<a href="home.html">Home Page</a> <br>
  	<c:forEach items="${feedbackmap}" var="item">
  		<a href="javascript:getFlvName('${item.value}')">${item.value}</a> <br>
	</c:forEach>
	<script>
		function getFlvName(path) {
			var url = path;
			url = url.split("/");
			var urlPath="flowplayer.html?name="+url[url.length-1];
			window.location.href = urlPath;
//			window.open(urlPath);
		}
	</script>
</body>
</html>
10、下面是 result.jsp 的代码:
<%@ page language="java" contentType="text/html; charset=ISO-8859-1"
    pageEncoding="ISO-8859-1"%>
<!DOCTYPE html PUBLIC "-//W3C//DTD HTML 4.01 Transitional//EN" "http://www.w3.org/TR/html4/loose.dtd">
<html>
	<head>
		<meta http-equiv="Content-Type" content="text/html; charset=ISO-8859-1">
		<title>result</title>
	</head>
	<body>
		<a href="home.html">Home Page</a> <br>
		<p>success!</p>
	</body>
</html>
11、下面是 spring-servlet.xml 的代码:
<?xml version="1.0" encoding="UTF-8"?>
<beans xmlns="http://www.springframework.org/schema/beans"
 xmlns:xsi="http://www.w3.org/2001/XMLSchema-instance"
 xmlns:p="http://www.springframework.org/schema/p"
 xmlns:context="http://www.springframework.org/schema/context"
 xsi:schemaLocation="http://www.springframework.org/schema/beans
  http://www.springframework.org/schema/beans/spring-beans-3.0.xsd
  http://www.springframework.org/schema/context
  http://www.springframework.org/schema/context/spring-context-3.0.xsd">

 <context:component-scan base-package="net.spring.controller" />
 <bean id="viewResolver" class="org.springframework.web.servlet.view.UrlBasedViewResolver">
  <property name="viewClass" value="org.springframework.web.servlet.view.JstlView" />
  <property name="prefix" value="/WEB-INF/jsp/" />
  <property name="suffix" value=".jsp" />
 </bean>
 <!-- SpringMVC上传文件时,需要配置MultipartResolver处理器 -->
 <bean id="multipartResolver" class="org.springframework.web.multipart.commons.CommonsMultipartResolver">
    <property name="defaultEncoding" value="utf-8" />
       <property name="maxUploadSize" value="10485760000" />
       <property name="maxInMemorySize" value="40960" />
 </bean>
</beans>
12、下面是 web.xml 的代码:
<?xml version="1.0" encoding="UTF-8"?>
<web-app xmlns:xsi="http://www.w3.org/2001/XMLSchema-instance" xmlns="http://java.sun.com/xml/ns/javaee" xsi:schemaLocation="http://java.sun.com/xml/ns/javaee http://java.sun.com/xml/ns/javaee/web-app_2_5.xsd" version="2.5">
  <display-name>Spring3MVC</display-name>
  <servlet>
    <servlet-name>spring</servlet-name>
    <servlet-class>org.springframework.web.servlet.DispatcherServlet</servlet-class>
    <load-on-startup>1</load-on-startup>
  </servlet>
  <servlet-mapping>
    <servlet-name>spring</servlet-name>
    <url-pattern>*.html</url-pattern>
  </servlet-mapping>
  <welcome-file-list>
    <welcome-file>index.jsp</welcome-file>
  </welcome-file-list>
</web-app>
13、下面是 index.jsp 的代码:
<%@ page language="java" contentType="text/html; charset=ISO-8859-1"  pageEncoding="ISO-8859-1"%>
<!DOCTYPE html PUBLIC "-//W3C//DTD HTML 4.01 Transitional//EN" "http://www.w3.org/TR/html4/loose.dtd">
<html>
<head>
	<title>Spring 3.0 MVC demo</title>
</head>
<body>
	<p>upload :</p>
	Please choose the file :<br />
	<form action="upload.html" method="post" enctype="multipart/form-data">
		<input type="file" name="file" size="50" />
		<br />
	<input type="submit" value="Upload" />
	</form>
	<br />
	<a href="convertvideo.html">Convert Videos</a>
	<br />
	<a href="catalog.html">HDFS Catalog</a>
</body>
</html>
14、下面是 pom.xml 的代码:
<project xmlns="http://maven.apache.org/POM/4.0.0" xmlns:xsi="http://www.w3.org/2001/XMLSchema-instance" xsi:schemaLocation="http://maven.apache.org/POM/4.0.0 http://maven.apache.org/xsd/maven-4.0.0.xsd">
  <modelVersion>4.0.0</modelVersion>
  <groupId>springmvx</groupId>
  <artifactId>springmvx</artifactId>
  <version>0.0.1-SNAPSHOT</version>
  <packaging>war</packaging>
  <build>
    <sourceDirectory>src</sourceDirectory>
    <plugins>
      <plugin>
        <artifactId>maven-compiler-plugin</artifactId>
        <version>3.3</version>
        <configuration>
          <source>1.7</source>
          <target>1.7</target>
        </configuration>
      </plugin>
      <plugin>
        <artifactId>maven-war-plugin</artifactId>
        <version>2.6</version>
        <configuration>
          <warSourceDirectory>WebContent</warSourceDirectory>
          <failOnMissingWebXml>false</failOnMissingWebXml>
        </configuration>
      </plugin>
    </plugins>
  </build>
  <dependencies>
  	<dependency>
        <groupId>jstl</groupId>
        <artifactId>jstl</artifactId>
        <version>1.2</version>
    </dependency>
    <dependency>
        <groupId>org.springframework</groupId>
        <artifactId>spring-webmvc</artifactId>
        <version>3.1.1.RELEASE</version>
    </dependency>
  	<dependency>
        <groupId>org.springframework</groupId>
        <artifactId>spring-web</artifactId>
        <version>3.1.1.RELEASE</version>
    </dependency>
    <dependency>
        <groupId>commons-fileupload</groupId>
        <artifactId>commons-fileupload</artifactId>
        <version>1.3.1</version>
    </dependency>
    <dependency>
        <groupId>jdk.tools</groupId>
        <artifactId>jdk.tools</artifactId>
        <version>1.7</version>
        <scope>system</scope>
        <systemPath>${JAVA_HOME}/lib/tools.jar</systemPath>
    </dependency>
    <dependency>
	<groupId>org.apache.hadoop</groupId>
	<artifactId>hadoop-client</artifactId>
	<version>2.6.0</version>
    </dependency>
    <dependency>
        <groupId>jstl</groupId>
        <artifactId>jstl</artifactId>
        <version>1.2</version>
    </dependency>
  </dependencies>
</project>
15、下面是页面操作:
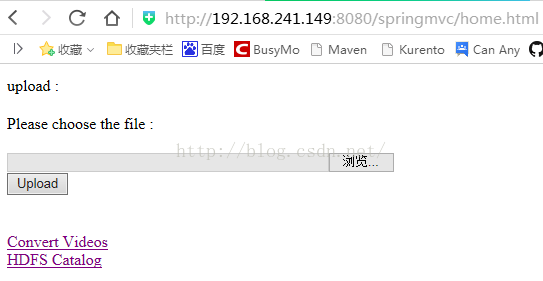
首先上传文件,上传文件完之后可以点击“HDFS Catalog” 查看一下:
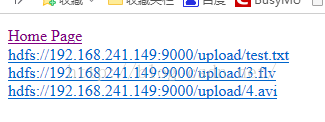
但是还没转码的文件不能播放,所以退回主页,点击“Convert Videos”,进行转码,之后再进目录点击文件就可以播放了。
tomcat 在linux下启动之后,可以用 tail -f ../logs/catalina.out 来实时查看控制台打印的信息。
至此点播服务器还是不能实现播放拖动,要实现播放拖动,参考:点击打开链接


 1520
1520

 被折叠的 条评论
为什么被折叠?
被折叠的 条评论
为什么被折叠?
 到【灌水乐园】发言


