下面是我在学习Picasso过程中做的笔记,思路可能有些凌乱,如果阅读过程中有发现不准确或者错误的地方欢迎交流
内容主要分三部分,第一部分是picasso的基本使用,第二部分是picasso的源码阅读,最后一部分是关于源码中一些细节的梳理.
关于图片加载库的思考
我们为什么要用图片库呢?
图片库通常会对图片加载逻辑进行封装、优化,比如多级缓存/异步线程调度/图片压缩变换,有了这些特性,开发者不再需要关注内存占用、
OOM、网络请求等问题,而只需关注业务本身的逻辑,这对提高生产效率有很大帮助。
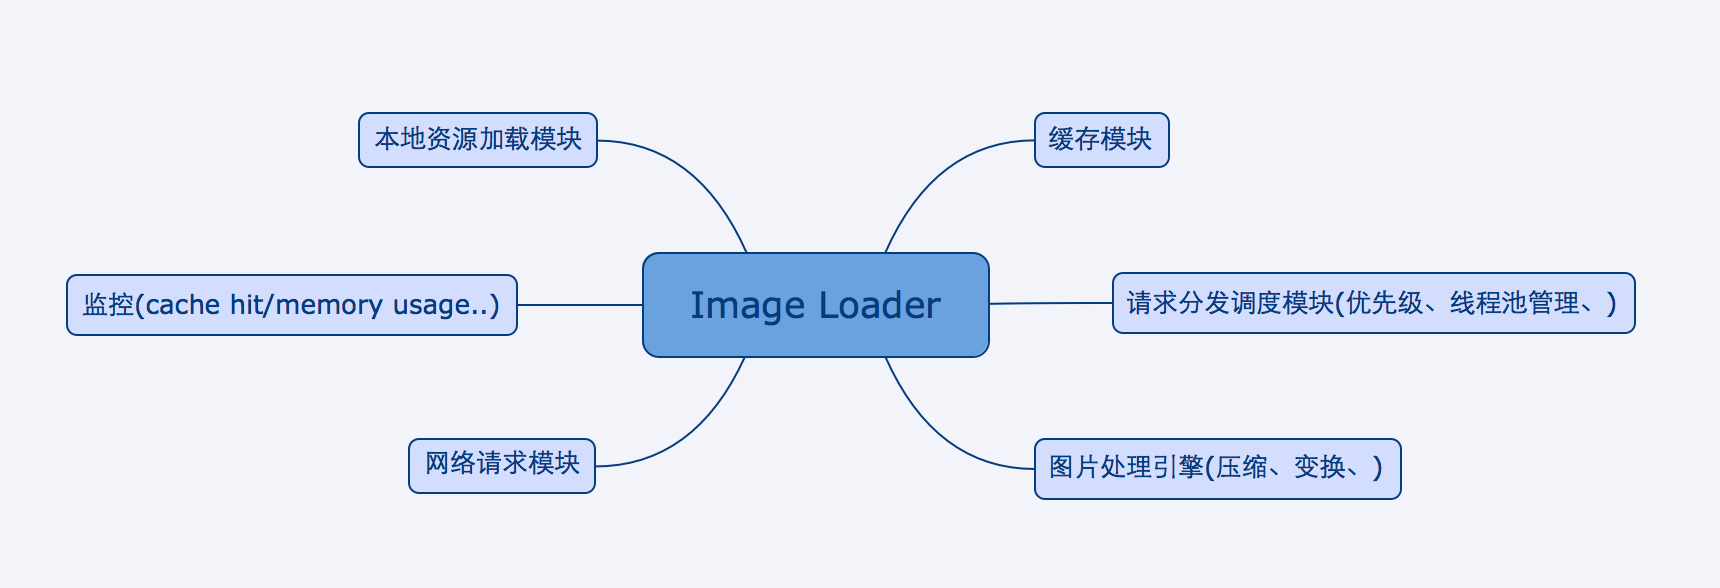
我工作半年以来也研究了一些主流的图片库,发现虽然每个图片的架构和实现细节不太一样,但是通常都会有以下模块:
- 请求分发模块。负责封装请求,对请求进行优先级排序,并按照类型进行分发。
- 缓存模块。通常包括一个二级的缓存,内存缓存、磁盘缓存。并预置多种缓存策略。
- 下载模块。负责下载网络图片。
- 监控模块。负责监控缓存命中率、内存占用、加载图片平均耗时等。
- 图片处理模块。负责对图片进行压缩、变换等处理。
- 本地资源加载模块。负责加载本地资源,如assert、drawable、sdcard等。
- 显示模块。负责将图片输出显示。
Android平台图片加载库现状
目前社区主流的图片加载库有Universal Image Loader,Picasso,Volley,Fresco,Glide.
Picasso简介
A powerful image downloading and caching library for Android,developed by Square
wiki:http://square.github.io/picasso/
Picasso的特性
- 绝对是最轻量的图片加载库,120kb.
- 自带监控功能,可以检测cache hit/内存大小等等数据
- 图片预加载
- 线程并发数依网络状态变化而变化、优先级调度
- 图片变换
- 图片压缩、自适应
- 易扩展
Picasso的使用
Picasso.with(context)
.load(url)
.placeholder(R.drawable.user_placeholder)
.error(R.drawable.user_placeholder_error)
.into(imageView)
Picasso.with(this).load(URL).fetch();
Picasso.with(this).load(URL).fetch(Callback);
注意哦,如果你以以下面这种方式加上图形变换preload的话:
Picasso.with(this).load(URL).rotate(20).fetch()
再下面这种方式是取不到preload的图片的,因为预缓存的是经过变换后的图片,它的cachekey会有rotation标识
Picasso.with(this).load(URL).into(imageView);
当然我说的是preload到内存中的那份经过旋转的图片,http会缓存旋转前的图片到磁盘(支持缓存的情况下),所以最终还是可以从磁盘缓存
拿到图片的。
Picasso p = new Picasso.Builder(this).executor().downloader(downloader).memoryCache(cache).build()
Picasso.setSingletonInstance(p)
 new AsyncTask<Void,Void,Bitmap>(){
        @Override
        protected Bitmap doInBackground(Void... params) {
            try {
                return Picasso.with(PicassoTestActivity.this).load(URL).get();
            } catch (IOException e) {
                e.printStackTrace();
            }
            return null;
        }

        @Override
        protected void onPostExecute(Bitmap bitmap) {
            if(bitmap != null){
                imageView.setImageBitmap(bitmap);
            }
        }
    }.execute();
- 1
- 2
- 3
- 4
- 5
- 6
- 7
- 8
- 9
- 10
- 11
- 12
- 13
- 14
- 15
- 16
- 17
- 18
注意,必须在异步线程调用,否则crash,另外,这个结果并不会缓存到内存里面,所以慎用。
Picasso.with(TestImageActivity.this).load(url).fit().into(imageview)
fit方法的意思是,让图片的宽高恰好等于imageView的宽高.前提是你的imageView控件不能设置成wrap_content,也就是必须
有大小才行。另外,如果使用了fit方法,那么就不能调用resize.
Picasso.with(TestImageActivity.this).load(url).resize(widthPixel,heightPixel).centerInside().into(imageView)
Picasso.with(TestImageActivity.this).load(URL).resizeDimen(R.dimen.width,R.dimen.height).centerCrop().into(iv)
resize后面通常接centerInside或者centerCrop。注意这跟ImageView的scaleTyoe没有关系,仅仅指的是图片的缩放方式。
比如如下代码,iv不压缩,iv_2宽高压缩到40dp并且指定为centerInside.
<ImageView
android:id="@+id/iv"
android:background="#000"
android:layout_width="100dp"
android:layout_height="100dp"/>
<ImageView
android:layout_below="@id/iv"
android:id="@+id/iv_2"
android:background="#000"
android:layout_width="100dp"
android:layout_height="100dp"/>
Picasso.with(TestImageActivity.this).load(URL).into(iv)
Picasso.with(TestImageActivity.this).load(URL).resizeDimen(R.dimen.width, R.dimen.height).centerInside().into(iv_2)
最终显示结果如下:

可以很明显看到下面的图模糊许多,这是因为图片被压缩了,但是显示的时候又被ImageView拉伸了(默认scaleType是fitCenter),
要想不显示拉伸的图,可以给iv_2增加scaleType="centerInside",效果如下:

Picasso.with(TestImageActivity.this).load(URL).rotate(20).into(iv);
Picasso.with(TestImageActivity.this).load(URL).transform(new Transformation() {
@Override
public Bitmap transform(Bitmap source) {
int size = Math.min(source.getWidth(), source.getHeight());
int x = (source.getWidth() - size) / 2;
int y = (source.getHeight() - size) / 2;
Bitmap result = Bitmap.createBitmap(source, x, y, size, size);
if (result != source) {
source.recycle();
}
return result;
}
@Override
public String key() {
return "square()";
}
}).into(iv);
- 1
- 2
- 3
- 4
- 5
- 6
- 7
- 8
- 9
- 10
- 11
- 12
- 13
- 14
- 15
- 16
- 17
- 18
- 19
- 20
各种图形变换:https://github.com/wasabeef/picasso-transformations
通常在滑动列表的时候需要暂停请求
Picasso.with(context).load(URL).tag(context);
public class SampleScrollListener implements AbsListView.OnScrollListener {
private final Context context;
public SampleScrollListener(Context context) {
this.context = context;
}
@Override
public void onScrollStateChanged(AbsListView view, int scrollState) {
final Picasso picasso = Picasso.with(context);
if (scrollState == SCROLL_STATE_IDLE || scrollState == SCROLL_STATE_TOUCH_SCROLL) {
picasso.resumeTag(context);
} else {
picasso.pauseTag(context);
}
}
@Override
public void onScroll(AbsListView view, int firstVisibleItem, int visibleItemCount,
int totalItemCount) {
}
}
- 1
- 2
- 3
- 4
- 5
- 6
- 7
- 8
- 9
- 10
- 11
- 12
- 13
- 14
- 15
- 16
- 17
- 18
- 19
- 20
- 21
- 22
- 23
- 24
- 25
- 26
- 27
- 28
- 29
- 30
- 31
Picasso源码分析
其实看源码分析什么的最无聊了,最好的方式是自己跟一遍源码,picasso里面有很多设计很优雅的地方,只有自己看了才会真正有收获.
整体架构
盗用下Trinea的图:
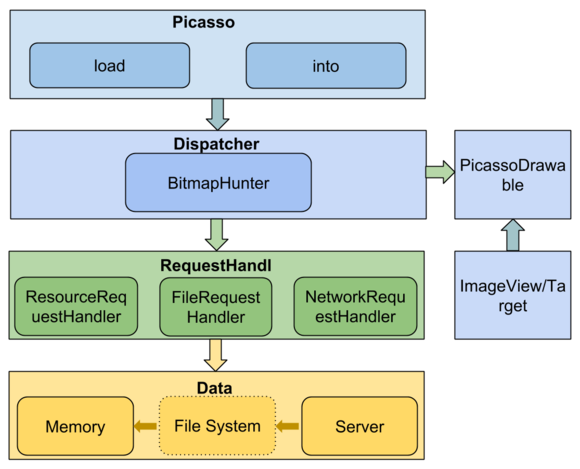
Picasso中的核心类包括Picasso、Dispatcher、BitmapHunter、RequestHandler、Request、Action、Cache
等.Picasso类是一个负责图片下载、变换、缓存的管理器,当它收到一个图片下载请求的时候,它会创建Request并提交给Dispatcher,
Dispatcher会寻找对应的处理器RequestHandler,并将请求与该处理器一起提交给线程池执行,图片获取成功后,最终会交给
PicassoDrawable显示到Target上。
它将一张图片的加载过程分为八步,依次为:
创建->入队->执行->解码->变换->批处理->完成->分发->显示(可选)
也可以从日志中看到这个过程:
11-05 10:39:00.942 2952-2952/com.taobao.paimainews D/Picasso: Main        created      [R0] Request{http://ww3.sinaimg.cn/mw600/006g34NHgw1exj5c4hmfvj30hs0qoqff.jpg resize(90,300) centerInside rotation(30.0) ARGB_8888}
11-05 10:39:00.981 2952-3109/com.taobao.paimainews D/Picasso: Dispatcher  enqueued     [R0]+40ms
11-05 10:39:00.993 2952-3193/com.taobao.paimainews D/Picasso: Hunter      executing    [R0]+50ms
11-05 10:39:01.038 2952-3193/com.taobao.paimainews D/Picasso: Hunter      decoded      [R0]+97ms
11-05 10:39:01.041 2952-3193/com.taobao.paimainews D/Picasso: Hunter      transformed  [R0]+100ms
11-05 10:39:01.042 2952-3109/com.taobao.paimainews D/Picasso: Dispatcher  batched      [R0]+101ms for completion
11-05 10:39:01.279 2952-2952/com.taobao.paimainews D/Picasso: Main        completed    [R0]+338ms from DISK
11-05 10:39:01.280 2952-3109/com.taobao.paimainews D/Picasso: Dispatcher  delivered    [R0]+338ms
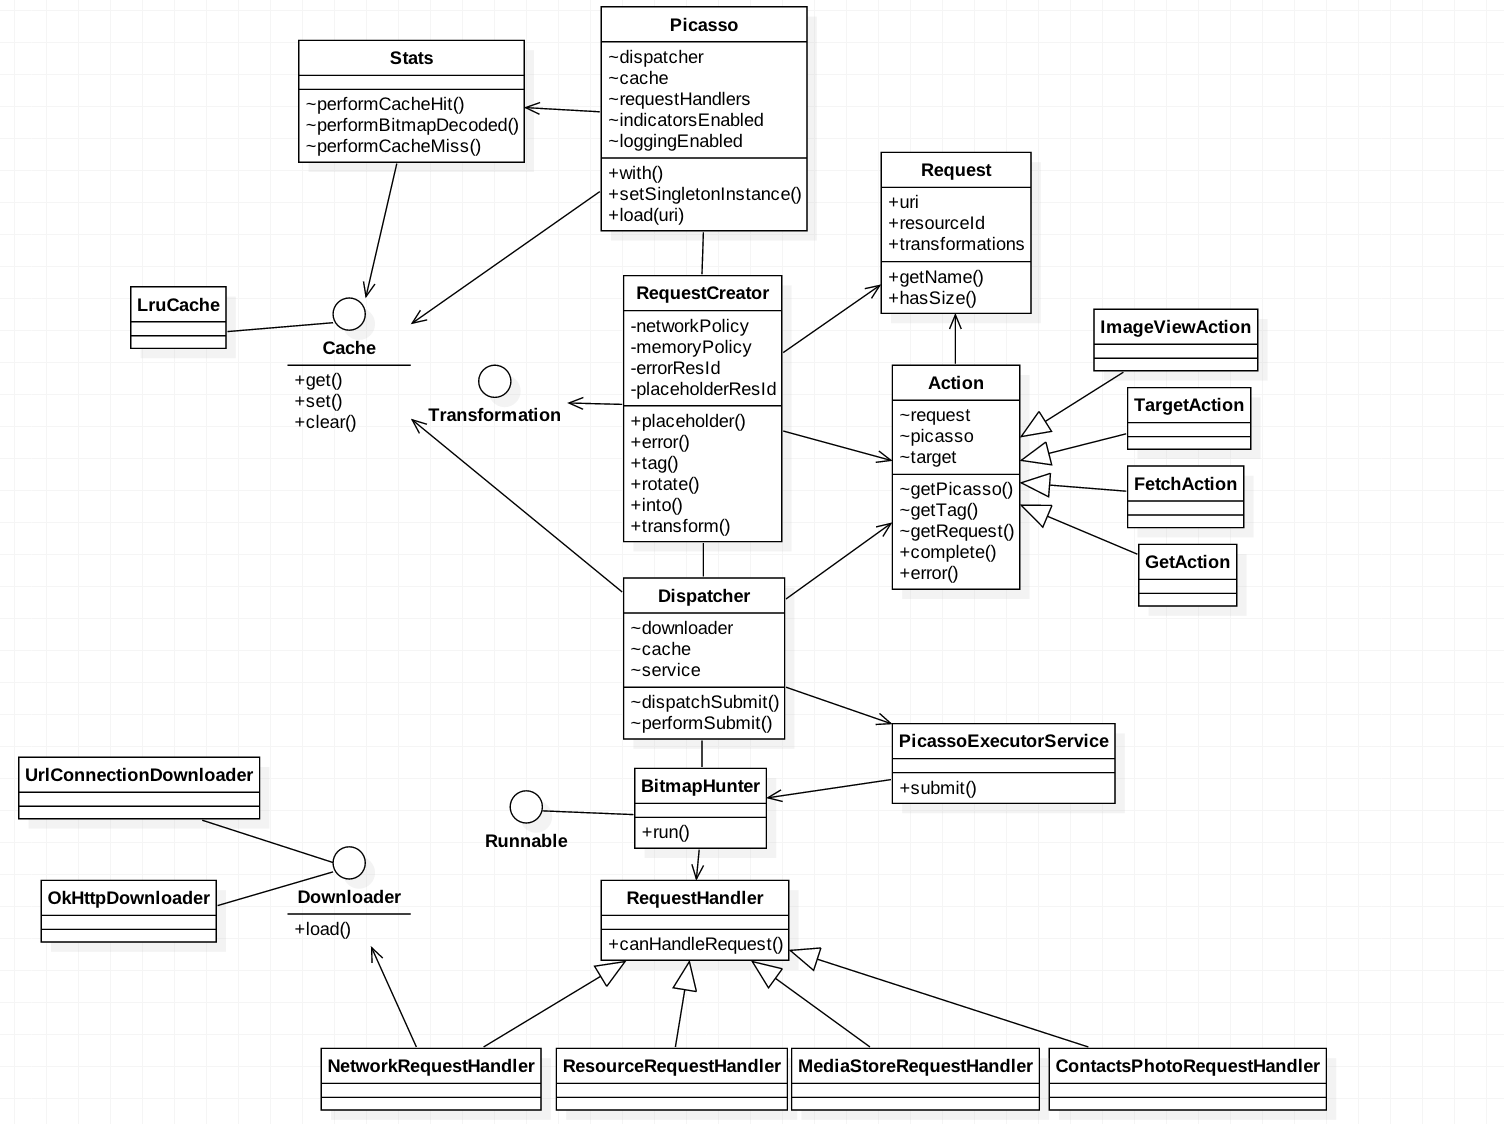
下面是Picasso的类图:
代码分析
版本:2.5.2
Picasso类是整个图片加载器的入口,负责初始化各个模块,配置相关参数等等。
Picasso.with()方法用于创建全局唯一的Picasso实例,为了确保唯一,使用了单例模式。
Picasso#with()
 static volatile Picasso singleton = null;

 public static Picasso with(Context context) {
    if (singleton == null) {
      synchronized (Picasso.class) {
        if (singleton == null) {
          singleton = new Builder(context).build();
        }
      }
    }
    return singleton;
  }
with方法内部通过Builder模式创建Picasso实例,这样做的好处是简洁清晰,通常在构造器参数很多的时候使用。
build方法会最终创建Picasso实例:
Picasso#Builder#build()
 public Picasso build() {
      Context context = this.context;

      if (downloader == null) {
        downloader = Utils.createDefaultDownloader(context);
      }
      if (cache == null) {
        cache = new LruCache(context);
      }
      if (service == null) {
        service = new PicassoExecutorService();
      }
      if (transformer == null) {
        transformer = RequestTransformer.IDENTITY;
      }

      Stats stats = new Stats(cache);

      Dispatcher dispatcher = new Dispatcher(context, service, HANDLER, downloader, cache, stats);

      return new Picasso(context, dispatcher, cache, listener, transformer, requestHandlers, stats,
          defaultBitmapConfig, indicatorsEnabled, loggingEnabled);
    }
- 1
- 2
- 3
- 4
- 5
- 6
- 7
- 8
- 9
- 10
- 11
- 12
- 13
- 14
- 15
- 16
- 17
- 18
- 19
- 20
- 21
- 22
- 23
此方法做了如下基本配置:
- 使用默认的缓存策略,内存缓存基于
LruCache,磁盘缓存基于http缓存,HttpResponseCache - 创建默认的下载器
- 创建默认的线程池(3个worker线程)
- 创建默认的
Transformer,这个Transformer什么事情也不干,只负责转发请求 - 创建默认的监控器(
Stats),用于统计缓存命中率、下载时长等等 - 创建默认的处理器集合,即
RequestHandlers.它们分别会处理不同的加载请求
处理器集合的初始化在Picasso的构造器中:
Picasso构造器
allRequestHandlers.add(new ResourceRequestHandler(context));
if (extraRequestHandlers != null)
allRequestHandlers.add(new ContactsPhotoRequestHandler(context));
allRequestHandlers.add(new MediaStoreRequestHandler(context));
allRequestHandlers.add(new ContentStreamRequestHandler(context));
allRequestHandlers.add(new AssetRequestHandler(context));
allRequestHandlers.add(new FileRequestHandler(context));
allRequestHandlers.add(new NetworkRequestHandler(dispatcher.downloader, stats));
requestHandlers = Collections.unmodifiableList(allRequestHandlers);
从命名就可以看出来,可以从网络、file、assert、contactsphoto等地方加载图片.
另,Picasso支持增加自己的处理器.
load()方法用于从不同地方加载图片,比如网络、resource、File等,该方法内部逻辑很简单,只是创建了一个RequestCreator
Picasso#load()
 public RequestCreator load(Uri uri) {
    return new RequestCreator(this, uri, 0);
  }
RequestCreator从名字就可以知道这是一个封装请求的类,请求在Picasso中被抽象成Request。RequestCreator类提供了
诸如placeholder、tag、error、memoryPolicy、networkPolicy等方法.
由于可配置项太多,所以Request也使用了Builder模式:
RequestCreator构造器
  RequestCreator(Picasso picasso, Uri uri, int resourceId) {
    if (picasso.shutdown) {
      throw new IllegalStateException(
          "Picasso instance already shut down. Cannot submit new requests.");
    }
    this.picasso = picasso;
    this.data = new Request.Builder(uri, resourceId, picasso.defaultBitmapConfig);
  }
那么可想而知into方法一定会去将Request创建,并丢到线程池或者分发器中执行。into方法有多种重载,因为Picasso不仅仅可以
将图片加载到ImageView上,还可以加载到Target或者RemoteView上.
这里选取imageView作为分析对象,该方法代码如下:
RequestCreator#into()
public void into(ImageView target, Callback callback) {
long started = System.nanoTime();
checkMain();
if (target == null) {
throw new IllegalArgumentException("Target must not be null.");
}
if (!data.hasImage()) {
picasso.cancelRequest(target);
if (setPlaceholder) {
setPlaceholder(target, getPlaceholderDrawable());
}
return;
}
if (deferred) {
if (data.hasSize()) {
throw new IllegalStateException("Fit cannot be used with resize.");
}
int width = target.getWidth();
int height = target.getHeight();
if (width == 0 || height == 0) {
if (setPlaceholder) {
setPlaceholder(target, getPlaceholderDrawable());
}
picasso.defer(target, new DeferredRequestCreator(this, target, callback));
return;
}
data.resize(width, height);
}
Request request = createRequest(started);
String requestKey = createKey(request);
if (shouldReadFromMemoryCache(memoryPolicy)) {
Bitmap bitmap = picasso.quickMemoryCacheCheck(requestKey);
if (bitmap != null) {
picasso.cancelRequest(target);
setBitmap(target, picasso.context, bitmap, MEMORY, noFade, picasso.indicatorsEnabled);
if (picasso.loggingEnabled) {
log(OWNER_MAIN, VERB_COMPLETED, request.plainId(), "from " + MEMORY);
}
if (callback != null) {
callback.onSuccess();
}
return;
}
}
if (setPlaceholder) {
setPlaceholder(target, getPlaceholderDrawable());
}
Action action =
new ImageViewAction(picasso, target, request, memoryPolicy, networkPolicy, errorResId,
errorDrawable, requestKey, tag, callback, noFade);
picasso.enqueueAndSubmit(action);
}
- 1
- 2
- 3
- 4
- 5
- 6
- 7
- 8
- 9
- 10
- 11
- 12
- 13
- 14
- 15
- 16
- 17
- 18
- 19
- 20
- 21
- 22
- 23
- 24
- 25
- 26
- 27
- 28
- 29
- 30
- 31
- 32
- 33
- 34
- 35
- 36
- 37
- 38
- 39
- 40
- 41
- 42
- 43
- 44
- 45
- 46
- 47
- 48
- 49
- 50
- 51
- 52
- 53
- 54
- 55
- 56
- 57
- 58
- 59
- 60
- 61
- 62
- 63
- 64
逻辑注释写的很清楚了,into方法会先从缓存里面查找图片,如果找不到的话,则会创建Action即一个加载任务,交给Dispatcher执行。
那我们就来看看picasso.enqueueAndSubmit方法做了什么.
在这之前,先来看下Action是什么鬼,为什么有了Request还要Action.
先看Request有哪些属性:
  int id;
  long started;
  int networkPolicy;
  public final Uri uri;
  public final int resourceId;
  public final String stableKey;
  public final List<Transformation> transformations;
  public final int targetWidth;
  public final int targetHeight;
  public final boolean centerCrop;
  public final boolean centerInside;
  public final boolean onlyScaleDown;
  public final float rotationDegrees;
  public final float rotationPivotX;
  public final float rotationPivotY;
  public final boolean hasRotationPivot;
  public final Bitmap.Config config;
  public final Priority priority;
- 1
- 2
- 3
- 4
- 5
- 6
- 7
- 8
- 9
- 10
- 11
- 12
- 13
- 14
- 15
- 16
- 17
- 18
再看Action的属性:
  final Picasso picasso;
  final Request request;
  final WeakReference<T> target;
  final boolean noFade;
  final int memoryPolicy;
  final int networkPolicy;
  final int errorResId;
  final Drawable errorDrawable;
  final String key;
  final Object tag;
  boolean willReplay;
  boolean cancelled;
Request关注的是请求本身,比如请求的源、id、开始时间、图片变换配置、优先级等等,而Action则代表的是一个加载任务,所以不仅需要
Request对象的引用,还需要Picasso实例,是否重试加载等等
Action有个需要关注的点,那就是WeakReference<T> target,它持有的是Target(比如ImageView..)的弱引用,这样可以保证加载时间很长的情况下
也不会影响到Target的回收了.
好的,那回到刚才的思路,我们开始分析picasso.enqueueAndSubmit方法:
picasso#enqueueAndSubmit()
  final Map<Object, Action> targetToAction;
   ...
  this.targetToAction = new WeakHashMap<Object, Action>();
   ...
  void enqueueAndSubmit(Action action) {
    Object target = action.getTarget();
    if (target != null && targetToAction.get(target) != action) {
      // This will also check we are on the main thread.
      cancelExistingRequest(target);
      targetToAction.put(target, action);
    }
    submit(action);
  }
它会先从action任务上拿到对应target,也就是imageView,然后从weakHashMap中通过这个imageView索引到对应的action,如果
发现这个action跟传进来的action不一样的话,那就取消掉之前的加载任务。最后将当前加载任务提交.
跟进submit发现最终调用的是Dispatcher的dispatchSubmit(action)方法.这个Dispatcher即任务分发器,它是在
Picasso实例创建的时候初始化的.。
那我们在看dispatchSubmit方法之前,必然得了解下Dispatcher.
Picasso.Builder.build()
Dispatcher dispatcher = new Dispatcher(context, service, HANDLER, downloader, cache, stats);
每一个Dispatcher都需要关联线程池(service)、下载器(downloader)、主线程的Handler(HANDLER)、缓存(cache)、
监控器(stats).
这里先看线程池,Picasso默认的线程池叫PicassoExecutorService,它继承自ThreadPoolExecutor,默认线程数量为
3.但是PicassoExecutorService的特性是可以根据网络情况调整线程数量,wifi下是4个线程,而2g网只有一个线程。具体是
通过在Dispatcher中注册了监听网络变化的广播接收者。
另外,PicassoExecutorService中还有一个很重要的方法叫submit,它会去执行一个runnable.
好的,我们回到Dispatcher,这里还需要关注的是Dispatcher中有个内部类叫DispatcherHandler,注意哦,
这个handler是Dispatcher自己的,而不是构造器传进来的。而且,这个handler绑定的是子线程的Looper,为什么?请看:
Dispatcher#构造器
this.handler = new DispatcherHandler(dispatcherThread.getLooper(), this);
而dispatcherThread则是一个HandlerThread:
Dispatcher内部类
 static class DispatcherThread extends HandlerThread {
    DispatcherThread() {
      super(Utils.THREAD_PREFIX + DISPATCHER_THREAD_NAME, THREAD_PRIORITY_BACKGROUND);
    }
  }
也就是说,这个handler的消息处理是在子线程进行的!这样就可以避免阻塞主线程的消息队列啦!
好的,再回到刚才的问题,来看下dispatchSubmit方法(不知道大家有没有看晕。。。。):
Dispatcher#dispatchSubmit
 void dispatchSubmit(Action action) {
    handler.sendMessage(handler.obtainMessage(REQUEST_SUBMIT, action));
  }
不用看都知道会发消息给handler。而handler收到这个消息之后调用了这个方法:
dispatcher.performSubmit(action)
果断跟进去:
Dispatcher#performSubmit
void performSubmit(Action action, boolean dismissFailed) {//注意哦,这里已经不在主线程了,而是在dispatcher线程(HandlerThread)
if (pausedTags.contains(action.getTag())) {//此任务是否被暂停
pausedActions.put(action.getTarget(), action)
if (action.getPicasso().loggingEnabled) {
log(OWNER_DISPATCHER, VERB_PAUSED, action.request.logId(),
"because tag '" + action.getTag() + "' is paused")
}
return
}
BitmapHunter hunter = hunterMap.get(action.getKey())
if (hunter != null) {
hunter.attach(action)
return
}
if (service.isShutdown()) {//线程池是否关闭
if (action.getPicasso().loggingEnabled) {
log(OWNER_DISPATCHER, VERB_IGNORED, action.request.logId(), "because shut down")
}
return
}
//创建hunter
hunter = forRequest(action.getPicasso(), this, cache, stats, action)
hunter.future = service.submit(hunter)
hunterMap.put(action.getKey(), hunter)
if (dismissFailed) {
failedActions.remove(action.getTarget())
}
if (action.getPicasso().loggingEnabled) {
log(OWNER_DISPATCHER, VERB_ENQUEUED, action.request.logId())
}
}
- 1
- 2
- 3
- 4
- 5
- 6
- 7
- 8
- 9
- 10
- 11
- 12
- 13
- 14
- 15
- 16
- 17
- 18
- 19
- 20
- 21
- 22
- 23
- 24
- 25
- 26
- 27
- 28
- 29
- 30
- 31
- 32
- 33
- 34
- 35
首先创建了一个BitmapHunter,它继承自Runnable,可以被线程池调用。然后判断线程池有没有关闭,如果没有的话,
就会将这个bitmapHunter丢到线程池里面,即调用刚才说的submit方法。
我们先看下forRequest方法里面干了什么:
BitmapHunter#forRequest
static BitmapHunter forRequest(Picasso picasso, Dispatcher dispatcher, Cache cache, Stats stats,
Action action) {
Request request = action.getRequest();
List<RequestHandler> requestHandlers = picasso.getRequestHandlers();
for (int i = 0, count = requestHandlers.size(); i < count; i++) {
RequestHandler requestHandler = requestHandlers.get(i);
if (requestHandler.canHandleRequest(request)) {
return new BitmapHunter(picasso, dispatcher, cache, stats, action, requestHandler);
}
}
return new BitmapHunter(picasso, dispatcher, cache, stats, action, ERRORING_HANDLER);
}
还记得大明湖畔的Picasso么?在它的构造器中创建了若干RequestHandler,用于处理不同的加载请求,在这里,它会遍历
这些requestHandler,看谁可以处理当前请求,如果发现了,那就创建BitmapHandler,并把这个requestHandler传进去,
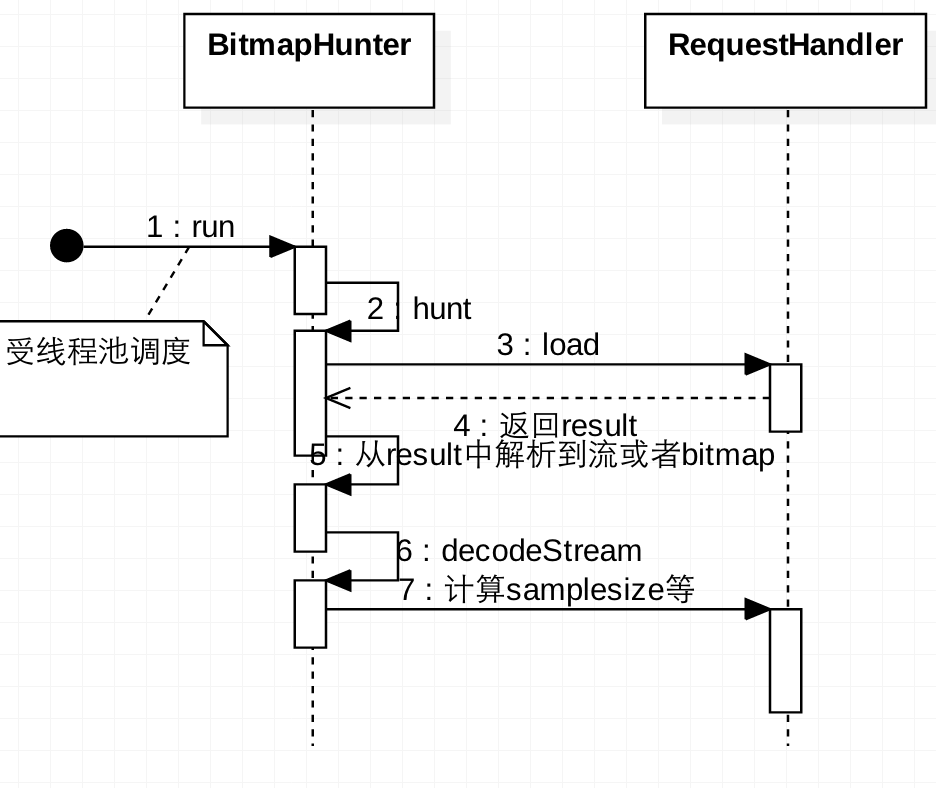
线程池在收到BitmapHunter之后,会调用其run方法,那么我们就来看下:
BitmapHunter#run
@Override public void run() {
    try {
      updateThreadName(data);

      if (picasso.loggingEnabled) {
        log(OWNER_HUNTER, VERB_EXECUTING, getLogIdsForHunter(this));
      }

      result = hunt();

      if (result == null) {
        dispatcher.dispatchFailed(this);
      } else {
        dispatcher.dispatchComplete(this);
      }
    } catch (Downloader.ResponseException e) {
      if (!e.localCacheOnly || e.responseCode != 504) {
        exception = e;
      }
      dispatcher.dispatchFailed(this);
    } catch (NetworkRequestHandler.ContentLengthException e) {
      exception = e;
      dispatcher.dispatchRetry(this);
    } catch (IOException e) {
      exception = e;
      dispatcher.dispatchRetry(this);
    } catch (OutOfMemoryError e) {
      StringWriter writer = new StringWriter();
      stats.createSnapshot().dump(new PrintWriter(writer));
      exception = new RuntimeException(writer.toString(), e);
      dispatcher.dispatchFailed(this);
    } catch (Exception e) {
      exception = e;
      dispatcher.dispatchFailed(this);
    } finally {
      Thread.currentThread().setName(Utils.THREAD_IDLE_NAME);
    }
  }
- 1
- 2
- 3
- 4
- 5
- 6
- 7
- 8
- 9
- 10
- 11
- 12
- 13
- 14
- 15
- 16
- 17
- 18
- 19
- 20
- 21
- 22
- 23
- 24
- 25
- 26
- 27
- 28
- 29
- 30
- 31
- 32
- 33
- 34
- 35
- 36
- 37
- 38
核心逻辑是由hunt方法完成的,下面一堆catch语句分别捕捉不同的异常然后上报给dispatcher进行处理。
而hunt方法里面肯定会调用RequestHandler的load方法:
BitmapHunter#hunt
Bitmap hunt() throws IOException {
Bitmap bitmap = null;
if (shouldReadFromMemoryCache(memoryPolicy)) {
bitmap = cache.get(key);
if (bitmap != null) {
stats.dispatchCacheHit();
loadedFrom = MEMORY;
if (picasso.loggingEnabled) {
log(OWNER_HUNTER, VERB_DECODED, data.logId(), "from cache");
}
return bitmap;
}
}
data.networkPolicy = retryCount == 0 ? NetworkPolicy.OFFLINE.index : networkPolicy;
RequestHandler.Result result = requestHandler.load(data, networkPolicy);
if (result != null) {
loadedFrom = result.getLoadedFrom();
exifRotation = result.getExifOrientation();
bitmap = result.getBitmap();
if (bitmap == null) {
InputStream is = result.getStream();
try {
bitmap = decodeStream(is, data);
} finally {
Utils.closeQuietly(is);
}
}
}
if (bitmap != null) {
if (picasso.loggingEnabled) {
log(OWNER_HUNTER, VERB_DECODED, data.logId());
}
stats.dispatchBitmapDecoded(bitmap);
if (data.needsTransformation() || exifRotation != 0) {
synchronized (DECODE_LOCK) {
if (data.needsMatrixTransform() || exifRotation != 0) {
bitmap = transformResult(data, bitmap, exifRotation);
if (picasso.loggingEnabled) {
log(OWNER_HUNTER, VERB_TRANSFORMED, data.logId());
}
}
if (data.hasCustomTransformations()) {
bitmap = applyCustomTransformations(data.transformations, bitmap);
if (picasso.loggingEnabled) {
log(OWNER_HUNTER, VERB_TRANSFORMED, data.logId(), "from custom transformations");
}
}
}
if (bitmap != null) {
stats.dispatchBitmapTransformed(bitmap);
}
}
}
return bitmap;
}
- 1
- 2
- 3
- 4
- 5
- 6
- 7
- 8
- 9
- 10
- 11
- 12
- 13
- 14
- 15
- 16
- 17
- 18
- 19
- 20
- 21
- 22
- 23
- 24
- 25
- 26
- 27
- 28
- 29
- 30
- 31
- 32
- 33
- 34
- 35
- 36
- 37
- 38
- 39
- 40
- 41
- 42
- 43
- 44
- 45
- 46
- 47
- 48
- 49
- 50
- 51
- 52
- 53
- 54
- 55
- 56
- 57
- 58
- 59
- 60
- 61
- 62
- 63
- 64
- 65
- 66
- 67
这里假设是一个网络请求,那么最终NetworkRequestHandler会处理请求:
NetworkRequestHandler#load
@Override public Result load(Request request, int networkPolicy) throws IOException {
Response response = downloader.load(request.uri, request.networkPolicy);
if (response == null) {
return null;
}
Picasso.LoadedFrom loadedFrom = response.cached ? DISK : NETWORK;
Bitmap bitmap = response.getBitmap();
if (bitmap != null) {
return new Result(bitmap, loadedFrom);
}
InputStream is = response.getInputStream();
if (is == null) {
return null;
}
if (loadedFrom == DISK && response.getContentLength() == 0) {
Utils.closeQuietly(is);
throw new ContentLengthException("Received response with 0 content-length header.");
}
if (loadedFrom == NETWORK && response.getContentLength() > 0) {
stats.dispatchDownloadFinished(response.getContentLength());
}
return new Result(is, loadedFrom);
}
- 1
- 2
- 3
- 4
- 5
- 6
- 7
- 8
- 9
- 10
- 11
- 12
- 13
- 14
- 15
- 16
- 17
- 18
- 19
- 20
- 21
- 22
- 23
- 24
- 25
- 26
- 27
- 28
- 29
- 30
- 31
现在我们关注下这个downloader的前世今生,如果用户没有自定义的话,那将使用默认downloader:
Picasso#Builder#build()
downloader = Utils.createDefaultDownloader(context);
Utils#createDefaultDownloader
static Downloader createDefaultDownloader(Context context) {
    try {
      Class.forName("com.squareup.okhttp.OkHttpClient");
      return OkHttpLoaderCreator.create(context);
    } catch (ClassNotFoundException ignored) {
    }
    return new UrlConnectionDownloader(context);
  }
首先反射下,看有没有依赖okhttp,如果依赖的话,那就使用OkHttpClient喽,否则就使用默认的HttpUrlConnection了。
注:其实从4.4开始,okhttp已经作为HttpUrlConnection的实现引擎了。
可以从picasso的pom文件里面看到,okhttp是optional的:
 <dependency>
      <groupId>com.squareup.okhttp</groupId>
      <artifactId>okhttp</artifactId>
      <optional>true</optional>
    </dependency>
以UrlConnectionDownloader为例,看下它的load方法:
  @Override public Response load(Uri uri, int networkPolicy) throws IOException {
    if (Build.VERSION.SDK_INT >= Build.VERSION_CODES.ICE_CREAM_SANDWICH) {
      installCacheIfNeeded(context);
    }

    HttpURLConnection connection = openConnection(uri);
    connection.setUseCaches(true);

    if (networkPolicy != 0) {
      String headerValue;

      if (NetworkPolicy.isOfflineOnly(networkPolicy)) {
        headerValue = FORCE_CACHE;
      } else {
        StringBuilder builder = CACHE_HEADER_BUILDER.get();
        builder.setLength(0);

        if (!NetworkPolicy.shouldReadFromDiskCache(networkPolicy)) {
          builder.append("no-cache");
        }
        if (!NetworkPolicy.shouldWriteToDiskCache(networkPolicy)) {
          if (builder.length() > 0) {
            builder.append(',');
          }
          builder.append("no-store");
        }

        headerValue = builder.toString();
      }

      connection.setRequestProperty("Cache-Control", headerValue);
    }

    int responseCode = connection.getResponseCode();
    if (responseCode >= 300) {
      connection.disconnect();
      throw new ResponseException(responseCode + " " + connection.getResponseMessage(),
          networkPolicy, responseCode);
    }

    long contentLength = connection.getHeaderFieldInt("Content-Length", -1);
    boolean fromCache = parseResponseSourceHeader(connection.getHeaderField(RESPONSE_SOURCE));

    return new Response(connection.getInputStream(), fromCache, contentLength);
  }
- 1
- 2
- 3
- 4
- 5
- 6
- 7
- 8
- 9
- 10
- 11
- 12
- 13
- 14
- 15
- 16
- 17
- 18
- 19
- 20
- 21
- 22
- 23
- 24
- 25
- 26
- 27
- 28
- 29
- 30
- 31
- 32
- 33
- 34
- 35
- 36
- 37
- 38
- 39
- 40
- 41
- 42
- 43
- 44
- 45
注意哦,Disk Cache功能是在这里做掉的,它基于Http语义来判断是否缓存.
另,返回的是inputStream流,而不是Bitmap对象.
好的,现在我们回到BitmapHunter#run(),它在拿到结果后会将结果交给dispatcher
BitmapHunter#run()
 if (result == null) {
        dispatcher.dispatchFailed(this);
      } else {
        dispatcher.dispatchComplete(this);
      }
我们看dispatcher.dispatchComplete(this),它会把消息发给自己内部的handler,也就是刚才说的Looper在子线程
的handler,handler将做如下处理:
BitmapHunter hunter = (BitmapHunter) msg.obj
dispatcher.performComplete(hunter)
注意哦,BitmapHunter会持有网络请求回来的Bitmap引用.来看下performComplete:
Dispatcher#performComplete
void performComplete(BitmapHunter hunter) {
if (shouldWriteToMemoryCache(hunter.getMemoryPolicy())) {
cache.set(hunter.getKey(), hunter.getResult())
}
hunterMap.remove(hunter.getKey())
batch(hunter)
if (hunter.getPicasso().loggingEnabled) {
log(OWNER_DISPATCHER, VERB_BATCHED, getLogIdsForHunter(hunter), "for completion")
}
}
首先会根据事先设置的缓存策略决定是否将结果加到内存缓存。然后调用batch方法,从名字就可以知道,这个方法会把结果暂存,
然后批量处理(等待200ms),这样做也是为了防止短时间大量任务阻塞消息队列。到时间后,就会执行performBatchComplete,
此方法会将这个批次的所有结果一次性发给主线程的Handler,也就是Picasso中定义的Handler:
Dispatcher#performBatchComplete
  void performBatchComplete() {
    List<BitmapHunter> copy = new ArrayList<BitmapHunter>(batch);
    batch.clear();
    mainThreadHandler.sendMessage(mainThreadHandler.obtainMessage(HUNTER_BATCH_COMPLETE, copy));
    logBatch(copy);
  }
主线程收到消息后会进行处理:
case HUNTER_BATCH_COMPLETE: {
@SuppressWarnings("unchecked") List<BitmapHunter> batch = (List<BitmapHunter>) msg.obj;
for (int i = 0, n = batch.size(); i < n; i++) {
BitmapHunter hunter = batch.get(i);
hunter.picasso.complete(hunter);
}
对batch中每个BitmapHunter调用complete方法,而complete方法会调用deliverAction方法,最终其实调用的是具体
action的complete方法,如果是ImageView的话,那就是ImageViewAction的complete方法:
ImageViewAction#complete
 @Override public void complete(Bitmap result, Picasso.LoadedFrom from) {
    if (result == null) {
      throw new AssertionError(
          String.format("Attempted to complete action with no result!\n%s", this));
    }

    ImageView target = this.target.get();
    if (target == null) {
      return;
    }

    Context context = picasso.context;
    boolean indicatorsEnabled = picasso.indicatorsEnabled;
    PicassoDrawable.setBitmap(target, context, result, from, noFade, indicatorsEnabled);

    if (callback != null) {
      callback.onSuccess();
    }
  }
- 1
- 2
- 3
- 4
- 5
- 6
- 7
- 8
- 9
- 10
- 11
- 12
- 13
- 14
- 15
- 16
- 17
- 18
- 19
注意看这一句,ImageView target = this.target.get(),因为target是ImageView的弱引用,在下载过程中,
ImageView可能已经被销毁了,所以这里要做下判断。
如果没有被回收,那么图片最终通过PicassoDrawable.setBitmap()方法被设置到ImageView上.
这个PicassoDrawable提供了fade动画.
好了,分析基本完毕,下面是整个流程的时序图.
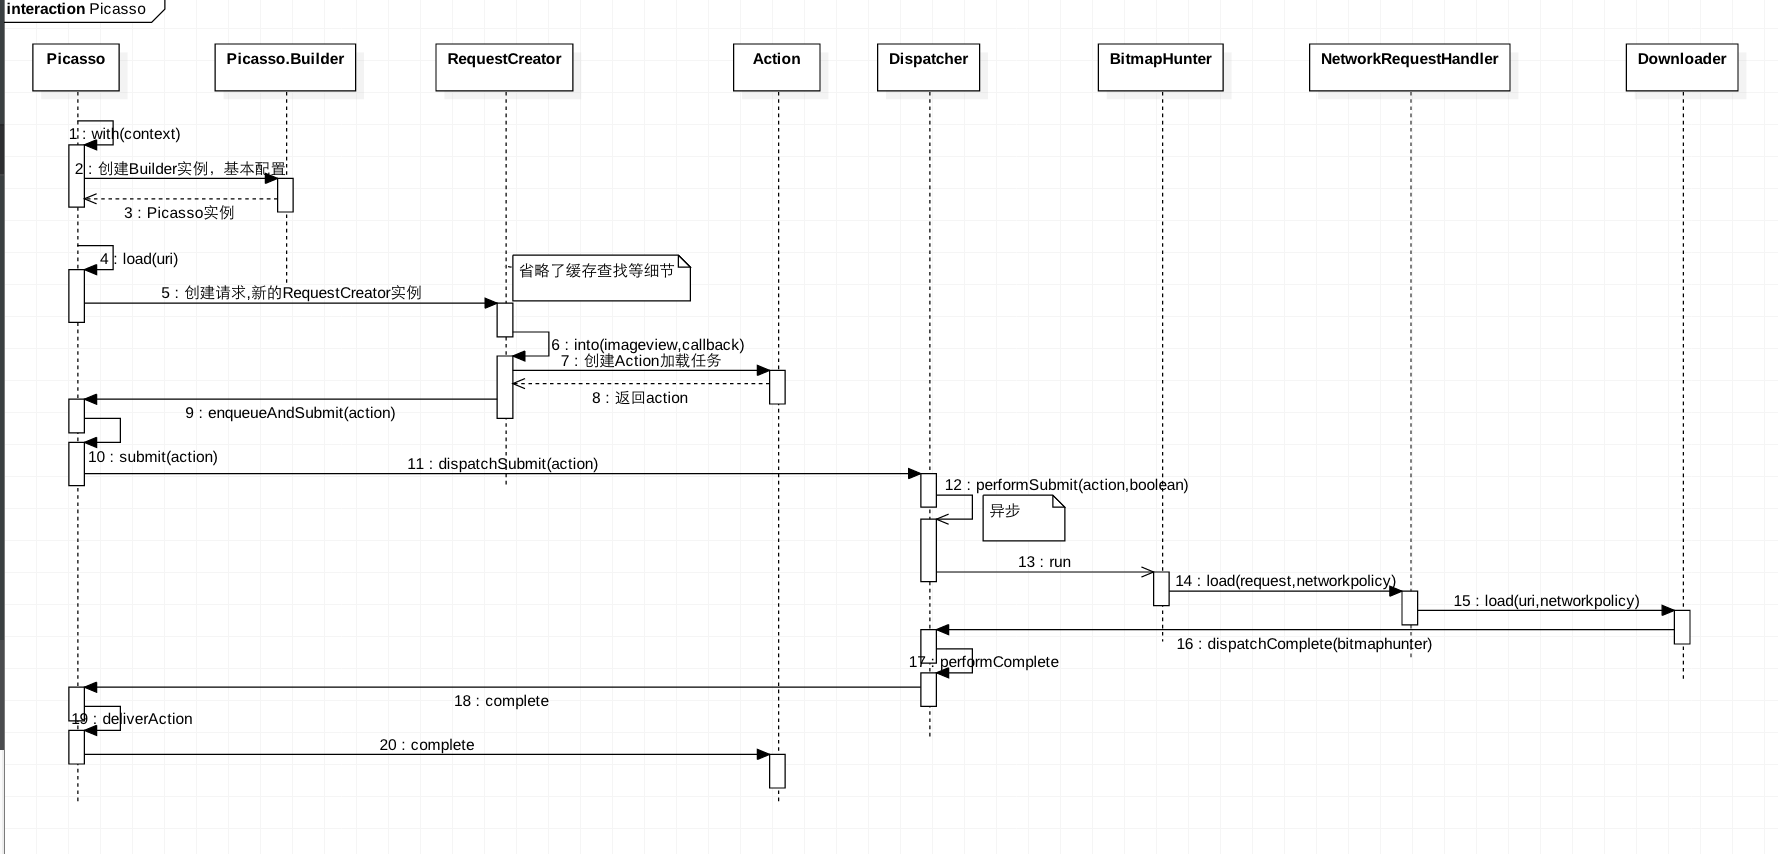
简单总结下,当我们执行Picasso.with(context).load(url).into(imageview)时,首先会构造Picasso实例,然后会
根据url创建请求,然后请求会被交给Dispatcher,Dispatcher将在子线程对请求任务进行调度,将请求任务交给线程池
执行,执行完毕后,将结果传给主线程的handler,最后在主线程中将图片设置到ImageView上.
其他需要关注的点
-
关于缓存策略
Picasso的缓存是内存缓存+磁盘缓存,内存缓存基于LruCache类,可配置替换。磁盘缓存依赖于http缓存,不可配置。
先看内存缓存.内存缓存比较简单,是通过LinkedHashMap实现.
读缓存时机:生成了请求Request对象,准备创建Action加载任务之前,会先去缓存里面查找下.
RequestCreator#into
if (shouldReadFromMemoryCache(memoryPolicy)) {
      Bitmap bitmap = picasso.quickMemoryCacheCheck(requestKey);
      if (bitmap != null) {
        picasso.cancelRequest(target);
        setBitmap(target, picasso.context, bitmap, MEMORY, noFade, picasso.indicatorsEnabled);
        if (picasso.loggingEnabled) {
          log(OWNER_MAIN, VERB_COMPLETED, request.plainId(), "from " + MEMORY);
        }
        if (callback != null) {
          callback.onSuccess();
        }
        return;
      }
    }
写缓存时机:图片从网络或者其他地方加载成功后,即在BitmapHunter的run方法执行结束的时候.
Dispatcher#performComplete
if (shouldWriteToMemoryCache(hunter.getMemoryPolicy())) {
cache.set(hunter.getKey(), hunter.getResult())
}
注意哦,缓存的是经过压缩之后的图片(如果你使用了fit或者resize方法的话),
再看磁盘缓存。
如果你是使用UrlConnectionDownloader的话,那很不幸,缓存只在Api>14上生效,因为缓存依赖于HttpResponseCache.
如果你依赖了okhttp,那么缓存策略始终是有效的。另外需要说明的是,既然是http缓存,那么缓存的可用性依赖于http响应是
否允许缓存,也就是说得看响应中是否携带Cache-Control、Expires等字段.对于这块不了解的话,可以参考我的这篇文章:
HttpCache in android
还有一点,缓存的路径是 应用cache目录/picasso-cache 文件夹.具体代码参考Utils.createDefaultCacheDir方法
-
关于预加载
首先要注意的是Callback是一个强引用,如果你使用带Callback的重载形式的话,只有当Request结束的时候才会释放
引用,在此期间你的Activity/Fragment等组件引用不会被释放.因此你需要注意内存泄露的情形.
怎么实现?很简单拉,调fetch的时候创建了FetchAction,然后其他流程上面描述的一样,最终在Dispatcher.performComplete
的时候将结果写入内存缓存,结果回传到主线程的时候,调用了FetchAction的complete方法,这里面不对Bitmap做
任何处理就行拉:
FetchAction#complete
```
 @Override void complete(Bitmap result, Picasso.LoadedFrom from) {
       if (callback != null) {
         callback.onSuccess();
       }
     }
```
-
关于图形变换
图形变换在Picasso中被抽象成Transformation接口,具体的变换操作由transform方法实现.Request维护一个
图形变换的列表List<Transformation>,当图片加载成功后,BitmapHunter中将会遍历这个变换集合,依次进行变换,
最后返回变换后的bitmap.恩,其实是一个回调的思想,将操作封装到接口中交给系统,系统在某个特定时机调用你的接口。
具体代码:
BitmapHunter#applyCustomTransformations
   ```
   static Bitmap applyCustomTransformations(List<Transformation> transformations, Bitmap result) {
             for (int i = 0, count = transformations.size(); i < count; i++) {
               final Transformation transformation = transformations.get(i);
               Bitmap newResult;
               try {
                 newResult = transformation.transform(result);
               } catch (final RuntimeException e) {
                 Picasso.HANDLER.post(new Runnable() {
                   @Override public void run() {
                     throw new RuntimeException(
                         "Transformation " + transformation.key() + " crashed with exception.", e);
                   }
                 });
                 return null;
               }
               ....
               result = newResult;
             }
             return result;
           }

   ```
-
关于CleanupThread
Picasso类中有一个内部线程叫CleanupThread,这是一个daemon线程,它的工作是找到那些Target(比如说ImageView)已经被回收
但是所对应的Request请求还在继续的任务(Action),找到之后,会取消对应的请求,避免资源浪费.
看下代码:
Picasso#CleanupThread
private static class CleanupThread extends Thread {
private final ReferenceQueue<Object> referenceQueue;
private final Handler handler;
CleanupThread(ReferenceQueue<Object> referenceQueue, Handler handler) {
this.referenceQueue = referenceQueue;
this.handler = handler;
setDaemon(true);
setName(THREAD_PREFIX + "refQueue");
}
@Override public void run() {
Process.setThreadPriority(THREAD_PRIORITY_BACKGROUND);
while (true) {
try {
RequestWeakReference<?> remove =
(RequestWeakReference<?>) referenceQueue.remove(THREAD_LEAK_CLEANING_MS);
Message message = handler.obtainMessage();
if (remove != null) {
message.what = REQUEST_GCED;
message.obj = remove.action;
handler.sendMessage(message);
} else {
message.recycle();
}
} catch (InterruptedException e) {
break;
} catch (final Exception e) {
handler.post(new Runnable() {
@Override public void run() {
throw new RuntimeException(e);
}
});
break;
}
}
}
void shutdown() {
interrupt();
}
}
- 1
- 2
- 3
- 4
- 5
- 6
- 7
- 8
- 9
- 10
- 11
- 12
- 13
- 14
- 15
- 16
- 17
- 18
- 19
- 20
- 21
- 22
- 23
- 24
- 25
- 26
- 27
- 28
- 29
- 30
- 31
- 32
- 33
- 34
- 35
- 36
- 37
- 38
- 39
- 40
- 41
- 42
- 43
- 44
- 45
- 46
- 47
可以看到它会不断轮询ReferenceQueue,找到这样的reference,就交给handler,handler会从reference中拿到action,
并取消请求.
case REQUEST_GCED: {
Action action = (Action) msg.obj
if (action.getPicasso().loggingEnabled) {
log(OWNER_MAIN, VERB_CANCELED, action.request.logId(), "target got garbage collected")
}
action.picasso.cancelExistingRequest(action.getTarget())
break
}
那么这个ReferenceQueue又是如何关联Action的呢?这个可以从Action的构造器中拿到答案:
this.target =
target == null ? null : new RequestWeakReference<T>(this, target, picasso.referenceQueue);
可以看到两点:
- 每个
Action都会关联Picasso中唯一的referenceQueue实例; - 每个
RequestWeakReference都会同时关联Target和Action.
-
resume/pause
-
pause
流程如下。
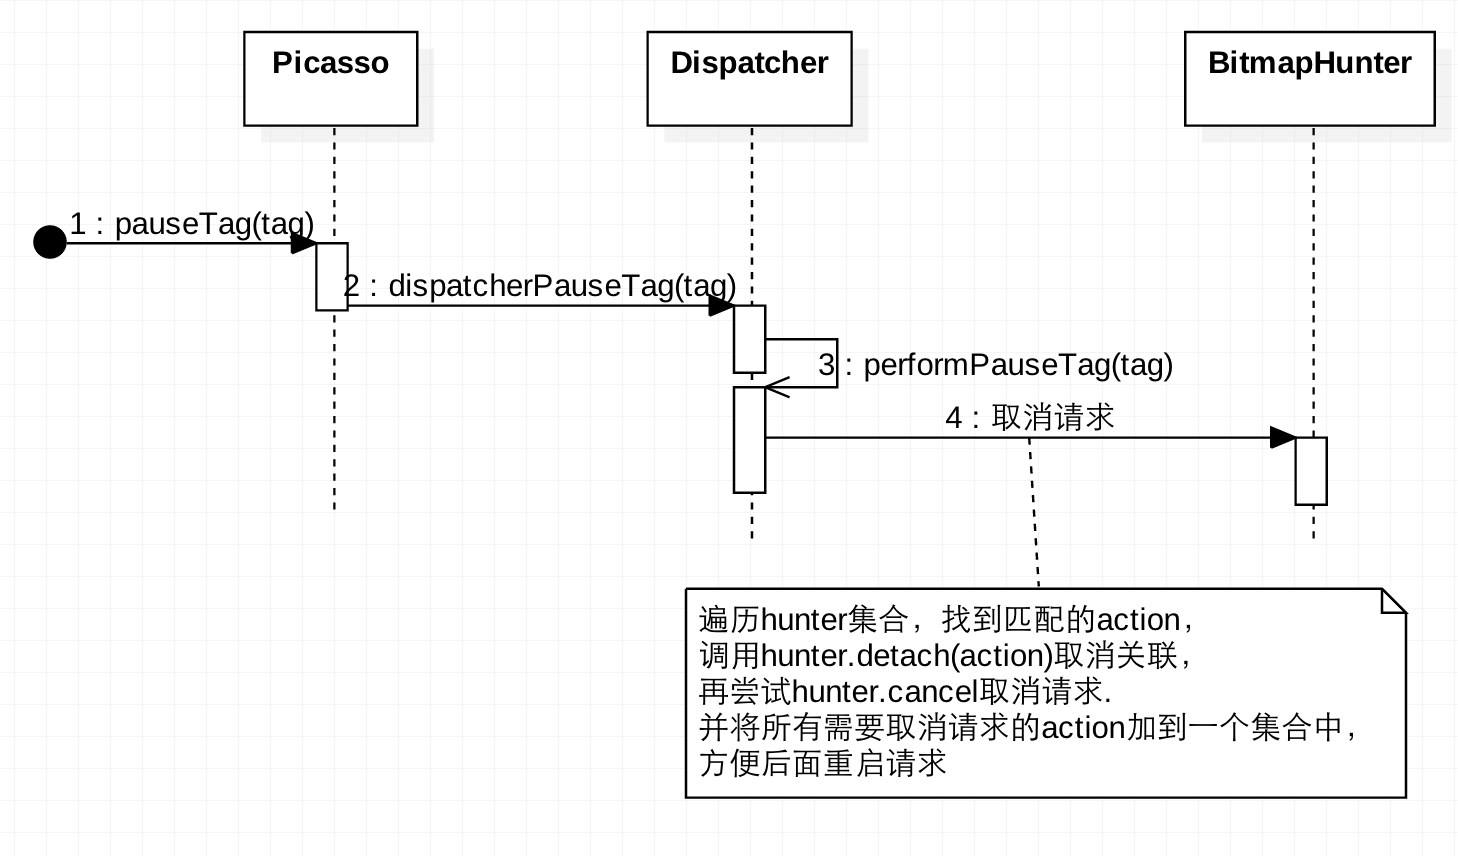
可能会有疑问的地方在于Dispatcher#performPauseTag中遍历所有的hunter,都会调一次cancel,这似乎会取消所有
的请求。但其实不是这样的,可以看下BitmapHunter#cancel方法的代码:
   boolean cancel() {
     return action == null
         && (actions == null || actions.isEmpty())
         && future != null
         && future.cancel(false);
   }
注意到它会判断action是否为空,如果不为空就不会取消了。而在Dispatcher#performPauseTag中会把tag匹配的
action与对应的BitmapHunter解绑(detach),让BitmapHunter的action为空.所以这并不影响其他任务的执行。
-
resume
流程如下。
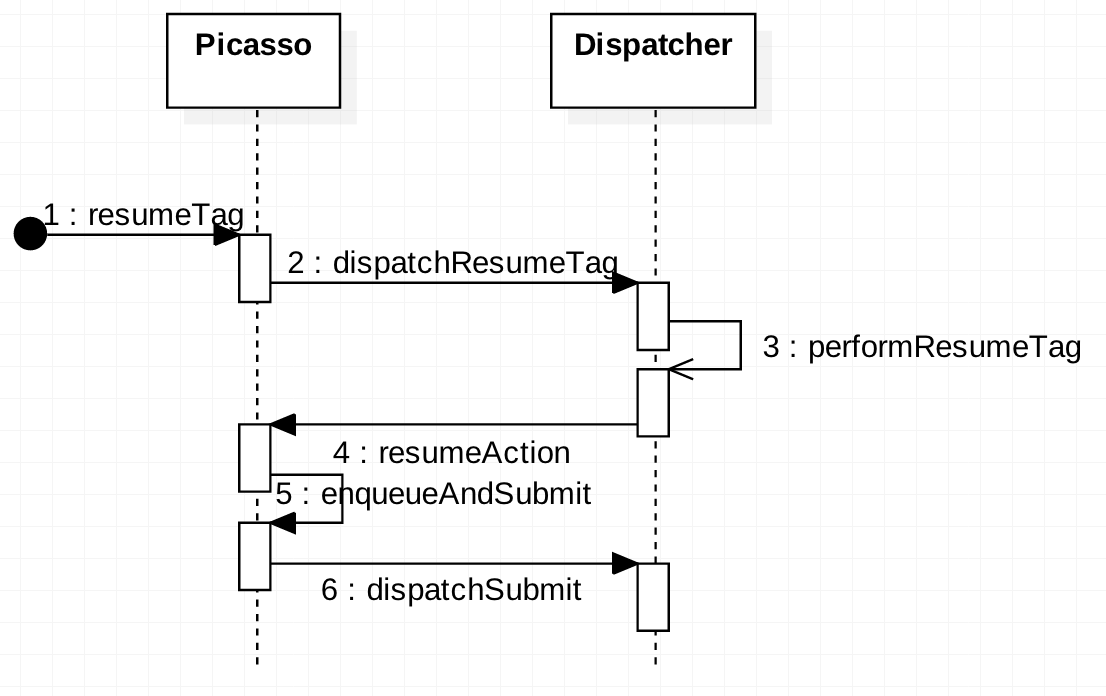
其实就是遍历pausedActions,挨个重新交给dispatcher分发。
作者的提交记录: https://github.com/square/picasso/pull/665/files#diff-f11286bbae6959a7a5dd74bf99276f1aR229
-
图片压缩
图片压缩的原理通常都是利用BitmapFactory#Options类,先将injustDecodeBounds设置为true,对Bitmap进行一次
解码,拿到outWidth/outHeight,即实际宽高,然后根据期望压缩到的宽和高算出inSampleSize,最后将injustDecodeBounds设置为false,
再对Bitmap进行一次解码即可。另一种压缩的方法是设置图片的显示效果,比如ARGB_8888等等.Picasso综合了利用这两种方案.
详细代码参考BitmapHunter#decodeStream、RequestHandler#createBitmapOptions、RequestHandler#calculateInSampleSize
这三个方法,有个需要注意的地方,只有当设置图片的宽高时(调用了fit或者resize)才会计算smpleSize进行压缩。


 4479
4479


 被折叠的 条评论
为什么被折叠?
被折叠的 条评论
为什么被折叠?
 到【灌水乐园】发言


