


终于等到3天假期了,中秋快乐!
还记得上个项目中,我们使用的登陆页面都是系统提供的页面,那么这次我们就要改动一下,变成我们自己的自定义页面。
说到这里我们又要谈起以前那个auto-config="true"这个标签了。
里边自动配置了一个<login-form>标签
那么我们看一下<login-form>标签是如何进行配置的吧。看下面这段代码:
<http auto-config="true" use-expressions="true" >
<intercept-url pattern= "/login.do" access="permitAll" />
<intercept-url pattern= "/*" access="hasRole('ROLE_USER')" />
<form-login login-page="/login.do" />
</http >
除了form-login标签我们都很熟悉了。
login-page这样的标签是来指定,登陆页面应该选择哪个页面。(是指向页面或者是控制器的)
这里是指向了"/login.do",那好,我们来看一下/login.do是什么呢?、其实他是spring mvc配置的一个控制器,如下:
@Controller
public class LoginLogoutController extends BaseController{
@RequestMapping(method=RequestMethod. GET,value="/login.do" )
public void home() {
}
}
spring mvc配置文件:
<?xml version= "1.0" encoding ="UTF-8"?>
<beans xmlns="http://www.springframework.org/schema/beans"
xmlns:xsi="http://www.w3.org/2001/XMLSchema-instance"
xmlns:context="http://www.springframework.org/schema/context"
xmlns:jdbc="http://www.springframework.org/schema/jdbc"
xsi:schemaLocation="http://www.springframework.org/schema/beans http://www.springframework.org/schema/beans/spring-beans-3.2.xsd
http://www.springframework.org/schema/jdbc http://www.springframework.org/schema/jdbc/spring-jdbc-3.2.xsd
http://www.springframework.org/schema/context http://www.springframework.org/schema/context/spring-context-3.2.xsd
" >
<bean id="viewResolver" class="org.springframework.web.servlet.view.UrlBasedViewResolver" >
<property name= "viewClass" value="org.springframework.web.servlet.view.JstlView" />
<property name="prefix" value="/WEB-INF/views/" />
<property name="suffix" value=".jsp" />
</bean >
<context:annotation-config />
<context:component-scan base-package="com.packtpub.springsecurity" />
</beans>
通过spring mvc配置文件我们知道/login.do是的物理资源是指向"/WEB-INF/views/login.jsp"的。
<form action= "j_spring_security_check" method="post" >
<label for="j_username"> Login</ label>:
<input id="j_username" name= "j_username" size="20" maxlength="50" type= "text"/>
<br />
<input id="_spring_security_remember_me" name="_spring_security_remember_me" type="checkbox" value="true"/>
<label for="_spring_security_remember_me" >Remember Me?</label>
<br />
<label for="j_password" >Password </label> :
<input id="j_password" name= "j_password" size="20" maxlength="50" type= "password"/>
<br />
<input type="submit" value= "Login"/>
</form>
看到一个我们很熟悉的东西哈, "j_spring_security_check"/"j_username"/"j_password".这些都是被拦截或者用到的。呵呵,只要符合这一规范就行了。
好了,那么这就是自定义登陆页面了、不过有个问题。
如果在spring security中不配置 < intercept-url pattern= "/login.do" access ="permitAll" />会出现什么问题呢。
看一看下边这个图:
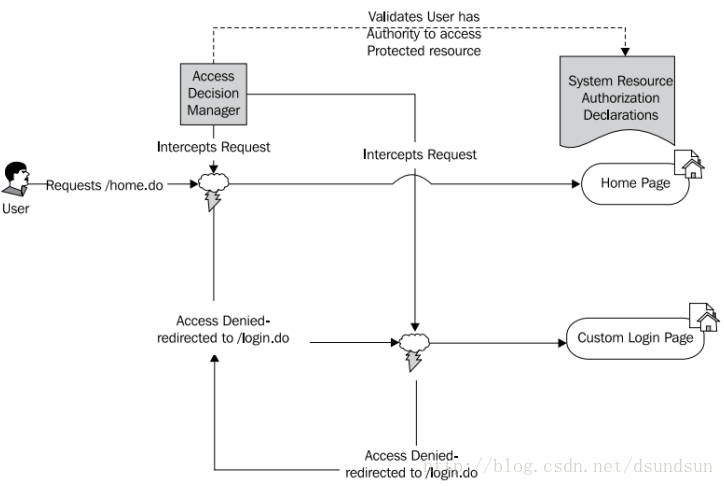
“
其实上面发生了反复请求登录页的情况
”
“
【对于所有给定的URL请求,Spring Security按照自顶向下的顺序评估认证规则。第一个匹配URL模式的规则将会被使用。这意味着你的授权规则将要按照最特殊的到最不特殊的规则来进行排列。这在开发复杂的规则集合时将会非常重要,因为开发人员经常会感到迷惑,因为他们有时会搞不清到底哪个规则会生效。记住自顶向下顺序,你将能够很容易地在任何场景下找到正确的对应规则。】
”


 1710
1710


 被折叠的 条评论
为什么被折叠?
被折叠的 条评论
为什么被折叠?
 到【灌水乐园】发言


