


> SpringBoot在微服务上应用是越来越多,同样教程也比较多,但是我相信会有人跟我一样的迷惑,它的加载过程是什么样的,要经过哪些类,然后又为什么会能直接把应用打包成jar/war,然后就可以直接运行?本次使用的SpringBoot版本1.5.2。
# 从快速启动Demo中看加载过程
有很多人都下载了Springboot 版的eclipse,构建项目也比较方便,其实我感觉也挺好的,但是我习惯了用IDEA,所以这次就从官网上初始化一个新的项目
## 准备快速启动项目
### 在官网初始化一个新的项目
### 运行打包
为了给大家展示jar/war打包的内容,然后我打包了两次,同时把相关的内容给大家贴出来。
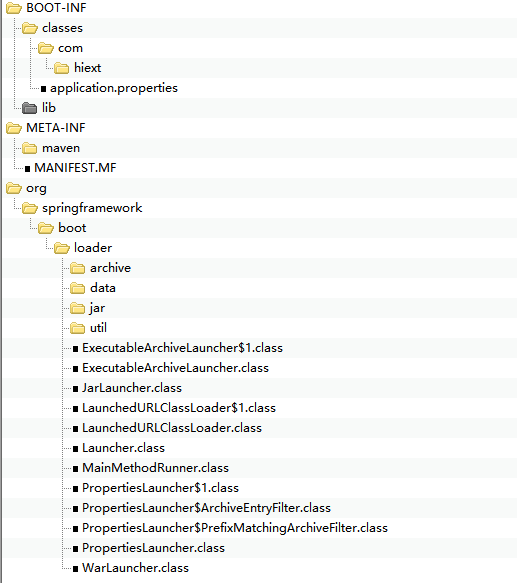
war打完包的目录结构
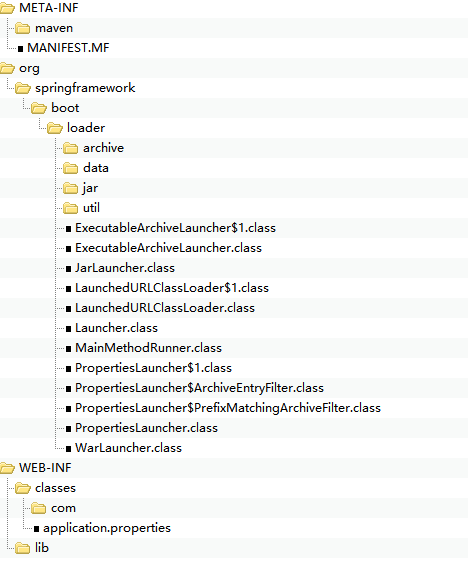
区别不大jar打包的时候是BOOT-INF放我们自己开发的代码,war打包的时候是WEB-INF。
#### 我们先看打包的META-INF里的MANIFEST.MF文件。
> jar MANIFEST.MF
```
Manifest-Version: 1.0
Implementation-Title: demo
Implementation-Version: 0.0.1-SNAPSHOT
Archiver-Version: Plexus Archiver
Built-By: angy
Implementation-Vendor-Id: com.hiext
Spring-Boot-Version: 1.5.2.RELEASE
Implementation-Vendor: Pivotal Software, Inc.
Main-Class: org.springframework.boot.loader.JarLauncher
Start-Class: com.hiext.DemoApplication
Spring-Boot-Classes: BOOT-INF/classes/
Spring-Boot-Lib: BOOT-INF/lib/
Created-By: Apache Maven 3.0.5
Build-Jdk: 1.8.0_111
Implementation-URL: http://projects.spring.io/spring-boot/authorizeServer/
`` `
> war MANIFEST.MF
`` `
Manifest-Version: 1.0
Implementation-Title: demo
Implementation-Version: 0.0.1-SNAPSHOT
Archiver-Version: Plexus Archiver
Built-By: angy
Implementation-Vendor-Id: com.hiext
Spring-Boot-Version: 1.5.2.RELEASE
Implementation-Vendor: Pivotal Software, Inc.
Main-Class: org.springframework.boot.loader.WarLauncher
Start-Class: com.hiext.DemoApplication
Spring-Boot-Classes: WEB-INF/classes/
Spring-Boot-Lib: WEB-INF/lib/
Created-By: Apache Maven 3.0.5
Build-Jdk: 1.8.0_111
Implementation-URL: http://projects.spring.io/spring-boot/authorizeServer/
```

从文件的比较上来看加载的不同的类,然后SpringBoot的代码也放在不同的位置。
#### 细说
MANIFEST.MF文件
> 这个 manifest 文件定义了与扩展和包相关的数据,是java打包必不可少的一个文件。这个文件也描述了jar包的一些很多信息,主要分为一下几类
* 1. 一般属性
1. Manifest-Version
用来定义manifest文件的版本,例如:Manifest-Version: 1.0
2. Created-By
声明该文件的生成者,一般该属性是由jar命令行工具生成的,例如:Created-By: Apache Ant 1.5.1
3. Signature-Version
定义jar文件的签名版本
4. Class-Path
应用程序或者类装载器使用该值来构建内部的类搜索路径
* 2. 应用程序相关属性
* 3. 包扩展属性
我们重点看应用程序相关的属性,就是Main-class,这是jar的入口类,也就是要求这个类必须是可执行的类。
一旦定义了该属性即可通过 java -jar x.jar来运行该jar文件。
Start-Class的配置就是我们自己写的main函数了。
#### 其他文件夹的介绍
BOOT-INF/WEB-INF 这里放的是我们自己要写开发的代码然后编译后的class与相关的jar等等。
org目录里放的是Springboot加载的class文件。 送上链接
https://github.com/spring-projects/spring-boot/tree/master/spring-boot-tools/spring-boot-loader/src/main/java/org/springframework/boot/loader 对应的就是该目录的源码。
#####Archive的概念
* archive即归档文件,这个概念在linux下比较常见
* 通常就是一个tar/zip格式的压缩包
* jar是zip格式
在spring boot里,抽象出了Archive的概念。
一个archive可以是一个jar(JarFileArchive),也可以是一个文件目录(ExplodedArchive)。可以理解为Spring boot抽象出来的统一访问资源的层。
我们看下Archive这个接口的定义:
```
package org.springframework.boot.loader.archive;
import java.io.IOException;
import java.net.MalformedURLException;
import java.net.URL;
import java.util.List;
import java.util.jar.Manifest;
import org.springframework.boot.loader.Launcher;
/**
* An archive that can be launched by the {@link Launcher}.
*
* @author Phillip Webb
* @see JarFileArchive
*/
public interface Archive extends Iterable<Archive.Entry> {
/**
* Returns a URL that can be used to load the archive.
* @return the archive URL
* @throws MalformedURLException if the URL is malformed
*/
URL getUrl() throws MalformedURLException;
/**
* Returns the manifest of the archive.
* @return the manifest
* @throws IOException if the manifest cannot be read
*/
Manifest getManifest() throws IOException;
/**
* Returns nested {@link Archive}s for entries that match the specified filter.
* @param filter the filter used to limit entries
* @return nested archives
* @throws IOException if nested archives cannot be read
*/
List<Archive> getNestedArchives(EntryFilter filter) throws IOException;
/**
* Represents a single entry in the archive.
*/
interface Entry {
/**
* Returns {@code true} if the entry represents a directory.
* @return if the entry is a directory
*/
boolean isDirectory();
/**
* Returns the name of the entry.
* @return the name of the entry
*/
String getName();
}
/**
* Strategy interface to filter {@link Entry Entries}.
*/
interface EntryFilter {
/**
* Apply the jar entry filter.
* @param entry the entry to filter
* @return {@code true} if the filter matches
*/
boolean matches(Entry entry);
}
}
```
>
Archive的实现有两个一个是
ExplodedArchive 一个是
JarFileArchive ,就是对应上面说的两种访问资源的形式 一种是文件夹 一种是直接访问jar。从接口来看,每一个资源都有一个URL。
```
jar:file:/C:/Users/angy/AppData/Local/Temp/junit7462285095317089505/archive.jar!/BOOT-INF/classes!/
jar:
file:/C:/Users/angy/AppData/Local/Temp/junit7462285095317089505/archive.jar!/BOOT-INF/lib/foo.jar!/
```
有了上面资源的保障,下面来看看JarLauncher
在MANIFEST.MF里可以看到Main函数加载的是JarLauncher,下面来分析它的工作流程
同样JarLauncher的源码在上面的SpringBoot的tools里,JarLauncher 继承了ExecutableArchiveLauncher类,然后ExecutableArchiveLauncher又继承了
Launcher类。
从JarLauncher 入手,JarLauncher 在构造对象的时候是调用
ExecutableArchiveLauncher的构造方法,需要一个Archive的实现。
```
protected ExecutableArchiveLauncher(Archive archive) {
this.archive = archive;
}
```
Archive是在
Launcher类中创建的
```
protected final Archive createArchive() throws Exception {
ProtectionDomain protectionDomain = getClass().getProtectionDomain();
CodeSource codeSource = protectionDomain.getCodeSource();
URI location = (codeSource == null ? null : codeSource.getLocation().toURI());
String path = (location == null ? null : location.getSchemeSpecificPart());
if (path == null) {
throw new IllegalStateException("Unable to determine code source archive");
}
File root = new File(path);
if (!root.exists()) {
throw new IllegalStateException(
"Unable to determine code source archive from " + root);
}
return (root.isDirectory() ? new ExplodedArchive(root)
: new JarFileArchive(root));
//返回其他Jar
}
```
JarLauncher先找到自己所在的jar,然后通过
Launcher来调用抽象的方法
getClassPathArchives()来
找到其他的Jar包。下面是ExecutableArchiveLauncher类
getClassPathArchives()的实现。
```
protected List<Archive> getClassPathArchives() throws Exception {
List<Archive> archives = new ArrayList<Archive>(
this.archive.getNestedArchives(new EntryFilter() {
@Override
public boolean matches(Entry entry) {
return isNestedArchive(entry);
}
}));
postProcessClassPathArchives(archives);
return archives;
}
```
从上面可以看到是通过getNestedArchives函数来获取到jar包下lib下面的所有jar文件,并创建为List。然后调用
Launcher类里面的
createClassLoader方法。用于返回
LaunchedURLClassLoader的启动加载器。
```
/**
* Create a classloader for the specified archives.
* @param archives the archives
* @return the classloader
* @throws Exception if the classloader cannot be created
*/
protected ClassLoader createClassLoader(List<Archive> archives) throws Exception {
List<URL> urls = new ArrayList<URL>(archives.size());
for (Archive archive : archives) {
urls.add(archive.getUrl());
}
return createClassLoader(urls.toArray(new URL[urls.size()]));
}
/**
* Create a classloader for the specified URLs.
* @param urls the URLs
* @return the classloader
* @throws Exception if the classloader cannot be created
*/
protected ClassLoader createClassLoader(URL[] urls) throws Exception {
return new LaunchedURLClassLoader(urls, getClass().getClassLoader());
}
```
创建好ClassLoader之后,再从MANIFEST.MF里读取到Start-Class,即com.hiext.DemoApplication,以下是读取Start-Class的方法。
```
@Override
protected String getMainClass() throws Exception {
Manifest manifest = this.archive.getManifest();
String mainClass = null;
if (manifest != null) {
mainClass = manifest.getMainAttributes().getValue("Start-Class");
}
if (mainClass == null) {
throw new IllegalStateException(
"No 'Start-Class' manifest entry specified in " + this);
}
return mainClass;
}
```
获得到jar的Start-class后通过
launch方法来创建线程,并执行main函数。
```
/**
* Launch the application given the archive file and a fully configured classloader.
* @param args the incoming arguments
* @param mainClass the main class to run
* @param classLoader the classloader
* @throws Exception if the launch fails
*/
protected void launch(String[] args, String mainClass, ClassLoader classLoader)
throws Exception {
Thread.currentThread().setContextClassLoader(classLoader);
createMainMethodRunner(mainClass, args, classLoader).run();
}
/**
* Create the {@code MainMethodRunner} used to launch the application.
* @param mainClass the main class
* @param args the incoming arguments
* @param classLoader the classloader
* @return the main method runner
*/
protected MainMethodRunner createMainMethodRunner(String mainClass, String[] args,
ClassLoader classLoader) {
return new MainMethodRunner(mainClass, args);
}
```
以上是整个Jar的启动流程,本人是在tools源码里debug下一步一步执行后写下。代码均来之官方的源码。
知识碎片,重在整理,路很长,一步一个脚印,就好。


 2万+
2万+


 被折叠的 条评论
为什么被折叠?
被折叠的 条评论
为什么被折叠?
 到【灌水乐园】发言


