


服务(Service)是Android中实现程序后台运行的解决方案,它用于去执行那些不需要和用户交互却要求长期运行的任务(如音乐播放器,天气类应用)。服务也是Android的四大组件之一,下面就看一下服务的基本用法。
1.服务的启动和停止
package company.servicetest;

import android.app.Service;
import android.content.Intent;
import android.os.Binder;
import android.os.IBinder;
import android.support.annotation.Nullable;
import android.util.Log;

/**
 * Created by samyang on 2016/8/30.
 */
public class MyService extends Service {

    @Nullable
    @Override
    public IBinder onBind(Intent intent) {
        return null;
    }

    @Override
    public void onCreate() {
        super.onCreate();
        Log.d("MainActivity", "onCreate executed");
    }

    @Override
    public int onStartCommand(Intent intent, int flags, int startId) {
        Log.d("MainActivity", "onStartCommand executed");
        return super.onStartCommand(intent, flags, startId);

    }

    @Override
    public void onDestroy() {
        super.onDestroy();
        Log.d("MainActivity", "onDestroy executed");
    }

}
想要操作一个服务,首先我们得定义一个服务。新建一个你的服务类并让其继承于Service此时应该会报红,因为你还未重写其中的onBind()方法。重写了onBind()方法之后我们先不了解它,先继续重写我们马上要用到的onCreate(),onStartCommand(),onDestroy()方法,同时我在其中事先打好了log,方便一会儿可以看出到底该方法执行与否。
<service android:name=".MyIntentService">

</service>
前面提到了服务也是四大组件之一,接下来在AndroidManifest.xml中注册我们定义的服务。
package company.servicetest;

import android.content.ComponentName;
import android.content.Intent;
import android.content.ServiceConnection;
import android.os.Bundle;
import android.os.IBinder;
import android.support.v7.app.AppCompatActivity;
import android.util.Log;
import android.view.View;
import android.widget.Button;

public class MainActivity extends AppCompatActivity implements View.OnClickListener{

    private MyService.DownloadBinder mDownloadBinder;

    @Override
    protected void onCreate(Bundle savedInstanceState) {
        super.onCreate(savedInstanceState);
        setContentView(R.layout.activity_main);
        Button start = (Button) findViewById(R.id.start_service);
        Button stop = (Button) findViewById(R.id.stop_service);

        start.setOnClickListener(this);
        stop.setOnClickListener(this);

    }

    @Override
    public void onClick(View view) {
        switch (view.getId()){
            case R.id.start_service:
                Intent startIntent = new Intent(this, MyService.class);
                startService(startIntent);
                break;
            case R.id.stop_service:
                Intent stopIntent = new Intent(this, MyService.class);
                stopService(stopIntent);
                break;
            default:
                break;
        }
    }
}
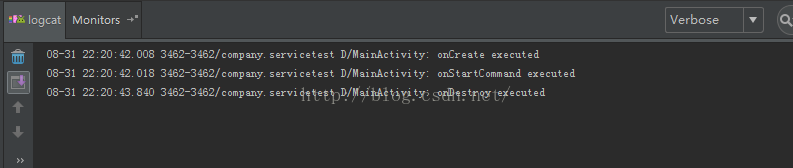
接下来修改MainActivity中的代码,在这之前我实际先在布局中放入了2个按钮,并指定了ID,非常简单所以代码省略了。然后在活动中找到按钮并为其设置了点击事件。在点击逻辑中写入了服务的启动和停止,可以看到,服务的启动和停止都是通过Intent来实现的:new出一个Intent、在其中将当前活动和期望启动的服务联系起来、然后调用startService()或stopService()方法、并在其中传入刚才实例化的intent。 先后点击启动和停止按钮查看logcat如下:
2.活动和服务的通信
刚才我们暂时忽略了创建Service的onBind()方法,并且同时你可以发现,在以上的服务用法当中,活动和服务并没有很紧密的联系,仅仅是在活动中去让服务启动起来而已。但有时候我们会需求在活动中去指定服务去做某一件事情,这时就需要活动和服务之间建立通信,就要用到刚才忽略的onBind()方法。假设我们现在要指挥刚才的服务去下载某个应用,并同时查看下载的进度,以此为示例如下:
package company.servicetest;

import android.app.Service;
import android.content.Intent;
import android.os.Binder;
import android.os.IBinder;
import android.support.annotation.Nullable;
import android.util.Log;

/**
 * Created by samyang on 2016/8/30.
 */
public class MyService extends Service {

    private DownloadBinder mBinder = new DownloadBinder();

    @Nullable
    @Override
    public IBinder onBind(Intent intent) {
        return mBinder;
    }

    @Override
    public void onCreate() {
        super.onCreate();
        Log.d("MainActivity", "onCreate executed");
    }

    @Override
    public int onStartCommand(Intent intent, int flags, int startId) {
        Log.d("MainActivity", "onStartCommand executed");
        return super.onStartCommand(intent, flags, startId);

    }

    @Override
    public void onDestroy() {
        super.onDestroy();
        Log.d("MainActivity", "onDestroy executed");
    }

    class DownloadBinder extends Binder {
        public void startDownload(){
            Log.d("MyService", "start download executed");
        }
        public int getProgress(){
            Log.d("MyService", "get progress executed");
            return 0;
        }
    }
}
我们对想要指挥的服务做了如下修改:先定义了一个内部类DownloadBinder让其继承Binder,在其中加入了我们刚才想要做的事情即下载和查看(当然这里是虚拟方法,通过打Log来示意),然后声明一个DownloadBinder并实例化得到mBinder对象,最后在onBind()方法中去返回这个mBinder。
package company.servicetest;

import android.content.ComponentName;
import android.content.Intent;
import android.content.ServiceConnection;
import android.os.Bundle;
import android.os.IBinder;
import android.support.v7.app.AppCompatActivity;
import android.util.Log;
import android.view.View;
import android.widget.Button;

public class MainActivity extends AppCompatActivity implements View.OnClickListener{

    private MyService.DownloadBinder mDownloadBinder;
    private ServiceConnection mConnection = new ServiceConnection() {
        @Override
        public void onServiceConnected(ComponentName componentName, IBinder service) {
            mDownloadBinder = (MyService.DownloadBinder) service;
            mDownloadBinder.startDownload();
            mDownloadBinder.getProgress();
        }

        @Override
        public void onServiceDisconnected(ComponentName componentName) {

        }
    };

    @Override
    protected void onCreate(Bundle savedInstanceState) {
        super.onCreate(savedInstanceState);
        setContentView(R.layout.activity_main);
        Button start = (Button) findViewById(R.id.start_service);
        Button stop = (Button) findViewById(R.id.stop_service);
        Button bind = (Button) findViewById(R.id.bind_service);
        Button unbind = (Button) findViewById(R.id.unbind_service);

        start.setOnClickListener(this);
        stop.setOnClickListener(this);
        bind.setOnClickListener(this);
        unbind.setOnClickListener(this);

    }

    @Override
    public void onClick(View view) {
        switch (view.getId()){
            case R.id.start_service:
                Intent startIntent = new Intent(this, MyService.class);
                startService(startIntent);
                break;
            case R.id.stop_service:
                Intent stopIntent = new Intent(this, MyService.class);
                stopService(stopIntent);
                break;
            case R.id.bind_service:
                Intent bindIntent = new Intent(this, MyService.class);
                bindService(bindIntent, mConnection, BIND_AUTO_CREATE);
                break;
            case R.id.unbind_service:
                unbindService(mConnection);
                break;

                break;
        }
    }
}
放入的按钮、设置点击事件就不多说了,原理同之前。我们将重点放在创建的ServiceConnect匿名类上,同时你要留意到在这之前我先声明了一个mDownloadBinder。然后重写了mServiceConnect匿名类中的onServiceConnected(), onServiceDisconnect()方法,他们分别会在绑定和解绑服务时调用。点击绑定服务按钮,绑定服务同样是通过实例化一个Intent对象,然后调用bindService()方法,这个方法传入三个参数:第一个当然是刚刚new出的bindIntent;第二个是前面创建的mConnection对象;第三个是标志位,这里传入的BIND_AUTO_CREATE表示会在服务和活动绑定后自动创建该服务。点击了之后就会指挥服务去做写在onServiceConnect()中的开始下载和查看进度操作。点击解绑按钮,就会解绑服务,点击逻辑中只需要写入unbindService()方法并传入之前绑定的mConnection对象即可。
下面我们再次将重点放在ServiceConnect匿名类上,因为我觉得你应该理解其中的来龙去脉。
一开始我们声明的mDownloadBinder很明显是一个空值,我们将命名为service的IBinder通过向下转型给了mDownloadBinder,从而mDownloadBinder才实例化、从而进行后面的方法。并且我查阅文档后发现,当客户端调用bindService()绑定服务的时候,Android系统随后调用服务的onBind()方法,该方法返回用于与服务交互的IBinder。(也正是因为返回的是一个IBinder,而mDownloadBinder是通过DownloadBinder声明的,而DownloadBinder继承自Binder,所以需要使用向下转型。)绑定是异步的,bindService()会立即返回,“绝对不会”是IBinder返回给客户端。那我们的IBinder是如何接收到的呢?我们创建了一个ServiceConnection实例,并将其传递给bindService(),而ServiceConnection包括一个回调方法,系统通过调用它来传递IBinder。
这样你应该更加深入理解了活动是怎样绑定到服务的了。
3.IntentService的使用
再次观察上面的代码,你可以发现服务中的逻辑都是在主线程中执行的,这样很容易出现ANR。这是我们就需要将onStartCommand()中的具体逻辑放在一个子线程中,在这时启动的服务会一直运行下去,除非我们调用stopService()或stopSelf()方法。这样的逻辑我们的确很容易实现,但是Android为了解决刚才的提到的问题专门提供了一个IntentService类。
package company.servicetest;

import android.content.Intent;
import android.util.Log;

/**
 * Created by samyang on 2016/8/30.
 */
public class MyIntentService extends android.app.IntentService {


    public MyIntentService() {
        super("MyIntentService");
    }

    @Override
    protected void onHandleIntent(Intent intent) {
        Log.d("MyIntentService", "Thread id is " + Thread.currentThread().getId());
    }

    @Override
    public void onDestroy() {
        super.onDestroy();
        Log.d("MyIntentService", "onDestroy executed");
    }
}
要使用IntentService,我们首先要定义自己的IntentService并让其继承于IntentService,定义它首先要提供一个无参构造方法,并且在内部调用父类的有参构造函数。注意:这个构造方法用于初始化MyIntentService,由于我们要用super来调用父类的构造方法并且传入想要初始化的IntentService所以在这里必须提供一个无参的构造方法,当内部调用父类的有参构造函数并传入MyIntentService时候,MyIntentService就初始化好了。
onHandleIntent()方法中就可以尽情的写入耗时操作,也不用担心ANR问题了。这里我们仍然用log的方式起一个示意,onDestroy()也一样,用log来查看它是否会自动执行使服务停止。
package company.servicetest;

import android.content.ComponentName;
import android.content.Intent;
import android.content.ServiceConnection;
import android.os.Bundle;
import android.os.IBinder;
import android.support.v7.app.AppCompatActivity;
import android.util.Log;
import android.view.View;
import android.widget.Button;

public class MainActivity extends AppCompatActivity implements View.OnClickListener{

    private MyService.DownloadBinder mDownloadBinder;
    private ServiceConnection mConnection = new ServiceConnection() {
        @Override
        public void onServiceConnected(ComponentName componentName, IBinder service) {
            mDownloadBinder = (MyService.DownloadBinder) service;
            mDownloadBinder.startDownload();
            mDownloadBinder.getProgress();
        }

        @Override
        public void onServiceDisconnected(ComponentName componentName) {

        }
    };

    @Override
    protected void onCreate(Bundle savedInstanceState) {
        super.onCreate(savedInstanceState);
        setContentView(R.layout.activity_main);
        Button start = (Button) findViewById(R.id.start_service);
        Button stop = (Button) findViewById(R.id.stop_service);
        Button bind = (Button) findViewById(R.id.bind_service);
        Button unbind = (Button) findViewById(R.id.unbind_service);
        Button startIntent = (Button) findViewById(R.id.start_intent_service);
        start.setOnClickListener(this);
        stop.setOnClickListener(this);
        bind.setOnClickListener(this);
        unbind.setOnClickListener(this);
        startIntent.setOnClickListener(this);
    }

    @Override
    public void onClick(View view) {
        switch (view.getId()){
            case R.id.start_service:
                Intent startIntent = new Intent(this, MyService.class);
                startService(startIntent);
                break;
            case R.id.stop_service:
                Intent stopIntent = new Intent(this, MyService.class);
                stopService(stopIntent);
                break;
            case R.id.bind_service:
                Intent bindIntent = new Intent(this, MyService.class);
                bindService(bindIntent, mConnection, BIND_AUTO_CREATE);
                break;
            case R.id.unbind_service:
                unbindService(mConnection);
                break;
            case R.id.start_intent_service:
                Log.d("MainActivity", "Thread id is " + Thread.currentThread().getId());
                Intent intentService = new Intent(this, MyIntentService.class);
                startService(intentService);
            default:
                break;
        }
    }
}
布局代码略,在添加的startIntent按钮点击逻辑中启动IntentService,同样通过Intent来启动,只不过在new出这个Intent的时候传入的MyIntentService.class就行了。最后别忘了在AndroidManifest.xml中去注册这个服务。
仅点击了一下startIntentService按钮,出现以上logcat。说明这个服务的确是在子线程中启动的,并且自动停止了。
4.前台服务。
也许在你使用Android系统的过程中还会对一件东西有一点印象,那就是天气软件的部分天气信息始终出现在你的通知栏,这就是前台服务的应用了。这样的设计是有原因的:1.由于项目的特殊需求,我们希望某些信息一直显示在系统的状态栏,譬如刚才提到的天气信息。2.由于服务的系统有限级较低,当系统出现内存不足的情况时,就有可能会回收掉正在后台运行的服务,如果你不希望这件事情发生,就可以使用前台服务。
前台服务并不复杂,并且不用更改太多我们定义的Service类中代码,只需要在其中加入Notification相关的代码即可。因此你可以自行尝试前台服务的使用方法,如果没有头绪请先查阅Notification相关的资料。
5.服务生命周期
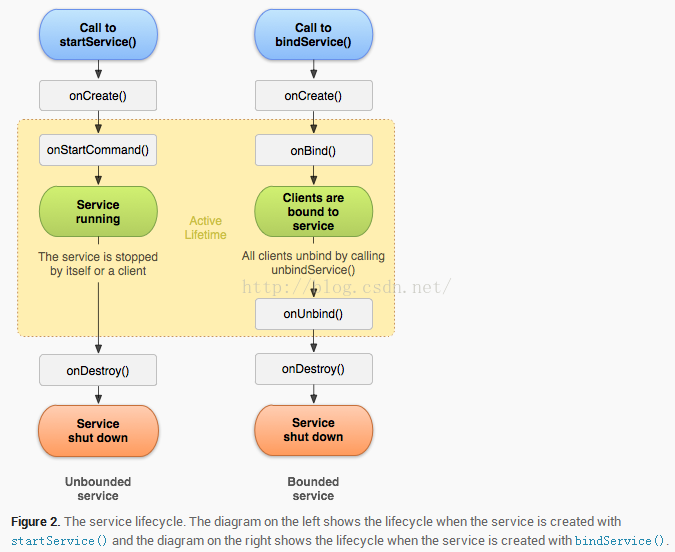
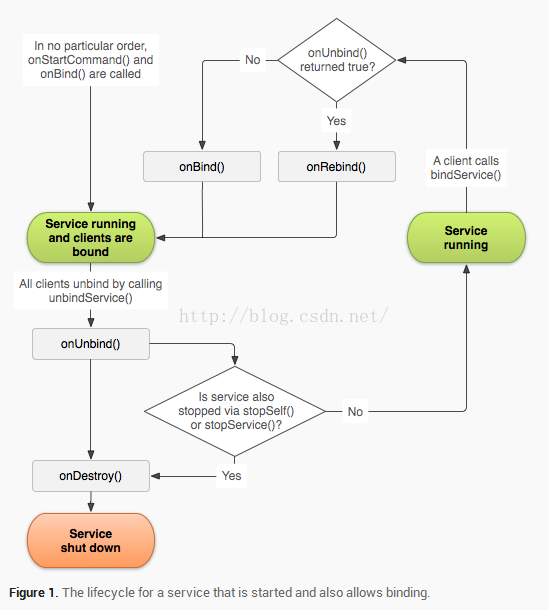
上图很好的解释了服务的生命周期,但是我们完全有可能对一个服务既调用了startService()又条用了bindService()的,这种时候需要同时调用stopService()和ubBindService()方法,onDestroy()方法才会执行。可以参照以下周期图。
至此,Android四大组件中的Service的常见用法已经介绍完毕了。


 1968
1968


 被折叠的 条评论
为什么被折叠?
被折叠的 条评论
为什么被折叠?
 到【灌水乐园】发言


