


摘要:
在上一文中介绍了hello驱动的JNI方法,最终更新在android runtime中的java-native函数表。本文将介绍java的世界中如何通过调用JNI定义的java函数实现hello系统服务进程,为应用程序提供系统服务。
通信代理AIDL
java的世界,硬件服务一般是运行在一个独立的进程中为各种应用程序提供服务。因此,调用这些硬件服务的应用程序与这些硬件服务之间的通信需要通过代理来进行。
AIDL (Android Interface DefinitionLanguage) 是一种IDL 语言,用于生成可以在Android设备上两个进程之间进行进程间通信(interprocess communication, IPC)的代码。如果在一个进程中(例如Activity)要调用另一个进程中(例如Service)对象的操作,就可以使用AIDL生成可序列化的参数。
如何实现
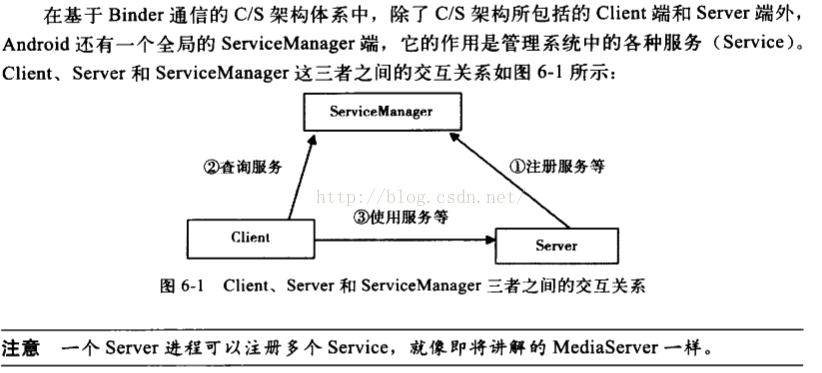
如上图,在system_server中注册很多系统服务,这些系统服务通过servicemanager进程进行管理,如果应用程序(client)需要使用某个服务就通过servicemanager来申请使用。
基于这种思路我们需要实现hello系统服务可以这样做:
1、建立aidl通信接口;
2、在system_server中注册hello_service到servicemanager;
3、实现hello_service,对应aidl中的接口函数。
4、client向servicemanager请求hello_service,成功后,调用aidl接口函数,建立client进程和hello_service进程的通信关系。
注意:关于android L 版本以后需要添加selinux策略,否则第二步向system_server中注册hello_service到servicemanager不成功,会出现:ServiceManager add_service SELinux Permission Denied !详细解决方案请参考:
http://blog.csdn.net/eliot_shao/article/details/51770558
下面是具体实现流程和测试过程,主要参考罗升阳的hello代码,感谢!。
1、建立aidl通信接口;
建立frameworks\base\core\java\android\os\IHelloService.aidl
内容:
package android.os;

interface IHelloService {
    void setVal(int val);
    int getVal();
}
2、在system_server中注册hello_service到servicemanager;
修改frameworks\base\services\java\com\android\server\SystemServer.java
添加如下代码:
//add by eliot start
			try {

			Slog.i(TAG, "Hello Service");

			ServiceManager.addService("hello", new HelloService());//

			} catch (Throwable e) {

			Slog.e(TAG, "Failure starting Hello Service", e);

			}

			//add by eliot end
3、实现hello_service
创建frameworks\base\services\core\java\com\android\server\HelloService.java
实现内容:
package com.android.server;
import android.content.Context;
import android.os.IHelloService;


public class HelloService extends IHelloService.Stub {
	private static final String TAG = "HelloService";

	HelloService() {
		init_native();
	}

	public void setVal(int val) {
		setVal_native(val);
	}

	public int getVal() {
		return getVal_native();
	}

	private static native boolean init_native();
  private static native void setVal_native(int val);
	private static native int getVal_native();
};
4、client使用hello_service
在app中使用hello_service的大致流程如下:
import android.os.IHelloService;//导入通信接口
//请求hello_service
private IHelloService helloService = null;
helloService = IHelloService.Stub.asInterface(
		ServiceManager.getService("hello"));

//使用hello_service并显示
int val = helloService.getVal();
String text = String.valueOf(val);
valueText.setText(text);
测试
<span style="font-family: Arial, Helvetica, sans-serif; background-color: rgb(255, 255, 255);">在第三步后,就可以进行编译测试。</span>mmm frameworks/base
打包下载到机器,使用service list查看是否有hello service:


 1万+
1万+


 被折叠的 条评论
为什么被折叠?
被折叠的 条评论
为什么被折叠?
 到【灌水乐园】发言


