


CallerInfo
最近在做很杂碎的事情,移植功能,需要零碎的知识点很多,想写一些博客记录,方便自己查阅和供大家参考。这篇记录的是联系人的相关部分,主要部分是打电话的时候如何查询联系人,如何显示在incallui界面
如下图:
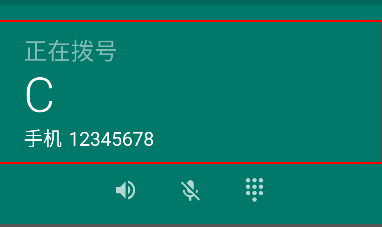
本文主要分析根据 12345678 分析 数据库查询联系人保存为 C
联系人数据库的生成
第一次开机启动的时候,BootCompletedReceiver会接收开机启动的广播,收到广播后创建ContactsDatabaseHelper实例,开始创建contacts2.db数据库,
    public void onReceive(Context context, Intent intent) {


        while (TextUtils.isEmpty(dbTime) && count != 3) {
            SystemClock.sleep(1000);
            dbTime = ContactsDatabaseHelper.getInstance(context).getProperty(
                    ContactsDatabaseHelper.DbProperties.DATABASE_TIME_CREATED, "");// 创建database
            count++;
        }

    }
使用ContactsDatabaseHelper创建contacts2.db数据库
虽然是ContactsDatabaseHelper 创建了contacts2.db 最终创建是在SQLiteOpenHelper父类处理(不深究) 进行创建数据库
- com.android.providers.contacts.ContactsDatabaseHelper
private static final String DATABASE_NAME = "contacts2.db";

sSingleton = new ContactsDatabaseHelper(context, DATABASE_NAME, true);
//创建contacts2.db datatbase 数据库
protected ContactsDatabaseHelper(
        Context context, String databaseName, boolean optimizationEnabled) {
    super(context, databaseName, null, DATABASE_VERSION);


}
** 前方高能,需要补一点能量,流程更新也是十分复杂的,希望读者能够 边看 边动手跟踪流程,打印log **
打电话 基本的callInfo显示信息的流程
首先放置一张 完整的主体查询数据库和显示callinfo信息的流程,后面分析的时候 会拆解流程分析
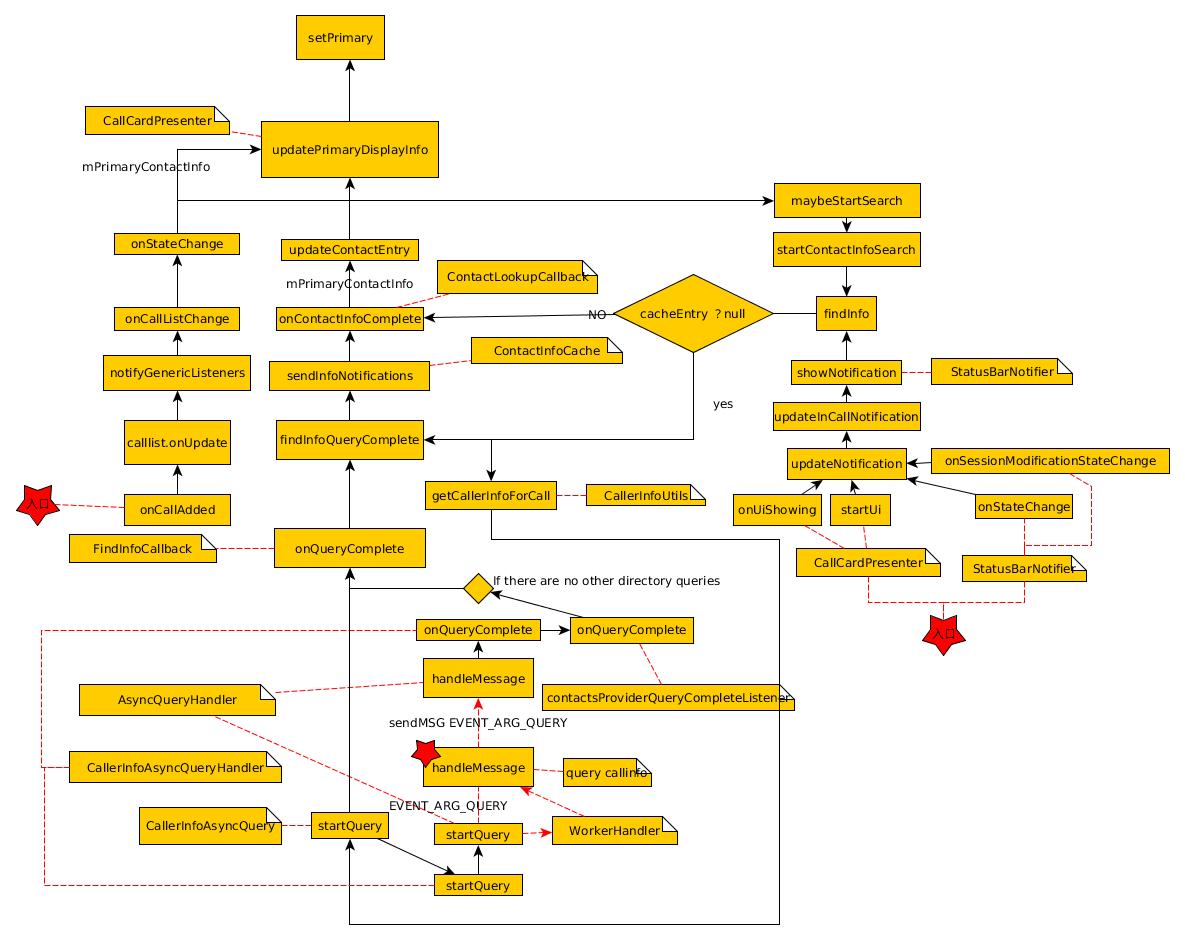
###流程图声明
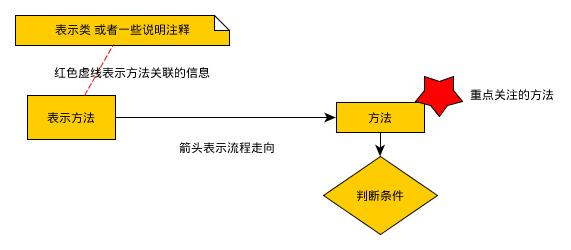
相信经常用plantUML的同学都基本能看懂,在介绍中也会大概说明流程图的意思
第一步 在incallUI 界面 起来的时候 ,可以看到图中 有2个入口
首先分析第一个入口,如下图
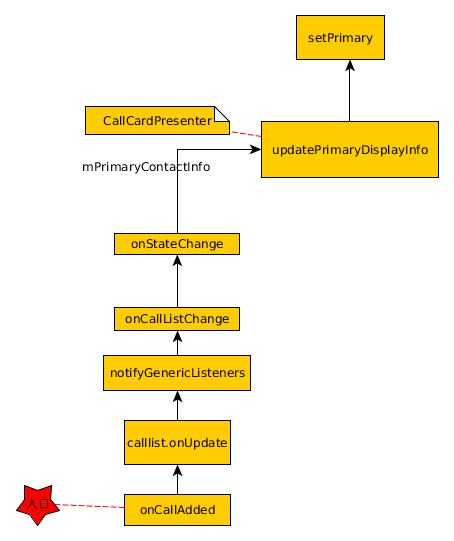
此时会将call 加入到 calllist 中
- com.android.incallui.InCallPresenter#onCallAdded
    public void onCallAdded(final android.telecom.Call call) {
//....
                mCallList.onCallAdded(call);
    }
- com.android.incallui.CallList#onCallAdded
    public void onCallAdded(final android.telecom.Call telecomCall) {

//.. 由于我们是拨打电话 因此 不是 incoming 和 waiting 状态 是更新update call
        if (call.getState() == Call.State.INCOMING ||
                call.getState() == Call.State.CALL_WAITING) {
            onIncoming(call, call.getCannedSmsResponses());
        } else {
            onUpdate(call);
        }
    }
- com.android.incallui.CallList#onUpdate
    public void onUpdate(Call call) {

        onUpdateCall(call);
        notifyGenericListeners();
    }
上面方法有两个更新状态,,如果我们跟踪 onUpdateCall,你会发现最终只是将call 全部传递给所有的listener,代码中可以看到:
- com.android.incallui.CallList#notifyCallUpdateListeners
    public void notifyCallUpdateListeners(Call call) {
        final List<CallUpdateListener> listeners = mCallUpdateListenerMap.get(call.getId());
        if (listeners != null) {
            for (CallUpdateListener listener : listeners) {
                listener.onCallChanged(call); //回调onCallChanged 传递call对象
            }
        }
    }
如果我们在深入跟踪流程 会找出有所有的listeners={AnswerPresenter,CallCardPresenter,StatusBarNotifier},监听肯定用来刷新call的状态,以后如果涉及就好好分析下,这里就不详述
还有一个更新是notifyGenericListeners ,这个就是刷新所有listeners
- com.android.incallui.CallList#notifyGenericListeners
    private void notifyGenericListeners() {
        for (Listener listener : mListeners) {
            listener.onCallListChange(this);//this 代表的是CallList 实例 包含call
        }
    }
很好奇 listeners 有啥?于是跟踪了下,listeners = {AnswerPresenter,CallCardPresenter},因为我们在CallCardFragment界面,所以我只分析CallCardPresenter(这里说明下,高手可忽略,dialer 应用采用的是MVP模式所以使用的是CallCardPresenter)
- com.android.incallui.InCallPresenter#onCallListChange
    public void onCallListChange(CallList callList) {


        // notify listeners of new state
        for (InCallStateListener listener : mListeners) {

            listener.onStateChange(oldState, mInCallState, callList);
        }


    }
代码中也说明了最终刷新监听 mListeners={CallButtonPresenter,CallCardPresenter,ConferenceManagerPresenter,DialpadPresenter,statusBarNotifier,ProximitySensor,VideoCallPresenter,VideoPauseController},这里也只是跟踪CallCardPresenter 刷新 call信息
- com.android.incallui.CallCardPresenter#onStateChange
    public void onStateChange(InCallState oldState, InCallState newState, CallList callList) {
        //.....
        // Refresh primary call information if either:
        // 1. Primary call changed.
        // 2. The call's ability to manage conference has changed.
        // 3. The call subject should be shown or hidden.
        if (shouldRefreshPrimaryInfo(primaryChanged, ui, shouldShowCallSubject(mPrimary))) {
            //....
            CallList.getInstance().addCallUpdateListener(mPrimary.getId(), this);

            mPrimaryContactInfo = ContactInfoCache.buildCacheEntryFromCall(mContext, mPrimary,
                    mPrimary.getState() == Call.State.INCOMING);

            updatePrimaryDisplayInfo(); //刷新CallInfo
            maybeStartSearch(mPrimary, true);
            maybeClearSessionModificationState(mPrimary);
        }
    }
刷新callInfo ,updatePrimaryDisplayInfo 就是直接发现mPrimaryContactInfo 刷新显示,而maybeStartSearch 需要查询,从最大的流程图知道 maybeStartSearch 会有另一个流程。updatePrimaryDisplayInfo分析如下
- com.android.incallui.CallCardPresenter#updatePrimaryDisplayInfo
    private void updatePrimaryDisplayInfo() {
        \\...

        if (mPrimaryContactInfo != null) {
            Log.d(TAG, "Update primary display info for " + mPrimaryContactInfo);

            String name = getNameForCall(mPrimaryContactInfo);


            boolean nameIsNumber = name != null && name.equals(mPrimaryContactInfo.number);

            ui.setPrimary( //根据获取的callinfo信息设置界面信息
                    number,
                    name,
                    nameIsNumber,
                    isChildNumberShown || isCallSubjectShown ? null : mPrimaryContactInfo.label,
                    mPrimaryContactInfo.photo,
                    mPrimaryContactInfo.isSipCall,
                    showContactPhoto,
                    hasWorkCallProperty || isWorkContact);

    }
分析第一步中的流程分支 maybeStartSearch (cacheEntry != null的情况)
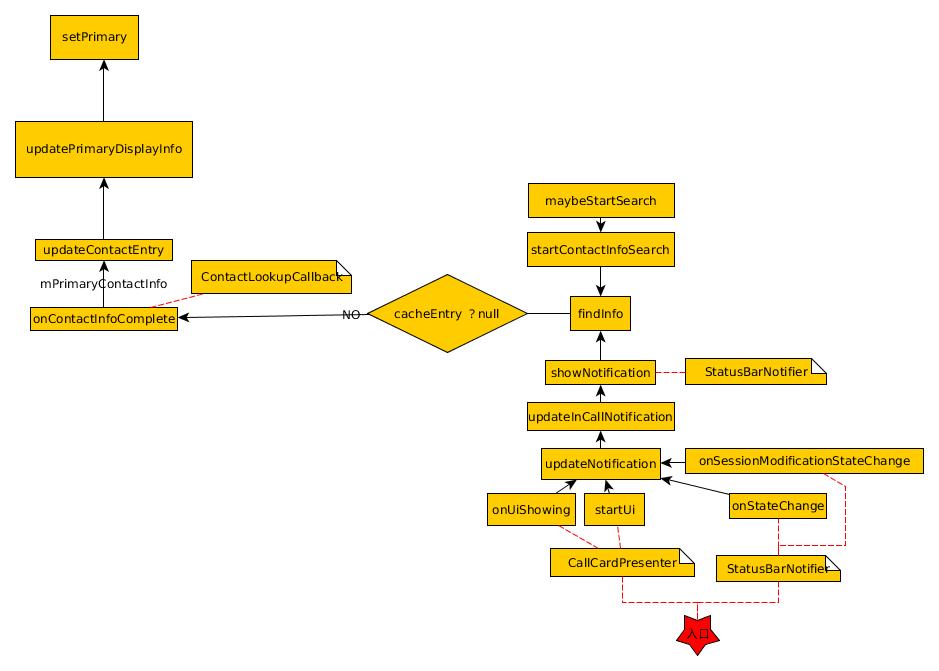
在IncallUI刚起来的时候,mPrimaryContactInfo很有可能为空,事实证明也是这样的,因此会多一次查询信息的流程maybeStartSearch,这里 分析 查询后不为空的情况 即 cacheEntry != null
- com.android.incallui.CallCardPresenter#maybeStartSearch
    private void maybeStartSearch(Call call, boolean isPrimary) {
        // no need to start search for conference calls which show generic info.

        if (call != null && !call.isConferenceCall()) {
            startContactInfoSearch(call, isPrimary, call.getState() == Call.State.INCOMING);
            //此时状态绝对不是INCOMING
        }
    }
最后直接就是 通过ContactInfoCache的findInfo查询
    private void startContactInfoSearch(final Call call, final boolean isPrimary,
            boolean isIncoming) {
        final ContactInfoCache cache = ContactInfoCache.getInstance(mContext);

        cache.findInfo(call, isIncoming, new ContactLookupCallback(this, isPrimary));
    }
根据流程我们需要判断cacheEntry 的情况,所以这里看代码分析
- com.android.incallui.ContactInfoCache#findInfo
    public void findInfo(final Call call, final boolean isIncoming,
            ContactInfoCacheCallback callback) {

        //如果cacheEntry 不为空这里就是我们需要分析的步骤
        //直接走ContactLookupCallback 的回调函数onContactInfoComplete

        // If we have a previously obtained intermediate result return that now
        if (cacheEntry != null) {
            Log.d(TAG, "Contact lookup. In memory cache hit; lookup "
                    + (callBacks == null ? "complete" : "still running"));
            callback.onContactInfoComplete(callId, cacheEntry);
            // If no other callbacks are in flight, we're done.
            if (callBacks == null) {
                return;
            }
        }

        //....

        //下面这一部分 留给 cacheEntry 为空的情况分析
        /**
         * Performs a query for caller information.
         * Save any immediate data we get from the query. An asynchronous query may also be made
         * for any data that we do not already have. Some queries, such as those for voicemail and
         * emergency call information, will not perform an additional asynchronous query.
         */
        final CallerInfo callerInfo = CallerInfoUtils.getCallerInfoForCall(
                mContext, call, new FindInfoCallback(isIncoming));

        findInfoQueryComplete(call, callerInfo, isIncoming, false);
    }
这里 流程暂停走一下,图片中 会看机另外一个入口,所以我们先分析入口怎么最终 执行到findInfo函数
从入口的红五角星看出 InCallUI 起来的时候,有好几个方法刷新 但是这里我们只关注 StatusBarNotifier onStageChange
还记得上面分析calllist 发生改变时 通过com.android.incallui.CallList#onUpdate 最后刷新 listener的onStateChange 其中监听 listeners={AnswerPresenter,CallCardPresenter,StatusBarNotifier} 所以上面分析刷新的时候 将StatusBarNotifier onStageChange刷新
    public void onStateChange(InCallState oldState, InCallState newState, CallList callList) {

        updateNotification(newState, callList);
    }
这个流程 很清晰,所以最后在com.android.incallui.ContactInfoCache#findInfo处理,而上面也分析了最后是回调ContactLookupCallback#onContactInfoComplete,
- com.android.incallui.CallCardPresenter.ContactLookupCallback#onContactInfoComplete
        public void onContactInfoComplete(String callId, ContactCacheEntry entry) {
            CallCardPresenter presenter = mCallCardPresenter.get();
            if (presenter != null) {
                presenter.onContactInfoComplete(callId, entry, mIsPrimary);
            }
        }
- com.android.incallui.CallCardPresenter#onContactInfoComplete
    private void onContactInfoComplete(String callId, ContactCacheEntry entry, boolean isPrimary) {
        //.....
        if (entryMatchesExistingCall) {
            updateContactEntry(entry, isPrimary);
            //更新 ContactEntry 信息
        }
    }
- com.android.incallui.CallCardPresenter#updateContactEntry
    private void updateContactEntry(ContactCacheEntry entry, boolean isPrimary) {
        if (isPrimary) {
            mPrimaryContactInfo = entry;

            updatePrimaryDisplayInfo();
        } else {
            mSecondaryContactInfo = entry;
            updateSecondaryDisplayInfo();
        }
    }
刷新完ContactEntry 信息直接刷新updatePrimaryDisplayInfo,后面的流程上面分析过了,只是setPrimary
分析cacheEntry 为空 需要进行数据库查询的情况
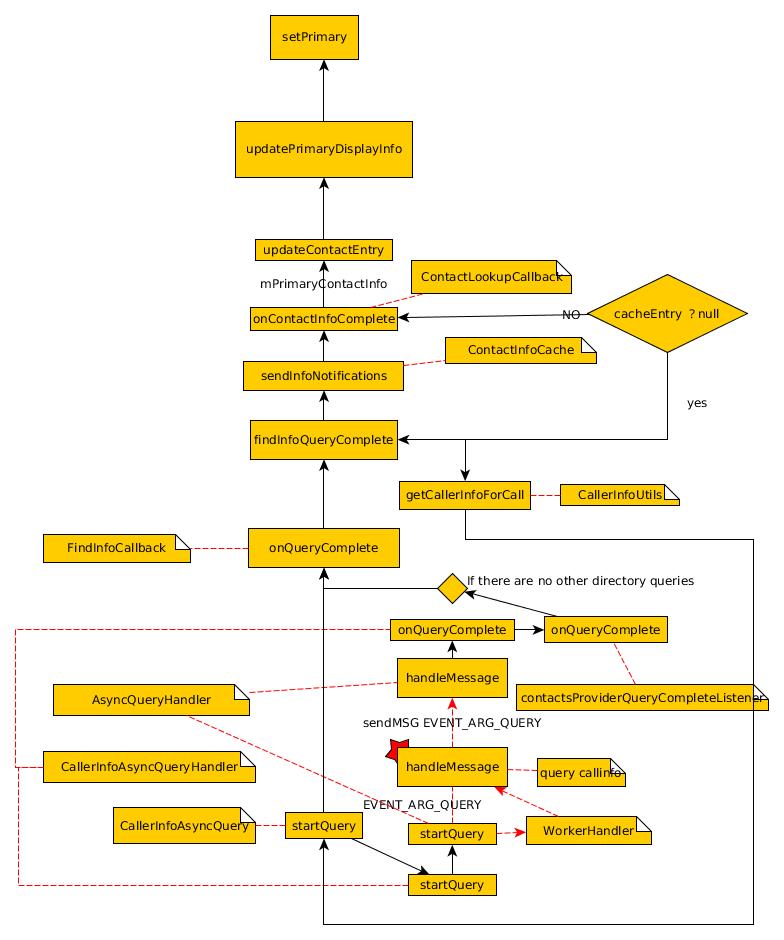
上面分析cacheEntry 不为空,这里分析cacheEntry为空,这个部分是关键,因为这里才是真正查询数据库的地方,如果有时候有运营商需求,定制一些需求,基本就在这里
- com.android.incallui.ContactInfoCache#findInfo
    public void findInfo(final Call call, final boolean isIncoming,
            ContactInfoCacheCallback callback) {

        //下面是cacheEntry 为空 需要重新查询 获取数据库信息
        /**
         * Performs a query for caller information.
         * Save any immediate data we get from the query. An asynchronous query may also be made
         * for any data that we do not already have. Some queries, such as those for voicemail and
         * emergency call information, will not perform an additional asynchronous query.
         */
        final CallerInfo callerInfo = CallerInfoUtils.getCallerInfoForCall(
                mContext, call, new FindInfoCallback(isIncoming));


        findInfoQueryComplete(call, callerInfo, isIncoming, false);
    }
如果 走findInfoQueryComplete ,说明CallInfo信息已经存在了,直接走刷新流程,有兴趣的同学就跟着流程图跟一下,这里我想详细分析getCallerInfoForCall,这里涉及数据库查询
- com.android.incallui.CallerInfoUtils#getCallerInfoForCall
    public static CallerInfo getCallerInfoForCall(Context context, Call call,
            CallerInfoAsyncQuery.OnQueryCompleteListener listener) {
        CallerInfo info = buildCallerInfo(context, call);

        // TODO: Have phoneapp send a Uri when it knows the contact that triggered this call.

        if (info.numberPresentation == TelecomManager.PRESENTATION_ALLOWED) {
            // Start the query with the number provided from the call.
            Log.d(TAG, "==> Actually starting CallerInfoAsyncQuery.startQuery()...");
            CallerInfoAsyncQuery.startQuery(QUERY_TOKEN, context, info, listener, call);
            //数据库开始查询
            // QUERY_TOKEN = -1
            /*call [Call_0, DIALING,
            [Capabilities: CAPABILITY_SUPPORT_HOLD
            CAPABILITY_MUTE
            CAPABILITY_CANNOT_DOWNGRADE_VIDEO_TO_AUDIO]
            , [Properties:]
            , children:[]
            , parent:null
            , conferenceable:[]
            , videoState:Audio Only
            , mSessionModificationState:0
            , VideoSettings:(CameraDir:-1)]

            info = CallerInfo
            listener = OnQueryCompleteListener
            */
        }
        return info;
    }
- com.android.incallui.CallerInfoAsyncQuery#startQuery
    public static void startQuery(final int token, final Context context, final CallerInfo info,
            final OnQueryCompleteListener listener, final Object cookie) {


        if (!PermissionsUtil.hasPermission(context, Manifest.permission.READ_CONTACTS)) {

            listener.onQueryComplete(token, cookie, info);
            return;
        }

        OnQueryCompleteListener contactsProviderQueryCompleteListener =
                new OnQueryCompleteListener() {
                    @Override
                    public void onQueryComplete(int token, Object cookie, CallerInfo ci) {


                        // If there are no other directory queries, make sure that the listener is
                        // notified of this result.  see b/27621628
                        if ((ci != null && ci.contactExists) ||
                            !startOtherDirectoriesQuery(token, context, info, listener, cookie)) {
                            if (listener != null && ci != null) {
                                listener.onQueryComplete(token, cookie, ci);
                            }
                        }
                    }
                };
        startDefaultDirectoryQuery(token, context, info, contactsProviderQueryCompleteListener,
                cookie);
    }
从上面代码可以看出来 当没有READ_CONTACTS权限的时候,就 走FindInfoCallback onQueryComplete,所以需要看startDefaultDirectoryQuery方法
- com.android.incallui.CallerInfoAsyncQuery#startDefaultDirectoryQuery
    private static CallerInfoAsyncQuery startDefaultDirectoryQuery(int token, Context context,
            CallerInfo info, OnQueryCompleteListener listener, Object cookie) {
        // Construct the URI object and query params, and start the query.
        Uri uri = ContactInfoHelper.getContactInfoLookupUri(info.phoneNumber);
        return startQueryInternal(token, context, info, listener, cookie, uri);
    }
上面token = -1
info 就是callerInfo
callerInfo = com.android.incallui.CallerInfo@1991911 {
name null, phoneNumber non-null }
call = [
Call_0
, DIALING
, [Capabilities: CAPABILITY_SUPPORT_HOLD CAPABILITY_MUTE CAPABILITY_CANNOT_DOWNGRADE_VIDEO_TO_AUDIO]
, [Properties:]
, children:[]
, parent:null
, conferenceable:[]
, videoState:Audio Only
, mSessionModificationState:0
, VideoSettings:(CameraDir:-1)]
isIncoming = false
call 就是cookie
listener 就是contactsProviderQueryCompleteListener
而 uri就是将12345678编码
- com.android.incallui.CallerInfoAsyncQuery#startQueryInternal
    private static CallerInfoAsyncQuery startQueryInternal(int token, Context context,
            CallerInfo info, OnQueryCompleteListener listener, Object cookie, Uri contactRef) {


        CallerInfoAsyncQuery c = new CallerInfoAsyncQuery();
        c.allocate(context, contactRef);

        //create cookieWrapper, start query
        CookieWrapper cw = new CookieWrapper();
        cw.listener = listener;
        cw.cookie = cookie;
        cw.number = info.phoneNumber;

        // check to see if these are recognized numbers, and use shortcuts if we can.
        if (PhoneNumberUtils.isLocalEmergencyNumber(context, info.phoneNumber)) {
            cw.event = EVENT_EMERGENCY_NUMBER;
        } else if (info.isVoiceMailNumber()) {
            cw.event = EVENT_VOICEMAIL_NUMBER;
        } else {
            cw.event = EVENT_NEW_QUERY;
        }


        String[] proejection = CallerInfo.getDefaultPhoneLookupProjection(contactRef);

        c.mHandler.startQuery(token,
                cw,  // cookie
                contactRef,  // uri
                proejection, // projection
                null,  // selection
                null,  // selectionArgs
                null);  // orderBy
        //这里查询实际上是CallerInfoAsyncQueryHandler 处理
        return c;
    }
- com.android.incallui.CallerInfoAsyncQuery.CallerInfoAsyncQueryHandler#startQuery
        public void startQuery(int token, Object cookie, Uri uri, String[] projection,
                String selection, String[] selectionArgs, String orderBy) {

            super.startQuery(token, cookie, uri, projection, selection, selectionArgs, orderBy);
            //这里 selection, selectionArgs, orderBy 为null
        }
根据打印的log 可以看到全部详细信息
InCall: startQuery: url=content://com.android.contacts/phone_lookup_enterprise/12345678?sip=false projection=[[contact_id, display_name, lookup, number, normalized_number, label, type, photo_uri, custom_ringtone, send_to_voicemail]] selection=null args=[null]
我们根据 12345678查询[contact_id, display_name, lookup, number, normalized_number, label, type, photo_uri, custom_ringtone, send_to_voicemail]
是由父类的方法startQuery进一步处理
- android.content.AsyncQueryHandler#startQuery
    public void startQuery(int token, Object cookie, Uri uri,
            String[] projection, String selection, String[] selectionArgs,
            String orderBy) {
        // Use the token as what so cancelOperations works properly
        Message msg = mWorkerThreadHandler.obtainMessage(token);
        msg.arg1 = EVENT_ARG_QUERY;

        WorkerArgs args = new WorkerArgs();
        args.handler = this;
        args.uri = uri;
        args.projection = projection;
        args.selection = selection;
        args.selectionArgs = selectionArgs;
        args.orderBy = orderBy;
        args.cookie = cookie;
        msg.obj = args;

        mWorkerThreadHandler.sendMessage(msg);
    }
这里的mWorkerThreadHandler 就是WorkerHandler ,通过WorkerHandler 查询数据库,这里的流程中在这个方法上加了(红星闪闪的五角星),这个就是关键
                case EVENT_ARG_QUERY:
                    Cursor cursor;
                    try {

                        cursor = resolver.query(args.uri, args.projection,
                                args.selection, args.selectionArgs,
                                args.orderBy);
                        // Calling getCount() causes the cursor window to be filled,
                        // which will make the first access on the main thread a lot faster.
                        if (cursor != null) {
                            cursor.getCount();
                        }
                    } catch (Exception e) {
                        Log.w(TAG, "Exception thrown during handling EVENT_ARG_QUERY", e);
                        cursor = null;
                    }

                    args.result = cursor;
                    break;
从上面可以看到 查询数据库需要安卓四大组件的 ContentResolver,这个数据库查询部分分析 我会在下一章去分析
后面又交给 AsyncQueryHandler handleMessage处理,因为上面 WorkerHandler 处理完又发送消息给 AsyncQueryHandler,这里的args.handler 在一开始startquery的时候赋值是 this 即 AsyncQueryHandler
            // passing the original token value back to the caller
            // on top of the event values in arg1.
            Message reply = args.handler.obtainMessage(token);
            reply.obj = args;
            reply.arg1 = msg.arg1;
            reply.sendToTarget();
            case EVENT_ARG_QUERY:
                Log.d("james_song_INCallName","EVENT_ARG_QUERY");
                onQueryComplete(token, args.cookie, (Cursor) args.result);
                break;
最后交给 重写的子类实现,这里表示 数据库查询完成将查询的cursor 传递给 界面显示
protected void onQueryComplete(int token, Object cookie, Cursor cursor) {
            try {


                //get the cookie and notify the listener.
                CookieWrapper cw = (CookieWrapper) cookie;
                if (mCallerInfo == null) {

                    if (cw.event == EVENT_EMERGENCY_NUMBER) {

                    } else if (cw.event == EVENT_VOICEMAIL_NUMBER) {

                    } else {
                        mCallerInfo = CallerInfo.getCallerInfo(mQueryContext, mQueryUri, cursor);
                        //这里将cursor最后封装成mCallerInfo
                    }


                //notify the listener that the query is complete.
                if (cw.listener != null) {
                    //传递给各个监听者
                    cw.listener.onQueryComplete(token, cw.cookie, mCallerInfo);
                }
            } finally {
                // The cursor may have been closed in CallerInfo.getCallerInfo()
                if (cursor != null && !cursor.isClosed()) {
                    cursor.close();
                }
            }
        }
    }
这里的监听者 根据监听的回调流程很快定位是 contactsProviderQueryCompleteListener 回调onQueryComplete
- com.android.incallui.CallerInfoAsyncQuery.OnQueryCompleteListener#onQueryComplete
                    public void onQueryComplete(int token, Object cookie, CallerInfo ci) {


                        // If there are no other directory queries, make sure that the listener is
                        // notified of this result.  see b/27621628
                        if ((ci != null && ci.contactExists) ||
                            !startOtherDirectoriesQuery(token, context, info, listener, cookie)) {
                            if (listener != null && ci != null) {
                                listener.onQueryComplete(token, cookie, ci);
                            }
                        }
                    }
这里也是通过传递监听者回调 ,这里的listener 是 FindInfoCallback,所以根据流程图 ,很容易看出来 ,之前我们分析过到这里 实现循环 刷新 callerInfo ,这里就算流程结束。
下一篇文章详细分析数据库 知识 和 cusor 查询 如何提取数据


 1万+
1万+


 被折叠的 条评论
为什么被折叠?
被折叠的 条评论
为什么被折叠?
 到【灌水乐园】发言


