


1. Structure and template
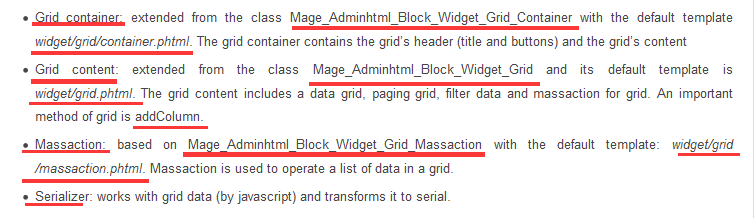
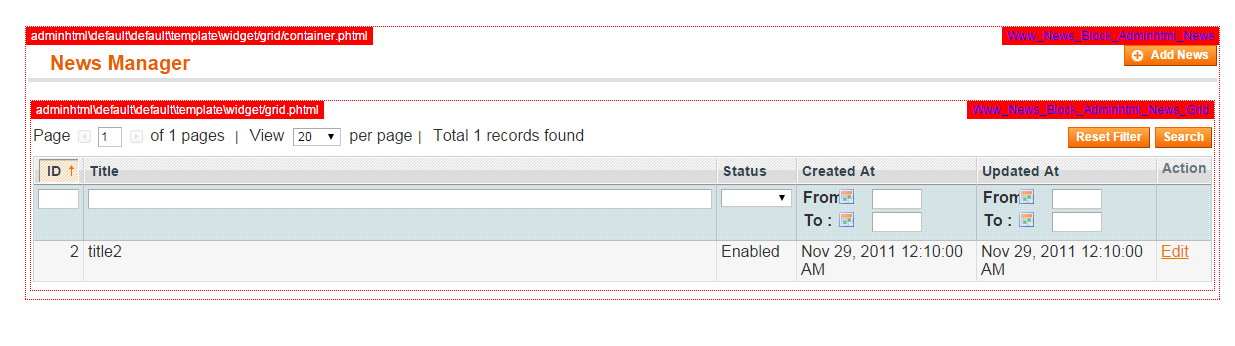
In Magento, the grid container automatically finds the grid content block (based on two protected attributes: _blockGroup, _controller) to render grid to HTML.
Secondly, the Form in Magento back-end is a basic template. The Form Widgets in Magento have some blocks as the followings: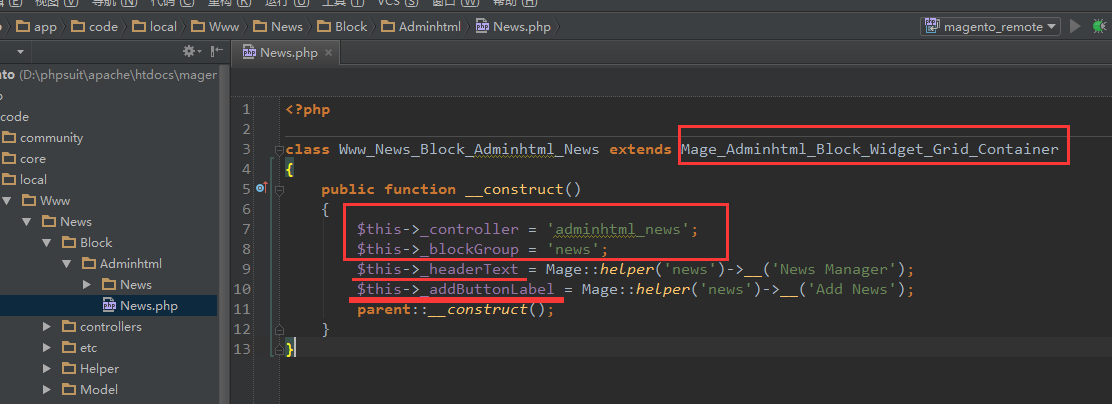
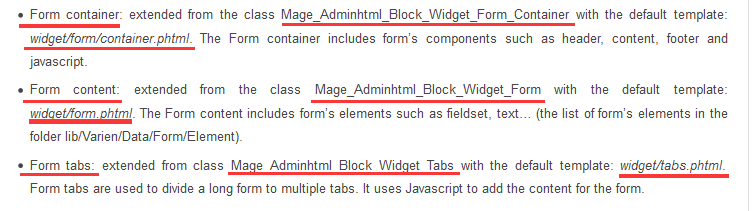
Similar to the grid container, the form container automatically finds the form content block (based on protected attributes: _blockGroup and _controller) to render form to HTML.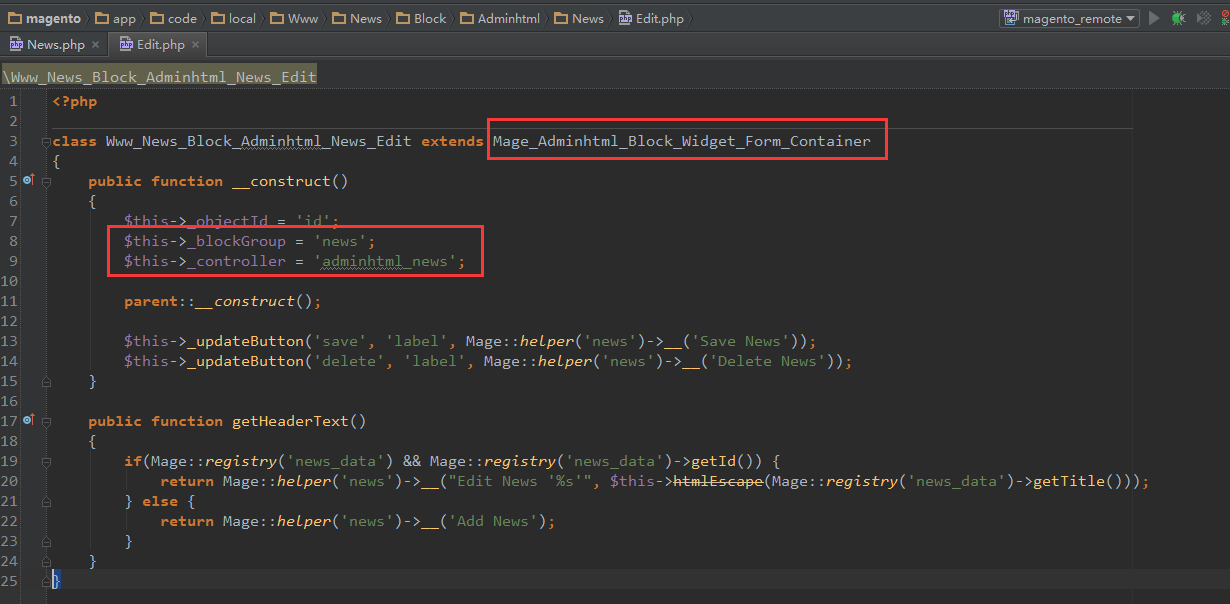
2. How to use a grid in your extension
Now, we will create an adminhtml grid with some steps below:
Step 1: Create a grid container block. For example: app\code\local\Magestore\Tests\Block\Adminhtml\Tests.php<?php
class Magestore_Tests_Block_Adminhtml_Tests extends Mage_Adminhtml_Block_Widget_Grid_Container
{
public function __construct(){
$this->_controller = 'adminhtml_tests';
$this->_blockGroup = 'tests';
$this->_headerText = Mage::helper('tests')->__('Item Manager');
$this->_addButtonLabel = Mage::helper('tests')->__('Add Item');
parent::__construct();
}
}
Step 2: Create a grid block

Because the grid container above has the attribute _controller equal ‘adminhtml_test’, so we need to create a grid block app\code\local\Magestore\Tests\Block\Adminhtml\Tests\Grid.php
?php
class Magestore_Tests_Block_Adminhtml_Tests_Grid extends Mage_Adminhtml_Block_Widget_Grid
{
public function __construct(){
parent::__construct();
$this->setId('testsGrid');
$this->setDefaultSort('tests_id');
$this->setDefaultDir('ASC');
$this->setSaveParametersInSession(true);
}
protected function _prepareCollection(){
$collection = Mage::getModel('tests/tests')->getCollection();
$this->setCollection($collection);
return parent::_prepareCollection();
}
protected function _prepareColumns(){
$this->addColumn('tests_id', array(
'header' => Mage::helper('tests')->__('ID'),
'align' =>'right',
'width' => '50px',
'index' => 'tests_id',
));
$this->addColumn('title', array(
'header' => Mage::helper('tests')->__('Title'),
'align' =>'left',
'index' => 'title',
));
return parent::_prepareColumns();
}
protected function _prepareMassaction(){
$this->setMassactionIdField('tests_id');
$this->getMassactionBlock()->setFormFieldName('tests');
$this->getMassactionBlock()->addItem('delete', array(
'label' => Mage::helper('tests')->__('Delete'),
'url' => $this->getUrl('*/*/massDelete'),
'confirm' => Mage::helper('tests')->__('Are you sure?')
));
return $this;
}
public function getRowUrl($row){
return $this->getUrl('*/*/edit', array('id' => $row->getId()));
}
}Step 3: Show the grid in a controllers/action by editing the layout file: app\design\adminhtml\default\default\layout\tests.xml<?xml version="1.0"?>
<layout version="0.1.0">
<testsadmin_adminhtml_tests_index>
<reference name="content">
<block type="tests/adminhtml_tests" name="tests" />
</reference>
</testsadmin_adminhtml_tests_index>
</layout>3. How to use a form in your extension
To use a form in your extension, it’s necessary to create form’s blocks and attach them to your controller.
Step 1: Create a form container block (app\code\local\Magestore\Tests\Block\Adminhtml\Tests\Edit.php)<?php
class Magestore_Tests_Block_Adminhtml_Tests_Edit extends Mage_Adminhtml_Block_Widget_Form_Container
{
public function __construct(){
parent::__construct();
$this->_objectId = 'id';
$this->_blockGroup = 'tests';
$this->_controller = 'adminhtml_tests';
$this->_mode = 'edit';
$this->_updateButton('save', 'label', Mage::helper('tests')->__('Save Item'));
$this->_updateButton('delete', 'label', Mage::helper('tests')->__('Delete Item'));
}
public function getHeaderText(){
if(Mage::registry('tests_data') && Mage::registry('tests_data')->getId())
return Mage::helper('tests')->__("Edit Item '%s'", $this->htmlEscape(Mage::registry('tests_data')->getTitle()));
return Mage::helper('tests')->__('Add Item');
}
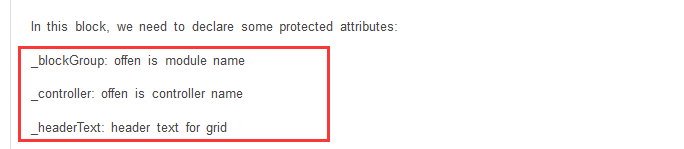
}Similar to the grid container, you have to declare some protected attributes, besides you can set _mode attribute (default is ‘edit‘).Step 2: Create a form content block
Because form container attribute _mode is ‘edit‘, you need create form block:
(app\code\local\Magestore\Tests\Block\Adminhtml\Tests\Edit\Form.php)<?php
class Magestore_Tests_Block_Adminhtml_Tests_Edit_Form extends Mage_Adminhtml_Block_Widget_Form
{
protected function _prepareForm(){
$form = new Varien_Data_Form(array(
'id' => 'edit_form',
'action' => $this->getUrl('*/*/save', array(
'id' => $this->getRequest()->getParam('id'),
)),
'method' => 'post',
'enctype' => 'multipart/form-data'
));
$form->setUseContainer(true);
$this->setForm($form);
return parent::_prepareForm();
}
}This block only defines a form that has no items. The form item will be added by a Tabs block as below:
Step 3: Create a Tabs block
(app\code\local\Magestore\Tests\Block\Adminhtml\Tests\Edit\Tabs.php)<?php
class Magestore_Tests_Block_Adminhtml_Tests_Edit_Tabs extends Mage_Adminhtml_Block_Widget_Tabs
{
public function __construct(){
parent::__construct();
$this->setId('tests_tabs');
$this->setDestElementId('edit_form');
$this->setTitle(Mage::helper('tests')->__('Item Information'));
}
protected function _beforeToHtml(){
$this->addTab('form_section', array(
'label' => Mage::helper('tests')->__('Item Information'),
'title' => Mage::helper('tests')->__('Item Information'),
'content' => $this->getLayout()->createBlock('tests/adminhtml_tests_edit_tab_form')->toHtml(),
));
return parent::_beforeToHtml();
}
}In this block, we add tab form_section to a form ‘tests/adminhtml_tests_edit_tab_form‘, so we need to create that block:
(app\code\local\Magestore\Tests\Block\Adminhtml\Tests\Edit\Tab\Form.php)<?php
class Magestore_Tests_Block_Adminhtml_Tests_Edit_Tab_Form extends Mage_Adminhtml_Block_Widget_Form
{
protected function _prepareForm(){
$form = new Varien_Data_Form();
$this->setForm($form);
if (Mage::getSingleton('adminhtml/session')->getTestsData()){
$data = Mage::getSingleton('adminhtml/session')->getTestsData();
Mage::getSingleton('adminhtml/session')->setTestsData(null);
}elseif(Mage::registry('tests_data'))
$data = Mage::registry('tests_data')->getData();
$fieldset = $form->addFieldset('tests_form', array('legend'=>Mage::helper('tests')->__('Item information')));
$fieldset->addField('title', 'text', array(
'label' => Mage::helper('tests')->__('Title'),
'class' => 'required-entry',
'required' => true,
'name' => 'title',
));
$form->setValues($data);
return parent::_prepareForm();
}
}Step 4: Add a form to controllers/action in the controller filepublic function editAction() {
$id = $this->getRequest()->getParam('id');
$model = Mage::getModel('tests/tests')->load($id);
if ($model->getId() || $id == 0) {
$data = Mage::getSingleton('adminhtml/session')->getFormData(true);
if (!empty($data))
$model->setData($data);
Mage::register('tests_data', $model);
$this->loadLayout();
$this->_setActiveMenu('tests/tests');
$this->getLayout()->getBlock('head')->setCanLoadExtJs(true);
$this->_addContent($this->getLayout()->createBlock('tests/adminhtml_tests_edit'))
->_addLeft($this->getLayout()->createBlock('tests/adminhtml_tests_edit_tabs'));
$this->renderLayout();
} else {
Mage::getSingleton('adminhtml/session')->addError(Mage::helper('tests')->__('Item does not exist'));
$this->_redirect('*/*/');
}
}
Here you can see two functions: _addContent and _addLeft to add the form’s content and tabs for the controllers/action.
This part ends here. Hope that you can take and extend the Magento experience that I’ve shared for your own needs.


 449
449

 被折叠的 条评论
为什么被折叠?
被折叠的 条评论
为什么被折叠?
 到【灌水乐园】发言


