


本博客转载于:http://blog.csdn.net/liuhaoyutz/article/details/7383563 [作者:刘昊昱 ]
本文分析LDD3第四章相关代码,主要是使用/proc文件系统(包括seq_file接口)进行调试操作,即在/proc目录下生成/proc/scullmem和/proc/scullseq文件,用户可以通过这些文件获得scull设备相关信息。对应的源码文件主要是examples/scull/main.c。
一、使用proc文件系统
需要注意的一点是,如果要测试本章相关代码,即建立/proc/scullmem和/proc/scullseq文件并进行操作,需要打开DEBUG选项,否则编译出的模块是不包含调试功能的。打开DEBUG选项的方法是修改Makefile的第2行,打开DEBUG=y选项。
scull模块是在模块初始化函数scull_init_module中调用scull_create_proc函数创建/proc/scullmem和/proc/scullseq两个文件的,列出代码如下:
- 661#ifdef SCULL_DEBUG /* only when debugging */
- 662 scull_create_proc();
- 663#endif
由代码可见,只有定义了SCULL_DEBUG变量,才会调用scull_create_proc函数。那么SCULL_DEBUG是在哪里定义的呢?答案是在Makefile文件中:
- 2DEBUG = y
- 3
- 4
- 5# Add your debugging flag (or not) to CFLAGS
- 6ifeq ($(DEBUG),y)
- 7 DEBFLAGS = -O -g -DSCULL_DEBUG # "-O" is needed to expand inlines
- 8else
- 9 DEBFLAGS = -O2
- 10endif
在Makefile的第2行我们打开了DEBUG=y(默认情况下这行是被屏蔽的)。所以第6行判断成立,就会执行第7行,其中-DSCULL_DEBUG在编译时会传递给gcc,参考gcc的-D选项,这等价于在头文件中定义了#define SCULL_DEBUG,所以main.c的661行#ifdef SCULL_DEBUG成立,进而调用662行scull_create_proc创建proc文件。
- 209static void scull_create_proc(void)
- 210{
- 211 struct proc_dir_entry *entry;
- 212 create_proc_read_entry("scullmem", 0 /* default mode */,
- 213 NULL /* parent dir */, scull_read_procmem,
- 214 NULL /* client data */);
- 215 entry = create_proc_entry("scullseq", 0, NULL);
- 216 if (entry)
- 217 entry->proc_fops = &scull_proc_ops;
- 218}
212行,调用create_proc_read_entry函数创建/proc/scullmem,该函数函数原型如下:
struct proc_dir_entry *create_proc_read_entry(const char *name,
mode_t mode,
struct proc_dir_entry *base,
read_proc_t *read_proc,
void *data);
name是要创建的文件名称;
mode是该文件的保护掩码(传入0表示使用系统默认值);
base指定该文件所在的目录(如果base为NULL,则该文件将创建在/proc根目录下);
read_proc是实现该文件的读操作的函数;
data是传递给read_proc的参数。
这里我们重点看read_proc函数。为了创建一个只读的/proc文件,驱动程序必须实现一个函数,用于在读取文件时生成数据,这个函数称为read_proc。当某个进程读取这个/proc文件时(使用read系统调用),就会调用相应驱动程序的read_proc函数。
read_proc函数的原型如下:
int (*read_proc)(char *page, char **start, off_t off, int count, int *eof, void *data)
这个函数的参数比较难理解,这里我偷下懒,直接把文档Linux Kernel Procfs Guide上对这个函数的解释复制过来,大家自己看。另外,LDD3上说的比较难以理解,特别是中文版,翻译上有许多不对的地方,建议大家看英文版的描述。
The read function is a call back function that allows userland processes to read data
from the kernel.
The read function should write its information into the page. For proper use, the function should start writing at an offset ofoffinpageand write at mostcountbytes, but because most read functions are quite simple and only return a small amount of information, these two parameters are usually ignored (it breaks pagers like more and less, but cat still works).
If the off and count parameters are properly used,eofshould be used to signal that the end of the file has been reached by writing 1 to the memory locationeofpoints to.
The parameter start doesn’t seem to be used anywhere in the kernel. Thedata
parameter can be used to create a single call back function for several files.
The read_func function must return the number of bytes written into thepage.
对应212 - 214行,scull模块在/proc下创建了一个称为scullmem的文件,并默认具有全局可读的权限,对应该文件的read_proc函数是scull_read_procmem,列出如下:
- 90int scull_read_procmem(char *buf, char **start, off_t offset,
- 91 int count, int *eof, void *data)
- 92{
- 93 int i, j, len = 0;
- 94 int limit = count - 80; /* Don't print more than this */
- 95
- 96 for (i = 0; i < scull_nr_devs && len <= limit; i++) {
- 97 struct scull_dev *d = &scull_devices[i];
- 98 struct scull_qset *qs = d->data;
- 99 if (down_interruptible(&d->sem))
- 100 return -ERESTARTSYS;
- 101 len += sprintf(buf+len,"\nDevice %i: qset %i, q %i, sz %li\n",
- 102 i, d->qset, d->quantum, d->size);
- 103 for (; qs && len <= limit; qs = qs->next) { /* scan the list */
- 104 len += sprintf(buf + len, " item at %p, qset at %p\n",
- 105 qs, qs->data);
- 106 if (qs->data && !qs->next) /* dump only the last item */
- 107 for (j = 0; j < d->qset; j++) {
- 108 if (qs->data[j])
- 109 len += sprintf(buf + len,
- 110 " % 4i: %8p\n",
- 111 j, qs->data[j]);
- 112 }
- 113 }
- 114 up(&scull_devices[i].sem);
- 115 }
- 116 *eof = 1;
- 117 return len;
- 118}
94行,定义limit变量,这里limit的值表明最多向buf中写count - 80个字符。实际上按照read_proc的定义,最多向参数buf中写入参数count指定个数的字符,这里只是进一步限制最多写入字数。系统传递的count值应该小于一页大小,在我的机器上验证count的值为3072。
96行,循环处理scull0 - scull3,每次循环处理1个设备。
101行,将设备相关信息保存进buf中。包括设备编号,量子集大小,量子大小,设备实际大小。
103行,循环处理设备的scull_qset,每次循环处理一个scull_qset。
104行,将scull_qset相关信息保存进buf中,包括scull_qset的地址和量子数组地址。
107行,循环处理量子数组,每次循环处理一个量子数组成员。
109行,将量子数组成员的信息保存进buf中,包括数组下标和相应数组成员地址。
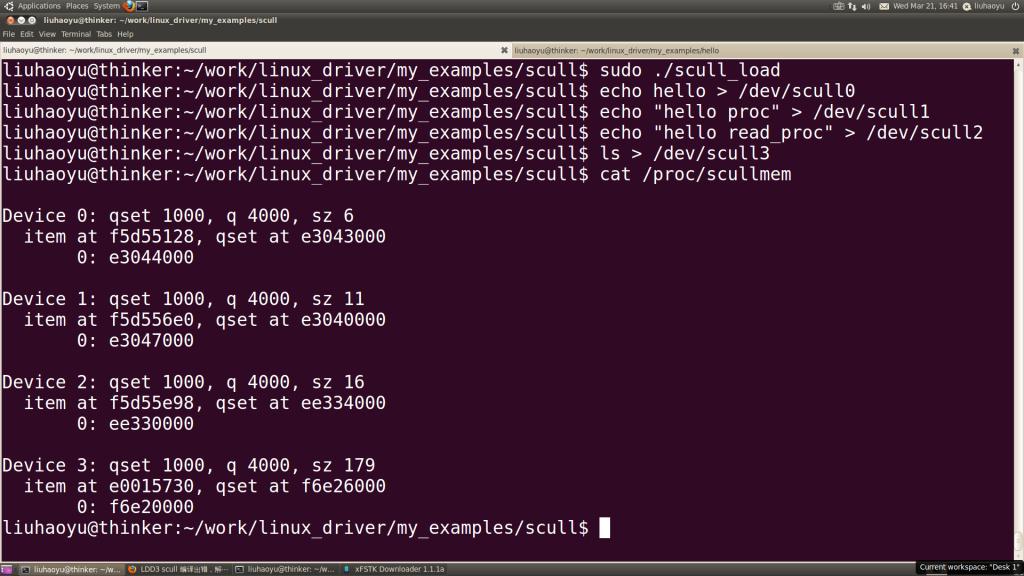
下图是我对/proc/scullmem的测试过程:
二、使用seq_file接口
针对/proc系统处理大文件比较困难的问题,内核提供了seq_file接口。
seq_file的实现基于/proc系统。要使用seq_file,我们必须抽象出一个对象序列,然后可以依次遍历对象序列的每个成员。这个对象序列可以是链表,数组,哈希表等等。具体到scull模块,是把scull_devices数组做为一个对象序列,每个对象就是一个scull_dev结构。
seq_file接口有两个重要数据结构:
struct seq_file {
char *buf;
size_t size;
size_t from;
size_t count;
loff_t index;
loff_t read_pos;
u64 version;
struct mutex lock;
const struct seq_operations *op;
void *private;
};
seq_file结构在seq_open函数中创建,然后作为参数传递给每个seq_file接口操作函数。
struct seq_operations {
void * (*start) (struct seq_file *m, loff_t *pos);
void (*stop) (struct seq_file *m, void *v);
void * (*next) (struct seq_file *m, void *v, loff_t *pos);
int (*show) (struct seq_file *m, void *v);
};
要使用seq_file接口,必须实现四个操作函数,分别是start(), next(), show(), stop()。
start函数完成初始化工作,在遍历操作开始时调用,返回一个对象指针。
show函数对当前正在遍历的对象进行操作,利用seq_printf,seq_puts等函数,打印这个对象的信息。
next函数在遍历中寻找下一个对象并返回。
stop函数在遍历结束时调用,完成一些清理工作。
下面我们看scull模块中是怎样使用seq_file接口的:
- 126/*
- 127 * Here are our sequence iteration methods. Our "position" is
- 128 * simply the device number.
- 129 */
- 130static void *scull_seq_start(struct seq_file *s, loff_t *pos)
- 131{
- 132 if (*pos >= scull_nr_devs)
- 133 return NULL; /* No more to read */
- 134 return scull_devices + *pos;
- 135}
- 136
- 137static void *scull_seq_next(struct seq_file *s, void *v, loff_t *pos)
- 138{
- 139 (*pos)++;
- 140 if (*pos >= scull_nr_devs)
- 141 return NULL;
- 142 return scull_devices + *pos;
- 143}
- 144
- 145static void scull_seq_stop(struct seq_file *s, void *v)
- 146{
- 147 /* Actually, there's nothing to do here */
- 148}
- 149
- 150static int scull_seq_show(struct seq_file *s, void *v)
- 151{
- 152 struct scull_dev *dev = (struct scull_dev *) v;
- 153 struct scull_qset *d;
- 154 int i;
- 155
- 156 if (down_interruptible(&dev->sem))
- 157 return -ERESTARTSYS;
- 158 seq_printf(s, "\nDevice %i: qset %i, q %i, sz %li\n",
- 159 (int) (dev - scull_devices), dev->qset,
- 160 dev->quantum, dev->size);
- 161 for (d = dev->data; d; d = d->next) { /* scan the list */
- 162 seq_printf(s, " item at %p, qset at %p\n", d, d->data);
- 163 if (d->data && !d->next) /* dump only the last item */
- 164 for (i = 0; i < dev->qset; i++) {
- 165 if (d->data[i])
- 166 seq_printf(s, " % 4i: %8p\n",
- 167 i, d->data[i]);
- 168 }
- 169 }
- 170 up(&dev->sem);
- 171 return 0;
- 172}
- 173
- 174/*
- 175 * Tie the sequence operators up.
- 176 */
- 177static struct seq_operations scull_seq_ops = {
- 178 .start = scull_seq_start,
- 179 .next = scull_seq_next,
- 180 .stop = scull_seq_stop,
- 181 .show = scull_seq_show
- 182};
- 183
- 184/*
- 185 * Now to implement the /proc file we need only make an open
- 186 * method which sets up the sequence operators.
- 187 */
- 188static int scull_proc_open(struct inode *inode, struct file *file)
- 189{
- 190 return seq_open(file, &scull_seq_ops);
- 191}
- 192
- 193/*
- 194 * Create a set of file operations for our proc file.
- 195 */
- 196static struct file_operations scull_proc_ops = {
- 197 .owner = THIS_MODULE,
- 198 .open = scull_proc_open,
- 199 .read = seq_read,
- 200 .llseek = seq_lseek,
- 201 .release = seq_release
- 202};
- 203
- 204
- 205/*
- 206 * Actually create (and remove) the /proc file(s).
- 207 */
- 208
- 209static void scull_create_proc(void)
- 210{
- 211 struct proc_dir_entry *entry;
- 212 create_proc_read_entry("scullmem", 0 /* default mode */,
- 213 NULL /* parent dir */, scull_read_procmem,
- 214 NULL /* client data */);
- 215 entry = create_proc_entry("scullseq", 0, NULL);
- 216 if (entry)
- 217 entry->proc_fops = &scull_proc_ops;
- 218}
126 - 148行,实现了scull_seq_start,scull_seq_next,scull_seq_stop三个函数,这三个函数比较简单,没有什么可说的。如果不明白,可以参考LDD3。
150 - 172行,实现了scull_seq_show。这个函数与前面介绍的scull_read_procmem逻辑是一样的,主要区别是打印语句用seq_printf,可对比参考理解。
177 - 182行,填充了一个seq_operations结构体,这是seq_file接口要求的。
接下来,我们要实现一个file_operations结构,这个结构将实现在该/proc文件上进行读取和定位时所需要的所有操作。与第三章介绍的字符设备驱动程序不同,这里我们只要实现一个open方法,其他的方法可以直接使用seq_file接口提供的函数。
188 - 191行,实现了open方法scull_proc_open。调用seq_open(file, &scull_seq_ops)将file结构与seq_operations结构体连接在一起。
196 - 202行,定义了file_operations结构体scull_proc_ops,其中,只有scull_proc_open是我们自己定义的,其他函数都是使用seq_file接口提供的函数。
215行,调用create_proc_entry函数创建/proc/scullseq文件。
217行,接scull_proc_ops结构体与/proc/scullseq连接起来。
至此,使用seq_file接口进行调试的过程我们就分析完了。
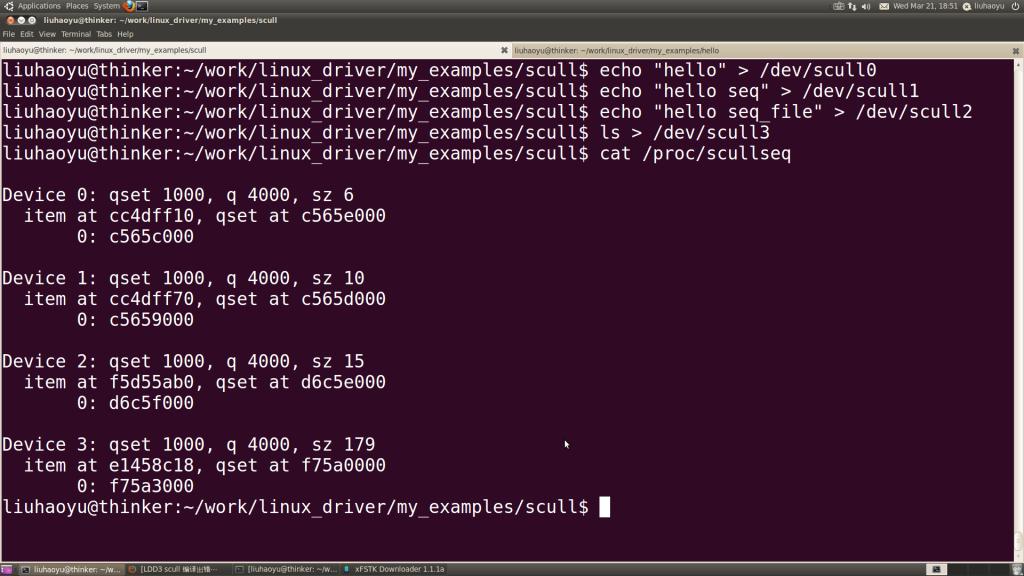
下图是在我的系统上使用seq_file接口打印的信息:


 1万+
1万+


 被折叠的 条评论
为什么被折叠?
被折叠的 条评论
为什么被折叠?
 到【灌水乐园】发言


