


近日在搞一个关于模板的东西. 基本过程是这样的: 假设是thrift服务吧, thrift从数据库中读取模板, 结合应用后端传过来的Map数据, 将Map数据填到模板中. 使用的框架时freemarker. 这里对freemarker做简单介绍.
freemarker说白了就是, 使用数据模型去填充模板, 然后输出文本.
Demo如下:
pom依赖
        <dependency>
            <groupId>org.freemarker</groupId>
            <artifactId>freemarker</artifactId>
            <version>2.3.23</version>
        </dependency>
package org.fan.learn.freeMarker;
import freemarker.template.Template;
import freemarker.template.TemplateException;
import java.io.IOException;
import java.io.StringReader;
import java.io.StringWriter;
import java.util.HashMap;
import java.util.Map;
/**
* Created by fan on 15-12-10.
*/
public class FreeMarkerTest {
public static void main(String[] args) throws IOException, TemplateException {
StringReader stringReader = new StringReader("userName:${user}; URL:${url};");
Template template = new Template(null, stringReader, null);
Map<String, String> map = new HashMap<String, String>();
map.put("user", "fan");
map.put("url", "www.fan.org");
StringWriter stringWriter = new StringWriter();
template.process(map, stringWriter);
System.out.println(stringWriter.toString());
}
}
输出结果:

网上一些说使用freemarker的一般步骤为:
(1)创建Configuration实例, 该实例负责管理freemarker的模板加载路径
(2)使用Configuration实例创建Template实例, 并指定使用的模板文件
(3)使用Map对象填充模板
(4)调用Template实例的process方法完成合并
上例没有使用Configuration, 直接创建的Template实例. 使用Configuration的Demo如下所示:
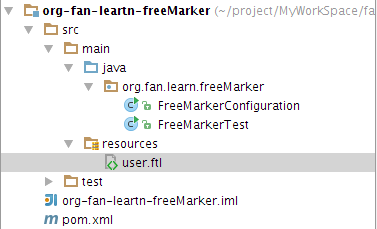
工程结构如下图所示:
package org.fan.learn.freeMarker;


import freemarker.template.Configuration;
import freemarker.template.Template;
import freemarker.template.TemplateException;
import freemarker.template.Version;

import java.io.File;
import java.io.IOException;
import java.io.StringWriter;
import java.util.HashMap;
import java.util.Map;

/**
 * Created by fan on 15-12-10.
 */
public class FreeMarkerConfiguration {
    public static void main(String[] args) throws IOException, TemplateException {

        String path = FreeMarkerConfiguration.class.getResource("/").getPath();

        File cfgFile = new File(path);

        Configuration configuration = new Configuration(Configuration.VERSION_2_3_23);
        configuration.setDirectoryForTemplateLoading(cfgFile);

        Template template = configuration.getTemplate("user.ftl");

        Map<String, String> map = new HashMap<String, String>();
        map.put("name", "fan");
        map.put("message", "hello world!");

        StringWriter stringWriter = new StringWriter();
        template.process(map, stringWriter);

        System.out.println(stringWriter.toString());
    }
}
user.ftl(存放在resource目录下)
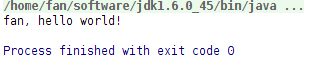
${name}, ${message}运行结果如下所示:
参考资料:
https://m.oschina.net/blog/100785
http://lavasoft.blog.51cto.com/62575/716825


 310
310


 被折叠的 条评论
为什么被折叠?
被折叠的 条评论
为什么被折叠?
 到【灌水乐园】发言


