


/**
* 判断child的布局是否依赖dependency
*/
   @Override
 public boolean layoutDependsOn(CoordinatorLayout parent, T child, View dependency) {
    boolean rs;
    //根据逻辑判断rs的取值
    //返回false表示child不依赖dependency,ture表示依赖
    return rs;
}

/**
* 当dependency发生改变时(位置、宽高等),执行这个函数
* 返回true表示child的位置或者是宽高要发生改变,否则就返回false
*/
@Override
public boolean onDependentViewChanged(CoordinatorLayout parent, T child, View dependency) {
     //child要执行的具体动作
        return true;
}
曾在网上找了一些关于CoordinatorLayout的教程,大部分文章都是把CoordinatorLayout、AppbarLayout、CollapsingToolbarLayout 以及Toolbar等一起使用来介绍,这让我不知不觉在心中认为把这几个布局要一起使用,而且只是用于那种场景中。其实CoordinatorLayout的功能并不是局限于与AppBarLayout一起使用,它的功能强大着呢,本文主要对CoordinatorLayout的使用进行介绍,后面再写一篇文章将AppBarLayout和CollapsingToolBarLayout整合CoordinatorLayout一起。那么到底CoordinatorLayout有多好用,请往下感受吧~
Behavior只有是CoordinatorLayout的直接子View才有意义。可以为任何View添加一个Behavior。Behavior是一系列回调
CoordinatorLayout能做什么
在学习CoordinatorLayout之前,很有必要了解CoordinatorLayout能帮我们做什么,从名字上可以看出,就是帮我们协调子View的。怎么个协调法呢?就是它根据我们的定制,帮助我们协调各个子View的布局。我们先看一组动画图~
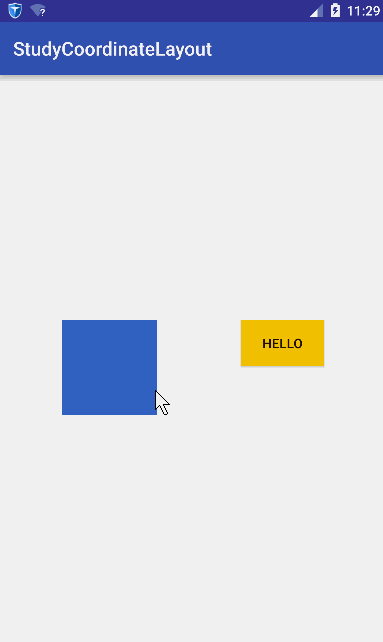
稍微解释一下这个动画,蓝色的矩形是我们一个普通View,黄色的Hello是一个Button。我们水平拖动蓝色矩形时,黄色Button查着与蓝色矩形相反方向移动;竖直移动蓝色矩形时,黄色也跟着竖直。简而言之:它们在竖直方向同步移动,在水平方向相反。
这个效果如果让你不用CoordinatorLayout去实现,应该没有任何问题,但是代码的耦合度应该非常大,你的代码必须要持有2个View的引用,然后在onTouchEvent里面做各种判断。如果我们想要实现的功能是,有更多的View要根据蓝色的View的移动相应作出响应,那么那就得在蓝色View的onTounchEvent里面针对其他的View处理各种逻辑。这耦合度未免太伤感了~
而CoordinatorLayout既然号称能帮我们协调子View的布局,我们接下来看看CoordinatorLayout如何实现~
CoordinatorLayout使用
CoordinatorLayout的使用核心是Behavior,Behavior就是执行你定制的动作。在讲Behavior之前必须先理解两个概念:Child和Dependency,什么意思呢?Child当然是子View的意思了,是谁的子View呢,当然是CoordinatorLayout的子View;其实Child是指要执行动作的CoordinatorLayout的子View。而Dependency是指Child依赖的View。比如上面的gif图中,蓝色的View就是Dependency,黄色的View就是Child,因为黄色的View的动作是依赖于蓝色的View。简而言之,就是如过Dependency这个View发生了变化,那么Child这个View就要相应发生变化。发生变化是具体发生什么变化呢?这里就要引入Behavior,Child发生变化的具体执行的代码都是放在Behavior这个类里面。
怎么使用Behavior呢,首先,我们定义一个类,继承CoordinatorLayout.Behavior<T>,其中,泛型参数T是我们要执行动作的View类,也就是Child。然后就是去实现Behavior的两个方法:
为了响应跟随手指移动的操作,我们定义一个非常简单的View,这个View只响应跟随手指移动,将这个View作为Dependency。由于过于简单,这个View源码不粘贴,我们只需知道这个View的类名叫:TempView。
我们看看Behavior的使用:
package com.hc.studyCoordinatorLayout;

import android.content.Context;
import android.support.design.widget.CoordinatorLayout;
import android.util.AttributeSet;
import android.util.DisplayMetrics;
import android.view.View;
import android.widget.Button;

/**
 * Package com.hc.studyCoordinatorLayout
 * Created by HuaChao on 2016/6/1.
 */
public class MyBehavior extends CoordinatorLayout.Behavior<Button> {
    private int width;

    public MyBehavior(Context context, AttributeSet attrs) {
        super(context, attrs);
        DisplayMetrics display = context.getResources().getDisplayMetrics();
        width = display.widthPixels;
    }

    @Override
    public boolean layoutDependsOn(CoordinatorLayout parent, Button child, View dependency) {
        //如果dependency是TempView的实例,说明它就是我们所需要的Dependency
        return dependency instanceof TempView;
    }

    //每次dependency位置发生变化,都会执行onDependentViewChanged方法
    @Override
    public boolean onDependentViewChanged(CoordinatorLayout parent, Button btn, View dependency) {

        //根据dependency的位置,设置Button的位置

        int top = dependency.getTop();
        int left = dependency.getLeft();

        int x = width - left - btn.getWidth();
        int y = top;

        setPosition(btn, x, y);
        return true;
    }

    private void setPosition(View v, int x, int y) {
        CoordinatorLayout.MarginLayoutParams layoutParams = (CoordinatorLayout.MarginLayoutParams) v.getLayoutParams();
        layoutParams.leftMargin = x;
        layoutParams.topMargin = y;
        v.setLayoutParams(layoutParams);
    }


}
OK,现在我们为Button类指定了Dependency,并且定义好了跟随Dependency一直变化的动作(Behavior),接下来我们就要指定好为哪个具体的Button实例来绑定这些。方法很简单,直接在布局文件指定就好:
<?xml version="1.0" encoding="utf-8"?>
<android.support.design.widget.CoordinatorLayout xmlns:android="http://schemas.android.com/apk/res/android"
    xmlns:app="http://schemas.android.com/apk/res-auto"
    xmlns:tools="http://schemas.android.com/tools"
    android:layout_width="match_parent"
    android:layout_height="match_parent"
    tools:context="com.hc.studyCoordinatorLayout.MainActivity">

    <Button
        android:id="@+id/btn"
        android:layout_width="wrap_content"
        android:layout_height="wrap_content"
        android:layout_marginLeft="300dp"
        android:layout_marginTop="300dp"
        android:background="#FFCC00"
        android:text="Hello"
        app:layout_behavior="com.hc.studyCoordinatorLayout.MyBehavior" />

    <com.hc.studyCoordinatorLayout.TempView
        android:layout_width="100dp"
        android:layout_height="100dp"
        android:layout_marginLeft="300dp"
        android:layout_marginTop="300dp"
        android:background="#3366CC"  />
</android.support.design.widget.CoordinatorLayout>
是不是很简单呢?我们只需关注Behavior的编写就好了,把Child和Dependency之间的关系完全解耦了~
附上源码地址:http://download.csdn.net/detail/huachao1001/9537636
Behavior是Android新出的Design库里新增的布局概念。Behavior只有是CoordinatorLayout的直接子View才有意义。可以为任何View添加一个Behavior。
Behavior是一系列回调。让你有机会以非侵入的为View添加动态的依赖布局,和处理父布局(CoordinatorLayout)滑动手势的机会。不过官方只有少数几个Behavior的例子。对于理解Behavior实在不易。开发过程中也是很多坑,下面总结一下CoordinatorLayout与Behavior。
依赖
首先自定义一个Behavior。
    public class MyBehavior extends CoordinatorLayout.Behavior{
        public MyBehavior(Context context, AttributeSet attrs) {
            super(context, attrs);
        }
}一定要重写这个构造函数。因为CoordinatorLayout源码中parseBehavior()函数中直接反射调用这个构造函数。
static final Class<?>[] CONSTRUCTOR_PARAMS = new Class<?>[] {
        Context.class,
        AttributeSet.class
};
下面反射生成Behavior实例在实例化CoordinatorLayout.LayoutParams时:
final Class<Behavior> clazz = (Class<Behavior>) Class.forName(fullName, true,
                 context.getClassLoader());
c = clazz.getConstructor(CONSTRUCTOR_PARAMS);
c.setAccessible(true);
constructors.put(fullName, c);
return c.newInstance(context, attrs)
在任意View中添加:
app:layout_behavior=“你的Behavior包含包名的类名”然后CoordinatorLayout就会反射生成你的Behavior。
另外一种方法如果你的自定义View默认使用一个Behavior。
在你的自定义View类上添加@DefaultBehavior(你的Behavior.class)这句注解。
你的View就默认使用这个Behavior。就像AppBarLayout一样。
@DefaultBehavior(AppBarLayout.Behavior.class)
public class AppBarLayout extends LinearLayout {}
生成Behavior后第一件事就是确定依赖关系。重写Behavior的这个方法来确定你依赖哪些View。
@Override
public boolean layoutDependsOn(CoordinatorLayout parent, View child, View dependency) {
    return dependency.getId() == R.id.first;
}
child 是指应用behavior的View ,dependency 担任触发behavior的角色,并与child进行互动。
确定你是否依赖于这个View。CoordinatorLayout会将自己所有View遍历判断。
如果确定依赖。这个方法很重要。当所依赖的View变动时会回调这个方法。
@Override
public boolean onDependentViewChanged(CoordinatorLayout parent, View child, View dependency) {
    return true;
}
下面这个例子:
    <declare-styleable name="Follow">
        <attr name="target" format="reference"/>
    </declare-styleable>
先自定义target这个属性。
  public class FollowBehavior extends CoordinatorLayout.Behavior {
  private int targetId;

  public FollowBehavior(Context context, AttributeSet attrs) {
      super(context, attrs);
      TypedArray a = context.obtainStyledAttributes(attrs, R.styleable.Follow);
      for (int i = 0; i < a.getIndexCount(); i++) {
          int attr = a.getIndex(i);
          if(a.getIndex(i) == R.styleable.Follow_target){
              targetId = a.getResourceId(attr, -1);
          }
      }
      a.recycle();
  }

  @Override
  public boolean onDependentViewChanged(CoordinatorLayout parent, View child, View dependency) {
       child.setY(dependency.getY()+dependency.getHeight());
      return true;
  }

  @Override
  public boolean layoutDependsOn(CoordinatorLayout parent, View child, View dependency) {
      return dependency.getId() == targetId;
  }
}
xml中:
<android.support.design.widget.CoordinatorLayout    xmlns:android="http://schemas.android.com/apk/res/android"
    xmlns:app="http://schemas.android.com/apk/res-auto"
    xmlns:tools="http://schemas.android.com/tools"
    android:orientation="vertical"
    android:layout_width="match_parent"
    android:layout_height="match_parent"
    android:fitsSystemWindows="true"
    tools:context=".MainActivity">

    <View
        android:id="@+id/first"
        android:layout_width="match_parent"
        android:layout_height="128dp"
        android:background="@android:color/holo_blue_light"/>

    <View
        android:id="@+id/second"
        android:layout_width="match_parent"
        android:layout_height="128dp"
        app:layout_behavior=".FollowBehavior"
        app:target="@id/first"
        android:background="@android:color/holo_green_light"/>


</android.support.design.widget.CoordinatorLayout>
效果是不管first怎么移动。second都会在他下面。
滑动
Behavior最大的用处在于对滑动事件的处理。就像CollapsingToolbarLayout的那个酷炫效果一样。
主要是这3个方法,所依赖对象的滑动事件都将通知进来:
@Override
public boolean onStartNestedScroll(CoordinatorLayout coordinatorLayout, View child, View directTargetChild, View target, int nestedScrollAxes) {
    return true;//这里返回true,才会接受到后续滑动事件。
}

@Override
public void onNestedScroll(CoordinatorLayout coordinatorLayout, View child, View target, int dxConsumed, int dyConsumed, int dxUnconsumed, int dyUnconsumed) {
//进行滑动事件处理
}

@Override
public boolean onNestedFling(CoordinatorLayout coordinatorLayout, View child, View target, float velocityX, float velocityY, boolean consumed) {
//当进行快速滑动
    return super.onNestedFling(coordinatorLayout, child, target, velocityX, velocityY, consumed);
}
注意被依赖的View只有实现了NestedScrollingChild接口的才可以将事件传递给CoordinatorLayout。
但注意这个滑动事件是对于CoordinatorLayout的。所以只要CoordinatorLayout有NestedScrollingChild就会滑动,他滑动就会触发这几个回调。无论你是否依赖了那个View。
下面就是一个简单的View跟随ScrollView滑入滑出屏幕的例子。可以是Toolbar或其他任何View。
public class ScrollToTopBehavior extends CoordinatorLayout.Behavior<View>{
    int offsetTotal = 0;
    boolean scrolling = false;

    public ScrollToTopBehavior(Context context, AttributeSet attrs) {
        super(context, attrs);
    }

    @Override
    public boolean onStartNestedScroll(CoordinatorLayout coordinatorLayout, View child, View directTargetChild, View target, int nestedScrollAxes) {
        return true;
    }

    @Override
    public void onNestedScroll(CoordinatorLayout coordinatorLayout, View child, View target, int dxConsumed, int dyConsumed, int dxUnconsumed, int dyUnconsumed) {
        offset(child, dyConsumed);
    }

    public void offset(View child,int dy){
        int old = offsetTotal;
        int top = offsetTotal - dy;
        top = Math.max(top, -child.getHeight());
        top = Math.min(top, 0);
        offsetTotal = top;
        if (old == offsetTotal){
            scrolling = false;
            return;
        }
        int delta = offsetTotal-old;
        child.offsetTopAndBottom(delta);
        scrolling = true;
    }

}
xml中:
<android.support.design.widget.CoordinatorLayout
    xmlns:android="http://schemas.android.com/apk/res/android"
    xmlns:app="http://schemas.android.com/apk/res-auto"
    xmlns:tools="http://schemas.android.com/tools"
    android:orientation="vertical"
    android:layout_width="match_parent"
    android:layout_height="match_parent"
    android:fitsSystemWindows="false"
    tools:context=".MainActivity">

    <android.support.v4.widget.NestedScrollView
        android:id="@+id/second"
        android:layout_width="match_parent"
        android:layout_height="match_parent">

        <LinearLayout
            android:layout_width="match_parent"
            android:layout_height="wrap_content">
            <TextView
                android:layout_width="match_parent"
                android:layout_height="wrap_content"
                android:layout_marginTop="128dp"
                style="@style/TextAppearance.AppCompat.Display3"
                android:text="A\nB\nC\nD\nE\nF\nG\nH\nI\nJ\nK\nL\nM\nN\nO\nP\nQ\nR\nS\nT\nU\nV\nW\nX\nY\nZ"
                android:background="@android:color/holo_red_light"/>
        </LinearLayout>
    </android.support.v4.widget.NestedScrollView>

    <View
        android:id="@+id/first"
        android:layout_width="match_parent"
        android:layout_height="128dp"
        app:layout_behavior=".ScrollToTopBehavior"
        android:background="@android:color/holo_blue_light"/>

</android.support.design.widget.CoordinatorLayout>
当NestedScrollView滑动的时候,first也能跟着滑动。toolbar和fab的上滑隐藏都可以这样实现。
事件处理
这2个回调与View中的事件分发是一样的。所有Behavior能在子View之前收到CoordinatorLayout的所有触摸事件。可以进行拦截,如果拦截事件将不会流经子View。因为这2个方法都是在CoordinatorLayout的 回调中
@Override
public boolean onInterceptTouchEvent(CoordinatorLayout parent, View child, MotionEvent ev) {
    return super.onInterceptTouchEvent(parent, child, ev);
}

@Override
public boolean onTouchEvent(CoordinatorLayout parent, View child, MotionEvent ev) {
    return super.onTouchEvent(parent, child, ev);
}
AppBarLayout的收缩原理分析
示例中给可滑动View设的Behavior是@string/appbar_scrolling_view_behavior(android.support.design.widget.AppBarLayout$ScrollingViewBehavior)。
ScrollingViewBehavior的源码不多,看得出唯一的作用是把自己放到AppBarLayout的下面...(不能理解为什么叫ScrollingViewBehavior)
所有View都能使用这个Behavior。
AppBarLayout自带一个Behivior。直接在源码里注解声明的。这个Behivior也只能用于AppBarLayout。
作用是让他根据CoordinatorLayout上的滚动手势进行一些效果(比如收缩)。与ScrollingViewBehavior是无关的,加不加ScrollingViewBehavior不影响收缩。
只不过只有某些可滑动View才会把滑动事件响应给CoordinatorLayout才能继而响应给AppBarLayout。


 4963
4963


 被折叠的 条评论
为什么被折叠?
被折叠的 条评论
为什么被折叠?
 到【灌水乐园】发言


