


一、 入门
1、初识Angular2
硬知识:Angular2与Angular的区别
(1)依赖加载:Angular1是依赖前置,angular2是按需加载
(2)数据绑定:
Angular1 在启动时会给所有的异步交互点打补丁:
超时、
Ajax 请求、
浏览器事件、
Websockets,等等
在那些交互点,Angular 会对 scope 对象进行变动检查,如果发现有变动就激发相应的监视器
重新运行变动检查,检查是否有更多的变化发生,重新运行监视器Angular 2 使用 zone.js 机制使摘要循环不再被需要。简单的非 Angular 指定代码可以透明地激发一个Angular 2 摘要。
zone.js的设计灵感来源于Dart语言,它描述JavaScript执行过程的上下文,可以在异步任务之间进行持久性传递,它类似于Java中的TLS(线程本地存储)技术,zone.js则是将TLS引入到JavaScript语言中的实现框架。
写一个Angular2的Hello World应用相当简单,分三步走:
- 引入Angular2预定义类型
import {Component,View,bootstrap} from "angular2/angular2";import是ES6的关键字,用来从模块中引入类型定义。在这里,我们从angular2模块库中引入了三个类型: Component类、View类和bootstrap函数。
- 实现一个Angular2组件
实现一个Angular2组件也很简单,定义一个类,然后给这个类添加注解:
@Component({selector:"ez-app"})
@View({template:"<h1>Hello,Angular2</h1>"})
class EzApp{}
class也是ES6的关键字,用来定义一个类。@Component和@View都是给类EzApp附加的元信息, 被称为注解/Annotation。
@Component最重要的作用是通过selector属性(值为CSS选择符),指定这个组件渲染到哪个DOM对象上。 @View最重要的作用是通过template属性,指定渲染的模板。
- 渲染组件到DOM
将组件渲染到DOM上,需要使用自举/bootstrap函数:
bootstrap(EzApp);这个函数的作用就是通知Angular2框架将EzApp组件渲染到DOM树上。
2、注解/Annotation
ES6规范里没有装饰器。这其实利用了traceur的一个实验特性:注解。给一个类 加注解,等同于设置这个类的annotations属性:
//注解写法
@Component({selector:"ez-app"})
class EzApp{...}
等同于:

class EzApp{...}
EzApp.annotations = [new Component({selector:"ez-app"})];
很显然,注解可以看做编译器(traceur)层面的语法糖,但和python的装饰器不同, 注解在编译时仅仅被放在annotation里,编译器并不进行解释展开 - 这个解释的工作是 Angular2完成的
二、组件开发–模板语法
1、最简单的模板
有两种方法为组件指定渲染模板:
- 内联模板
可以使用组件的View注解中的template属性直接指定内联模板:
@View({
    template : `<h1>hello</h1>
                <div>...</div>`
})
在ES6中,使用一对`符号就可以定义多行字符串,这使得编写内联的模板轻松多了。
- 外部模板
也可以将模板写入一个单独的文件:
<!--ezcomp-tpl.html-->
<h1>hello</h1>
<div>...</div>
然后在定义组件时,使用templateUrl引用外部模板:

@View({
    templateUrl : "ezcomp-tpl.html"
})
2、directives - 使用组件
在Angular2中,一个组件的模板内除了可以使用标准的HTML元素,也可以使用自定义的组件!
这是相当重要的特性,意味着Angular2将无偏差地对待标准的HTML元素和你自己定义的组件。这样, 你可以建立自己的领域建模语言了,这使得渲染模板和视图模型的对齐更加容易,也使得模板的语义性 更强:
@Component({selector:"ez-app"})
        @View({
            directives:[EzCard],
            template:`
                <div class="ez-app">
                    <h1>EzApp</h1>
                    <ez-card></ez-card>
                </div>`
        })
        class EzApp{}

        @Component({selector : "ez-card"})
        @View({
            directives:[EzLogo],
            template : `
                <div class="ez-card">
                    <h1>EzCard</h1>
                    <ez-logo></ez-logo>
                </div>`
        })
        class EzCard{}

        @Component({selector : "ez-logo"})
        @View({
            template : `
                <div class="ez-logo">
                    <h1>EzLogo</h1>
                </div>`
        })
        class EzLogo{}

        bootstrap(EzApp);
声明要在模板中使用的组件
不过,在使用自定义组件之前,必需在组件的ViewAnnotation中通过directives属性声明这个组件:
@View({
    directives : [EzComp],
    template : "<ez-comp></ez-comp>"
})
你应该注意到了,directives属性的值是一个数组,这意味着,你需要在这里声明所有你需要在模板 中使用的自定义组件。
3、{{model}} - 文本插值
在模板中使用可以{{表达式}}的方式绑定组件模型中的表达式,当表达式变化时, Angular2将自动更新对应的DOM对象:
import {Component,View,bootstrap} from "angular2/angular2";

        @Component({selector:"ez-app"})
        @View({
            template:`
                <div>
                    <h1>{{title}}</h1>
                    <div>
                        <span>{{date}}</span> 来源:<span>{{source}}</span>
                    </div>
                </div>
            `
        })
        class EzApp{
            constructor(){
                this.title = "证监会:对恶意做空是有监测的";
                this.date = "2015年07月11日 15:32:35";
                this.source = "北京晚报";
            }
        }

        bootstrap(EzApp);
4、[property] - 绑定属性
在模板中,也可以使用一对中括号将HTML元素或组件的属性绑定到组件模型的某个表达式, 当表达式的值变化时,对应的DOM对象将自动得到更新:
import {bind,Component,View,bootstrap} from "angular2/angular2";

        @Component({selector:"ez-app"})
        @View({
               template:`<h1 [style.color]="color">Hello,Angular2</h1>`
        })
        class EzApp{

            constructor(){
                this.color = 'red';
                this.d = ["red", "green", "blue", "yellow", "black", "grey"];
                var self = this;
                var num = 0;
                setInterval(function () {
                    num++;
                    if (num + 1 == self.d.length) {
                        num = 0
                    }
                    self.color = self.d[num];
                }, 500);
            }
        }

        bootstrap(EzApp);
以上的代码,h1标签会每秒自动变颜色。
5、(event) - 监听事件
在模板中为元素添加事件监听很简单,使用一对小括号包裹事件名称,并绑定 到表达式即可:
import {Component,View,bootstrap} from "angular2/angular2";

        @Component({selector:"ez-app"})
        @View({
            template:`
                <h1>Your turn! <b>{{sb}}</b></h1>
                <button (click)="roulette()">ROULETTE</button>
            `
        })
        class EzApp{
            constructor(){
                this.names = ["Jason","Mary","Linda","Lincoln","Albert","Jimmy"];
                this.roulette();
            }
            //轮盘赌
            roulette(){
                var idx = parseInt(Math.random()*this.names.length);
                this.sb = this.names[idx];
            }
        }

        bootstrap(EzApp);
上面的代码实例为DOM对象h1的click事件添加监听函数onClick()。
另一种等效的书写方法是在事件名称前加on-前缀:
@View({template : `<h1 on-click="onClick()">HELLO</h1>`})6、#var - 局部变量
有时模板中的不同元素间可能需要互相调用,Angular2提供一种简单的语法将元素 映射为局部变量:添加一个以#或var-开始的属性,后续的部分表示变量名, 这个变量对应元素的实例。
在下面的代码示例中,我们为元素h1定义了一个局部变量v_h1,这个变量指向 该元素对应的DOM对象,你可以在模板中的其他地方调用其方法和属性:
@View({
    template : `
        <h1 #v_h1>hello</h1>
        <button (click) = "#v_h1.textContent = 'HELLO'">test</button>
    `
})
如果在一个组件元素上定义局部变量,那么其对应的对象为组件的实例:
@View({
    directives:[EzCalc],
    template : "<ez-calc #c></ez-calc>"
})
在上面的示例中,模板内的局部变量c指向EzCalc的实例。
三、条件逻辑
1、NgIf
有时我们需要模板的一部分内容在满足一定条件时才显示, NgIf发挥作用的场景,它评估属性ngIf的值是否为真,来决定是否渲染 template元素的内容:
@View({
    template : `<!--根据变量trial的值决定是否显示广告图片-->
                <template *ngIf="trial==true">
                    <img src="ad.jpg">
                </template>
                <!--以下是正文-->
                <pre>...
` })
2、ngSwitch
<container-element [ngSwitch]="switch_expression">
  <some-element *ngSwitchCase="match_expression_1">...</some-element>
  <some-element *ngSwitchCase="match_expression_2">...</some-element>
  <some-other-element *ngSwitchCase="match_expression_3">...</some-other-element>
  <ng-container *ngSwitchCase="match_expression_3">
    <!-- use a ng-container to group multiple root nodes -->
    <inner-element></inner-element>
    <inner-other-element></inner-other-element>
  </ng-container>
  <some-element *ngSwitchDefault>...</some-element>
</container-element>
3、ngFor
<li *ngFor="let item of items; let i = index; trackBy: trackByFn">...</li>
<li template="ngFor let item of items; let i = index; trackBy: trackByFn">...</li>
NgFor provides several exported values that can be aliased to local variables:
- index will be set to the current loop iteration for each template context.
- first will be set to a boolean value indicating whether the item is the first one in the iteration.
- last will be set to a boolean value indicating whether the item is the last one in the iteration.
- even will be set to a boolean value indicating whether this item has an even index.
- odd will be set to a boolean value indicating whether this item has an odd index.
四、属性与事件声明
1、属性声明–暴露成员变量
属性是组件暴露给外部世界的调用接口,调用者通过设置不同的属性值来定制 组件的行为与外观:
在Angular2中为组件增加属性接口非常简单,只需要在Component注解的 properties属性中声明组件的成员变量就可以了:
//EzCard
@Component({
properties:["name","country"]
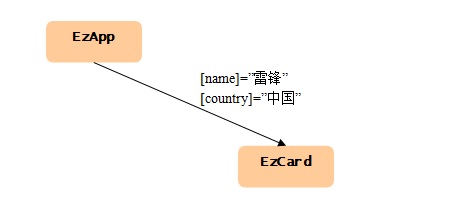
})上面的代码将组件的成员变量name和country暴露为同名属性,这意味着在EzApp 的模板中,可以直接使用中括号语法来设置EzCard对象的属性:
//EzApp
@View({
    directives : [EzCard],
    template : "<ez-card [name]="'雷锋'" [country]="'中国'"></ez-card>"
})
提醒:如果要在模板中使用自定义的指令(组件是一种指令),必须在View注解的directives 属性中提前声明!
示例代码:为EzCard调用添加name和country属性!
import {Component,View,bootstrap} from "angular2/angular2";

        //根组件 - EzApp
        @Component({selector:"ez-app"})
        @View({
            directives:[EzCard],
            template:`
                <div class="ez-app">
                    <h1>EzApp</h1>
                    <ez-card [name]="'frank'" [country]="'China'"></ez-card>
                </div>`
        })
        class EzApp{}

        //具有属性接口的组件 - EzCard
        @Component({
            selector:"ez-card",
            properties:["name","country"]
        })
        @View({
            template : `<div class='ez-card'>
                    My name is <b>{{name}}</b>,
                    I am from <b>{{country}}</b>.</div>`
        })
        class EzCard{
            constructor(){
                this.name = "Mike";
                this.country = "Sweden";
            }
        }

        //渲染组件
        bootstrap(EzApp);
2、事件声明 - 暴露事件源
与属性相反,事件从组件的内部流出,用来通知外部世界发生了一些事情:
在Angular2中为组件增加事件接口也非常简单:定义一个事件源/EventEmitter, 然后通过Component注解的events接口包括出来:
//EzCard
@Component({
events:["change"]
})
class EzCard{
constructor(){
this.change = new EventEmitter();
}
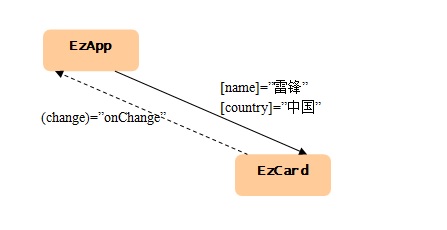
}上面的代码将组件EzCard的事件源change暴露为同名事件,这意味着在调用者 EzApp组件的模板中,可以直接使用小括号语法挂接事件监听函数:
//EzApp
@View({
    template : "<ez-card (change)="onChange()"></ez-card>"
})
每次EzCard触发change事件时,EzApp的onChange()方法都将被调用。
import {Component,View,bootstrap,EventEmitter} from "angular2/angular2";

        //根组件 - EzApp
        @Component({selector:"ez-app"})
        @View({
            directives:[EzCard],
            template:`
                <div class="ez-app">
                    <h1>EzApp</h1>
                    <ez-card (change)="onChange($event)"></ez-card>
                    <pre>{{evtStr}}</pre>
                </div>`
        })
        class EzApp{
            constructor(){
                this.evtStr
            }
            onChange(evt){
                console.log("sth. occured");
                this.evtStr = JSON.stringify(evt,null,"\t");
            }
        }

        //具有事件接口的组件 - EzCard
        @Component({
            selector:"ez-card",
            events:["change"]
        })
        @View({
            template : `<div class='ez-card'>
                    My name is <b>{{name}}</b>,
                    I am from <b>{{country}}</b>.</div>`
        })
        class EzCard{
            constructor(){
                this.name = "Mike";
                this.country = "Sweden";
                this.change = new EventEmitter();
                //模拟触发事件
                setTimeout(()=>this.change.next({
                    src:"EzCard",
                    desc:"模拟事件"
                }),1000);
            }
        }

        //渲染组件
        bootstrap(EzApp);
五、form
1、NgForm - 表单指令
NgForm指令为表单元素/form建立一个控件组对象,作为控件的容器; 而NgControlName指令为则为宿主input元素建立一个控件对象,并将该控件加入到NgForm 指令建立的控件组中:
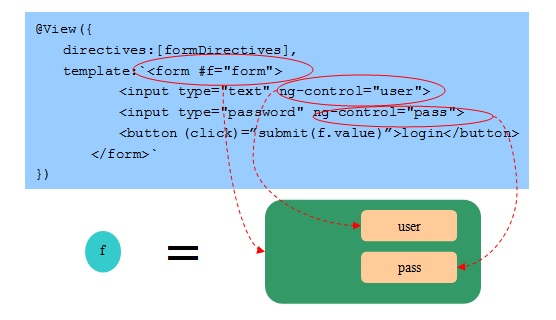
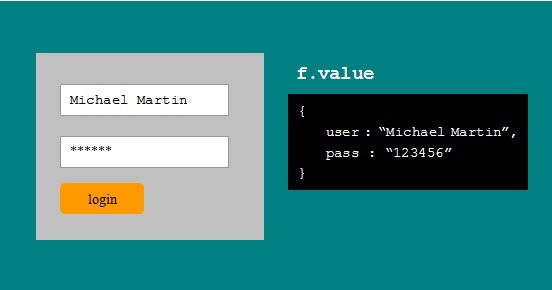
局部变量
通过使用#符号,我们创建了一个引用控件组对象(注意,不是form元素!)的局部变量f。 这个变量最大的作用是:它的value属性是一个简单的JSON对象,键对应于input元素的 ng-control属性,值对应于input元素的值:
声明指令依赖
NgForm指令和NgControlName指令都包含在预定义的数组变量formDirectives中,所以我们在 组件注解的directives属性中直接声明formDirectives就可以在模板中直接使用这些指令了:
//angular2/ts/src/forms/directives.ts
export const formDirectives = CONST_EXPR([
  NgControlName,
  NgControlGroup,

  NgFormControl,
  NgModel,
  NgFormModel,
  NgForm,

  NgSelectOption,
  DefaultValueAccessor,
  CheckboxControlValueAccessor,
  SelectControlValueAccessor,

  NgRequiredValidator
]);
为示例代码中的select元素也使用NgControlName指令,并在反馈中显示所选择 的搜索类别!
import {Component,View,bootstrap,NgIf} from "angular2/angular2";
        //引入form指令集
        import {formDirectives} from "angular2/forms";

        //EzApp组件
        @Component({selector:"ez-app"})
        @View({
            directives:[formDirectives,NgIf],
            template:`
                <form #f="form" (submit)="search(f.value)">
                    <select ng-control="kw2">
                        <option selected value="web">网页</option>
                        <option value="news">新闻</option>
                        <option value="image">图片</option>
                    </select>
                    <input type="text" ng-control="kw">
                    <button type="submit">搜索</button>
                </form>
                <!--给个简单的反馈-->
                <h1 *ng-if="kw!=''">正在搜索 {{kw}} {{kw2}}</h1>
            `,
            styles:[`form{background:#90a4ae;padding:5px;}`]
        })
        class EzApp{
            constructor(){
                this.kw = "";
                this.kw2="";
            }
            search(val){
                this.kw = val.kw;
                this.kw2 = val.kw2;
                //假装在搜索,2秒钟返回
                setTimeout(()=>this.kw="",2000);
            }
        }


        bootstrap(EzApp);
2、NgControlName - 命名控件指令
如前所述,NgControlName指令必须作为NgForm或NgFormModel的后代使用, 因为这个指令需要将创建的控件对象添加到祖先(NgForm或NgFormModel)所创建 的控件组中。
NgControlName指令的选择符是[ng-control],这意味着你必须在一个HTML元素上 定义ng-control属性,这个指令才会起作用。
属性:ngControl
NgControlName指令为宿主的DOM对象创建一个控件对象,并将这个对象以ngControl属性 指定的名称绑定到DOM对象上:
<form #f="form">
    <input type="text" ng-control="user">
    <input type="password" ng-control="pass">
</form>
在上面的代码中,将创建两个Control对象,名称分别为user和pass。
属性/方法:ngModel
除了使用控件组获得输入值,NgControlName指令可以通过ngModel实现模型 与表单的双向绑定:
<form>
    <input type="text" ng-control="user" [(ng-model)]="data.user">
    <input type="password" ng-control="pass" [(ng-model)]="data.pass">
</form>`
ngModel即是NgControlName指令的属性,也是它的事件,所以下面 的两种写法是等价的:
<input type="text" ng-control="user" [(ng-model)]="data.user">
//等价于
<input type="text" ng-control="user" [ng-model]="data.user" (ng-model)="data.user">
3、NgCongrolGroup - 命名控件组
NgControlGroup指令的选择符是[ng-control-group],如果模板中的某个元素具有这个属性, Angular2框架将自动创建一个控件组对象,并将这个对象以指定的名称与DOM对象绑定。
控件组可以嵌套,方便我们在语义上区分不同性质的输入:
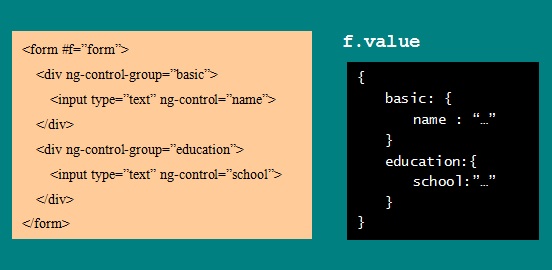
和NgControlName指令一样,NgControlGroup指令也必须作为NgForm或NgFormModel的 后代使用,因为这个指令需要将创建的控件组对象添加到祖先(NgForm或NgFormModel)所创建 的控件组中。
<ez-app></ez-app>
    <script type="module">
        import {Component,View,bootstrap,NgIf} from "angular2/angular2";
        import {formDirectives} from "angular2/forms";

        @Component({selector:"ez-app"})
        @View({
            directives:[NgIf,formDirectives],
            template:`
                <form #f="form">
                    <div>基本信息</div>
                    <!--声明控件组-->
                    <ul ng-control-group="basic">
                        <li>姓名:<input type="text" ng-control="name"></li>
                        <li>地址:<input type="text" ng-control="address"></li>
                        <li>电话:<input type="text" ng-control="telephone"></li>
                    </ul>
                    <div>专业技能</div>
                    <!--声明控件组-->
                    <ul ng-control-group="expertise">
                        <li>英语:<input type="checkbox" ng-control="english"></li>
                        <li>科技:<input type="checkbox" ng-control="tech"></li>
                        <li>运动:<input type="checkbox" ng-control="sport"></li>
                    </ul>
                </form>
                <!--调试:实时转储模型的值-->
                <pre>{{decode(f.value)}}</pre>
            `,
            styles:[`
                div{padding:5px;background:#b3e5fc;color:red;}
                form{background:#e1f5fe;}
                ul{list-style:none;padding:5px;margin:0px;}
                li{line-height:30px;}
            `]
        })
        class EzApp{
            decode(val){
                return JSON.stringify(val,null,"\t");
            }
        }

        bootstrap(EzApp);
    </script>
输出结果:
{
    "basic": {
        "name": "123",
        "address": "123",
        "telephone": "123"
    },
    "expertise": {
        "english": true,
        "tech": true,
        "sport": true
    }
}
4、NgFormControl - 绑定已有控件对象
与NgControlName指令不同,NgFormControl将已有的控件/Control对象绑定到DOM元素 上。当需要对输入的值进行==初始化==时,可以使用NgFormControl指令。
下面的代码中,使用NgFormControl指令将DOM元素绑定到组件EzComp的成员 变量movie上,我们需要在构造函数中先创建这个Control对象:
@View({
    //将输入元素绑定到已经创建的控件对象上
    template : `<input type="text" [ng-form-control]="movie">`
})
class EzComp{
    constructor(){
        //创建控件对象
        this.movie = new Control("Matrix II - Reload");
    }
}
控件/Control是Angular2中对表单输入元素的抽象,我们使用其value属性,就可以获得对应的 输入元素的值。
与NgControlName指令的另一个区别是,NgFormControl不需要NgForm或NgFormModel的祖先。
<ez-app></ez-app>
    <script type="module">
        import {Component,View,bootstrap} from "angular2/angular2";
        import {Control,formDirectives} from "angular2/forms";

        @Component({selector:"ez-app"})
        @View({
            directives:[formDirectives],
            template:`
                <div>
                    <ul>
                        <!--将输入元素绑定到已经创建的控件对象-->
                        <li>姓名:<input type="text" [ng-form-control]="name"></li>
                        <li>地址:<input type="text" [ng-form-control]="address"></li>
                        <li>电话:<input type="text" [ng-form-control]="telephone"></li>
                        <li>工作:<input type="text" [ng-form-control]="company"></li>
                    </ul>
                </div>
                <!--调试:转储模型信息-->
                <pre>{{dump()}}</pre>
            `,
            styles:[`
                form{background:#e1f5fe;}
                ul{list-style:none;padding:10px;margin:0px;}
                li{line-height:30px;}
            `]
        })
        class EzApp{
            constructor(){
                //创建控件对象
                this.name = new Control("Jason");
                this.address = new Control("London U.K.");
                this.telephone = new Control("114");
                this.company = new Control("114");
            }
            dump(){
                //读取控件对象的值
                var val = {
                    name : this.name.value,
                    address : this.address.value,
                    telephone : this.telephone.value,
                    company : this.company.value
                }
                return JSON.stringify(val,null,"\t");
            }
        }


        bootstrap(EzApp);
    </script>
5、NgFormModel - 绑定已有控件组
NgFormModel指令类似于NgControlGroup指令,都是为控件提供容器。但区别在于, NgFormModel指令将已有的控件组绑定到DOM对象上:
@View({
    template : `
        <!--绑定控件组与控件对象-->
        <div [ng-form-model]="controls">
            <input type="text" ng-control="name">
            <input type="text" ng-control="age">
        </div>`
})
class EzComp{
    constructor(){
        //创建控件组及控件对象
        this.controls = new ControlGroup({
            name :new Control("Jason"),
            age : new Control("45")
        });
    }
}
NgFormModel指令可以包含NgControlGroup指令,以便将不同性质的输入分组。
六、 @input和@output
先做个比方,然后奉上代码比如:
<talk-cmp [talk]="someExp" (rate)="eventHandler($event.rating)">input:
[talk]=”someExp” 这个标签可以理解为一个专门的监听器,监听父组件传递过来的someExp参数,并存入自身组件的talk变;好像是开了个后门,允许且只允许父组件的someExp进入,一旦进入立刻抓进一个叫talk的牢房,然后==子组件==中就可以通过@Input来定义这个变量talk然后使用它。
output:
(rate)=”eventHandler(event.rating) 这个意思是, 当子组件的click事件被触发,就执行父组件的eventHandler函数,并把子组件的参数 event.rating传递给父组件的eventHandler函数;就好像,当小孩子一哭(执行click事件),他的母亲立刻把他抱在怀里(执行母亲的eventHandler),同时母亲获得了小孩子的一些参数(event.rating)
1、@input()
父组件 father.component.ts 提供数据
import {Component} from "@angular/core";
@Component({
    selector: "my-father",
    templateUrl: "father.html"
})
export class FatherComponent {
    data: Array<Object>;
    constructor() {
        this.data = [
            {
                "id": 1,
                "name": "html"
            },
            {
                "id": 2,
                "name": "css"
            },
            {
                "id": 3,
                "name": "angular"
            },
            {
                "id": 4,
                "name": "ionic"
            },
            {
                "id": 5,
                "name": "node"
            }
        ]
    }
}
模板文件 father.html
<h1>父组件</h1>
// 包含子组件, 并使用属性传递数据过去
<my-child [info]="data"></my-child>
子组件 child.component.ts 获取数据
import {Component, Input} from "@angular/core";
@Component({
    selector: "my-child",
    templateUrl: "child.html"
})
export class ChildComponent {
    // 使用@Input获取传递过来的数据
    @Input()
    info: Array<Object>;
    constructor() {

    }
}
子组件 child.html模板文件
<ul>
    <li *ngFor="let item of info">
        {{item.name}}
    </li>
</ul>
2、@Output()
子组件three-link.component.ts
- 引入
import {Component, OnInit, Output, EventEmitter} from "@angular/core";- 定义输出变量
export class ThreeLinkComponent {
    province: string;
    // 输出一下参数
    @Output() provinceOut = new EventEmitter();
    constructor() {
        this.province = "陕西";
    }
}- 事件出发,发射变量给父组件
provinceChange() {
    // 选择省份的时候发射省份给父组件
    this.provinceOut.emit(this.province);
}
父组件模板
<!--三级联动组件-->
<three-link (provinceOut)="recPro($event)"></three-link>
父组件
// 函数接受子函数传递过来的变量, 子函数中emit的时候触发这个函数。
recPro(event) {
   this.province = event;
}


 2万+
2万+


 被折叠的 条评论
为什么被折叠?
被折叠的 条评论
为什么被折叠?
 到【灌水乐园】发言


