


1、首先是一个Fragment(这个demo中的聊天是放在Fragment实现的)。
public class MMFragment extends Fragment {
	ListView lv;
	EditText et;
	Button bt;
	public List<Map<String,Object>>data=new ArrayList();

	@Override
	public void onCreate(Bundle savedInstanceState) {
		super.onCreate(savedInstanceState);
		//模拟数据
		Map<String,Object>m1=new HashMap();
		m1.put("a", R.drawable.f2);
		m1.put("msg", "您好!");
		data.add(m1);

		Map<String,Object>m2=new HashMap();
		m2.put("b", R.drawable.f1);
		m2.put("msg", "聊天内容测试,该泡泡框应该比较长!");
		data.add(m2);

		Map<String,Object>m3=new HashMap();
		m3.put("a", R.drawable.f2);
		m3.put("msg", "还行吧!");
		data.add(m3);
	}

	@Override
	public View onCreateView(LayoutInflater inflater, ViewGroup container,
			Bundle savedInstanceState) {
		View v=inflater.inflate(R.layout.mainmsgfrglayout, null);
		lv=(ListView) v.findViewById(R.id.mmf_lv);
		prepareLv();	//向LV中添加模拟数据

		et=(EditText) v.findViewById(R.id.mmf_msg);
		bt=(Button) v.findViewById(R.id.mmf_bt);
		bt.setOnClickListener(new OnClickListener() {
			@Override
			public void onClick(View v) {
				if(et.getText().toString().length()<1)return;
				Map<String,Object>m=new HashMap();
				m.put("b", R.drawable.f1);
				m.put("msg", et.getText().toString());
				data.add(m);
				et.setText("");
				//
				prepareLv();
			}
		});
		return v;
	}
	//准备聊天内容
	private void prepareLv() {
		ChatAdapter ca =new ChatAdapter(getActivity(), data,R.layout.mainmsgfrgl_lv_item);
		lv.setAdapter(ca);
	}
}
2、这个Fragment采用的布局文件(这个布局文件的名字是 mainmsgfrglayout.xml)
<?xml version="1.0" encoding="utf-8"?>
<LinearLayout xmlns:android="http://schemas.android.com/apk/res/android"
    android:layout_width="match_parent"
    android:layout_height="match_parent"
    android:padding="5dp"
    android:orientation="vertical" >
 	<ListView
        android:id="@+id/mmf_lv"
        android:layout_width="match_parent"
        android:layout_height="wrap_content"
        android:layout_weight="1.0"
        android:divider="#ffffff"
        android:dividerHeight="8dp"
        android:stackFromBottom="true"
         >
    </ListView>

	<LinearLayout
	    android:layout_width="match_parent"
	    android:layout_height="wrap_content"
	    android:orientation="horizontal"
	    android:paddingBottom="4dp"
	    >
	    <EditText
	        android:layout_weight="1.0"
	        android:layout_width="wrap_content"
	        android:layout_height="46dp"
	        android:singleLine="true"
	        android:id="@+id/mmf_msg"
	        android:background="@drawable/tvborder"
	        />
	    <Button
	        android:layout_width="wrap_content"
	        android:layout_height="wrap_content"
	        android:text="发送"
	        android:id="@+id/mmf_bt"
	        />
	</LinearLayout>
</LinearLayout>
3、ListView控件的适配器是自定义的。
public class ChatAdapter extends BaseAdapter {
	public static List<Map<String,Object>>data;
	Context context;

	int layout;

	public ChatAdapter() {
		super();
	}
	public ChatAdapter(Context context,List<Map<String,Object>>data, int layout) {
		super();
		this.context = context;
		this.data=data;
		this.layout = layout;
	}

	@Override
	public int getCount() {
		// TODO Auto-generated method stub
		return data.size();
	}

	@Override
	public Object getItem(int arg0) {
		// TODO Auto-generated method stub
		return null;
	}

	@Override
	public long getItemId(int index) {
		// TODO Auto-generated method stub
		return index;
	}

	@Override
	public View getView(int index, View arg1, ViewGroup arg2) {
		LayoutInflater inflater=LayoutInflater.from(context);
		View v=inflater.inflate(layout, null);
		//解析控件,并填充数据
		if(data.get(index).get("a")!=null){
			//解析来言
			ImageView f=(ImageView) v.findViewById(R.id.mainmsgfrgl_lv_item_lface);
			f.setImageResource(R.drawable.f2);

			LinearLayout msgb=(LinearLayout) v.findViewById(R.id.mainmsgfrgl_lv_item_msgbox);
			msgb.setBackgroundResource(R.drawable.chat02);
			TextView msg=(TextView) v.findViewById(R.id.mainmsgfrgl_lv_item_msg);
			msg.setText(data.get(index).get("msg").toString());

		}else{
			//解析回复
			ImageView f=(ImageView) v.findViewById(R.id.mainmsgfrgl_lv_item_rface);
			f.setImageResource(R.drawable.f1);

			LinearLayout msgb=(LinearLayout) v.findViewById(R.id.mainmsgfrgl_lv_item_msgbox);
			msgb.setBackgroundResource(R.drawable.chat01);

			TextView msg=(TextView) v.findViewById(R.id.mainmsgfrgl_lv_item_msg);
			msg.setText(data.get(index).get("msg").toString());
		}
		return v;
	}

}<?xml version="1.0" encoding="utf-8"?>
<LinearLayout xmlns:android="http://schemas.android.com/apk/res/android"
android:layout_width="match_parent"
android:layout_height="match_parent"
android:orientation="horizontal"
android:gravity="bottom"
>
<ImageView
android:layout_width="wrap_content"
android:layout_height="wrap_content"
android:id="@+id/mainmsgfrgl_lv_item_lface"
/>
<LinearLayout
android:layout_width="wrap_content"
android:layout_height="wrap_content"
android:layout_weight="1.0"
android:padding="8dp"
android:id="@+id/mainmsgfrgl_lv_item_msgbox"
>
<TextView
android:layout_width="wrap_content"
android:layout_height="wrap_content"
android:id="@+id/mainmsgfrgl_lv_item_msg"
/>
</LinearLayout>
<ImageView
android:id="@+id/mainmsgfrgl_lv_item_rface"
android:layout_width="wrap_content"
android:layout_height="wrap_content"
/>
</LinearLayout>
5、上述适配器中用到一些图片(主要看名称,找对应关系)。

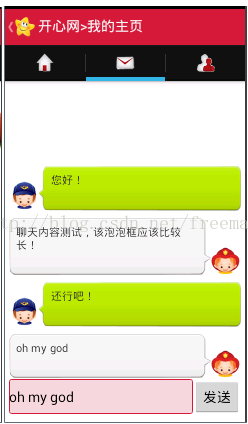
6、运行出的效果是
7、感谢观看。


 4968
4968


 被折叠的 条评论
为什么被折叠?
被折叠的 条评论
为什么被折叠?
 到【灌水乐园】发言


