


如何实现NSImage对其指定像素的保持及拉伸?
在UIKit中的UIImage有以下两个方法可以实现对图片的部分拉伸:
- (UIImage *)stretchableImageWithLeftCapWidth:(NSInteger)leftCapWidth topCapHeight:(NSInteger)topCapHeight
- (UIImage *)resizableImageWithCapInsets:(UIEdgeInsets)capInsets
上面的UIEdgeInsets指,
typedef struct {
CGFloat top, left, bottom, right;
} UIEdgeInsets; 分别表示上左下右四个方向的偏移量。
简单地说,Image *backButton = [[UIImage imageNamed:@”blueButton”]
resizableImageWithCapInsets:UIEdgeInsetsMake(12, 12, 12, 12)];
即让图片在UIEdgeInsetsMake(12, 12, 12, 12)这个范围内拉伸,其他区域则不拉伸。
不过值得注意的是resizableImageWithCapInsets:方法需要至少iOS5的运行环境,因此对于需要开发支持iOS5之前的App>来说是不可行的。替代方案是stretchableImageWithLeftCapWidth:topCapHeight:,但是在iOS5中,这已经是被Deprecated的方法了,而且该方法只能以1px作为重复铺满拉伸区域,无法做到类似渐变等图片效果,是存在一定局限的。
但在AppKit中的NSImage却没有类似的方法,于是可手动写类似这两个功能的函数来对NSImage类进行扩展:
//保持四周一定区域像素不拉伸,将图像扩散到一定的大小
- (NSImage *)stretchableImageWithSize:(NSSize)size edgeInsets:(NSEdgeInsets)insets;
//保持leftWidth,rightWidth这左右一定区域不拉伸,将图片宽度拉伸到(leftWidth+middleWidth+rightWidth)
- (NSImage *)stretchableImageWithLeftCapWidth:(float)leftWidth middleWidth:(float)middleWidth rightCapWidth:(float)rightWidth;
具体实现函数为:
- (NSImage *)stretchableImageWithSize:(NSSize)size edgeInsets:(NSEdgeInsets)insets
{
void (^makeAreas)(NSRect, NSRect *, NSRect *, NSRect *, NSRect *, NSRect *, NSRect *, NSRect *, NSRect *, NSRect *) = ^(NSRect srcRect, NSRect *tl, NSRect *tc, NSRect *tr, NSRect *ml, NSRect *mc, NSRect *mr, NSRect *bl, NSRect *bc, NSRect *br) {
CGFloat w = NSWidth(srcRect);
CGFloat h = NSHeight(srcRect);
CGFloat cw = w - insets.left - insets.right;
CGFloat ch = h - insets.top - insets.bottom;
CGFloat x0 = NSMinX(srcRect);
CGFloat x1 = x0 + insets.left;
CGFloat x2 = NSMaxX(srcRect) - insets.right;
CGFloat y0 = NSMinY(srcRect);
CGFloat y1 = y0 + insets.bottom;
CGFloat y2 = NSMaxY(srcRect) - insets.top;
*tl = NSMakeRect(x0, y2, insets.left, insets.top);
*tc = NSMakeRect(x1, y2, cw, insets.top);
*tr = NSMakeRect(x2, y2, insets.right, insets.top);
*ml = NSMakeRect(x0, y1, insets.left, ch);
*mc = NSMakeRect(x1, y1, cw, ch);
*mr = NSMakeRect(x2, y1, insets.right, ch);
*bl = NSMakeRect(x0, y0, insets.left, insets.bottom);
*bc = NSMakeRect(x1, y0, cw, insets.bottom);
*br = NSMakeRect(x2, y0, insets.right, insets.bottom);
};
NSRect rect = NSMakeRect(0, 0, size.width, size.height);
// Source rects
NSRect srcRect = (NSRect){NSZeroPoint, self.size};
NSRect srcTopL, srcTopC, srcTopR, srcMidL, srcMidC, srcMidR, srcBotL, srcBotC, srcBotR;
makeAreas(srcRect, &srcTopL, &srcTopC, &srcTopR, &srcMidL, &srcMidC, &srcMidR, &srcBotL, &srcBotC, &srcBotR);
// Destinations rects
NSRect dstTopL, dstTopC, dstTopR, dstMidL, dstMidC, dstMidR, dstBotL, dstBotC, dstBotR;
makeAreas(rect, &dstTopL, &dstTopC, &dstTopR, &dstMidL, &dstMidC, &dstMidR, &dstBotL, &dstBotC, &dstBotR);
NSRect srcRects[] = {srcTopL, srcTopC, srcTopR, srcMidL, srcMidC, srcMidR, srcBotL, srcBotC, srcBotR};
NSRect dstRects[] = {dstTopL, dstTopC, dstTopR, dstMidL, dstMidC, dstMidR, dstBotL, dstBotC, dstBotR};
NSMutableArray *partImgs = [NSMutableArray arrayWithCapacity:9];
for (int i=0;i<9;i++)
{
NSRect aSrcRect = srcRects[i];
NSRect aDstRect = dstRects[i];
NSImage *partImg = [[NSImage alloc] initWithSize:aSrcRect.size];
[partImg lockFocus];
[self drawAtPoint:NSZeroPoint fromRect:aSrcRect operation:NSCompositeCopy fraction:1.0];
[partImg setSize:aDstRect.size];
[partImg unlockFocus];
[partImgs addObject:partImg];
}
// Draw
NSImage *resultImg = [[NSImage alloc] initWithSize:rect.size];
[resultImg lockFocus];
NSDrawNinePartImage(rect,
[partImgs objectAtIndex:0],
[partImgs objectAtIndex:1],
[partImgs objectAtIndex:2],
[partImgs objectAtIndex:3],
[partImgs objectAtIndex:4],
[partImgs objectAtIndex:5],
[partImgs objectAtIndex:6],
[partImgs objectAtIndex:7],
[partImgs objectAtIndex:8],
NSCompositeSourceOver, 1, NO);
[resultImg unlockFocus];
return resultImg;
}
- (NSImage *)stretchableImageWithLeftCapWidth:(float)leftWidth middleWidth:(float)middleWidth rightCapWidth:(float)rightWidth
{
// Calculate the new images dimensions
float imageWidth = leftWidth + middleWidth + rightWidth;
float imageHeight = self.size.height;
// Generate the left image
NSRect rectLeft = NSMakeRect(0, 0, leftWidth, imageHeight);
NSImage *imageLeft = [[NSImage alloc] initWithSize:rectLeft.size];
if (imageLeft.size.width > 0) {
[imageLeft lockFocus];
[self drawInRect:rectLeft fromRect:rectLeft operation:NSCompositeCopy fraction:1.0];
[imageLeft unlockFocus];
}
// Generate the middle image
NSRect rectMiddle = NSMakeRect(0, 0, middleWidth, imageHeight);
NSImage *imageMiddle = [[NSImage alloc] initWithSize:rectMiddle.size];
if (imageMiddle.size.width > 0) {
[imageMiddle lockFocus];
[self drawInRect:rectMiddle fromRect:NSMakeRect(leftWidth, 0, self.size.width-rightWidth-leftWidth,imageHeight) operation:NSCompositeCopy fraction:1.0];
[imageMiddle unlockFocus];
}
// Generate the right image
NSRect rectRight = NSMakeRect(0, 0, rightWidth, imageHeight);
NSImage *imageRight = [[NSImage alloc] initWithSize:rectRight.size];
if (imageRight.size.width > 0) {
[imageRight lockFocus];
[self drawInRect:rectRight fromRect:NSMakeRect(self.size.width - rightWidth, 0, rightWidth, imageHeight) operation:NSCompositeCopy fraction:1.0];
[imageRight unlockFocus];
}
// Combine the images
NSImage *newImage = [[NSImage alloc] initWithSize:NSMakeSize(imageWidth, imageHeight)];
if (newImage.size.width > 0) {
[newImage lockFocus];
NSDrawThreePartImage(NSMakeRect(0, 0, imageWidth, imageHeight), imageLeft, imageMiddle, imageRight, NO, NSCompositeSourceOver, 1, NO);
[newImage unlockFocus];
}
// Release the images and return the new image
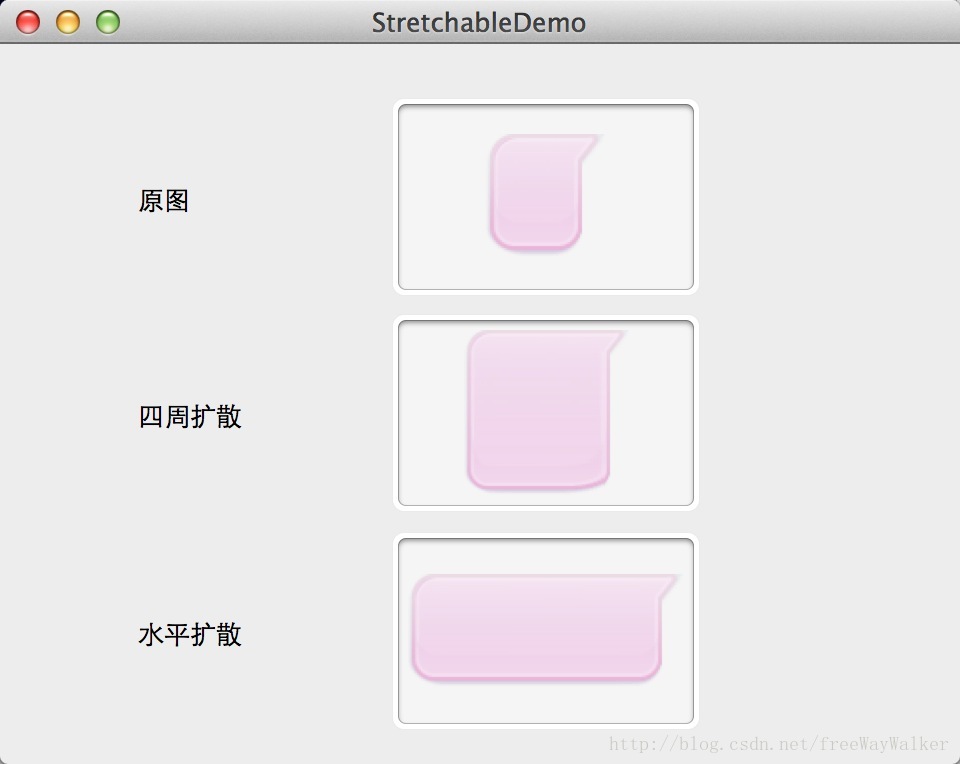
return newImage;
}效果如图所示:
Demo下载:StretchableDemo
参考自:
Customizing Appearance With Resizable Images http://useyourloaf.com/blog/2012/07/05/customizing-appearance-with-resizable-images.html
实现将NSImage保持指定像素的拉伸 http://www.tanhao.me/pieces/1408.html


 4483
4483


 被折叠的 条评论
为什么被折叠?
被折叠的 条评论
为什么被折叠?
 到【灌水乐园】发言


