


一、属性
dataSource ---设置UITableViewDataSource的代理
delegate ---设置UItableViewDelegate的代理
/*当header、footer、cell的高度是固定值的话,用该方法直接设置表的高度,无需调用表的delegate方法设置它们的高度 eg:_table.rowHeight = 60 */sectionIndexColor -- 设置sectionIndexTitle(表索引子母)的颜色
@property (nonatomic) NSInteger sectionIndexMinimumDisplayRowCount;                                                      // show special section index list on right when row count reaches this value. default is 0
@property (nonatomic, strong, nullable) UIColor *sectionIndexColor NS_AVAILABLE_IOS(6_0) UI_APPEARANCE_SELECTOR;                   // color used for text of the section index
@property (nonatomic, strong, nullable) UIColor *sectionIndexBackgroundColor NS_AVAILABLE_IOS(7_0) UI_APPEARANCE_SELECTOR;         // the background color of the section index while not being touched
@property (nonatomic, strong, nullable) UIColor *sectionIndexTrackingBackgroundColor NS_AVAILABLE_IOS(6_0) UI_APPEARANCE_SELECTOR; // the background color of the section index while it is being touched
估算元素的高度 // NS_AVAILABLE_IOS(7_0)
/*
   连接文章 介绍了estimatedRowHeight的用的场景。(适用动态的cell.height的适配)
*/
理解iOS 8中的Self Sizing Cells和Dynamic Type
estimatedRowHeight --- 设置表格行的估算高度以改善性能
estimatedSectionHeaderHeight、estimatedSectionFooterHeight ----- 设置Section头和Section尾估算高度以改善性能
- (CGFloat)tableView:(UITableView *)tableView estimatedHeightForRowAtIndexPath:(NSIndexPath *)indexPath NS_AVAILABLE_IOS(7_0);
- (CGFloat)tableView:(UITableView *)tableView estimatedHeightForHeaderInSection:(NSInteger)section NS_AVAILABLE_IOS(7_0);
- (CGFloat)tableView:(UITableView *)tableView estimatedHeightForFooterInSection:(NSInteger)section NS_AVAILABLE_IOS(7_0);
separatorEffect -------- 表的分割线(毛玻璃效果)//默认的分割线的色调暗
效果图:

/*
    UIImageView *backImageView = [[UIImageView alloc] initWithImage:[UIImage imageNamed:@"4.jpg"]];
    self.myTableView.backgroundView = backImageView;
    UIBlurEffect *blureffect = [UIBlurEffect effectWithStyle:UIBlurEffectStyleDark];
    UIVibrancyEffect *vinb = [UIVibrancyEffect effectForBlurEffect:blureffect];
    self.myTableView.separatorEffect = vinb;
    //cell.backgroundColor = [UIColor clearColor];
*/
二、方法
初始化方法:
initWithFrame:-----------设置表的大小和位置
initWithFrame:style---------设置表的大小,位置和样式(组,单一)
setEditing:----------表格进入编辑状态,无动画
setEditing: animated:---------表格进入编辑状态,有动画
reloadData---------------刷新整个表视图
reloadSectionIndexTitles
numberOfSections-----------获取当前所有的组
numberOfRowsInSection:---------获取某个组有多少行
rectForSection:----------获取某个组的位置和大小
rectForHeaderInSection:---------获取某个组的头标签的位置和大小
rectForFooterInSection:-----------获取某个组的尾标签的位置和大小
rectForRowAtIndex:-----------获取某一行的位置和大小
indexPathForRowAtPoint-------------点击某一个点,判断是在哪一行上的信息。
indexPathForCell:------------获取单元格的信息
indexPathsForRowsInRect:---------在某个区域里会返回多个单元格信息
cellForRowAtIndexPath:-------------通过单元格路径得到单元格
visibleCells-----------返回所有可见的单元格
indexPathsForVisibleRows
UITableViewHeaderFooterView的使用说明
headerViewForSection:--------设置头标签的视图
footerViewForSection;----------设置尾标签的视图
UITableViewHeaderFooterView的使用说明
- (nullable UITableViewHeaderFooterView *)headerViewForSection:(NSInteger)section NS_AVAILABLE_IOS(6_0);
- (nullable UITableViewHeaderFooterView *)footerViewForSection:(NSInteger)section NS_AVAILABLE_IOS(6_0);

- (UIView *)tableView:(UITableView *)tableView viewForHeaderInSection:(NSInteger)section
{
    static NSString *HeaderIdentifier = @"header";
    //表头、尾UITableViewHeaderFooterView的重用机制
    //CustomHeaderView *myHeader = [tableView dequeueReusableHeaderFooterViewWithIdentifier:HeaderIdentifier];
    if(!myHeader) {
    //    [tableView registerClass:[CustomHeaderView class] forHeaderFooterViewReuseIdentifier:HeaderIdentifier];
        myHeader = [[[NSBundle mainBundle] loadNibNamed:@"CustomHeaderView"
                                                  owner:self
                                                options:nil] objectAtIndex:0];
    }

    [myHeader.btnSomething setTitle:@"-" forState:UIControlStateNormal];
    [myHeader.lblSomething setText:[NSString stringWithFormat:@"Section: %d",section]];

    return myHeader;
}

- (void)tableView:(UITableView *)tableView didSelectRowAtIndexPath:(NSIndexPath *)indexPath
{
    CustomHeaderView *theHeaderView = (CustomHeaderView*)[tableView <span style="color:#FF0000;">headerViewForSection</span>:indexPath.section];
    NSLog(@"%@",theHeaderView);

    [theHeaderView.lblSomething setAlpha:theHeaderView.lblSomething.alpha-0.1];
    [theHeaderView.btnSomething setTitle:@"+" forState:UIControlStateNormal];
}
重用机制(2个)
/**< 使用这个方法之前必须是使用了registerNib:forCellReuseIdentifier:<span>或者</span>registerClass:forCellReuseIdentifier:方法注册了Cell
*/- (void)registerNib:(nullable UINib *)nib forCellReuseIdentifier:(NSString *)identifier NS_AVAILABLE_IOS(5_0);
- (void)registerClass:(nullable Class)cellClass forCellReuseIdentifier:(NSString *)identifier NS_AVAILABLE_IOS(6_0);
- (void)registerNib:(nullable UINib *)nib forHeaderFooterViewReuseIdentifier:(NSString *)identifier NS_AVAILABLE_IOS(6_0);
- (void)registerClass:(nullable Class)aClass forHeaderFooterViewReuseIdentifier:(NSString *)identifier NS_AVAILABLE_IOS(6_0);/*
beginUpdates and endUpdates两个方法,是配合起来使用的,标记了一个tableView的动画块。分别代表动画的开始开始和结束。两者成对出现,可以嵌套使用。
一般,在添加,删除,选择 tableView中使用,并实现动画效果。在动画块内,不建议使用reloadData方法,如果使用,会影响动画。
*/
调用范例
beginUpdates--------只添加或删除才会更新行数
beginUpdates--------只添加或删除才会更新行数
endUpdates---------添加或删除后会调用添加或删除方法时才会更新
insertSections:withRowAnimation:-----------插入一个或多个组,并使用动画
insertRowsIndexPaths:withRowAnimation:-------插入一个或多个单元格,并使用动画
deleteSections:withRowAnimation:--------删除一个或多个组,并使用动画
deleteRowIndexPaths:withRowAnimation:--------删除一个或多个单元格,并使用动画
reloadSections:withRowAnimation:---------更新一个或多个组,并使用动画
reloadRowIndexPaths:withRowAnimation:-------------更新一个或多个单元格,并使用动画
moveSection:toSection:-------------移动某个组到目标组位置
moveRowAtIndexPath:toIndexPath:-----------移动个某个单元格到目标单元格位置
indexPathsForSelectedRow
indexPathsForSelectedRow
selectRowAtIndexPath:animation:scrollPosition---------设置选中某个区域内的单元格
deselectRowAtIndexPath:animation:----------取消选中的单元格
UITableViewDataSource代理方法:
numberOfSectionsInTableV
tableView:numberOfRowInSection:----------设置每个组有多少行
tableView:cellForRowAtIndexPath:---------设置单元格显示的内容
tableView:titleForHeaderInSection:---------设置组表的头标签视图
tableView:titleForFooterInSection:-----------设置组表的尾标签视图
tableView:canEditRowAtIndexPath:---------设置单元格是否可以编辑
tableView:canMoveRowAtIndexPath:--------设置单元格是否可以移动
tableView:sectionIndexTitleForTabl
tableView:commitEditingStyle:forRowAtIndexPath:----------编辑单元格(添加,删除)
tableView:moveRowAtIndexPath:toIndexPath ------- 单元格移动
tableView:indentationLevelForRowAtIndexPath ------- 返回行层次的深度
效果图:
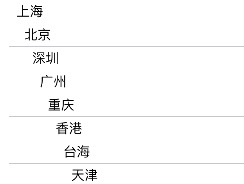
tableView:indentationLevelForRowAtIndexPath ------- 返回行层次的深度
效果图:
/*
- (NSInteger)tableView:(UITableView *)tableView indentationLevelForRowAtIndexPath:(NSIndexPath *)indexPath
{
    return [indexPath row];
}
*/
//NS_AVAILABLE_IOS(8_0)
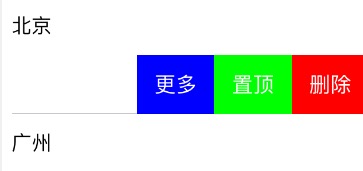
tableView:editActionsForRowAtIndexPath ----- 自定义左滑动的编辑功能样式(UITableViewRowAction)
tableView:titleForDeleteConfirmationButtonForRowAtIndexPath ------ 改变默认左滑动出现的字样 eg:改变默认默认 Delete 字为 下载 (return @“下载”;)
效果图:
/*
- (BOOL)tableView:(UITableView *)tableView canEditRowAtIndexPath:(NSIndexPath *)indexPath
{    return YES;
}
- (UITableViewCellEditingStyle)tableView:(UITableView *)tableView editingStyleForRowAtIndexPath:(NSIndexPath *)indexPath
{    return UITableViewCellEditingStyleDelete;
}
-(NSArray *)tableView:(UITableView *)tableView editActionsForRowAtIndexPath:(NSIndexPath *)indexPath{
    UITableViewRowAction *layTopRowAction1 = [UITableViewRowAction rowActionWithStyle:UITableViewRowActionStyleDestructive title:@"删除" handler:^(UITableViewRowAction *action, NSIndexPath *indexPath) {
        NSLog(@"点击了删除");
        [tableView setEditing:NO animated:YES];
    }];
    layTopRowAction1.backgroundColor = [UIColor redColor];
    UITableViewRowAction *layTopRowAction2 = [UITableViewRowAction rowActionWithStyle:UITableViewRowActionStyleDestructive title:@"置顶" handler:^(UITableViewRowAction *action, NSIndexPath *indexPath) {
        NSLog(@"点击了置顶");
        [tableView setEditing:NO animated:YES];
    }];
    layTopRowAction2.backgroundColor = [UIColor greenColor];
    UITableViewRowAction *layTopRowAction3 = [UITableViewRowAction rowActionWithStyle:UITableViewRowActionStyleDestructive title:@"更多" handler:^(UITableViewRowAction *action, NSIndexPath *indexPath) {
        NSLog(@"点击了更多");
        [tableView setEditing:NO animated:YES];

    }];
    layTopRowAction3.backgroundColor = [UIColor blueColor];
    NSArray *arr = @[layTopRowAction1,layTopRowAction2,layTopRowAction3];
    return arr;
}
*/
UITableViewDelegate代理方法:

在iOS8以上tableView:willDisplayFooterView:forSection:,和tableView:willDisplayHeaderView:forSection:可以正常被调用
在iOS7(iOS6没测试)上却没有被调用
原来iOS7必须同时实现了Header和Footer这个delegate才会被调用所以
- (CGFloat)tableView:(UITableView *)tableView heightForHeaderInSection:(NSInteger)section
{
    return 0.f;
}

- (UIView *)tableView:(UITableView *)tableView viewForHeaderInSection:(NSInteger)section
{
    UIView *view = [UIView new];
    view.backgroundColor = [UIColor clearColor];
    return view;
}
tableView: willDisplayCell:forRowAtIndexPath:-----------设置当前的单元格
效果图:
/*
-(void)tableView:(UITableView *)tableView willDisplayCell:(UITableViewCell *)cell forRowAtIndexPath:(NSIndexPath *)indexPath
{
    cell.transform = CGAffineTransformMakeTranslation(320, 0);
    [UIView animateWithDuration:indexPath.row*0.2 animations:^{
        cell.transform = CGAffineTransformIdentity;
    }];
}
*/
tableView: heightForRowAtIndexPath:-----------设置每行的高度
tableView:tableViewheightForHeaderInSection
tableView:tableViewheightForFooterInSection
tableView: viewForHeaderInSection:----------自定义组表的头标签视图
tableView: viewForFooterInSection: ----------自定义组表的尾标签视图
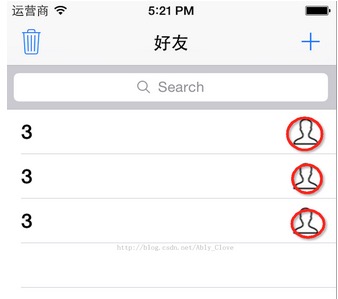
tableView:accessoryButtonTappedFor
效果图:
/*
    UIImage *image= [ UIImage imageNamed:@"man" ];
    UIButton *button = [ UIButton buttonWithType:UIButtonTypeCustom ];
    CGRect frame = CGRectMake( 0.0 , 0.0 , image.size.width , image.size.height );
    button.frame = frame;
    [button setBackgroundImage:image forState:UIControlStateNormal ];
    button.backgroundColor = [UIColor clearColor ];
    [button addTarget:self
               action:@selector(accessoryButtonIsTapped:event:) forControlEvents:UIControlEventTouchUpInside];

<pre name="code" class="objc">- (void)accessoryButtonIsTapped:(id)sender event:(id)event{
    NSSet *touches = [event allTouches];
    UITouch *touch = [touches anyObject];
    CGPoint currentTouchPosition = [touch locationInView:self.tableView];
    NSIndexPath *indexPath = [self.tableView indexPathForRowAtPoint:currentTouchPosition];
    if(indexPath != nil)
    {
        [self tableView:self.tableView <span style="color:#FF0000;">accessoryButtonTappedForRowWithIndexPath</span>:indexPath];
    }
}
tableView:willSelectRowAtIndexPath
tableView:didSelectRowAtIndexPath:-----------获取选中的单元格的响应事件
tableView: tableViewwillDeselectRowAtIndexPa
tableView:didDeselectRowAtIndexPat
NS_AVAILABLE_IOS(9_0)
remembersLastFocusedIndexPath -------- 使用Apple TV遥控器控制屏幕上的用户界面
- (BOOL)tableView:(UITableView *)tableView canFocusRowAtIndexPath:(NSIndexPath *)indexPath NS_AVAILABLE_IOS(9_0);
- (BOOL)tableView:(UITableView *)tableView shouldUpdateFocusInContext:(UITableViewFocusUpdateContext *)context NS_AVAILABLE_IOS(9_0);
- (void)tableView:(UITableView *)tableView didUpdateFocusInContext:(UITableViewFocusUpdateContext *)context withAnimationCoordinator:(UIFocusAnimationCoordinator *)coordinator NS_AVAILABLE_IOS(9_0);
- (nullable NSIndexPath *)indexPathForPreferredFocusedViewInTableView:(UITableView *)tableView NS_AVAILABLE_IOS(9_0);


 132
132


 被折叠的 条评论
为什么被折叠?
被折叠的 条评论
为什么被折叠?
 到【灌水乐园】发言


