


最近做项目的时候用到了这个控件,觉得整体看上去还是高大上的。先来看看官方的API文档是怎么描述这个类的吧。

CardView是一个有着圆角的有阴影效果的FrameLayout(阴影啊,使用起来还是很有层次感的)。

CardView使用elevation属性来显示阴影效果,这个值越大,阴影效果越大如下
app:cardElevation="2sp"
因为在Android Lollipop版本(5.0)之前圆角的裁剪是非常麻烦的,CardView不会裁剪那些和圆角相交的子控件。但是它增加padding来避免这样的交集(可以参考setPreventCornerOverlap(boolean)来改变这些行为)。

在Android L之前版本,CardView为它显示的内容和绘制成的阴影效果增加padding。在sides处的padding值等于maxCardElevation + (1 - cos45) * cornerRadius,在bottom处的值等于maxCardElevation * 1.5 + (1 - cos45) * cornerRadius。

padding是用来抵消阴影的,你不能在CardView上设置padding。但是,你可以使用content padding属性在XML文件中或者通过setContentPadding(int,int,int,int)在JAVA代码中来设置Card边缘和CardView的子控件之间的padding。

注意,如果你给CardView设置了精确的尺寸,由于阴影效果,在Android L之前和Android L之后的版本中,CardView中显示的content是有区别的。通过使用API版本的特定值,可以避免这些改变。如果你想更好的设置CardView的内边距在Android L和之后的版本,你可以设置setUseCompatPadding(boolean)为true

修改CardView的elevation属性通过使用setCardElevation(float)。CardView将使用elevation在Android L和之前的版本,它将修改这个阴影的size。为了避免当shadow size改变的时候View的移动,shadow size不能大于getMaxCardElevation()。如果你想动态的修改elevation,你可以调用setMaxCardElevation(float)方法当CardView别初始化的时候。
属性和方法
app:cardBackgroundColor="#ffffff"
cardView.setCardBackgroundColor(int);//设置CardView的background的颜色
app:cardCornerRadius="5dp"
cardView.setRadius(float);//设置CardView的圆角半径
app:cardElevation="2sp"
cardView.setMaxCardElevation(float)//设置CardView的elevation(阴影,值越大,阴影效果越强)
app:cardMaxElevation="2sp"//设置CardView的最大Elevation
app:cardPreventCornerOverlap="true|false"
cardView.setPreventCornerOverlap(boolean);//在Android5.0以前的版本上防止子控件和CardView的圆角之间的重叠交接
app:cardUseCompatPadding="true|false"
cardView.setUseCompatPaddin(boolean);//在Android5.0和以上版本添加padding让其和之前的版本有相同的测量形式
app:contentPadding=""
cardView.setContentPadding(int,int,int,int);//设置Card边缘和CardView的子控件之间的内边距
app:contentPaddingTop=""
app:contentPaddingBottom=""
app:contentPaddingLeft=""
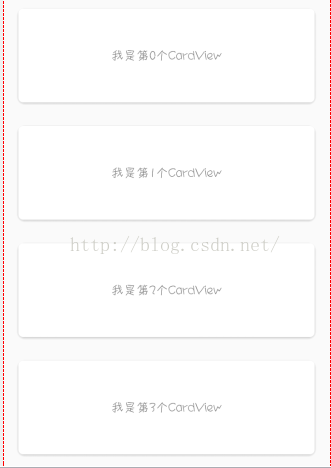
app:contentPaddingRight=""先上效果图,一般CardView用在ListView或者RecyclerView作为列表的一项使用。
布局文件
<?xml version="1.0" encoding="utf-8"?>

<android.support.design.widget.CoordinatorLayout xmlns:android="http://schemas.android.com/apk/res/android"
    xmlns:app="http://schemas.android.com/apk/res-auto"
    xmlns:tools="http://schemas.android.com/tools"
    android:layout_width="match_parent"
    android:layout_height="match_parent"
    tools:context=".activity.MainActivity">

    <android.support.design.widget.AppBarLayout
        android:layout_width="match_parent"
        android:layout_height="wrap_content">

        <TextView
            android:layout_width="match_parent"
            android:layout_height="50dp"
            android:background="#ffff00"
            android:gravity="center"
            android:text="我出去了,别想我~"
            android:textColor="#00ffff"
            android:textSize="20sp"
            app:layout_scrollFlags="scroll|enterAlwaysCollapsed" />

        <android.support.design.widget.TabLayout
            android:id="@+id/tab_view"
            android:layout_width="match_parent"
            android:layout_height="wrap_content">

        </android.support.design.widget.TabLayout>

    </android.support.design.widget.AppBarLayout>

    <android.support.v4.view.ViewPager
        android:id="@+id/pager_view"
        android:layout_width="match_parent"
        android:layout_height="match_parent"
        app:layout_behavior="@string/appbar_scrolling_view_behavior" />

</android.support.design.widget.CoordinatorLayout><?xml version="1.0" encoding="utf-8"?>
<LinearLayout xmlns:android="http://schemas.android.com/apk/res/android"
xmlns:app="http://schemas.android.com/apk/res-auto"
android:layout_width="match_parent"
android:layout_height="wrap_content"
android:orientation="vertical">
<android.support.v7.widget.CardView
android:layout_width="match_parent"
android:layout_height="wrap_content"
android:layout_marginBottom="10dp"
android:layout_marginLeft="15dp"
android:layout_marginRight="15dp"
android:layout_marginTop="10dp"
app:cardBackgroundColor="#ffffff"
app:cardCornerRadius="5dp"
app:cardElevation="2sp">
<TextView
android:id="@+id/txt"
android:layout_width="match_parent"
android:layout_height="100dp"
android:gravity="center" />
</android.support.v7.widget.CardView>
</LinearLayout>Fragment的布局
<FrameLayout xmlns:android="http://schemas.android.com/apk/res/android"
    xmlns:tools="http://schemas.android.com/tools"
    android:layout_width="match_parent"
    android:layout_height="match_parent"
    tools:context="com.destiny.cardviewdemo.fragment.CardFragment">

    <android.support.v7.widget.RecyclerView
        android:id="@+id/recycler_view"
        android:layout_width="match_parent"
        android:layout_height="match_parent" />

</FrameLayout>
package com.destiny.cardviewdemo.activity;

import android.os.Bundle;
import android.support.design.widget.TabLayout;
import android.support.v4.app.Fragment;
import android.support.v4.view.ViewPager;
import android.support.v7.app.AppCompatActivity;

import com.destiny.cardviewdemo.R;
import com.destiny.cardviewdemo.adapter.CardPagerAdapter;
import com.destiny.cardviewdemo.fragment.CardFragment;

import java.util.ArrayList;
import java.util.List;

public class MainActivity extends AppCompatActivity {

    private TabLayout mTabLayout;
    private ViewPager mViewPager;

    private List<Fragment> fragmentList;
    private CardPagerAdapter adapter;

    @Override
    protected void onCreate(Bundle savedInstanceState) {
        super.onCreate(savedInstanceState);
        setContentView(R.layout.activity_main);

        initView();
        initPager();
    }

    private void initPager() {
        fragmentList = new ArrayList<>();
        for (int i = 0; i < mTabLayout.getTabCount(); i++) {
            CardFragment fragment = new CardFragment();
            fragmentList.add(fragment);
        }
        adapter = new CardPagerAdapter(getSupportFragmentManager(), fragmentList);
        mViewPager.setAdapter(adapter);
    }

    private void initView() {
        mTabLayout = (TabLayout) findViewById(R.id.tab_view);
        mViewPager = (ViewPager) findViewById(R.id.pager_view);

        mTabLayout.addTab(mTabLayout.newTab().setText("A"));
        mTabLayout.addTab(mTabLayout.newTab().setText("B"));
        mTabLayout.addTab(mTabLayout.newTab().setText("C"));

        mTabLayout.setOnTabSelectedListener(new TabLayout.ViewPagerOnTabSelectedListener(mViewPager));
        mViewPager.addOnPageChangeListener(new TabLayout.TabLayoutOnPageChangeListener(mTabLayout));
    }
}
package com.destiny.cardviewdemo.fragment;


import android.os.Bundle;
import android.support.v4.app.Fragment;
import android.support.v7.widget.LinearLayoutManager;
import android.support.v7.widget.RecyclerView;
import android.view.LayoutInflater;
import android.view.View;
import android.view.ViewGroup;

import com.destiny.cardviewdemo.R;
import com.destiny.cardviewdemo.adapter.RecyclerAdapter;

import java.util.ArrayList;
import java.util.List;

public class CardFragment extends Fragment {

    private RecyclerView mRecyclerView;
    private RecyclerAdapter adapter;
    private List<String> data;

    @Override
    public View onCreateView(LayoutInflater inflater, ViewGroup container, Bundle savedInstanceState) {
        View rootView = inflater.inflate(R.layout.fragment_card, container, false);
        mRecyclerView = (RecyclerView) rootView.findViewById(R.id.recycler_view);
        data = new ArrayList<>();
        for (int i = 0; i < 30; i++) {
            data.add("我是第" + i + "个CardView");
        }
        adapter = new RecyclerAdapter(getActivity(), data);
        mRecyclerView.setLayoutManager(new LinearLayoutManager(getActivity(), LinearLayoutManager.VERTICAL
                , false));
        mRecyclerView.setAdapter(adapter);
        return rootView;
    }

}
package com.destiny.cardviewdemo.adapter;

import android.support.v4.app.Fragment;
import android.support.v4.app.FragmentManager;
import android.support.v4.app.FragmentStatePagerAdapter;

import java.util.List;

public class CardPagerAdapter extends FragmentStatePagerAdapter {

    private List<Fragment> data;

    public CardPagerAdapter(FragmentManager fm, List<Fragment> data) {
        super(fm);
        this.data = data;
    }

    @Override
    public Fragment getItem(int position) {
        return data == null ? null : data.get(position);
    }

    @Override
    public int getCount() {
        return data == null ? 0 : data.size();
    }
}
package com.destiny.cardviewdemo.adapter;

import android.content.Context;
import android.support.v7.widget.RecyclerView;
import android.view.LayoutInflater;
import android.view.View;
import android.view.ViewGroup;
import android.widget.TextView;

import com.destiny.cardviewdemo.R;

import java.util.List;

public class RecyclerAdapter extends RecyclerView.Adapter<RecyclerAdapter.ViewHolder> {

    private List<String> data;
    private LayoutInflater inflater;
    private Context mContext;

    public RecyclerAdapter(Context context, List<String> data) {
        this.mContext = context;
        inflater = LayoutInflater.from(mContext);
        this.data = data;
    }

    @Override
    public ViewHolder onCreateViewHolder(ViewGroup parent, int viewType) {
        View rootView = inflater.inflate(R.layout.item_list, parent, false);
        ViewHolder holder = new ViewHolder(rootView);
        return holder;
    }

    @Override
    public void onBindViewHolder(ViewHolder holder, int position) {
        holder.mTextView.setText(data.get(position));
    }

    @Override
    public int getItemCount() {
        return data == null ? 0 : data.size();
    }

    class ViewHolder extends RecyclerView.ViewHolder {

        TextView mTextView;

        public ViewHolder(View itemView) {
            super(itemView);
            mTextView = (TextView) itemView.findViewById(R.id.txt);
        }
    }
}


 3493
3493


 被折叠的 条评论
为什么被折叠?
被折叠的 条评论
为什么被折叠?
 到【灌水乐园】发言


