


译者:老葛 ESKALATE科技公司
跨页面表单
我们已经学习了简单的单页面表单。但是你可能需要让用户跨越多个页面来填充一个表单或者通过多步来输入数据。让我们创建一个简洁的模块来说明跨页面表单技术,在该模块中通过3个独立的步骤来从用户收集3种成分(ingeredient)。我们的方式是使用表单隐藏域来传递数值。我们将模块命名为formwizard.module。当然,我们首先需要一个formwizard.info文件。
; $Id$
name = Form Wizard Example
description = An example of a multistep form.
version = "$Name$"
接着,我们将编写真实的模块。该模块展示两个页面:一个用来输入数据(我们将重复使用这一页面),一个最终页面用来展示用户的输入以及对用户输入的致谢。
<?php
// $Id$
/**
* Implementation of hook_menu().
*/
function formwizard_menu($may_cache) {
$items = array();
if ($may_cache) {
$items[] = array(
'title' => t('Form Wizard'),
'path' => 'formwizard',
'callback' => 'drupal_get_form',
'callback arguments' => array('formwizard_multiform'),
'type' => MENU_CALLBACK,
'access' => user_access('access content'),
);
$items[] = array(
'title' => t('Thanks!'),
'path' => 'formwizard/thanks',
'callback' => 'formwizard_thanks',
'type' => MENU_CALLBACK,
'access' => user_access('access_content')
);
}
return $items;
}
/**
* Build the form differently depending on which step we're on.
*/
function formwizard_multiform($form_values = NULL) {
$form['#multistep'] = TRUE;
// Find out which step we are on. If $form_values is NULL,
// that means we are on step 1.
$step = isset($form_values) ? (int) $form_values['step'] : 1;
// Store next step in hidden field.
$form['step'] = array(
'#type' => 'hidden',
'#value' => $step + 1
);
// Customize the fieldset title to indicate the current step to the user.
$form['indicator'] = array(
'#type' => 'fieldset',
'#title' => t('Step @number', array('@number' => $step))
);
// The name of our ingredient form element is unique for
// each step, e.g., ingredient_1, ingredient_2...
$form['indicator']['ingredient_' . $step] = array(
'#type' => 'textfield',
'#title' => t('Ingredient'),
'#description' => t('Enter ingredient @number of 3.', array('@number' => $step))
);
// The button will say Next until the last step, when it will say Submit.
// Also, we turn off redirection until the last step.
$button_name = t('Submit');
if ($step < 3) {
$form['#redirect'] = FALSE;
$button_name = t('Next');
}
$form['submit'] = array(
'#type' => 'submit',
'#value' => $button_name
);
switch($step) {
case 2:
$form['ingredient_1'] = array(
'#type' => 'hidden',
'#value' => $form_values['ingredient_1']
);
break;
case 3:
$form['ingredient_1'] = array(
'#type' => 'hidden',
'#value' => $form_values['ingredient_1']
);
$form['ingredient_2'] = array(
'#type' => 'hidden',
'#value' => $form_values['ingredient_2']
);
}
return $form;
}
/**
* Validate handler for form ID 'formwizard_multiform'.
*/
function formwizard_multiform_validate($form_id, $form_values) {
drupal_set_message(t('Validation called for step @step',
array('@step' => $form_values['step'] - 1)));
}
/**
* Submit handler for form ID 'formwizard_multiform'.
*/
function formwizard_multiform_submit($form_id, $form_values) {
if ($form_values['step'] < 4) {
return;
}
drupal_set_message(t('Your three ingredients were %ingredient_1, %ingredient_2,
and %ingredient_3.', array(
'%ingredient_1' => $form_values['ingredient_1'],
'%ingredient_2' => $form_values['ingredient_2'],
'%ingredient_3' => $form_values['ingredient_3']
)
)
);
return 'formwizard/thanks';
}
function formwizard_thanks() {
return t('Thanks, and have a nice day.');
}
在这个简单模块中,我们需要注意几点。在我们的建造表单函数formwizard_multiform()中,我们将$form['#multistep']设置为TRUE,这将向Drupal说明本表单是一个多步表单。在我们已经跳出第一个页面时,这将促使Drupal两次建造该表单。让我们看一下整个流程。如果我们访问http://example.com/?q=formwizard,我们就会得到初始的表单,如图10-6所示:
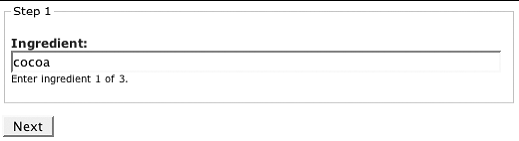
图10-6 多步表单的初始步骤
当我们点击按钮“Next“时,Drupal将像处理其它表单一样处理本表单:构建表单,调用验证函数,调用提交函数。但是接着,由于它是一个多步表单,Drupal将再次调用建造表单函数formwizard_multiform(),这次带了一个$form_values拷贝。这允许在我们模块函数formwizard_multiform()中得到$form_values['step']从而决定我们所处的步骤并据此建造表单。我们在表单结束本步以后得到的结果如图10-7所示。

图10-7 多步表单的第2步
我们有证据证明我们的验证函数运行了,因为它通过调用drupal_set_message()在屏幕上展示了一条消息。而且我们的字段集标题和文本输入框的描述也被恰当的设置了,这意味着用户到达了第2步。让我们继续。在如图10-8所示的表单中输入最后一个成分。
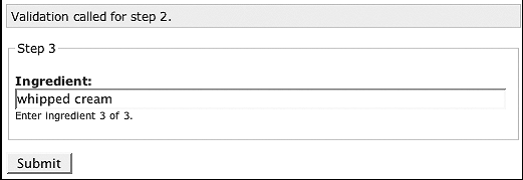
图10-8 多步表单的最后一步
注意,在第3步,我们将提交按钮的名称从“Next“修改为“Submit”。还有,我们也没有将$form['#redirect']设置为FALSE,而是没有对它进行设置,这样当处理完成以后提交处理器就可以将用户转到一个新的页面上。这样当我们点击提交按钮“Submit”时,我们的提交处理器将识别出本步是第四步,与前面几步直接跳到下一步不同,本步将对数据进行处理。在本例中,我们仅仅调用了drupal_set_message(),这将在Drupal提供的下一个页面中展示用户输入信息,接着将用户重定向到了formwizard/thankyou。结果页面如图10-9所示。

图10-9 多步表单的提交处理器已经运行。
前面的例子试图向你展示多步表单如何工作的基本轮廓。除了将数据保存到隐藏域中从而将其传到下一步,你也可以在你的提交处理器中将其保存到数据库中,或者使用表单ID作为键将其保存到全局变量$_SESSION。需要理解的重点是构造表单函数将被继续调用,这是因为设置了$form['#multistep']和$form['#redirect'],通过使用前面的方式增加$form_values['step'],从而验证和提交函数能够智能的决定要做什么。


 1470
1470


 被折叠的 条评论
为什么被折叠?
被折叠的 条评论
为什么被折叠?
 到【灌水乐园】发言


