


先介绍下这篇博文的由来,之前已经对JUnit的使用经行了深入的介绍和演示(参考JUnit学习(一),JUnit学习(二)),其中的部分功能是通过分析JUnit源代码找到的。得益于这个过程有幸完整的拜读了JUnit的源码十分赞叹作者代码的精美,一直计划着把源码的分析也写出来。突发奇想决定从设计模式入手赏析JUnit的流程和模式的应用,希望由此能写出一篇耐读好看的文章。于是又花了些时日重读《设计模式》以期能够顺畅的把两者结合在一起,由于个人水平有限难免出现错误、疏漏,还请各位高手多多指出、讨论。
测试用例的一生——运行流程图

首先,介绍下JUnit的测试用例运行会经过哪些过程,这里说起来有些抽象会让人比较迷惑,在看了后面章节的内容之后就比较清晰了:
- Client(JUnitCore、Eclipse):这里是TestCase开始的地方,如果是Main函数来启动测试用例的话一般会调用JUnitCore的方法,如果是在Eclipse中使用JUnit插件则实际上调用的是org.eclipse.jdt.internal.junit4.runner.JUnit4TestClassReference这个类。
- Request(org.junit.runner.Request):Client会根据测试类或方法而创建一个Request实体,Request包含了要被执行的测试类、测试方法等信息。
- RunnerBuilder:在创建后Client调用Request.getRunner()方法获取用于执行测试的Runner,该过程是由RunnerBuilder这个工厂类完成的。
- RunNotifier:在执行Runner.run方法时Client还会传递一个RunNotifier对象,是事件的监听器的管理员。Runner在开始执行、成功、失败和执行结束时会调用RunNotifier中相应的方法从而发送事件给注册了的监听器,JUnit运行的最终结果就是这些监听器收集展现的。
- Runner:从名字可以猜出这里应该是测试用例运行的地方了,在Client调用了Runner.run()方法之后,Runner会先构造Statement对象将所有要执行的逻辑委托给它,接着执行Statement.evaluate()方法。在这期间Runner会触发RunNotifier(如测试开始、测试结束等等)。
- Statement:测试用例的运行时描述,关注于测试用例如何运行和调用测试代码。比如在执行测试用例前是否有@Before注释的方法需要调用等信息都会被Runner构造为Statement。
JUnit的类设计和模式应用

首先先介绍下JUnit中的模型类(Model),在JUnit模型类可以划分为三个范围:
- 描述模型:是对要执行的测试用例的描述(比如要执行哪个类的哪个方法,是否有指定Runner,使用了哪些注解等),这一层类似于流程文件之于流程引擎——不是用来执行的,而是描述要有哪些环节、细节。个人认为这一模型包括测试类本身(即你自己编写的测试用例)和Request。其中测试类本身等同于描述文件,Request则记录了是要运行的Suit、测试类或者是某个具体的方法、过滤器、排序的Comparator等信息(JUnit是支持对测试方法排序和过滤的)。
- 运行时模型:是JUnit中可执行的模型,包括FrameworkMember(org.junit.runners.model.FrameworkMember)及其子类、TestClass(org.junit.runners.model.TestClass)、Statement。FrameworkMember的子类包括FrameworkMethod和FrameworkField分别描述了测试类的方法和变量信息,比如是否为静态、作用域、包含哪些注解等JUnit运行时需要用到的信息;TestClass的作用有些类似FrameworkMember,是针对测试的Class的描述。Statement在上面已经介绍过是对测试执行流程和细节的描述。
- 结果模型:JUnit中用于描述用例的类,包括Description(org.junit.runner.Description)、Result(org.junit.runner.Result)、Failure(org.junit.runner.notification.Failure)。Description是对测试用例的描述(测试名称、所在Class的名字、是否是suit等等)只为RunNotifier提供服务。Result是运行结果的描述,用例执行完成后RunNotifier的 fireTestRunFinished(final Result result)方法会被触发,传入的Result实例描述了运行耗时、忽略的用例次数、是否成功等信息。Failure则是用例失败后Runner传递给RunNotifier的对象用于描述错误信息,特别包含了错误的StackTrace。
言归正传,下面讨论设计模式和JUnit的源码:
工厂方法模式、职责链:用例启动,Client在创建Request后会调用RunnerBuilder(工厂方法的抽象类)来创建Runner,默认的实现是AllDefaultPosibilitiesBuilder,根据不同的测试类定义(@RunWith的信息)返回Runner。AllDefaultPosibilitiesBuilder使用职责链模式来创建Runner,部分代码如下。代码A是AllDefaultPosibilitiesBuilder的主要构造逻辑构造了一个【IgnoreBuilder->AnnotatedBuilder->SuitMethodBuilder->JUnit3Builder->JUnit4Builder】的职责链,构造Runner的过程中有且只有一个handler会响应请求。代码B是Junit4Builder类实现会返回一个BlockJUnit4ClassRunner对象,这个是JUnit4的默认Runner。
|
1
2
3
4
5
6
7
8
9
10
11
12
13
14
15
16
|
public
Runner runnerForClass(Class<?> testClass)
throws
Throwable {
List<RunnerBuilder> builders = Arrays.asList(
ignoredBuilder(),
annotatedBuilder(),
suiteMethodBuilder(),
junit3Builder(),
junit4Builder());
for
(RunnerBuilder each : builders) {
Runner runner = each.safeRunnerForClass(testClass);
if
(runner !=
null
) {
return
runner;
}
}
return
null
;
}
|
|
1
2
3
4
5
6
|
public
class
JUnit4Builder
extends
RunnerBuilder {
@Override
public
Runner runnerForClass(Class<?> testClass)
throws
Throwable {
return
new
BlockJUnit4ClassRunner(testClass);
}
}
|
代码B JUnit4Builder实现
组合模式:将具备树形结构的数据抽象出公共的接口,在遍历的过程中应用同样的处理方式。这个模式在Runner中的应用不是很明显,扣进来略有牵强。Runner是分层次的,父层包括@BeforeClass、@AfterClass、@ClassRule注解修饰的方法或变量,它们在测试执行前或执行后执行一次。儿子层是@Before、@After、@Rule修饰的方法或变量它们在每个测试方法执行前后执行。当编写的用例使用Suit来运行时则是三层结构,上面的父子结构中间插入了一层childrenRunners,也就是一个Suilt中每个测试类都会生成一个Runner,调用顺序变成了Runner.run()>childRunner.run()<即遍历childrenRunners>->testMethod()。ParentRunner中将变化的部分封装为runChild()方法交给子类实现,达到了遍历过程使用同样处理方式的目的——ParentRunner.this.runChild(each,notifier)。
|
1
2
3
4
5
6
7
8
9
10
11
12
13
14
15
16
17
18
19
20
21
22
23
24
25
|
public
void
run(
final
RunNotifier notifier) {
EachTestNotifier testNotifier =
new
EachTestNotifier(notifier,
getDescription());
try
{
Statement statement = classBlock(notifier);
statement.evaluate();
}
catch
(AssumptionViolatedException e) {
testNotifier.fireTestIgnored();
}
catch
(StoppedByUserException e) {
throw
e;
}
catch
(Throwable e) {
testNotifier.addFailure(e);
}
}
private
void
runChildren(
final
RunNotifier notifier) {
for
(
final
T each : getFilteredChildren()) {
fScheduler.schedule(
new
Runnable() {
public
void
run() {
ParentRunner.
this
.runChild(each, notifier);
}
});
}
fScheduler.finished();
}
|
代码C ParentRunner的组合模式应用
模板方法模式:模板方法的目的是抽取公共部分封装变化,在父类中会包含公共流程的代码,将变化的部分封装为抽象方法由子类实现(就像模板一样框架式定好的,你去填写你需要的内容就行了)。JUnit的默认Runner——BlockJUnit4ClassRunner继承自ParentRunner,ParentRunner类定义了Statement的构造和执行流程,而如何执行儿子层的runChild方法时交给子类实现的,在BlockJUnit4ClassRunner中就是去构造和运行TestMethod,而另一个子类Suit中则是执行子层次的runner.run。
观察者模式 :Runner在执行TestCase过程中的各个阶段都会通知RunNotifier,其中RunNotifier负责listener的管理者角色,支持添加和删除监听者,提供了监听JUnit运行的方法:如用例开始、完成、失败、成功、忽略等。代码D截取自RunNotifier。SafeNotifier是RunNotifier的内部类,抽取了公共逻辑——遍历注册的listener,调用notifyListener方法。fireTestRunStarted()方法是RunNotifier众多fireXXX()方法的一个,它在方法里构造SafeNotifier的匿名类实现notifyListener()方法。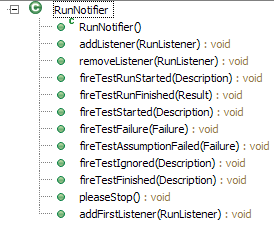
|
1
2
3
4
5
6
7
8
9
10
11
12
13
14
15
16
17
18
19
20
21
22
23
24
25
26
27
28
29
30
31
32
33
34
35
36
37
38
39
40
41
42
|
private
abstract
class
SafeNotifier {
private
final
List<RunListener> fCurrentListeners;
SafeNotifier() {
this
(fListeners);
}
SafeNotifier(List<RunListener> currentListeners) {
fCurrentListeners = currentListeners;
}
void
run() {
synchronized
(fListeners) {
List<RunListener> safeListeners =
new
ArrayList<RunListener>();
List<Failure> failures =
new
ArrayList<Failure>();
for
(Iterator<RunListener> all = fCurrentListeners.iterator(); all
.hasNext(); ) {
try
{
RunListener listener = all.next();
notifyListener(listener);
safeListeners.add(listener);
}
catch
(Exception e) {
failures.add(
new
Failure(Description.TEST_MECHANISM, e));
}
}
fireTestFailures(safeListeners, failures);
}
}
abstract
protected
void
notifyListener(RunListener each)
throws
Exception;
}
public
void
fireTestRunStarted(
final
Description description) {
new
SafeNotifier() {
@Override
protected
void
notifyListener(RunListener each)
throws
Exception {
each.testRunStarted(description);
}
;
}.run();
}
|
装饰模式:保持对象原有的接口不改变而透明的增加对象的行为,看起来像是在原有对象外面包装了一层(或多层)行为——虽然对象还是原来的类型但是行为逐渐丰富起来。 之前一直在强调Statement描述了测试类的执行细节,到底是如何描述的呢?代码E展示了Statement的构筑过程,首先是调用childrenInvoker方法构建了Statement的基本行为——执行所有的子测试runChildren(notifier)(非Suit情况下就是TestMethod了,如果是Suit的话则是childrenRunners)。
接着是装饰模式的应用,代码F是withBeforeClasses()的实现——很简单,检查是否使用了@BeforeClasses注解修饰如果存在构造RunBefores对象——RunBefore继承自Statement。代码H中的evaluate()方法可以发现新生成的Statement在执行runChildren(fNext.evaluate())之前遍历所有使用@BeforeClasses注解修饰的方法并执行。产生的效果即使用@BeforeClasses修饰的方法会在所有用例运行前执行且只执行一次。后面的withAfterClasses、withClassRules方法原理一样都使用了装饰模式,不再赘述。
|
1
2
3
4
5
6
7
8
9
10
11
12
13
14
15
16
|
protected
Statement classBlock(
final
RunNotifier notifier) {
Statement statement = childrenInvoker(notifier);
statement = withBeforeClasses(statement);
statement = withAfterClasses(statement);
statement = withClassRules(statement);
return
statement;
}
protected
Statement childrenInvoker(
final
RunNotifier notifier) {
return
new
Statement() {
@Override
public
void
evaluate() {
runChildren(notifier);
}
};
}
|
|
1
2
3
4
5
6
|
protected
Statement withBeforeClasses(Statement statement) {
List<FrameworkMethod> befores = fTestClass
.getAnnotatedMethods(BeforeClass.
class
);
return
befores.isEmpty() ? statement :
new
RunBefores(statement, befores,
null
);
}
|
|
1
2
3
4
5
6
7
8
9
10
11
12
13
14
15
16
17
18
19
20
21
|
public
class
RunBefores
extends
Statement {
private
final
Statement fNext;
private
final
Object fTarget;
private
final
List<FrameworkMethod> fBefores;
public
RunBefores(Statement next, List<FrameworkMethod> befores, Object target) {
fNext = next;
fBefores = befores;
fTarget = target;
}
@Override
public
void
evaluate()
throws
Throwable {
for
(FrameworkMethod before : fBefores) {
before.invokeExplosively(fTarget);
}
fNext.evaluate();
}
}
|
策略模式:针对相同的行为在不同场景下算法不同的情况,抽象出接口类,在子类中实现不同的算法并提供算法执行必须Context信息。JUnit中提供了Timeout、ExpectedException、ExternalResource等一系列的TestRule用于丰富测试用例的行为,这些TestRule的都是通过修饰Statement实现的。
修饰Statement的代码在withRules()方法中实现,使用了策略模式。代码I描述了JUnit是如何处理@Rule标签的,withRules方法获取到测试类中所有的@Rule修饰的变量,分别调用withMethodRules和withTestRules方法,前者是为了兼容JUnit3版本的Rule这里忽略,后者withTestRules的逻辑很简单首先查看是否使用了@Rule,如存在就交给RunRules类处理。代码J是RunRules的实现,在构造函数中处理了修饰Statement的逻辑(applyAll方法)——抽象接口是TestRule,根据不同的场景(即使用@Rule修饰的不同的TestRule的实现)选择不同的策略(TestRule的具体实现),而Context信息就是入参(result:Statement, description:Description)。
|
1
2
3
4
5
6
7
8
9
10
11
12
13
14
15
|
private
Statement withRules(FrameworkMethod method, Object target,
Statement statement) {
List<TestRule> testRules = getTestRules(target);
Statement result = statement;
result = withMethodRules(method, testRules, target, result);
result = withTestRules(method, testRules, result);
return
result;
}
private
Statement withTestRules(FrameworkMethod method, List<TestRule> testRules,
Statement statement) {
return
testRules.isEmpty() ? statement :
new
RunRules(statement, testRules, describeChild(method));
}
|
|
1
2
3
4
5
6
7
8
9
10
11
12
13
14
15
16
17
18
19
20
|
public
class
RunRules
extends
Statement {
private
final
Statement statement;
public
RunRules(Statement base, Iterable<TestRule> rules, Description description) {
statement = applyAll(base, rules, description);
}
@Override
public
void
evaluate()
throws
Throwable {
statement.evaluate();
}
private
static
Statement applyAll(Statement result, Iterable<TestRule> rules,
Description description) {
for
(TestRule each : rules) {
result = each.apply(result, description);
}
return
result;
}
}
|
|
1
2
3
4
5
6
7
8
9
10
11
12
13
14
|
public
class
Timeout
implements
TestRule {
private
final
int
fMillis;
/**
* @param millis the millisecond timeout
*/
public
Timeout(
int
millis) {
fMillis = millis;
}
public
Statement apply(Statement base, Description description) {
return
new
FailOnTimeout(base, fMillis);
}
}
|
外观模式 :封装统一的对外接口,隐藏内部各个小模块之间的调用细节,使得用户既可以简单的使用facade来达到目的,必要时又可以自行操作内部对象。这里的举例可能不是非常明显。图四是TestClass的公共方法,代码L给出了 TestClass(org.junit.runners.model.TestClass) 的一小部分代码,TestClass主要作用是封装对Class的操作提供了JUnit运行时需要用到的功能并隐藏其中操作的细节。在TestClass内部将功能委托给了三个对象Class(java.lang.Class)、FrameworkMethod、FrameworkField来实现,本身充当了外观(facade)对外提供了getName、getOnlyConstructor、getAnnotations等等接口,在必要的时又可以通过这个外观获取到Class、FrameworkMethod等对象。

|
1
2
3
4
5
6
7
8
9
10
11
12
13
14
15
16
17
18
19
20
21
22
23
24
25
26
27
28
29
30
31
32
33
|
public
class
TestClass {
private
final
Class<?> fClass;
private
Map<Class<?>, List<FrameworkMethod>> fMethodsForAnnotations =
new
HashMap<Class<?>, List<FrameworkMethod>>();
private
Map<Class<?>, List<FrameworkField>> fFieldsForAnnotations =
new
HashMap<Class<?>, List<FrameworkField>>();
/**
* Creates a {@code TestClass} wrapping {@code klass}. Each time this
* constructor executes, the class is scanned for annotations, which can be
* an expensive process (we hope in future JDK's it will not be.) Therefore,
* try to share instances of {@code TestClass} where possible.
*/
public
TestClass(Class<?> klass) {
fClass = klass;
if
(klass !=
null
&& klass.getConstructors().length >
1
) {
throw
new
IllegalArgumentException(
"Test class can only have one constructor"
);
}
for
(Class<?> eachClass : getSuperClasses(fClass)) {
for
(Method eachMethod : MethodSorter.getDeclaredMethods(eachClass)) {
addToAnnotationLists(
new
FrameworkMethod(eachMethod),
fMethodsForAnnotations);
}
for
(Field eachField : eachClass.getDeclaredFields()) {
addToAnnotationLists(
new
FrameworkField(eachField),
fFieldsForAnnotations);
}
}
}
……
}
|
写在最后
读JUnit代码时确实非常赞叹其合理的封装和灵活的设计,自己虽然也写了几年代码但是在JUnit的源码中收获很多。由于对源码的钻研深度以及设计模式的领会不够深入,文中有很多牵强和错误的地方欢迎大家讨论指正。最喜欢的是JUnit对装饰模式和职责链的应用,在看到AllDefaultPossiblitiesBuilder中对职责链的应用还觉得设计比较合理,等到看到Statement的创建和组装就感慨设计的精湛了,无论是基本的调用测试方法的逻辑还是@Before、@After等以及实现自TestRule的逻辑一并融入到Statement的构造中,又不会牵扯出太多的耦合。总之无论是设计模式还是设计思想,归根结底就是抽取公共部分,封装变化,做到灵活、解耦。最后说明这篇文章根据的源代码是JUnit4.11的,maven坐标如下,在JUnit的其它版本中源码差别比较大没有研究过。
<dependency> <groupId>junit</groupId> <artifactId>junit</artifactId> <version>4.11</version> </dependency>


 654
654

 被折叠的 条评论
为什么被折叠?
被折叠的 条评论
为什么被折叠?
 到【灌水乐园】发言


