


Nginx
Nginx 是一个开放的Web服务器和反向代理。比较适合大型网络的建设使用,web加速,负载均衡。
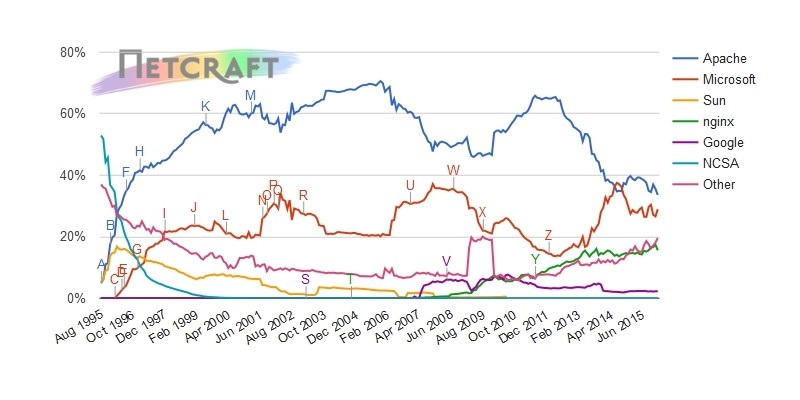
由上图可见,在全球web服务器的选择方向上,nginx的势头很强劲。
基本功能及特性
1. Web服务器--配置虚拟服务器,使用变量,URL重写和自定义错误页面。
2. 静态内容--设置请求的内容和根目录。可将内容直接缓存至memcached。
3.反向代理--代理请求HTTP,Fcgi和缓存服务。
4.压缩与解压缩--最大限度上的节约带宽。
5.模块化的结构--过滤器包括图片缩放(比如淘宝上显示的是小图片,当点击后才显示大图片),SSI,XSLT。
6.支持SSL。
7.keepalived 长连接 和pipelined连接支持。(pipelind 反向代理时,可以直接去将客户请求与后端服务器打通)
8.灵活的配置。
9.平滑部署(就是升级时候,不需要中断服务。有点像平滑重启。reload)
10.支持referer验证。
11.支持视频流。可以边下载边播放。所以可以创建视频网站站点。
负载均衡
http负载均衡器--分配HTTP请求在一组基于服务器的选择算法。
反向代理
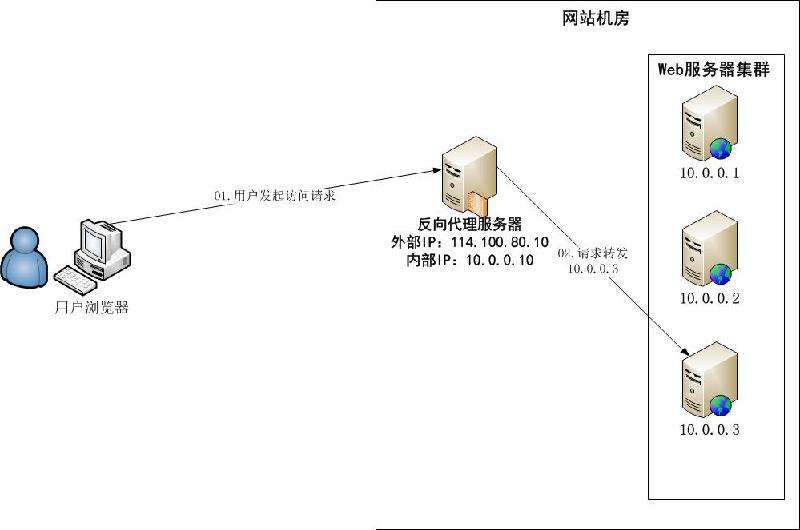
说到反向代理服务器,nginx的性能十分优良。反向代理过程中。nginx作为反向代理服务器。会重新封装客户端的请求报文。变成了nginx向后端源服务器请求。这样可以隔离服务器和客户端。而且有一个好处。那就是可以缓存请求内容,还有负载均衡。负载均衡有很多负载均衡调度策略。再负载均衡中,又有session保持等很多问题。。。
类似与反向代理的FastCGI(PHP)和uWSGI(Python)支持等等
限制访问
基于客户端的IP地址-访问流量,限制同时的连接数量,并且限制每个连接的请求率和带宽。
配置用户名/口令验证。
受地理位置限制的访问。
访问过程
对Ngnix来讲。
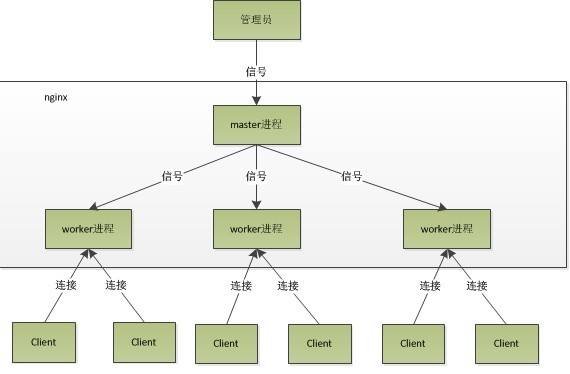
Master主进程。master启动多个worker进程。而master进程就负载监控worker。还有其他进程如cache loader进程。
master是管理员启动的,worker以普通用户身份运行。
Ngnix是高度模块化的,可以用到什么模块就加载某个模块。
master 进程的工作:
1.读取并验证配置信息。
2.创建、绑定套接字。
3.启动,终止,维护,监控worker进程
4.无需终止服务而重新配置工作特性
worker 进程的工作:
1.接收、传入并处理客户端的请求
2.提供反向代理及过滤功能
cacheloader 进程的工作:
1.缓存工作
Nginx+fcgi 的运行
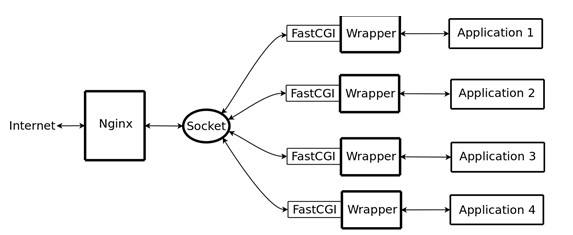
Nginx不知对外部的程序的直接调用,所有的外部程序都必须通过FastCGI接口来调用。Ngnix通过套接字去联系处理动态请求,
需要wrapper绑定在scoket上,wrapper去启动另一个程序。当nginx将请求发给socket时,通过fastcgi接口,wrapper接收到请求,派生出一个新的线程,这个线程调用解释器去解释处理脚本然后返回数据。wrapper将返回的数据通过fastcgi接口沿着socket传递给nginx。nginx再将至二个数据返回给客户端。
注:cgi和fcgi和模块 的区别--
1.cgi相当于web接到一个活就fork一个进程来处理这个请求。当然这样的活,web就很忙了。web既要接请求,还要管理cgi进程。
2.fcgi就是接到请求不会去创建新的进程了,而是将请求通过socket传递给其他进程去处理。
3.模块,就是web直接把php,perl解释器嵌入到web里面,就不需要再去fork进程去解释了。
nginx如此强大得益于:
支持事件驱动,AIO,内存映射。
nginx不是一个良好的应用程序服务器。而是一个静态资源web服务器,可以缓存打开的文件描述符。支持http,smtp,pop3的反向代理。
sendfile 的支持: 数据走向变成了数据从磁盘到内核,而直接构建响应报文。不经过用户空间。从而减少资源的消耗。当然sendfile不是什么新鲜的技术。apache也支持。
sendfile64 的支持。因为普通的sendfile只能发送很小的字节。sendfile64 支持更多的发送字节。
nginx的工作模式。非阻塞,事件驱动,有一个master进程生成多个worker线程。每个worker相应那个请求。
三大WEB服务器
目前来说有三大流行的web服务器。
1.lighttpd
lighttpd是一个轻量级webserver。支持fastcgi,cgi,输出压缩,最重要的是内存开销和cpu占用率很低。效能好。以及丰富的模块支持。
lighttpd使用fcgi。
从稳定上看,fastcgi以单独的进程池去运行cgi。单独进程死掉,系统可以轻易的丢掉。
从安全上看,fastcgi和宿主server完成独立,fastcgi不会把server搞垮。
从性能上看,fastcgi把动态逻辑的处理从server中分离出来。大负荷的I/O还是留给了server。宿主server可以一心一意做I/O。
2.apache
apache是世界第一的webserver。姜还是老的辣
支持虚拟主机,由于apr的原因,使得apache可以抑制到各式各样的计算机平台上。支持服务端的包含命令(ssi)。支持安全套接,支持fastcgi,支持通用网关接口(cgi),支持http认证。
3.nginx
nginx是俄罗斯人编写的http,一个反向代理,负载均衡的web。高度模块化。
nginx不支持cgi,而支持fcgi,至于fcgi的运行过程是上面有细说。
nginx作为http服务器,有以下几项基本特征。
处理静态文件,无缓存的反向代理加速。简单的负载均衡和容错。fastcgi,简单的负载均衡。
它支持内核Poll模型,能经受高负载的考验,有报告表明能支持高达 50,000 个并发连接数。
apache同一时刻接到200个请求就有点卡了,而nginx接受10000个没有活动的连接只占2.5M的内存。
nginx支持热部署,启动特别容易,可以做到一周不间断运行。
综合比较
1.proxy 代理 apache(非常好) nginx(非常好) lighttpd(一般)
2.rewrite apache (非常好) nginx(非常好) lighttpd(一般)
3.Fcgi apache(不好) nginx(好) lighttpd(非常好)
4.系统压力比较 apache(很大) nginx(很小) lighttpd(一般)
5.稳定性 apache(好) nginx(非常好) lighttpd(不好)
6.安全性 apache(非常好) nginx(一般) lighttpd(一般)
7.bug apache(很少) nginx(比较多)
nginx 处理请求是异步非阻塞的,而apache则是阻塞型的,在高并发下nginx 能保持低资源低消耗高性能。在Apache+PHP(prefork)模式下,如果PHP处理慢或者前端压力很大的情况下,很容易出现Apache进程数飙升,从而拒绝服务的现象。
安装配置nginx
创建用户
[root@nginx ~]# useradd -r nginx
[root@nginx ~]# chsh -s /sbin/nologin nginx
解压源码包
[root@nginx ~]# tar xf nginx-1.4.2.tar.gz
[root@nginx ~]# tar xf nginx-1.4.2[root@nginx ~]# yum groupinstall 'Development tools' 'Server Platform'
[root@nginx ~]# yum -y install pcre-devel opensll-devel[root@proxy nginx-1.4.2]# ./configure \
> --prefix=/usr \
> --sbin-path=/usr/sbin/nginx \
> --conf-path=/etc/nginx/nginx.conf \
> --error-log-path=/var/log/nginx/error.log \
> --http-log-path=/var/log/nginx/access.log \
> --pid-path=/var/run/nginx/nginx.pid \
> --lock-path=/var/lock/nginx.lock \
> --user=nginx \
> --group=nginx \
> --with-http_ssl_module \
> --with-http_flv_module \
> --with-http_stub_status_module \
> --with-http_gzip_static_module \
> --http-client-body-temp-path=/var/tmp/nginx/client \
> --http-proxy-temp-path=/var/tmp/nginx/proxy \
> --http-fastcgi-temp-path=/var/tmp/nginx/fcgi \
> --http-uwsgi-temp-path=/var/tmp/nginx/uwsgi \
> --http-scgi-temp-path=/var/tmp/nginx/scgi \
> --with-pcre
[root@nginx ~]# make && make install#!/bin/sh
#
# chkconfig: - 99 1
# description: nginx
# date: 2011-4-22 15:13
### BEGIN INIT INFO
# Provides: nginx
# Required-Start: $local_fs $network $remote_fs
# Should-Start: $syslog
# Required-Stop: $local_fs $network $remote_fs
# Default-Start: 2 3 4 5
# Default-Stop: 0 1 6
# Short-Description: start and stop nginx
# Description: nginx is a very fast and reliable Web Server.
### END INIT INFO
USER="nginx"
NGINX="/usr/sbin/nginx"
PIDFILE="/var/run/nginx/nginx.pid"
CONF="/etc/nginx/nginx.conf"
check_config() {
if test -s $CONF; then
$NGINX -t -c "$CONF" || exit 1
fi
}
nginx_status() {
local status="0"
wget -Sq -4 --spider http://127.0.0.1:80/nginx_status >/dev/null 2>&1 || status="$?"
if test $status = "0" -o -s $PIDFILE; then
echo "nginx is running, master process is `cat $PIDFILE`."
return 0
else
echo "nginx has stopped."
return 1
fi
}
start() {
if nginx_status > /dev/null; then
echo "nginx is already running, master process is `cat $PIDFILE`."
return 1
else {
echo -n 'nginx is starting...'
$NGINX -c "$CONF"
sleep 3
if test -s $PIDFILE; then
echo ' done.'
return 0
else
echo ' fail.'
return 1
fi
}
fi
}
stop() {
if nginx_status >/dev/null; then
$NGINX -c "$CONF" -s quit && status="$?"
echo -n 'nginx is stopping.'
sleep 2;echo -n '.'
sleep 2;echo -n '.'
if nginx_status >/dev/null; then
kill -9 $pid >/dev/null 2>&1
status="$?"
fi
else
echo 'nginx has stopped.'
exit 1
fi
return $status
}
reload() {
if nginx_status >/dev/null; then
$NGINX -c "$CONF" -s reload
if [ $? -eq 0 ]; then
echo 'nginx reload configure... done.'
return 1
else
exit 1
fi
else
echo 'nginx has stopped.'
fi
}
case "$1" in
check)
check_config
;;
start)
check_config >/dev/null 2>&1
start
;;
stop)
check_config >/dev/null 2>&1
stop
if [ $? -eq 0 ]; then
echo ' done.'
else
echo ' fail.'
fi
;;
reload)
check_config
reload
;;
restart)
check_config >/dev/null 2>&1
$NGINX -c "$CONF" -s stop
echo -n 'nginx is stopping to restart...'
if [ $? -eq 0 ]; then
echo ' done.' && start
else
echo ' fail.'
exit 1
fi
;;
status)
status="0"
nginx_status || status="$?"
exit $status
;;
state)
nginx_status && ps --ppid `cat $PIDFILE` \
-o user='USER',pid='WORK',pcpu,pmem,state,ppid='MASTER'
;;
*)
echo "Usage: $0 (check|start|stop|reload|restart|status|state)"
exit 0
;;
esac
exit 0[root@nginx tmp]# service nginx start
nginx is starting... done.
[root@nginx tmp]# service nginx status
nginx is running, master process is 3772.
[root@nginx ~]# cd /var/tmp/
[root@nginx tmp]# ls
nginx
[root@nginx tmp]# cd nginx/
[root@nginx nginx]# ls
client  fcgi  proxy  scgi  uwsgi
[root@nginx nginx]# pwd
/var/tmp/nginx
[root@nginx nginx]#
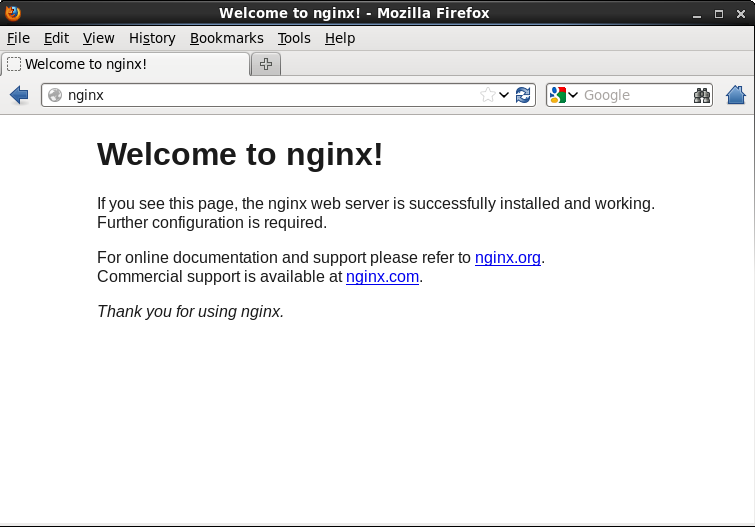
查看页面
nginx的配置文件
nginx的主配置文件在/etc/nginx/下。
[root@nginx nginx]# pwd
/etc/nginx
[root@nginx nginx]# ls
fastcgi.conf          fastcgi_params          koi-utf  mime.types          nginx.conf          scgi_params          uwsgi_params          win-utf
fastcgi.conf.default  fastcgi_params.default  koi-win  mime.types.default  nginx.conf.default  scgi_params.default  uwsgi_params.default
[root@nginx nginx]#
这里提供了一份nginx的配置文件详解
#user  nobody;
worker_processes  1; ##worker进程数,若负载以CPU密集型为主(如SSL,压缩),则最好为cpu个数,如果负载以IO密集型为主,则最好是cpu的1.5到2倍

#error_log  logs/error.log;
#error_log  logs/error.log  notice;
#error_log  logs/error.log  info;

#pid        logs/nginx.pid;


events {
    worker_connections  1024;  ##worker支持的连接数。
}


http {
    include       mime.types;
    default_type  application/octet-stream;

    #log_format  main  '$remote_addr - $remote_user [$time_local] "$request" '
    #                  '$status $body_bytes_sent "$http_referer" '
    #                  '"$http_user_agent" "$http_x_forwarded_for"';

    #access_log  logs/access.log  main;

    sendfile        on;
    #tcp_nopush     on;  ## 不做推送
    #tcp_nodelay    on;  ## 不做等待
                         ## 这里有必要讲一下,这里是结合nagle算法的,不做推送就是,不着急发数据,等数据多点再发
                         ## 不做等待,就是不等,有数据直接发,比如游戏服务器,鼠标的一个移动是很小的数据,服务器
                         ## 总是等数据多了再发送,会导致很差的游戏体验度,觉得游戏很卡。

    #keepalive_timeout  0;
    keepalive_timeout  65;

    #gzip  on;

    server {        ##虚拟主机
        listen       80;
        server_name  localhost;

        #charset koi8-r;

        #access_log  logs/host.access.log  main;

        location / {      ##定义网页页面所在位置,URL路径
            root   html;  ##相对路径,nginx的默认安装目录(/use/html)。。也可以写绝对路径
            index  index.html index.htm;
        }
        location /news {     ##访问news
	    root   /var/nginx/htdocs;   ## html页面需要放在/var/nginx/htdocs/new/index.html
	    index  index.html index.htm;
	    deny 172.25.254.31     ## 拒绝172.25.254.31访问该目录下的页面。错误返回403
	    auth_basic "Restricted Area .."    ##用户密码访问。
	    auth_basic_user_file /etc/nginx/.users;
	}

        error_page  404              /404.html;  #404 错误页面的位置。

        # redirect server error pages to the static page /50x.html
        #
        error_page   500 502 503 504  /50x.html;
        location = /50x.html {                 ##精确匹配路径,不包括子路径。因此只对当前资源生效
            root   html;
        }

        # proxy the PHP scripts to Apache listening on 127.0.0.1:80
        #
        #location ~ \.php$ {                    ## 正则匹配,以php结尾的文件, ~匹配大小写。~*不匹配大小写  ^~不使用正则匹配
        #    proxy_pass   http://127.0.0.1;
        #}

        # pass the PHP scripts to FastCGI server listening on 127.0.0.1:9000
        #
        #location ~ \.php$ {
        #    root           html;
        #    fastcgi_pass   127.0.0.1:9000;
        #    fastcgi_index  index.php;
        #    fastcgi_param  SCRIPT_FILENAME  /scripts$fastcgi_script_name;
        #    include        fastcgi_params;
        # deny access to .htaccess files, if Apache's document root
        # concurs with nginx's one
        #
        #location ~ /\.ht {
        #    deny  all;
        #}
    }


    # another virtual host using mix of IP-, name-, and port-based configuration
    #
    #server {
    #    listen       8000;
    #    listen       somename:8080;
    #    server_name  somename  alias  another.alias;

    #    location / {
    #        root   html;
    #        index  index.html index.htm;
    #    }
    #}


    # HTTPS server
    #
    #server {                            ##支持安全套接层,https
    #    listen       443;
    #    server_name  localhost;

    #    ssl                  on;
    #    ssl_certificate      /etc/nginx/ssl/nginx.pem;
    #    ssl_certificate_key  /etc/nginx/ssl/nginx.key;

    #    ssl_session_timeout  5m;

    #    ssl_protocols  SSLv2 SSLv3 TLSv1;
    #    ssl_ciphers  HIGH:!aNULL:!MD5;
    #    ssl_prefer_server_ciphers   on;

    #    location / {
    #        root   html;
    #        index  index.html index.htm;
    #    }
    #}

}
构建LNMP平台
源码编译mysql
cmake \
-DCMAKE_INSTALL_PREFIX=/usr/local/mysql \
-DMYSQL_DATADIR=/usr/local/mysql/data \
-DMYSQL_UNIX_ADDR=/usr/local/mysql/data/mysql.sock \
-DWITH_MYISAM_STORAGE_ENGINE=1 \
-DWITH_INNOBASE_STORAGE_ENGINE=1 \
-DWITH_ARCHIVE_STORAGE_ENGINE=1 \
-DWITH_BLACKHOLE_STORAGE_ENGINE=1 \
-DWITH_PARTITION_STORAGE_ENGINE=1 \
-DENABLED_LOCAL_INFILE=1 \
-DWITH_READLINE=1 \
-DWITH_SSL=yes \
-DDEFAULT_CHARSET=utf8 \
-DDEFAULT_COLLATION=utf8_general_ci \
-DEXTRA_CHARSETS=all \
-DMYSQL_TCP_PORT=3306   &>/dev/null
chown -R mysql:mysql /usr/local/mysql
cd $LOCATION/mysql
rm -f /etc/my.cnf /etc/init.d/mysqld
cp -f  support-files/my-large.cnf  /etc/my.cnf
cp -f  support-files/mysql.server /etc/init.d/mysqld
chown -R mysql.mysql $MYSQL_LOCATION/*
$MYSQL_LOCATION/scripts/mysql_install_db --user=mysql --basedir=$LOCATION/mysql --datadir=/usr/local/mysql/data &> /dev/null
chown -R root $MYSQL_LOCATION/*
chown -R mysql $MYSQL_LOCATION/data
chmod 777 $MYSQL_LOCATION/data

chkconfig mysqld on
echo "export PATH=\$PATH:/usr/local/mysql/bin" >> ~/.bash_profile
source /root/.bash_profile
编译安装PHP
装相关依赖
rpm -ivh libmcrypt-2.5.8-9.el6.x86_64.rpm libmcrypt-devel-2.5.8-9.el6.x86_64.rpm mhash-0.9.9.9-3.el6.x86_64.rpm mhash-devel-0.9.9.9-3.el6.x86_64.rpm[root@nginx lamp]# tar -xf libiconv-1.13.1.tar.gz
[root@nginx lamp]# cd libiconv-1.13.1
[root@nginx libiconv-1.13.1]# ./configure --prefix=/usr/local/libiconv
解压php,然后编译php
./configure --prefix=/usr/local/php \
--with-mysql=/usr/local/mysql \
--with-openssl \
--with-mysqli=/usr/local/mysql/bin/mysql_config \
--enable-mbstring \
--with-freetype-dir \
--with-jpeg-dir \
--with-png-dir \
--with-zlib \
--with-libxml-dir=/usr \
--enable-xml \
--enable-sockets \
--with-mcrypt \
--with-config-file-path=/etc \
--with-config-file-scan-dir=/etc/php.d \
--with-bz2 \
--enable-maintainer-zts \
--enable-fpm \
--with-curl \
--with-iconv=/usr/local/libiconv &>/dev/null
make && make install
[root@nginx php-5.4.13]# cp -f php.ini-production /usr/local/etc/php.ini
复制启动脚本到/etc/init.d下
[root@nginx php-5.4.13]# cp sapi/fpm/init.d.php-fpm  /etc/init.d/php-fpm
[root@nginx php-5.4.13]# chmod +x /etc/rc.d/init.d/php-fpm
[root@nginx php-5.4.13]# chkconfig --add php-fpm
[root@nginx php-5.4.13]# chkconfig php-fpm on
为php提供配置文件
[root@nginx php-5.4.13]# cp /usr/local/php/etc/php-fpm.conf.default /usr/local/php/etc/php-fpm.conf
修改nginx配置文件。
        location ~ \.php$ {
            root           html;
            fastcgi_pass   127.0.0.1:9000;
            fastcgi_index  index.php;
            fastcgi_param  SCRIPT_FILENAME  /scripts$fastcgi_script_name;
            include        fastcgi_params;
        }
在主页填写支持php结尾的文件。
        location / {
            root   html;
            index  index.php index.html index.htmi;
        }
编辑/etc/nginx/fastcgi_params 将其内容更改为如下内容。
fastcgi_param  GATEWAY_INTERFACE  CGI/1.1;
fastcgi_param  SERVER_SOFTWARE    nginx;

fastcgi_param  QUERY_STRING       $query_string;
fastcgi_param  REQUEST_METHOD     $request_method;
fastcgi_param  CONTENT_TYPE       $content_type;
fastcgi_param  CONTENT_LENGTH     $content_length;
fastcgi_param  SCRIPT_FILENAME    $document_root$fastcgi_script_name;

fastcgi_param  SCRIPT_NAME        $fastcgi_script_name;
fastcgi_param  REQUEST_URI        $request_uri;
fastcgi_param  DOCUMENT_URI       $document_uri;
fastcgi_param  DOCUMENT_ROOT      $document_root;
fastcgi_param  SERVER_PROTOCOL    $server_protocol;

fastcgi_param  REMOTE_ADDR        $remote_addr;
fastcgi_param  REMOTE_PORT        $remote_port;
fastcgi_param  SERVER_ADDR        $server_addr;
fastcgi_param  SERVER_PORT        $server_port;
fastcgi_param  SERVER_NAME        $server_name;


 160
160

 被折叠的 条评论
为什么被折叠?
被折叠的 条评论
为什么被折叠?
 到【灌水乐园】发言


