


 本文详细介绍了如何利用Nutch、MongoDB、ElasticSearch和Kibana搭建网络爬虫系统,包括配置环境、引擎数据流、Mongodb下载与安装、ElasticSearch下载与安装、Kibana下载与安装及ApacheNutch安装、编译、配置等关键步骤。
前言:
文章讲述如何通过Nutch、MongoDB、ElasticSearch、Kibana搭建网络爬虫,其中Nutch用于网页数据爬取,MongoDB用于存储爬虫而来的数据,ElasticSearch用来作Index索引,Kibana用来形象化查看索引结果。具体步骤如下:
配置环境:
系统环境:Ubuntu 14.04
JDK版本:jdk1.8.0_45
通过wget获取下载安装包:
gannyee@ubuntu:~/download$ wget https://www.reucon.com/cdn/java/jdk-8u45-linux-x64.tar.gz
tar zxvf jdk-8u45-linux-x64.tar.gz
解压后得到jdk1.8.0_45这个文件夹,先查看/usr/lib/路径下有没有jvm这个文件夹,若没有,则新建一个jvm文件夹:
gannyee@ubuntu:~/download$ mkdir /usr/lib/jvm将当前解压得到的jdk1.8.0_45复制到/usr/lib/jvm中:
gannyee@ubuntu:~/download$mv jdk1.8.0_45 /usr/lib/jvm打开profile设置环境变量:
gannyee@ubuntu:~/download$vim /etc/profile在profile的末尾加入以下内容:
export JAVA_HOME=/usr/lib/jvm/jdk1.8.0_45
export CLASSPATH=.:$JAVA_HOME/jre/lib/rt.jar:$JAVA_HOME/lib/dt.jar:$JAVA_HOME/lib/tools.jar
export PATH=$PATH:$JAVA_HOME/bin
然后使用以下命令使得环境变量生效:
gannyee@ubuntu:~/download$source /etc/profile到此为止,JDK就安装完成了。查看JDK的版本:
gannyee@ubuntu:~/download$java –version
java version "1.8.0_45"
Java(TM) SE Runtime Environment (build 1.8.0_45-b14)
Java HotSpot(TM) 64-Bit Server VM (build 25.45-b02, mixed mode)
若以上命令没有成功显示版本信息,那有可能是之前的操作出现问题,请仔细检查之前的操作。
Ant版本:1.9.4
通过wget下载安装包:
https://archive.apache.org/dist/ant/binaries/binaries/apache-ant-1.9.4-bin.tar.gz
gannyee@ubuntu:~/download$ wget https://archive.apache.org/dist/ant/binaries/binaries/apache-ant-1.9.4-bin.tar.gz解压后可得到apache-ant-1.9.6这个文件夹,将其移动到/usr/local/ant文件夹中:
gannyee@ubuntu:~/download$sudo tar -zvxf apache-ant-1.9.4-bin.tar.gz
gannyee@ubuntu:~/download$sudo mkdir /usr/local/ant
gannyee@ubuntu:~/download$mv apache-ant-1.9.4 /usr/local/ant
打开profile设置环境变量:
gannyee@ubuntu:~/download$vim /etc/profile在profile文件末尾加入以下内容:
export ANT_HOME=/usr/local/ant/apache-ant-1.9.4
export PATH=$PATH:$ANT_HOME/bin
使用以下命令使得环境变量生效:
gannyee@ubuntu:~/download$source /etc/profile查看Ant版本:
gannyee@ubuntu:~/download$ant -version
Apache Ant(TM) version 1.9.4 compiled on April 29 2014
至此,配置引擎所需的环境预先配置完成!
引擎数据流如图示:
图片来源博客:http://www.aossama.com/search-engine-with-apache-nutch-mongodb-and-elasticsearch/

Mongodb下载、安装、启动
开源文档数据库,Nosql数据典型代表之一。
版本:MongoDB-2.6.11
gannyee@ubuntu:~/download$ wget https://fastdl.mongodb.org/src/mongodb-src-r2.6.11.tar.gz
gannyee@ubuntu:~/download$ sudo tar -zxvf mongodb-src-r2.6.11.tar.gz
gannyee@ubuntu:~/download$ mv mongodb-src-r2.6.11/ ../mongodb/
gannyee@ubuntu:~$cd mongodb/
gannyee@ubuntu:~/mongodb$
sudo mkdir log/ conf/ data/从2.6版开始,mongodb使用YAML-based配置文件格式。参考下面的配置可以在这里找到。
创建se.yml
gannyee@ubuntu:~/mongodb$ vim conf/se.yml
net:
  port: 27017
  bindIp: 127.0.0.1
systemLog:
  destination: file
  path: "/opt/mongodb/log/mongodb.log"
  logAppend: true
processManagement:
  fork: true
  pidFilePath: "/opt/mongodb/log/mongodb.pid"
storage:
  dbPath: "/opt/mongodb/data"
  directoryPerDB: true
  smallFiles: true
启动Mongodb
gannyee@ubuntu:~/mongodb$ ./bin/mongod -f conf/se.yml进入Mongodb以检查Mongodb是否启动成功
gannyee@ubuntu:~/mongodb$ ./bin/mongo
MongoDB shell version: 2.6.11
connecting to: test
> show dbs
admin (empty)
local 0.031GB
> exit
bye
关闭Mongodb:
>use admin
>db.shutdownServer()
如Ubuntu使用Mongodb的图形化界面管理工具,推荐使用robomongo
下载地址:
http://app.robomongo.org/files/linux/robomongo-0.8.5-x86_64.deb
使用robomongo链接数据库
下载、安装robomongo
gannyee@ubuntu:~/mongodb$ sudo wget http://app.robomongo.org/files/linux/robomongo-0.8.5-x86_64.deb
gannyee@ubuntu:~/mongodb$sudo dpkg -i robomongo-0.8.5-x86_64.deb
gannyee@ubuntu:~$robomongo就可以打开客户端。
建立新连接,只需要添加host和port即可。
note:我第一次安装成功后链接也成功,但是看不到任何数据。
解决办法:重新使用root权限安装即可。
软件界面如图所示:
如果需要外网访问的话,需要配置文件中的bindIp: 127.0.0.1改为bindIp: 0.0.0.0
然后在浏览器中输入:http://localhost:27017,如果出现以下内容,说明外网可以访问:
It looks like you are trying to access MongoDB over HTTP on the native driver port.
如果出现无法执行./mongod的错误
大部分是因为mongodb 服务在不正常关闭的情况下,mongod 被锁,想想可能是上次无故死机造成的.
如何解决这种问题:删除 mongod.lock 文件和日志文件 mongodb.log.2016-1-26T06-55-20 ,如果有必要把 log日志全部删除
mongod –repair –dbpath /home/gannyee/mongodb/data/db / –repairpath /home/gannyee/mongodb
ElasticSearch下载、安装
从Apache Lucene提取高性能的分布式搜索引擎。
版本:ElastricSearch-1.4.4
gannyee@ubuntu:~/download$wget https://download.elasticsearch.org/elasticsearch/elasticsearch/elasticsearch-1.4.4.tar.gz
gannyee@ubuntu:~/download$tar -zxvf elasticsearch-1.4.4.tar.gz
gannyee@ubuntu:~/download$ mv elasticsearch-1.4.4 ../elasticsearch
gannyee@ubuntu:~$cd /elasticsearch
修改config下文件elasticsearch.yml
gannyee@ubuntu:~/elasticsearch$ vim config/elasticsearch.yml
......
cluster.name: gannyee
node.name: "gannyee"
node.master: true
node.data: true
path.conf: /home/gannyee/elasticsearch/config
path.data: /home/gannyee/elasticsearch/data
http.enabled: true
network.bind_host: 127.0.0.1
network.publish_host: 127.0.0.1
network.host: 127.0.0.1
.......
后台启动ElasticSearch
gannyee@ubuntu:~/elasticsearch$ ./bin/elasticsearch -d终止ElasticSearch进程
关闭单一节点
gannyee@ubuntu:~/elasticsearch$curl -XPOST
http://localhost:9200/_cluster/nodes/_shutdown
关闭节点BlrmMvBdSKiCeYGsiHijdg
gannyee@ubuntu:~/elasticsearch$curl –XPOST
http://localhost:9200/_cluster/nodes/BlrmMvBdSKiCeYGsiHijdg/_shutdown
检测是否成功运行ElasticSearch
gannyee@ubuntu:~/elasticsearch$ curl -XGET 'http://localhost:9200'
{
  "status" : 200,
  "name" : "gannyee",
  "cluster_name" : "gannyee",
  "version" : {
    "number" : "1.4.4",
    "build_hash" : "c88f77ffc81301dfa9dfd81ca2232f09588bd512",
    "build_timestamp" : "2015-02-19T13:05:36Z",
    "build_snapshot" : false,
    "lucene_version" : "4.10.3"
  },
  "tagline" : "You Know, for Search"
}
elasticsearch-head是一个elasticsearch的集群管理工具,它是完全由html5编写的独立网页程序,你可以通过插件把它集成到es
安装 elasticsearch-head插件
gannyee@ubuntu:~/elasticsearch$ cd elasticsearch
gannyee@ubuntu:~/elasticsearch$ ./bin/plugin -install mobz/elasticsearch-head
运行重启elasticsearch
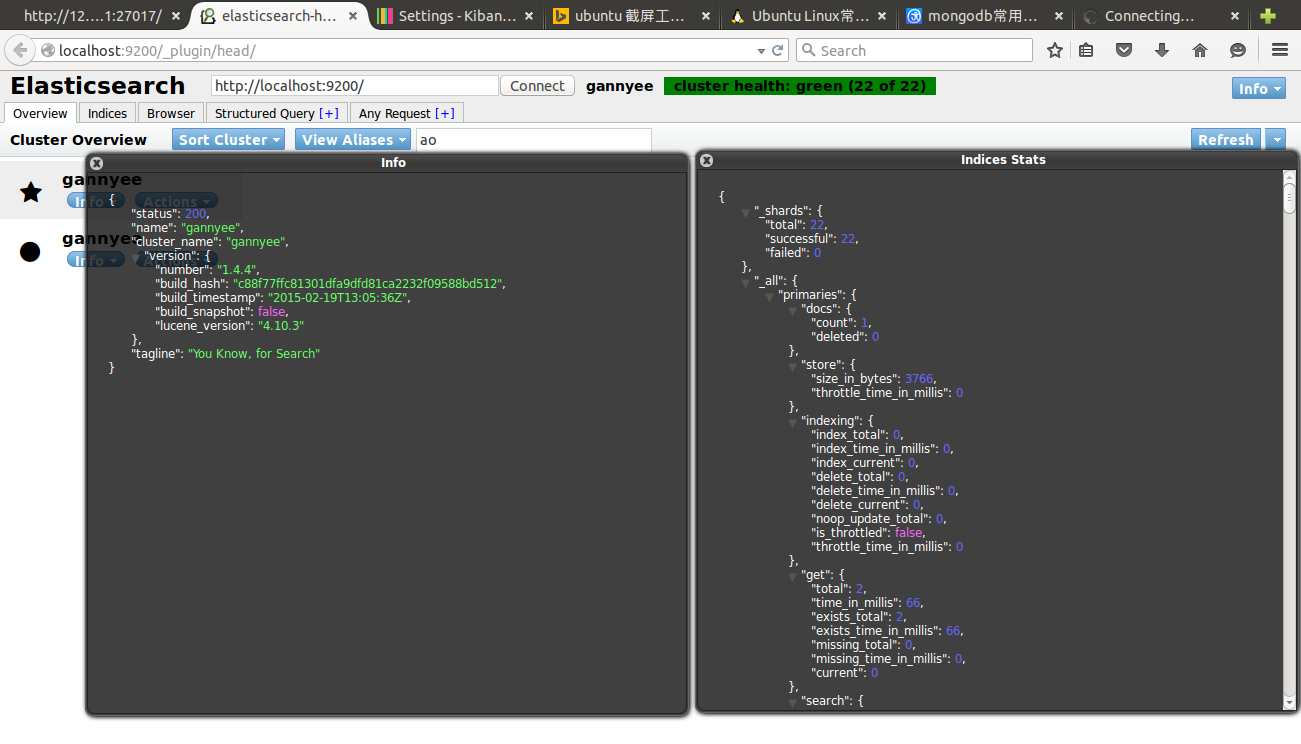
在浏览器输入:http://localhost:9200/_plugin/head/
界面的右边有些按钮,如:node stats, cluster nodes,这些是直接请求es的相关状态的api,返回结果为json,如下图:
Kibana下载、安装
基于分析和搜索Elasticsearch仪表板的开源浏览器
版本:kibana-4.0.1
gannyee@ubuntu:~/download$wget https://download.elasticsearch.org/kibana/kibana/kibana-4.0.1-linux-x64.tar.gz
gannyee@ubuntu:~/download$ tar -zxvf /download kibana-4.0.1-linux-x64.tar.gz
gannyee@ubuntu:~/download$mv kibana-4.0.1-linux-x64/ ../kibana/
gannyee@ubuntu:~/download$cd ../kibana/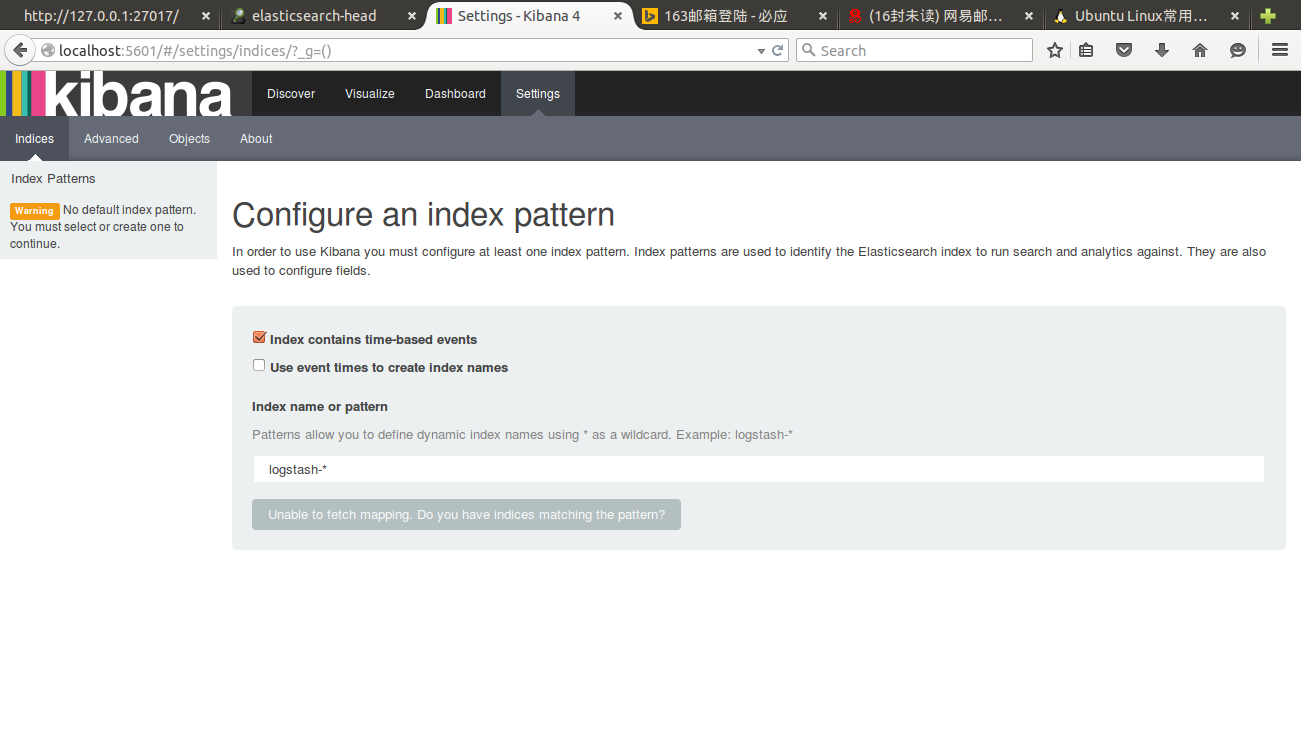
gannyee@ubuntu:~/kibana$ ./bin/kibana下面你就可以通过http://127.0.0.1:5601端口访问了,界面如图所示:
Apache Nutch 安装、编译、配置:
在Lucene发展来的开源网络爬虫,本次配置只能使用nutch2.x系列,1.x系列不支持MongoDB等其他如Mysql,Habase数据库。
版本:apache-nutch-2.3.1
Nutch2.3下载、编译、配置
gannyee@ubuntu:~/download$  wget
http://www.apache.org/dyn/closer.lua/nutch/2.3.1/apache-nutch-2.3.1-src.tar.gz
gannyee@ubuntu:~/download$ tar -zxvf apache-nutch-2.3.1-src.tar.gz
gannyee@ubuntu:~/download$  mv apache-nutch-2.3.1 ../nutch
gannyee@ubuntu:~/download$ cd ../nutch
gannyee@ubuntu:~/nutch$ export NUTCH_HOME=$(pwd)
修改/conf/nutch-site.xml使Mongodb作为GORA的存储单元
gannyee@ubuntu:~/nutch/conf$ vim nutch-site.conf
<configuration>
  <property>
    <name>storage.data.store.class</name>
    <value>org.apache.gora.mongodb.store.MongoStore</value>
    <description>Default class for storing data</description>
  </property>
</configuration>
从/ivy/ivy.xml文件中取消下面部分的注释
gannyee@ubuntu:~/nutch/conf$  vim $NUTCH_HOME/ivy/ivy.xml
<dependency org="org.apache.gora" name="gora-mongodb" rev="0.5" conf="*->default" />
...
</dependency>
确保MongoStore设置为默认数据存储
gannyee@ubuntu:~/nutch$ vim conf/gora.properties
/#######################
/# MongoDBStore properties #
/#######################
gora.datastore.default=org.apache.gora.mongodb.store.MongoStore
gora.mongodb.override_hadoop_configuration=false
gora.mongodb.mapping.file=/gora-mongodb-mapping.xml
gora.mongodb.servers=localhost:27017
gora.mongodb.db=nutch
开始编译nutch
gannyee@ubuntu:~/nutch$ant runtime如果编译过程中有如下错误
Trying to override old definition of task javac
  [taskdef] Could not load definitions from resource org/sonar/ant/antlib.xml. It could not be found.

ivy-probe-antlib:

ivy-download:
  [taskdef] Could not load definitions from resource org/sonar/ant/antlib.xml. It could not be found.

Trying to override old definition of task javac
  [taskdef] Could not load definitions from resource org/sonar/ant/antlib.xml. It could not be found.

ivy-probe-antlib:

ivy-download:
  [taskdef] Could not load definitions from resource org/sonar/ant/antlib.xml. It could not be found.
是因为缺少lib包,解决办法如下(其实可以无视):
下载 sonar-ant-task-2.1.jar,拷贝到 $NUTCH_HOME/lib 目录下面
修改 $NUTCH_HOME/build.xml,引入上面添加
<!-- Define the Sonar task if this hasn't been done in a common script -->
 <taskdef uri="antlib:org.sonar.ant" resource="org/sonar/ant/antlib.xml">
  <classpath path="${ant.library.dir}" />
  <classpath path="${mysql.library.dir}" />
  <classpath><fileset dir="lib/" includes="sonar*.jar" /></classpath>
 </taskdef>
编译后的文件将被放在新生成的文件夹/nutch/runtime中
最后确认nutch已经正确地编译和运行,输出如下:
gannyee@ubuntu:~/nutch/runtime/local$ ./bin/nutch
 Usage: nutch COMMAND
where COMMAND is one of:
 inject         inject new urls into the database
 hostinject     creates or updates an existing host table from a text file
 generate       generate new batches to fetch from crawl db
 fetch          fetch URLs marked during generate
 parse          parse URLs marked during fetch
 updatedb       update web table after parsing
 updatehostdb   update host table after parsing
 readdb         read/dump records from page database
 readhostdb     display entries from the hostDB
 index          run the plugin-based indexer on parsed batches
 elasticindex   run the elasticsearch indexer - DEPRECATED use the index command instead
 solrindex      run the solr indexer on parsed batches - DEPRECATED use the index command instead
 solrdedup      remove duplicates from solr
 solrclean      remove HTTP 301 and 404 documents from solr - DEPRECATED use the clean command instead
 clean          remove HTTP 301 and 404 documents and duplicates from indexing backends configured via plugins
 parsechecker   check the parser for a given url
 indexchecker   check the indexing filters for a given url
 plugin         load a plugin and run one of its classes main()
 nutchserver    run a (local) Nutch server on a user defined port
 webapp         run a local Nutch web application
 junit          runs the given JUnit test
 or
 CLASSNAME      run the class named CLASSNAME
Most commands print help when invoked w/o parameters.
定制你的爬取特性
gannyee@ubuntu:~$ sudo vim /nutch/runtime/local/conf/nutch-site.xml

< ?xml version="1.0"?>
< ?xml-stylesheet type="text/xsl" href="configuration.xsl"?>

<!-- Put site-specific property overrides in this file. -->

<configuration>
  <property>
    <name>storage.data.store.class</name>
    <value>org.apache.gora.mongodb.store.MongoStore</value>
    <description>Default class for storing data</description>
  </property>

  <property>
    <name>http.agent.name</name>
    <value>Hist Crawler</value>
  </property>

  <property>
    <name>plugin.includes</name>
    <value>protocol-(httphttpclient)urlfilter-regexindex-(basicmore)query-(basicsiteurllang)indexer-elasticnutch-extensionpointsparse-(texthtmlmsexcelmswordmspowerpointpdf)summary-basicscoring-opicurlnormalizer-(passregexbasic)parse-(htmltikametatags)index-(basicanchormoremetadata)</value>
  </property>
  <property>
    <name>elastic.host</name>
    <value>localhost</value>
  </property>

  <property>
    <name>elastic.cluster</name>
    <value>hist</value>
  </property>

  <property>
    <name>elastic.index</name>
    <value>nutch</value>
  </property>

  <property>
    <name>parser.character.encoding.default</name>
    <value>utf-8</value>
  </property>

  <property>
    <name>http.content.limit</name>
    <value>6553600</value>
  </property>

</configuration>
爬取自己第一个网页
创建一个URL种子列表
gannyee@ubuntu:~$ mkdir -p /nutch/runtime/local/urls
gannyee@ubuntu:~$ echo 'http://www.aossama.com/' >/nutch/runtime/local/urls/seed.txt
编辑conf/regex-urlfilter.txt文件,并且替换以下内容
/# accept anything else
+.
使用正则表达式匹配你想要爬取的域名
+^http://([a-z0-9]*\.)*aossama.com/初始化crawldb
gannyee@ubuntu:~/nutch/runtime/local$ ./bin/nutch inject urls/从 crawldb生成urls
gannyee@ubuntu:~/nutch/runtime/local$ ./bin/nutch generate -topN 80获取生成的所有urls
gannyee@ubuntu:~/nutch/runtime/local$ ./bin/nutch fetch -all解析获取的urls
gannyee@ubuntu:~/nutch/runtime/local$./ bin/nutch parse -all更新database数据库
gannyee@ubuntu:~/nutch/runtime/local$ ./bin/nutch updatedb -all索引解析的urls
gannyee@ubuntu:~/nutch/runtime/local$ bin/nutch index -all爬取完给定网页,mongoDB会生成一个新的数据库:nutch_1
gannyee@ubuntu:~/mongodb$ ./bin/mongo
MongoDB shell version: 2.6.11
connecting to: test
> show dbs
admin (empty)
local 0.031GB
nutch_1 0.031GB
test (empty)
> use nutch_1
switched to db nutch_1
> show tables
system.indexes
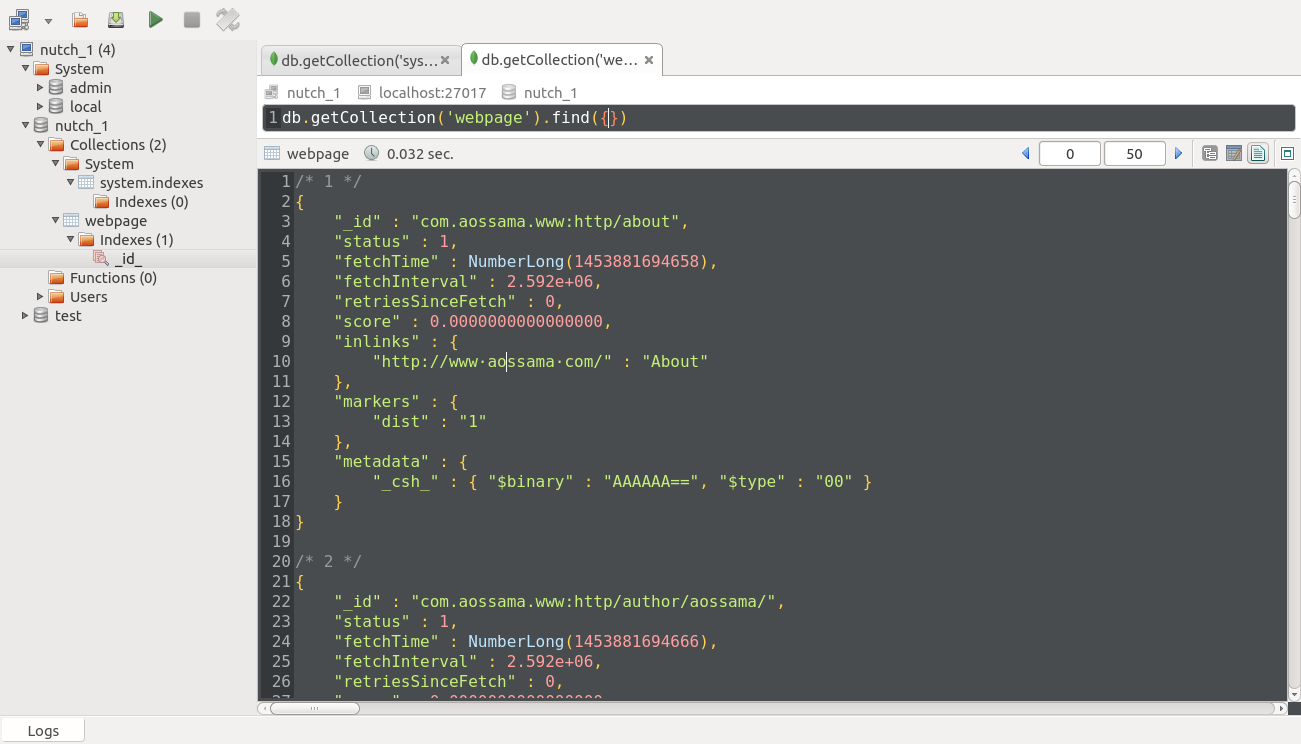
webpage
具体数据可以在terminal下用指令或在图形界面下直接点击查看!
参考博客:
【1】
http://www.aossama.com/search-engine-with-apache-nutch-mongodb-and-elasticsearch/
【2】http://www.micmiu.com/opensource/nutch/nutch2x-tutorial/
【3】http://www.jeepshoe.org/82645084.htm
【4】http://yijiebuyi.com/blog/f2e849b336b4d27fbf91bc52735d7841.html


 被折叠的 条评论
为什么被折叠?
被折叠的 条评论
为什么被折叠?
 到【灌水乐园】发言


