


在搭建如OpenStreetMap等瓦片服务器的过程中,我们会关心当前服务器上哪些瓦片已经存在(被渲染了)、哪些瓦片被访问量大,哪些少。
统计瓦片的历史记录,可以直接扫描缓存,或者通过数据库来完成。如果能够把统计数据直接叠加到地图上显示,就更棒了!今天,就来动手制作一个webService,用来生成每个瓦片的访问情况图。
演示网址由于OSM的一些非技术因素已经永久下架。
1.接口设计
我们希望,这个服务本身可以作为一个图层与现有的OpenStreetMap地图无缝契合。因此,它应该也是一个瓦片服务器。通过接口访问:
http://server_address/cgi-bin/tilehis.fcgi?x=138&y=221&z=7
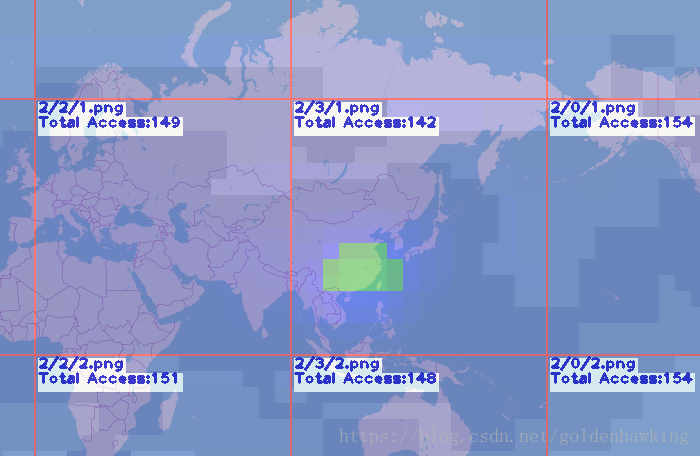
将返回一个透明的PNG图片,用不同色彩,显示该瓦片比例尺以下4级的渲染情况。
#2.数据库
数据库中,存储了各个瓦片的历史记录。数据库直接利用OpenStreetMap的PostGIS数据库,表如下:
CREATE TABLE tilehis
(
    x integer NOT NULL,
    y integer NOT NULL,
    z integer NOT NULL,
    counts integer NOT NULL DEFAULT 1,
    CONSTRAINT tilehis_pkey PRIMARY KEY (x, y, z)
       USING INDEX TABLESPACE tbspace_his
)
WITH (
    OIDS = FALSE
)
共4列,分别为x,y,z与访问次数。
在瓦片服务中,会根据每次客户端对瓦片的访问,为数据库中的记录加一。
#3.fcgi 功能实现
我们采用基于Qt的多线程并发fcgi框架
##3.1 主函数与工作线程
主函数(main.cpp)负责初始化fcgi环境,启动线程池,并进入消息循环。
#include <QCoreApplication>
#include <QList>
#include <iostream>
#include <QDebug>
#include <fcgi_stdio.h>
#include "listenthread.h"
using namespace std;
const int thread_count = 4;
int main(int argc, char *argv[])
{
		//由于Qt在fcgi下,采用console设置,所以为QCoreApplication而非QApplication
        QCoreApplication a(argc, argv);
		//初始化fcgi
        FCGX_Init();
        //初始化线程池
        QList<listenThread *> threadpool;
        for (int i=0;i<thread_count;++i)
                threadpool.push_back(new listenThread(&a));
        foreach (listenThread * t, threadpool)
                t->start();
        return a.exec();
}
在主函数中,启动四个线程,用于响应用户连接。具体的工作由 listenthread 完成。在listenthread中,存在一个Mutex,用于保护数据库创建过程中的线程安全。
listenthread.h
#ifndef LISTENTHREAD_H
#define LISTENTHREAD_H
#include <QThread>
#include <QMutex>
struct FCGX_Request;
class listenThread : public QThread
{
	Q_OBJECT
public:
	explicit listenThread(QObject *parent = 0);
protected:
	static QMutex  m_mutex;
	void run();
	void deal_client(FCGX_Request * request);
 };

#endif // LISTENTHREAD_H
3.2 不断接受并处理请求
在listenThread的实现中,入口点为Qthread::run。
void listenThread::run()
{
	//采用一个mutex保护数据库创建过程。Qt的数据库创建过程需要保护,创建后基本就安全了(对PostgreSQL而言)。
	m_mutex.lock();
	QString dbName = QString("RThread%1").arg(quint64(this));
	QSqlDatabase db = QSqlDatabase::addDatabase("QPSQL",dbName);
	//Sql Connections

	if (db.isValid())
	{
		db.setHostName("127.0.0.1");
		db.setDatabaseName("tilehis");
		db.setUserName("pi");
		db.setPassword("**********");
		db.open();
	}

	m_mutex.unlock();
	//检查创建效果
	if (db.isOpen()==false)
	{
		qCritical()<<db.lastError().text();
		quit();
		return;
	}
	//开始FCGI事件循环
	FCGX_Request request;
	FCGX_InitRequest(&request, 0, 0);
	int rc = FCGX_Accept_r(&request);
	while (rc >=0)
	{
		//执行业务逻辑
		deal_client(&request);
		FCGX_Finish_r(&request);
		rc = FCGX_Accept_r(&request);
	}
	//拆除数据库连接
	m_mutex.lock();
	db.close();
	QSqlDatabase::removeDatabase(dbName);
	m_mutex.unlock();
	quit();
}
这里需要注意的是,run运行在QThread管理的独立线程里。数据库对象的建立与拆除,都是在线程内进行的。Qt虽然号称支持多线程的数据库访问,但是数据库的创建(addDatabase)阶段,仍旧需要保护。否则,笔者实测会出错。
一旦数据库建立,即可不断接受cgi连接。
##3.3 实现响应:数据库查询与OpenCV图片生成
在响应函数deal_client中,我们获取请求内容,并查询数据库中瓦片的访问历史,从而生成一个半透明的叠加图片。
void listenThread::deal_client(FCGX_Request * request)
{
	//3.3.1 获得请求字符串,类似 x=374&y=378&z=13 这样的字符串。
	const char * const query_string=FCGX_GetParam("QUERY_STRING",request->envp);
	//3.3.2 利用Qt强大的字符功能,直接把请求变为字典。
	QHash < QString, QString> values;
	QString str = QString::fromUtf8(query_string) ;
	QStringList lst = str.split("&",QString::SkipEmptyParts);
	foreach (QString pai, lst)
	{
		int pd = pai.indexOf("=");
		if (pd>0 && pd < pai.length())
		{
			QString key = pai.left(pd);
			QString v = pai.mid(pd+1);
			values[key.trimmed().toUpper()]  = v;
		}
	}
	//3.3.2 获得 x,y,z 参数
	int x = values["X"].toInt();
	int y = values["Y"].toInt();
	int z = values["Z"].toInt();
	if (z>18) z = 18;
	if (z<0) z = 0;
	int maxsz = 1<<z;
	if (x<0) x = 0; if (x>=maxsz) x = maxsz - 1;
	if (y<0) y = 0; if (y>=maxsz) y = maxsz - 1;

	//3.3.3 获得本线程对应的数据库连接
	QString dbName = QString("RThread%1").arg(quint64(this));
	QSqlDatabase db = QSqlDatabase::database(dbName);

	//3.3.4 准备显示在瓦片上的文字
	QString urls = QString("%1/%2/%3.png").arg(z).arg(x).arg(y);

	//3.3.5 OpenCV部分,为本线程准备一副透明的图片(PNG)
	//注意,为了避免次次进行初始化,使用了静态对象。
	static cv::Mat mat_raw(256,256, CV_8UC4);
	static bool inited=false;
	if (inited==false)
	{
		creatAlphaMat(mat_raw);
		inited = true;
	}
	//3.3.5.1 从静态对象生成本会话需要的图片
	cv::Mat mat;
	mat_raw.copyTo(mat);

	//3.3.5.2 一个队列,存储需要显示的文本。
	std::vector<std::string> string_lists;
	string_lists.push_back(urls.toStdString());

	//3.3.5.3 运行SQL获得本瓦片总的被访问次数
	if (db.isOpen())
	{
		QSqlQuery query(db);
		query.setForwardOnly(true);
		query.prepare("select sum (counts) as subct from tilehis where x= ? and y=? and z=?");
		query.addBindValue(x);
		query.addBindValue(y);
		query.addBindValue(z);
		if (query.exec())
		{
			if (query.next())
			{
				QString ct = query.value(0).toString();
				std::string strCt = "Total Access:" +ct.toStdString();
				string_lists.push_back(strCt);
			}
		}
	}
	//3.3.5.4 运行SQL获得本瓦片内部的4级比例尺各层访问次数,并绘制热力图
	if (db.isOpen())
	{
		QSqlQuery query(db);
		query.setForwardOnly(true);
		for (int zo =1; zo<5 ;++zo)
		{
			if (z + zo >18)
				continue;
			int  x_left = x * (1<<zo);
			int  x_right = (x+1) * (1<<zo);
			int  y_left = y * (1<<zo);
			int  y_right = (y+1) * (1<<zo);
			query.prepare("select x,y,sum (counts) as subct from tilehis where x>= ? and x< ? and  y>=? and y<? and  z=? group by x,y");
			query.addBindValue(x_left);
			query.addBindValue(x_right);
			query.addBindValue(y_left);
			query.addBindValue(y_right);
			query.addBindValue(z+zo);
			if (query.exec())
			{
				int step = 256 / (1<<zo);
				while (query.next())
				{
					int sx = query.value(0).toInt() - x_left;
					int sy = query.value(1).toInt() - y_left;
					int sa = query.value(2).toInt();
					//色彩表,按照热度,从蓝色到红色映射。
					int colr = sa > 255 ? (sa>255+128?255 : sa -255+128):0;
					if (colr>255) colr = 255;
					int colg = sa > 128 && sa <=255? sa:0;
					if (colg>255) colg = 255;
					int colb = sa <= 128? sa+128:0;
					if (colb>255) colb = 255;
					int gama = 32 + zo*16;
					//openCV 绘制矩形
					cv::rectangle(mat, cv::Point(sx*step,sy*step), cv::Point((sx+1)*step-1,(sy+1)*step-1),cv::Scalar(colb,colg,colr,gama),(int)-1);
				}
			}

		}

	}
	//3.3.5.5 写入文字
	size_t szv = string_lists.size();
	if (szv)
	{
		for (int j = 0;j<szv;++j)
		{
			std::string text = string_lists[j];
			int fontFace = cv::FONT_HERSHEY_PLAIN;
			double fontScale = 1;
			int thickness = 2;
			int baseline = 0;
			cv::Size textSize = cv::getTextSize(text, fontFace, fontScale, thickness, &baseline);
			baseline += thickness;
			cv:: Point textOrg(3,(textSize.height)+3+j*textSize.height*1.5);
			cv::rectangle(mat,cv::Point(0,0) ,cv:: Point(255,255),cv::Scalar(0,0,255,128));
			cv::rectangle(mat,textOrg + cv::Point(0,baseline),textOrg + cv::Point(textSize.width,-textSize.height),cv::Scalar(255,255,255,128),(int)-1);
			cv::putText(mat,text,textOrg,fontFace,fontScale,cv::Scalar(192,0,0,192),thickness,8);
		}
	}
	//3.3.6 压缩生成PNG
	vector<uchar> buf; // Memory buffer
	vector<int> params;
	params.push_back( cv::IMWRITE_PNG_COMPRESSION );
	params.push_back( 9 ); // Quality of compression
	cv::imencode(".png", mat, buf, params );
	//3.3.7 向客户端返回PNG
	FCGX_FPrintF(request->out,"Content-type: image/png\n\n");
	FCGX_PutStr((const char *)buf.data(),buf.size(),request->out);
}
这里需要注意到,我们使用了OpenCV而不是Qt的QIMage,主要是因为fcgi程序没有GUI支持。如果硬是开启Qt的gui支持,笔者测试会出现问题。
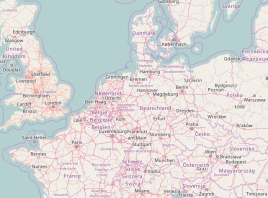
4 运行效果
我们使用两个图层叠加,实现地图的热力图效果。
具体的演示代码:
<!DOCTYPE html PUBLIC "-//W3C//DTD HTML 4.01//EN" "http://www.w3.org/TR/html4/strict.dtd">
<html style="height: 100%; width: 100%;">
<head>
  <meta content="text/html; charset=UTF8" http-equiv="content-type">
  <title>OpenStreetMap</title>
  <meta http-equiv="Content-Type" content="text/html; charset=UTF-8">
  <meta name="baidu-site-verification" content="tdO4FTbzxO">
  <meta http-equiv="cache-control" content="no-cache">
  <meta http-equiv="pragma" content="no-cache">
  <meta http-equiv="expires" content="0">
  <link href="/ol.css" rel="stylesheet" type="text/css">
  <script src="/ol.js"></script>
</head>
<body style="height: 98%; width: 99%;">
<div id="osm_map" class="map" style="width: 98%; height: 88%; text-align: center; color: rgb(255, 102, 102);">
</div>
<script>
      var map = new ol.Map({
        layers: [
          new ol.layer.Tile({
	    source: new ol.source.OSM({url:"/cgi-bin/get_tile.fcgi?z={z}&x={x}&y={y}"})
	  }),
	  new ol.layer.Tile({
	    source: new ol.source.OSM({url:"/cgi-bin/tile_his.fcgi?z={z}&x={x}&y={y}"})
	  })
	],
        target: 'osm_map',
         controls: ol.control.defaults({
          rotateOptions:({autoHide:true})
        }).extend([
          new ol.control.MousePosition({projection:'EPSG:4326'}),
          new ol.control.ScaleLine({
            units: 'metric'
          }),
          new ol.control.ZoomToExtent ({})
          ]),
        view: new ol.View({
          center: ol.proj.fromLonLat([114.395592, 30.5216412]),
          zoom: 0,
		  maxZoom: 18
        })
      });
</script>
</body>
</html>
其中,在OpenLayers中,插入了2个瓦片图层。get_tile.fcgi 是底图,tile_his.fcgi是覆盖热力图。
其效果:

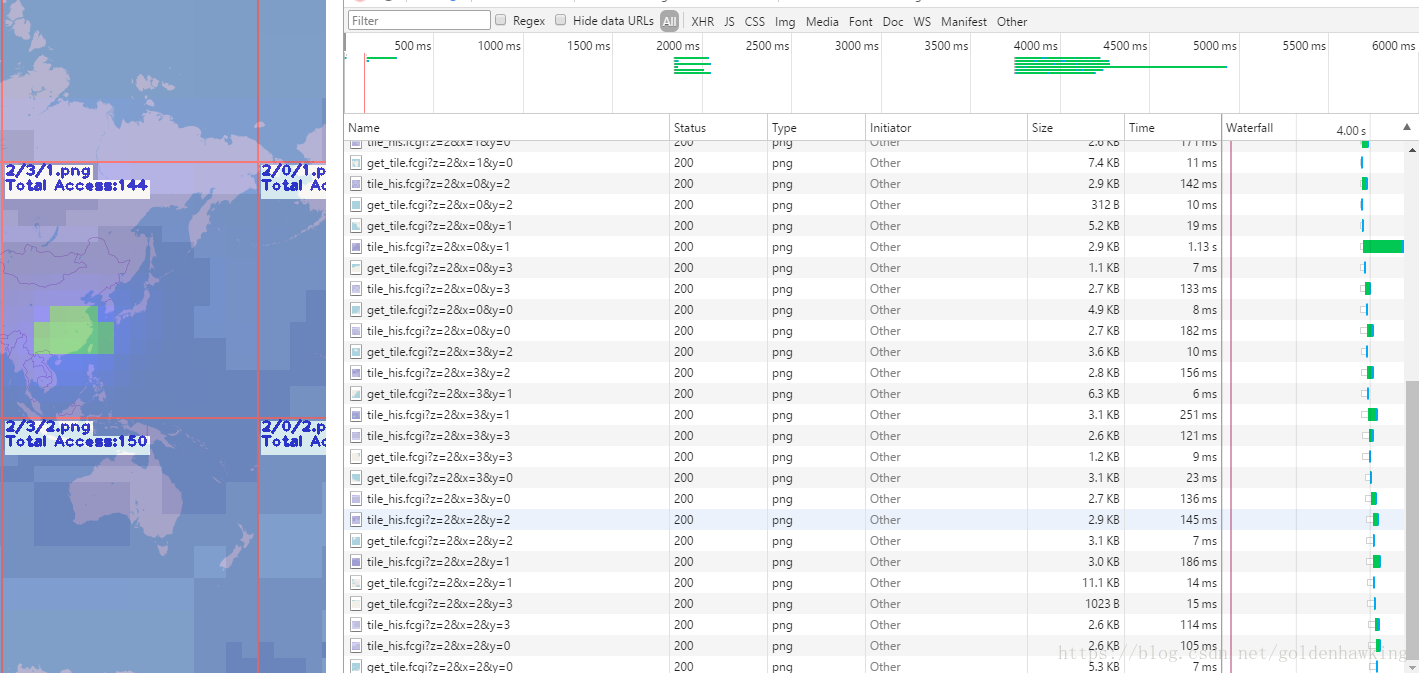
#5 Qt FCGI性能
我们使用了一个树莓派2代进行测试,发现性能还是不错的!由于全部是C的代码,即使在开启了PostgreSQL的Arm 1G内存下,访问效率仍旧很高。
在近期的各类应用中,我们尝试了使用Qt+FCGI实现了各种业务。包括数据下载、上传、图片处理、设备控制,对应熟悉C++、Qt的Native开发者来说,是架构转型的又一种解决方案。


 779
779


 被折叠的 条评论
为什么被折叠?
被折叠的 条评论
为什么被折叠?
 到【灌水乐园】发言


