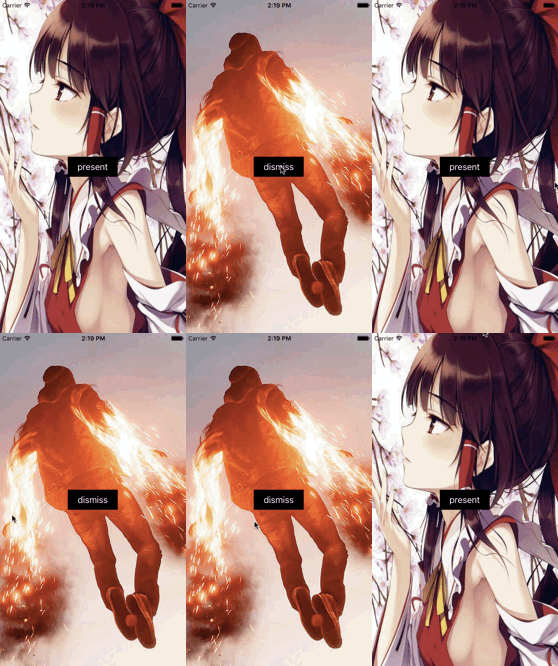
Dismiss
效果:
接着使用上一个代码
http://blog.csdn.net/h1078954008/article/details/49556809
1、新建PresentTransition继承NSObject,并在.h中遵守UIViewControllerAnimatedTransitioning协议。
2、实现协议的两个方法,并在其中编写 Push 的动画。类似Present,只需要修改少量代码:
// 返回动画的时间
- (NSTimeInterval)transitionDuration:(nullable id <UIViewControllerContextTransitioning>)transitionContext{
    return 0.8;
}
- (void)animateTransition:(id <UIViewControllerContextTransitioning>)transitionContext{
    ViewController * fromVC = [transitionContext viewControllerForKey:UITransitionContextFromViewControllerKey];
    SecondViewController * toVC = [transitionContext viewControllerForKey:UITransitionContextToViewControllerKey];
    UIView * container = [transitionContext containerView];

    [container addSubview:toVC.view];
    [container bringSubviewToFront:fromVC.view];

    // 改变m34
    CATransform3D transfrom = CATransform3DIdentity;
    transfrom.m34 = -0.002;
    container.layer.sublayerTransform = transfrom;

    // 设置archPoint和position
    CGRect initalFrame = [transitionContext initialFrameForViewController:fromVC];
    toVC.view.frame = initalFrame;
    fromVC.view.frame = initalFrame;
    fromVC.view.layer.anchorPoint = CGPointMake(0, 0.5);
    fromVC.view.layer.position = CGPointMake(0, initalFrame.size.height / 2.0);

    // 添加阴影效果
    CAGradientLayer * shadowLayer = [[CAGradientLayer alloc] init];
    shadowLayer.colors =@[
                         [UIColor colorWithWhite:0 alpha:1],
                         [UIColor colorWithWhite:0 alpha:0.5],
                         [UIColor colorWithWhite:1 alpha:0.5]
                         ];
    shadowLayer.startPoint = CGPointMake(0, 0.5);
    shadowLayer.endPoint = CGPointMake(1, 0.5);
    shadowLayer.frame = initalFrame;

    UIView * shadow = [[UIView alloc] initWithFrame:initalFrame];
    shadow.backgroundColor = [UIColor clearColor];
    [shadow.layer addSublayer:shadowLayer];
    [fromVC.view addSubview:shadow];
    shadow.alpha = 0;

    // 动画
    [UIView animateKeyframesWithDuration:[self transitionDuration:transitionContext] delay:0 options:2 animations:^{
        fromVC.view.layer.transform = CATransform3DMakeRotation(-M_PI_2, 0, 1, 0);
        shadow.alpha = 1.0;
    } completion:^(BOOL finished) {
        fromVC.view.layer.anchorPoint = CGPointMake(0.5, 0.5);
        fromVC.view.layer.position = CGPointMake(CGRectGetMidX(initalFrame), CGRectGetMidY(initalFrame));
        fromVC.view.layer.transform = CATransform3DIdentity;
        [shadow removeFromSuperview];

        [transitionContext completeTransition: ![transitionContext transitionWasCancelled]]; // 如果参数写成yes,当用户取消pop时,会继续执行动画,也就是让detailVC消失,设置成这个参数,会避免这样的错误
    }];
}
3、在ViewController.m中加入一个方法即可:
// dismiss动画
- (id<UIViewControllerAnimatedTransitioning>)animationControllerForDismissedController:(UIViewController *)dismissed{
    return [[DismissTransition alloc] init];
}
加入手势驱动
1、想要同时实现 present 和 dismiss 手势,就需要给两个 viewController.view 添加手势。首先在 ViewController 中给自己添加一个屏幕右边的手势,在init SecondViewController时给它的view添加一个屏幕左边的手势,让它们使用同一个手势监听方法,都交给viewController处理,也就是self
在ViewController中封装了一个增加手势的方法,参数为承载手势的view和手势
// 添加手势的方法
- (void)addScreenEdgePanGestureRecognizer:(UIView *)view edges:(UIRectEdge)edges{
    UIScreenEdgePanGestureRecognizer * edgePan = [[UIScreenEdgePanGestureRecognizer alloc] initWithTarget:self action:@selector(edgePanGesture:)]; // viewController和SecondViewController的手势都由self管理
    edgePan.edges = edges;
    [view addGestureRecognizer:edgePan];
}
2、在viewDidLoad()和用于present的按钮的点击方法中分别加入手势:
- (void)viewDidLoad {
    [super viewDidLoad];

    self.transitioningDelegate = self;
    [self addScreenEdgePanGestureRecognizer:self.view edges:UIRectEdgeRight]; // 为self.view增加右侧的手势,用于push
}
- (void)presentClick{
SecondViewController * secondVC = [[SecondViewController alloc] init];
secondVC.transitioningDelegate = self; // 必须second同样设置delegate才有动画
[self addScreenEdgePanGestureRecognizer:secondVC.view edges:UIRectEdgeLeft];
[self presentViewController:secondVC animated:YES completion:^{
}];
}3、实现手势的监听方法,首先定义一个属性:
@property (nonatomic, retain) UIPercentDrivenInteractiveTransition * percentDrivenTransition;
4、因为有两个手势,要区别他们使用的是 KeyWindow。手势监听方法:
// 手势的监听方法
- (void)edgePanGesture:(UIScreenEdgePanGestureRecognizer *)edgePan{
    CGFloat progress = fabs([edgePan translationInView:[UIApplication sharedApplication].keyWindow].x / [UIApplication sharedApplication].keyWindow.bounds.size.width);// 有两个手势,所以这里计算百分比使用的是 KeyWindow

    if(edgePan.state == UIGestureRecognizerStateBegan){
        self.percentDrivenTransition = [[UIPercentDrivenInteractiveTransition alloc] init];
        if(edgePan.edges == UIRectEdgeRight){
            // present,避免重复,直接调用点击方法
            [self presentClick];
        }else if(edgePan.edges == UIRectEdgeLeft){
            [self dismissViewControllerAnimated:YES completion:^{
            }];
        }
    }else if(edgePan.state == UIGestureRecognizerStateChanged){
        [self.percentDrivenTransition updateInteractiveTransition:progress];
    }else if(edgePan.state == UIGestureRecognizerStateCancelled || edgePan.state == UIGestureRecognizerStateEnded){
        if(progress > 0.5){
            [_percentDrivenTransition finishInteractiveTransition];
        }else{
            [_percentDrivenTransition cancelInteractiveTransition];
        }
        _percentDrivenTransition = nil;
    }
}
5、最后实现 UIViewControllerTransitioningDelegate 协议的另外两个方法,分别返回 Present 和 Dismiss 动画的百分比。
// 百分比present
- (id<UIViewControllerInteractiveTransitioning>)interactionControllerForPresentation:(id<UIViewControllerAnimatedTransitioning>)animator{
    return _percentDrivenTransition;
}
// 百分比dismiss
- (id<UIViewControllerInteractiveTransitioning>)interactionControllerForDismissal:(id<UIViewControllerAnimatedTransitioning>)animator{
    return _percentDrivenTransition;
}


 758
758


 被折叠的 条评论
为什么被折叠?


