


UICollectionView的使用跟UITableView的使用相似,必须实现UICollectionViewDataSource,UICollectionViewDelegate,
UICollectionViewDelegateFlowLayout这三个协议。
首先创建collectionView:
UICollectionViewFlowLayout *flowLayout = [[UICollectionViewFlowLayout alloc] init];
    self.collectionView = [[UICollectionView alloc] initWithFrame:CGRectMake(0, 0, self.view.frame.size.width, 100 * ((self.dataArr.count - 1)/2 + 1)) collectionViewLayout:flowLayout];
    self.collectionView.dataSource = self;
    self.collectionView.delegate = self;
    self.collectionView.backgroundColor = [UIColor clearColor];
    [self.view addSubview:self.collectionView];
    [self.collectionView registerClass:[PrefectureCollectionViewCell class] forCellWithReuseIdentifier:@"Cell"];
然后列举一些经常使用的方法:
#pragma mark -UICollectionView delegate
/**
 *  有多少个分区
 */
- (NSInteger)numberOfSectionsInCollectionView:(UICollectionView *)collectionView
{
    return 1;

}
/**
* 有多少个cell
*/
- (NSInteger)collectionView:(UICollectionView *)collectionView numberOfItemsInSection:(NSInteger)section
{
return _dataArr.count;
}/**
* 相当于单元格
*/
- (UICollectionViewCell *)collectionView:(UICollectionView *)collectionView cellForItemAtIndexPath:(NSIndexPath *)indexPath
{
PrefectureCollectionViewCell * cell = [collectionView dequeueReusableCellWithReuseIdentifier:@"Cell" forIndexPath:indexPath];
NSDictionary *dit = [_dataArr objectAtIndex:indexPath.row];
cell.imageV.backgroundColor = [UIColor cyanColor];
cell.titleLabel.text = [dit objectForKey:@"name"];
cell.detailLabel.text = [dit objectForKey:@"description"];
return cell;
}
//每个cell尺寸
- (CGSize)collectionView:(UICollectionView *)collectionView layout:(UICollectionViewLayout *)collectionViewLayout sizeForItemAtIndexPath:(NSIndexPath *)indexPath
{

    return CGSizeMake(self.view.frame.size.width/2.0, 100);

}
//每个cell间距
- (UIEdgeInsets)collectionView:(UICollectionView *)collectionView layout:(UICollectionViewLayout *)collectionViewLayout insetForSectionAtIndex:(NSInteger)section
{
return UIEdgeInsetsMake(0, 0, 0, 0);
}
- (CGFloat)collectionView:(UICollectionView *)collectionView layout:(UICollectionViewLayout*)collectionViewLayout minimumInteritemSpacingForSectionAtIndex:(NSInteger)section
{

    return 0;

}

- (CGFloat)collectionView:(UICollectionView *)collectionView layout:(UICollectionViewLayout*)collectionViewLayout minimumLineSpacingForSectionAtIndex:(NSInteger)section;
{
    return 0;

}
//UICollectionView被选中时调用的方法
-(void)collectionView:(UICollectionView *)collectionView didSelectItemAtIndexPath:(NSIndexPath *)indexPath
{
    UICollectionViewCell * cell = (UICollectionViewCell *)[collectionView cellForItemAtIndexPath:indexPath];
    cell.backgroundColor = [UIColor whiteColor];
}

//返回这个UICollectionView是否可以被选择
-(BOOL)collectionView:(UICollectionView *)collectionView shouldSelectItemAtIndexPath:(NSIndexPath *)indexPath
{
    return YES;
}
- (id)initWithFrame:(CGRect)frame
{
    self = [super initWithFrame:frame];
    if (self) {

        _imageV = [[UIImageView alloc] init];
        _imageV.frame = CGRectMake(10, (frame.size.height - 60.0)/2.0, 60, 60);
        _imageV.backgroundColor = [UIColor clearColor];
        [self.contentView addSubview:_imageV];


        _titleLabel = [[UILabel alloc] init];
        _titleLabel.frame = CGRectMake(_imageV.frame.origin.x + _imageV.frame.size.width + 5, _imageV.frame.origin.y + _imageV.frame.size.height - 45, frame.size.width - 70 - 5, 20.0);
        _titleLabel.backgroundColor = [UIColor clearColor];
        _titleLabel.textAlignment = NSTextAlignmentLeft;
        _titleLabel.font = [UIFont systemFontOfSize:17.0];
        _titleLabel.textColor = [UIColor colorWithWhite:0.2 alpha:1.0];
        [self.contentView addSubview:_titleLabel];

        _detailLabel = [[UILabel alloc] init];
        _detailLabel.frame = CGRectMake(_titleLabel.frame.origin.x, _titleLabel.frame.origin.y + _titleLabel.frame.size.height, _titleLabel.frame.size.width, 20.0);
        _detailLabel.backgroundColor = [UIColor clearColor];
        _detailLabel.textAlignment = NSTextAlignmentLeft;
        _detailLabel.font = [UIFont systemFontOfSize:12.0];
        _detailLabel.textColor = [UIColor blackColor];
        [self.contentView addSubview:_detailLabel];

    }

    return self;
}
- (void)drawRect:(CGRect)rect {

    [super drawRect:rect];
    CGContextRef context = UIGraphicsGetCurrentContext();
    CGContextSaveGState(context);
    CGContextSetLineCap(context, kCGLineCapSquare);
    CGContextSetStrokeColorWithColor(context, [UIColor clearColor].CGColor);
    CGContextSetFillColorWithColor(context, [UIColor whiteColor].CGColor);
    CGContextSetLineWidth(context, 1.0);
    CGContextMoveToPoint(context, 0, 0);
    CGContextAddLineToPoint(context, rect.size.width, 0);
    CGContextAddLineToPoint(context, rect.size.width, rect.size.height);
    CGContextAddLineToPoint(context, 0, rect.size.height);
    CGContextMoveToPoint(context,0, 0);
    CGContextClosePath(context);
    CGContextDrawPath(context, kCGPathFillStroke); //根据坐标绘制路径


    CGContextSetLineWidth(context, 0.6);
    CGContextSetStrokeColorWithColor(context,[UIColor lightGrayColor].CGColor);
    CGContextBeginPath(context);
    CGContextMoveToPoint(context, self.frame.size.width-1, 0);
    CGContextAddLineToPoint(context,self.frame.size.width -1, self.frame.size.height);
    CGContextAddLineToPoint(context, 0, self.frame.size.height);
    CGContextStrokePath(context);

}
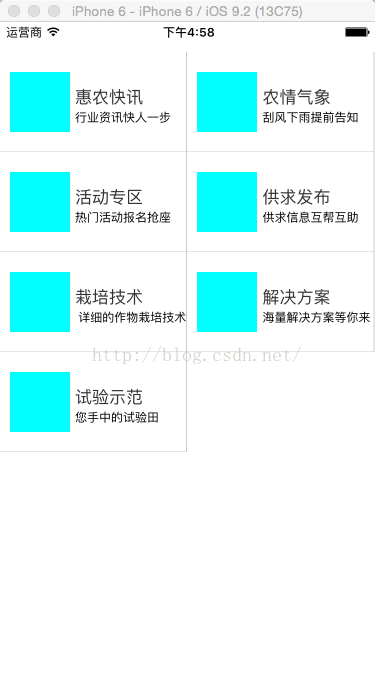
数据:
self.dataArr = @[@{@"module":@"news",
                       @"name":@"惠农快讯",
                       @"catid": @"29",
                       @"description":@"行业资讯快人一步",
                       @"icon":@"http://ynb.114nz.com/Public/Appimg/news.png"},
                     @{@"module":@"news",
                       @"name":@"农情气象",
                       @"catid":@"33",
                       @"description":@"刮风下雨提前告知",
                       @"icon":@"http://ynb.114nz.com/Public/Appimg/news_weather.png"
                               },
                     @{
                       @"module":@"event",
                       @"name":@"活动专区",
                       @"catid":@"1621,1623",
                       @"description":@"热门活动报名抢座",
                       @"icon":@"http://ynb.114nz.com/Public/Appimg/event.png"
                               },
                     @{
                       @"module":@"help",
                       @"name":@"供求发布",
                       @"catid":@"1089",
                       @"description":@"供求信息互帮互助",
                       @"icon":@"http://ynb.114nz.com/Public/Appimg/help.png"
                               },
                       @{
                        @"module":@"tech",
                        @"name":@"栽培技术",
                        @"catid":@"1549",
                        @"description":@" 详细的作物栽培技术",
                        @"icon":@"http://ynb.114nz.com/Public/Appimg/tech_skill.png"
                       },
                       @{
                        @"module":@"tech",
                        @"name":@"解决方案",
                        @"catid":@"1622",
                        @"description":@"海量解决方案等你来",
                        @"icon":@"http://ynb.114nz.com/Public/Appimg/tech_solve.png"
                       },
                       @{
                        @"module":@"tech",
                        @"name":@"试验示范",
                        @"catid":@"1551,1552",
                        @"description":@"您手中的试验田",
                        @"icon":@"http://ynb.114nz.com/Public/Appimg/tech_testpro.png"
                        }];
效果图:


 4219
4219


 被折叠的 条评论
为什么被折叠?
被折叠的 条评论
为什么被折叠?
 到【灌水乐园】发言


