


开发GWT RPC开发时。在GWT 2.2环境下。
我遇到了一些问题。不过今天把问题解决。以下是我的开发过程
首先导入GWT2.2 Sample目录下的DynaTable工程。
这里我使用创建新工程,导入已存在文件至项目中,过程如下所示:
new WindowBuilder 选中GWT java Project
至下一步,选中已经存在的GWT 项目DynaTable,并将工程命名为DynaTable。
通过查看该示例源代码。
我发现:
1.在DynaTable.gwt.xml文件中
<module rename-to="dynatable">
<inherits name='com.google.gwt.user.User' />
<inherits name='com.google.gwt.rpc.RPC' />
<entry-point class='com.google.gwt.sample.dynatable.client.DynaTable' />
<servlet path='/calendar'
class='com.google.gwt.sample.dynatable.server.SchoolCalendarServiceImpl' />
</module>
2.在Web.xml文件中
<?xml version="1.0" encoding="UTF-8"?>
<web-app>
<!-- Default page to serve -->
<welcome-file-list>
<welcome-file>DynaTable.html</welcome-file>
</welcome-file-list>
<!-- Servlets -->
<servlet>
<servlet-name>calendar</servlet-name>
<servlet-class>com.google.gwt.sample.dynatable.server.SchoolCalendarServiceImpl</servlet-class>
</servlet>
<servlet-mapping>
<servlet-name>calendar</servlet-name>
<url-pattern>/dynatable/calendar</url-pattern>
</servlet-mapping>
</web-app>
3.在SchoolCalendarServiceAsync.java文件中
package com.google.gwt.sample.dynatable.client;
import com.google.gwt.user.client.rpc.AsyncCallback;
/**
* The interface for the RPC server endpoint that provides school calendar
* information for clients that will be calling asynchronously.
*/
public interface SchoolCalendarServiceAsync {
void getPeople(int startIndex, int maxCount, AsyncCallback<Person[]> callback);
}
4.在SchoolCalendarService.java文件中
package com.google.gwt.sample.dynatable.client;
import com.google.gwt.rpc.client.RpcService;
/**
* The interface for the RPC server endpoint to get school calendar information.
*/
public interface SchoolCalendarService extends RpcService {
Person[] getPeople(int startIndex, int maxCount);
}
5.在SchoolCalendarServiceImpl.java文件中
。。。。。
public Person[] getPeople(int startIndex, int maxCount) {
int peopleCount = people.size();
int start = startIndex;
if (start >= peopleCount) {
return NO_PEOPLE;
}
int end = Math.min(startIndex + maxCount, peopleCount);
if (start == end) {
return NO_PEOPLE;
}
int resultCount = end - start;
Person[] results = new Person[resultCount];
for (int from = start, to = 0; to < resultCount; ++from, ++to) {
results[to] = people.get(from);
}
return results;
}
6.在SchoolCalendarWidget.java文件中
.....................
public CalendarProvider() {
// Initialize the service.
//
calService = (SchoolCalendarServiceAsync) GWT.create(SchoolCalendarService.class);
// By default, we assume we'll make RPCs to a servlet, but see
// updateRowData(). There is special support for canned RPC responses.
// (Which is a totally demo hack, by the way :-)
//
ServiceDefTarget target = (ServiceDefTarget) calService;
// Use a module-relative URLs to ensure that this client code can find
// its way home, even when the URL changes (as might happen when you
// deploy this as a webapp under an external servlet container).
String moduleRelativeURL = GWT.getModuleBaseURL() + "calendar";
target.setServiceEntryPoint(moduleRelativeURL);
}
.........................
以上则是该实现RPC的全部细节
这跟我以前用的那个GWT Windows下面的不一样。
下面我再介绍一下实现GWT Window 2.0的那个例子。自已参考源码写的
1.在GreetingService.java文件中
import com.google.gwt.core.client.GWT;
import com.google.gwt.user.client.rpc.RemoteService;
import com.google.gwt.user.client.rpc.RemoteServiceRelativePath;
import com.google.gwt.user.client.rpc.ServiceDefTarget;
@RemoteServiceRelativePath("GreetingServiceImpl")
public interface GreetingService extends RemoteService {
public String getGreetingHello(String greetingHello);
public static class Util {
public static GreetingServiceAsync getInstance() {
return GWT.create(GreetingService.class);
}
}
}
2.在GreetingServiceAsync.java文件中
import com.google.gwt.user.client.rpc.AsyncCallback;
public interface GreetingServiceAsync {
public void getGreetingHello(String greetingHello, AsyncCallback<String> callback);
}
3.在实现类中
// TODO Auto-generated method stub
Button button = new Button("测试按钮");
button.addListener(new ButtonListenerAdapter() {
@Override
public void onClick(Button button, EventObject e) {
// TODO Auto-generated method stub
super.onClick(button, e);
AsyncCallback<String> callback = new AsyncCallback<String>() {
public void onFailure(Throwable caught) {
// TODO Auto-generated method stub
Window.alert(caught.toString());
}
public void onSuccess(String result) {
// TODO Auto-generated method stub
Window.alert(result.toString());
}
};
gsa.getGreetingHello("hellowrold", callback);
}
});
RootPanel.get("hellodiv").add(button);
4.并在Main.gwt.xml中
<?xml version="1.0" encoding="UTF-8" standalone="no"?>
<module>
<!-- Inherit the core Web Toolkit stuff. -->
<inherits name="com.google.gwt.user.User" />
<!-- Specify the app entry point class. -->
<entry-point class="com.cystal.gwt.client.Main" />
<inherits name="com.google.gwt.user.theme.standard.Standard" />
<!-- <inherits name="com.google.gwt.user.theme.chrome.Chrome"/> -->
<!-- <inherits name="com.google.gwt.user.theme.dark.Dark"/> -->
<!-- 设置 Servlet -->
<servlet class="com.cystal.gwt.server.GreetingServiceImpl"
path="/GreetingServiceImpl" />
<!-- 继承使用Ext框架类 -->
<inherits name="com.gwtext.GwtExt" />
<!-- 使用Ext样式与javascript库 -->
<stylesheet src="js/ext/resources/css/ext-all.css" />
<script src="js/ext/adapter/ext/ext-base.js" />
<script src="js/ext/ext-all.js" />
</module>
5.在server实现类中
import com.cystal.gwt.client.GreetingService;
import com.google.gwt.user.server.rpc.RemoteServiceServlet;
public class GreetingServiceImpl extends RemoteServiceServlet implements GreetingService {
public String getGreetingHello(String greetingHello) {
// TODO Auto-generated method stub
return "你好:/t"+greetingHello;
}
}
最后我们看看web.xml文件
<?xml version="1.0" encoding="UTF-8"?>
<web-app>
<servlet>
<servlet-name>shell</servlet-name>
<servlet-class>com.google.gwt.dev.shell.GWTShellServlet</servlet-class>
</servlet>
<servlet-mapping>
<servlet-name>shell</servlet-name>
<url-pattern>/*</url-pattern>
</servlet-mapping>
</web-app>
注意这里没有注册GreetingServiceImpl 的Servlet,urlpattern了,同第一种方式不同。
注意我们在实际开发过程中还是要使用第一种方式的比较多。
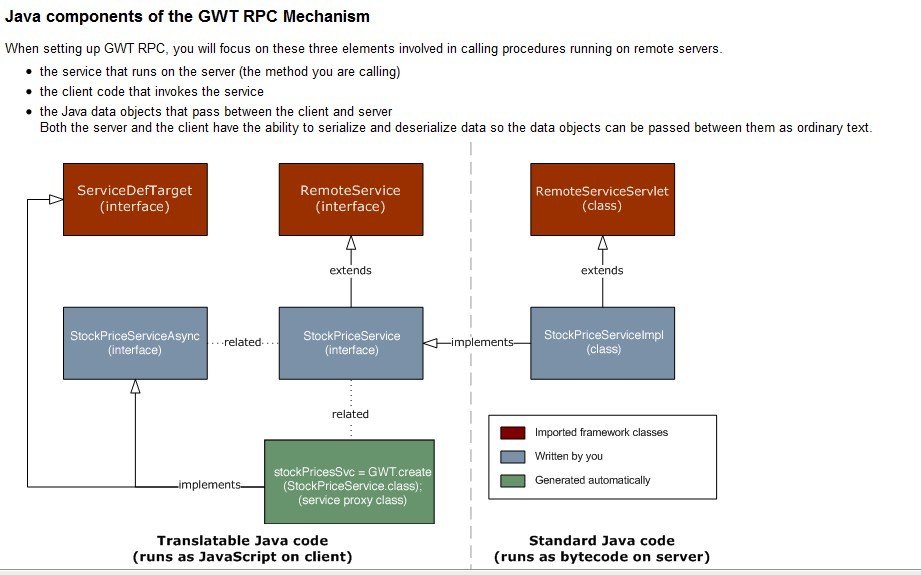
附GWT RPC结构图(源于官网)


 200
200


 被折叠的 条评论
为什么被折叠?
被折叠的 条评论
为什么被折叠?
 到【灌水乐园】发言


