


自定义View界面大合集
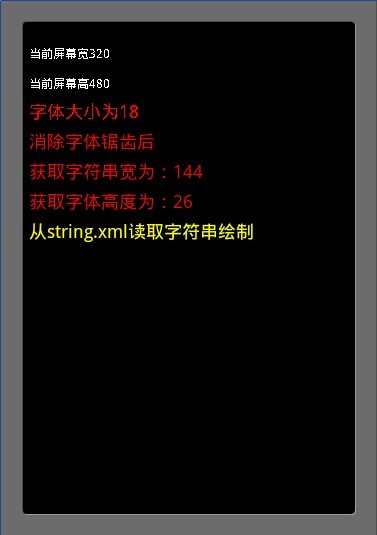
相信在实际开发过程中必然很多地方都须要用到系统字 为什么会用到系统字? 方便 省内存 我相信做过J2ME游戏开发的朋友应该深知内存有多么多么重要 而且使用它还可以带来一个更重要的好处就是很方便的可以实现多国语言的切换 笔者现在在正在做的一个产品就是可以多语言切换的软件 有英语 繁体中文 等等 设想如果使用图片字的话那每个语言都须要出一套图,我用一个例子简单介绍一下绘制字符串。
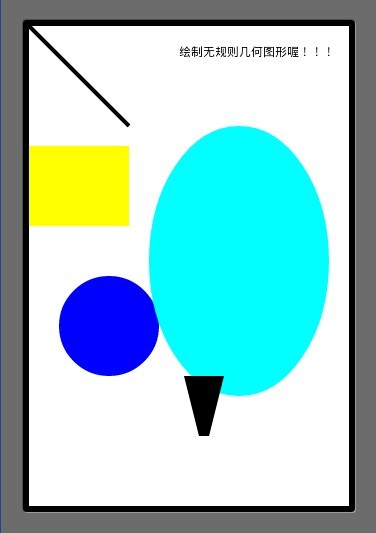
2.绘制无规则几何图形
绘制无规则几何图形似乎在实际工作中很少可以用到 原因是用程序去绘制图形即使在精准再好看也不会有美术出的图片好看 但是使用程序绘制图形作为学习来说却是基础中的基础,所以建议大家都看一看。
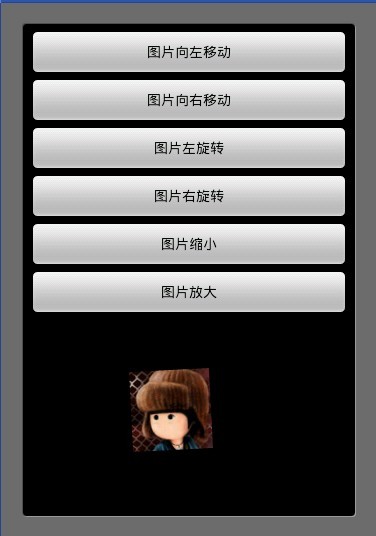
3.图片的绘制以及旋转缩放的实现
在这点上Android 确实比J2ME 强大很多 手机游戏开发最痛苦的是什么?? 是游戏引擎的开发,但是工程师会把大部分时间浪费在对坐标上,如果写引擎的时候没有把自适应考虑周全后期会非常痛苦,现在手机屏幕分辨率是各式各样 内存大小也是各式各样 所以可见自适应屏幕算法有多么的重要。
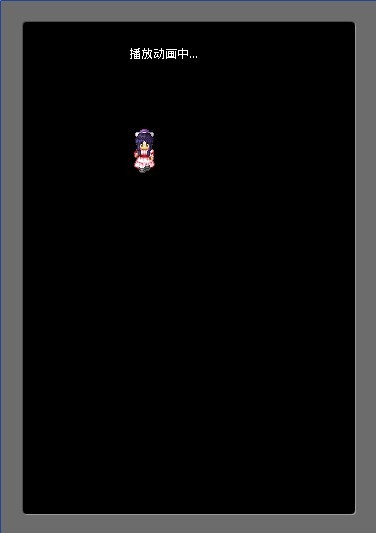
4.播放frame动画
做游戏的话播放动画可就是必不可少的元素 帧动画帧动画 顾名思义是一帧一帧的播放 。 实际在开发中为了节省内存美术会把人物的图片切成一小块一小块然后由程序根据编辑器生成的点把图片在拼接起来这样就可以做到用更少的图片去实现更多的动画效果因为不太方便介绍图片编辑器 这个demo我只给大家简单的介绍一下播放动画的原理 后期我会深入讲解。
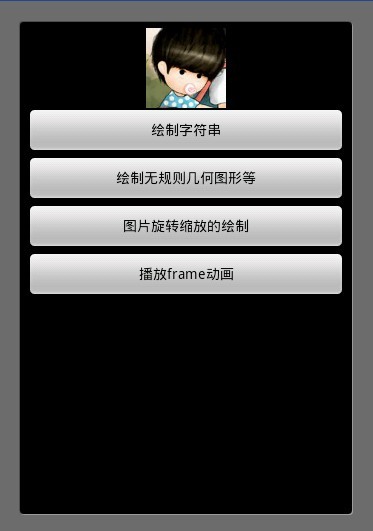
如图所示这个小人一直在行走 实际上是4张图片在来回切换 每张图片延迟500毫秒 后播下一张 以此类推。
雨松MOMO带大家盘点Android 中的自定义View界面的绘制
今天我用自己写的一个Demo 和大家详细介绍一个Android中自定义View中的使用与绘制技巧。
1.自定义view绘制字符串
今天我用自己写的一个Demo 和大家详细介绍一个Android中自定义View中的使用与绘制技巧。
1.自定义view绘制字符串
相信在实际开发过程中必然很多地方都须要用到系统字 为什么会用到系统字? 方便 省内存 我相信做过J2ME游戏开发的朋友应该深知内存有多么多么重要 而且使用它还可以带来一个更重要的好处就是很方便的可以实现多国语言的切换 笔者现在在正在做的一个产品就是可以多语言切换的软件 有英语 繁体中文 等等 设想如果使用图片字的话那每个语言都须要出一套图,我用一个例子简单介绍一下绘制字符串。
- package cn.m15.xys;
- import android.app.Activity;
- import android.content.Context;
- import android.graphics.Canvas;
- import android.graphics.Color;
- import android.graphics.Paint;
- import android.graphics.Paint.FontMetrics;
- import android.os.Bundle;
- import android.view.Display;
- import android.view.View;
- public class Font extends Activity {
- public int mScreenWidth = 0;
- public int mScreenHeight = 0;
- @Override
- protected void onCreate(Bundle savedInstanceState) {
- setContentView(new FontView(this));
- // 获取屏幕宽高
- Display display = getWindowManager().getDefaultDisplay();
- mScreenWidth = display.getWidth();
- mScreenHeight = display.getHeight();
- super.onCreate(savedInstanceState);
- }
- class FontView extends View {
- public final static String STR_WIDTH = "获取字符串宽为:";
- public final static String STR_HEIGHT = "获取字体高度为:";
- Paint mPaint = null;
- public FontView(Context context) {
- super(context);
- mPaint = new Paint();
- }
- @Override
- protected void onDraw(Canvas canvas) {
- //设置字符串颜色
- mPaint.setColor(Color.WHITE);
- canvas.drawText("当前屏幕宽" + mScreenWidth, 0, 30, mPaint);
- canvas.drawText("当前屏幕高"+ mScreenHeight, 0, 60, mPaint);
- //设置字体大小
- mPaint.setColor(Color.RED);
- mPaint.setTextSize(18);
- canvas.drawText("字体大小为18", 0, 90, mPaint);
- //消除字体锯齿
- mPaint.setFlags(Paint.ANTI_ALIAS_FLAG);
- canvas.drawText("消除字体锯齿后", 0, 120, mPaint);
- //获取字符串宽度
- canvas.drawText(STR_WIDTH + getStringWidth(STR_WIDTH), 0, 150, mPaint);
- //获取字体高度
- canvas.drawText(STR_HEIGHT + getFontHeight(), 0, 180, mPaint);
- //从string.xml读取字符串绘制
- mPaint.setColor(Color.YELLOW);
- canvas.drawText(getResources().getString(R.string.string_font), 0, 210, mPaint);
- super.onDraw(canvas);
- }
- /**
- * 获取字符串宽
- * @param str
- * @return
- */
- private int getStringWidth(String str) {
- return (int) mPaint.measureText(STR_WIDTH);
- }
- /*
- * 获取字体高度
- */
- private int getFontHeight() {
- FontMetrics fm = mPaint.getFontMetrics();
- return (int)Math.ceil(fm.descent - fm.top) + 2;
- }
- }
- }
2.绘制无规则几何图形
绘制无规则几何图形似乎在实际工作中很少可以用到 原因是用程序去绘制图形即使在精准再好看也不会有美术出的图片好看 但是使用程序绘制图形作为学习来说却是基础中的基础,所以建议大家都看一看。
- package cn.m15.xys;
- import android.app.Activity;
- import android.content.Context;
- import android.graphics.Canvas;
- import android.graphics.Color;
- import android.graphics.Paint;
- import android.graphics.Path;
- import android.graphics.RectF;
- import android.os.Bundle;
- import android.view.View;
- public class Geometry extends Activity {
- public int mScreenWidth = 0;
- public int mScreenHeight = 0;
- @Override
- protected void onCreate(Bundle savedInstanceState) {
- setContentView(new GeometryView(this));
- super.onCreate(savedInstanceState);
- }
- class GeometryView extends View {
- Paint mPaint = null;
- public GeometryView(Context context) {
- super(context);
- mPaint = new Paint();
- mPaint.setFlags(Paint.ANTI_ALIAS_FLAG);
- }
- @Override
- protected void onDraw(Canvas canvas) {
- super.onDraw(canvas);
- //设置画布颜色 也就是背景颜色
- canvas.drawColor(Color.WHITE);
- mPaint.setColor(Color.BLACK);
- canvas.drawText("绘制无规则几何图形喔!!!", 150, 30, mPaint);
- //绘制一条线
- mPaint.setColor(Color.BLACK);
- mPaint.setStrokeWidth(4);
- canvas.drawLine(0, 0, 100, 100, mPaint);
- //绘制一个矩形
- mPaint.setColor(Color.YELLOW);
- canvas.drawRect(0, 120, 100, 200, mPaint);
- //绘制一个圆形
- mPaint.setColor(Color.BLUE);
- canvas.drawCircle(80, 300, 50, mPaint);
- //绘制一个椭圆
- mPaint.setColor(Color.CYAN);
- canvas.drawOval(new RectF(300,370,120,100), mPaint);
- //绘制多边形
- mPaint.setColor(Color.BLACK);
- Path path = new Path();
- path.moveTo(150+5 , 400 -50);
- path.lineTo(150+45, 400 - 50);
- path.lineTo(150+30, 460 - 50);
- path.lineTo(150+20, 460 - 50);
- path.close();
- canvas.drawPath(path, mPaint);
- }
- }
- }
3.图片的绘制以及旋转缩放的实现
在这点上Android 确实比J2ME 强大很多 手机游戏开发最痛苦的是什么?? 是游戏引擎的开发,但是工程师会把大部分时间浪费在对坐标上,如果写引擎的时候没有把自适应考虑周全后期会非常痛苦,现在手机屏幕分辨率是各式各样 内存大小也是各式各样 所以可见自适应屏幕算法有多么的重要。
- package cn.m15.xys;
- import android.app.Activity;
- import android.content.Context;
- import android.graphics.Bitmap;
- import android.graphics.BitmapFactory;
- import android.graphics.Canvas;
- import android.graphics.Matrix;
- import android.graphics.Paint;
- import android.os.Bundle;
- import android.view.View;
- import android.view.View.OnClickListener;
- import android.widget.Button;
- import android.widget.LinearLayout;
- public class Image extends Activity {
- ImageView imageView = null;
- @Override
- protected void onCreate(Bundle savedInstanceState) {
- imageView = new ImageView(this);
- setContentView(R.layout.image);
- LinearLayout ll = (LinearLayout) findViewById(R.id.iamgeid);
- ll.addView(imageView);
- // 向左移动
- Button botton0 = (Button) findViewById(R.id.buttonLeft);
- botton0.setOnClickListener(new OnClickListener() {
- @Override
- public void onClick(View arg0) {
- imageView.setPosLeft();
- }
- });
- // 向右移动
- Button botton1 = (Button) findViewById(R.id.buttonRight);
- botton1.setOnClickListener(new OnClickListener() {
- @Override
- public void onClick(View arg0) {
- imageView.setPosRight();
- }
- });
- // 左旋转
- Button botton2 = (Button) findViewById(R.id.buttonRotationLeft);
- botton2.setOnClickListener(new OnClickListener() {
- @Override
- public void onClick(View arg0) {
- imageView.setRotationLeft();
- }
- });
- // 右旋转
- Button botton3 = (Button) findViewById(R.id.buttonRotationRight);
- botton3.setOnClickListener(new OnClickListener() {
- @Override
- public void onClick(View arg0) {
- imageView.setRotationRight();
- }
- });
- // 缩小
- Button botton4 = (Button) findViewById(R.id.buttonNarrow);
- botton4.setOnClickListener(new OnClickListener() {
- @Override
- public void onClick(View arg0) {
- imageView.setNarrow();
- }
- });
- // 放大
- Button botton5 = (Button) findViewById(R.id.buttonEnlarge);
- botton5.setOnClickListener(new OnClickListener() {
- @Override
- public void onClick(View arg0) {
- imageView.setEnlarge();
- }
- });
- super.onCreate(savedInstanceState);
- }
- class ImageView extends View {
- Paint mPaint = null;
- Bitmap bitMap = null;
- Bitmap bitMapDisplay = null;
- int m_posX = 120;
- int m_posY = 50;
- int m_bitMapWidth = 0;
- int m_bitMapHeight = 0;
- Matrix mMatrix = null;
- float mAngle = 0.0f;
- float mScale = 1f;//1为原图的大小
- public ImageView(Context context) {
- super(context);
- mPaint = new Paint();
- mPaint.setFlags(Paint.ANTI_ALIAS_FLAG);
- bitMap = BitmapFactory.decodeResource(this.getResources(),
- R.drawable.image);
- bitMapDisplay = bitMap;
- mMatrix = new Matrix();
- // 获取图片宽高
- m_bitMapWidth = bitMap.getWidth();
- m_bitMapHeight = bitMap.getHeight();
- }
- // 向左移动
- public void setPosLeft() {
- m_posX -= 10;
- }
- // 向右移动
- public void setPosRight() {
- m_posX += 10;
- }
- // 向左旋转
- public void setRotationLeft() {
- mAngle--;
- setAngle();
- }
- // 向右旋转
- public void setRotationRight() {
- mAngle++;
- setAngle();
- }
- // 缩小图片
- public void setNarrow() {
- if (mScale > 0.5) {
- mScale -= 0.1;
- setScale();
- }
- }
- // 放大图片
- public void setEnlarge() {
- if (mScale < 2) {
- mScale += 0.1;
- setScale();
- }
- }
- // 设置缩放比例
- public void setAngle() {
- mMatrix.reset();
- mMatrix.setRotate(mAngle);
- bitMapDisplay = Bitmap.createBitmap(bitMap, 0, 0, m_bitMapWidth,
- m_bitMapHeight, mMatrix, true);
- }
- // 设置旋转比例
- public void setScale() {
- mMatrix.reset();
- //float sx X轴缩放
- //float sy Y轴缩放
- mMatrix.postScale(mScale, mScale);
- bitMapDisplay = Bitmap.createBitmap(bitMap, 0, 0, m_bitMapWidth,
- m_bitMapHeight, mMatrix, true);
- }
- @Override
- protected void onDraw(Canvas canvas) {
- super.onDraw(canvas);
- canvas.drawBitmap(bitMapDisplay, m_posX, m_posY, mPaint);
- invalidate();
- }
- }
- }
- <?xml version="1.0" encoding="utf-8"?>
- <LinearLayout xmlns:android="http://schemas.android.com/apk/res/android"
- android:id="@+id/iamgeid"
- android:orientation="vertical"
- android:layout_width="fill_parent"
- android:layout_height="fill_parent"
- >
- <Button android:id="@+id/buttonLeft"
- android:layout_width="fill_parent" android:layout_height="wrap_content"
- android:text="图片向左移动"
- />
- <Button android:id="@+id/buttonRight"
- android:layout_width="fill_parent" android:layout_height="wrap_content"
- android:text="图片向右移动"
- />
- <Button android:id="@+id/buttonRotationLeft"
- android:layout_width="fill_parent" android:layout_height="wrap_content"
- android:text="图片左旋转"
- />
- <Button android:id="@+id/buttonRotationRight"
- android:layout_width="fill_parent" android:layout_height="wrap_content"
- android:text="图片右旋转"
- />
- <Button android:id="@+id/buttonNarrow"
- android:layout_width="fill_parent" android:layout_height="wrap_content"
- android:text="图片缩小"
- />
- <Button android:id="@+id/buttonEnlarge"
- android:layout_width="fill_parent" android:layout_height="wrap_content"
- android:text="图片放大"
- />
- </LinearLayout>
4.播放frame动画
做游戏的话播放动画可就是必不可少的元素 帧动画帧动画 顾名思义是一帧一帧的播放 。 实际在开发中为了节省内存美术会把人物的图片切成一小块一小块然后由程序根据编辑器生成的点把图片在拼接起来这样就可以做到用更少的图片去实现更多的动画效果因为不太方便介绍图片编辑器 这个demo我只给大家简单的介绍一下播放动画的原理 后期我会深入讲解。
如图所示这个小人一直在行走 实际上是4张图片在来回切换 每张图片延迟500毫秒 后播下一张 以此类推。
- package cn.m15.xys;
- import android.app.Activity;
- import android.content.Context;
- import android.graphics.Bitmap;
- import android.graphics.BitmapFactory;
- import android.graphics.Canvas;
- import android.graphics.Color;
- import android.graphics.Paint;
- import android.os.Bundle;
- import android.view.View;
- public class FramAnimation extends Activity {
- public final static int ANIM_COUNT = 4;
- @Override
- protected void onCreate(Bundle savedInstanceState) {
- setContentView(new FramView(this));
- super.onCreate(savedInstanceState);
- }
- class FramView extends View {
- Bitmap[] bitmap = new Bitmap[ANIM_COUNT];
- Bitmap display = null;
- Paint paint = null;
- long startTime = 0;
- int playID = 0;
- public FramView(Context context) {
- super(context);
- for (int i = 0; i < ANIM_COUNT; i++) {
- bitmap[i] = BitmapFactory.decodeResource(this.getResources(),
- R.drawable.hero_a + i);
- }
- display = bitmap[0];
- paint = new Paint();
- startTime = System.currentTimeMillis();
- }
- @Override
- protected void onDraw(Canvas canvas) {
- super.onDraw(canvas);
- paint.setColor(Color.WHITE);
- canvas.drawText("播放动画中...", 100, 30, paint);
- long nowTime = System.currentTimeMillis();
- if (nowTime - startTime >= 500) {
- startTime=nowTime;
- playID++;
- if (playID >= ANIM_COUNT) {
- playID = 0;
- }
- canvas.drawBitmap(bitmap[playID], 100, 100, paint);
- }
- invalidate();
- }
- }
- }


 5492
5492


 被折叠的 条评论
为什么被折叠?
被折叠的 条评论
为什么被折叠?
 到【灌水乐园】发言


