iOS开发之总结几个提高开发效率的小技巧

1、创建一个宏定义的define.h文件,方便管理常用的方法或者变量名,比如获取屏幕的宽和高:#define f_Device_w         [UIScreen mainScreen].bounds.size.width,#define f_Device_h          [UIScreen mainScreen].bounds.size.height,常用的头文件等等;

2、创建一个专门管理网络请求的头文件,方便管理各个模块的网络请求接口,同时方便切换测试和正式服务器的前缀接口;

3、熟悉一些常用的第三方库,方便更好的集成项目框架;

4、熟悉常用的Xcode快捷键,比如:

    • Cmd + Shift + F 在工程中查找 可以全工程查找或者替换(这个在项目开发中经常用到,前提是注释的好,命名规范,这样就能全局快速找到想要的方法)

    • Cmd + Shift + O 快速查找类(类名命名规范并且了解自己的习惯就能很快的找到)

    • Control + 6 列出当前文件中所有的方法,通过pragama进行区分可以快速的找到自己想要的方法

    • Cmd + Enter 在.h和.m之间切换

    • Cmd + 0 隐藏左边的导航(Nabigator)区

    • Cmd + Opt + 0 隐藏右边的工具

    • Cmd + Ctrl + Left/Right 到上/下一次编辑的位置,在两个编辑位置跳转的时候超级方便的,总之比用鼠标点那两个三角号要好吧

    • 选中一段代码Cmd + Shift + [ / ] 移动这段选中代码所在的行数,这样就不需要剪切和拷贝啦

    • Cmd + 点击 查看该方法的实现

    • Opt + 点击 查看该方法的文档

    • Cmd + R 运行工程

    • Cmd + B 编译

  • 还有一些就是在Xib的使用中的快捷键

    • Cmd + opt + Enter 键快速分屏,不用再点双环

    • 自动布局的时候两个子元素之间可以通过按住Ctrl并且拖线建立相互的位置关系

5、自定义常用的代码块,添加到{}中,方便输入调用名称,就可显示对应的常用代码,系统也有帮我们写好的代码块,比如 枚举、Block 、GCD 等一些格式比较复杂的代码块,记住快捷键选好回车剩下的做填空题就好,如:


自定义代码块,比如:创建自定义属性值的代码,在对应的位置先写好代码格式:@property(nonatomic,strong)<#expression#> *<#expression#>;(提示:填空效果的格式是:<#expression#>),然后选中想要自定义的代码块,整体拖拽到Xcode编辑器右侧菜单栏下方的 {}列表下,然后填写名称,方便下次调用,尽量写有助于自己开发的名称


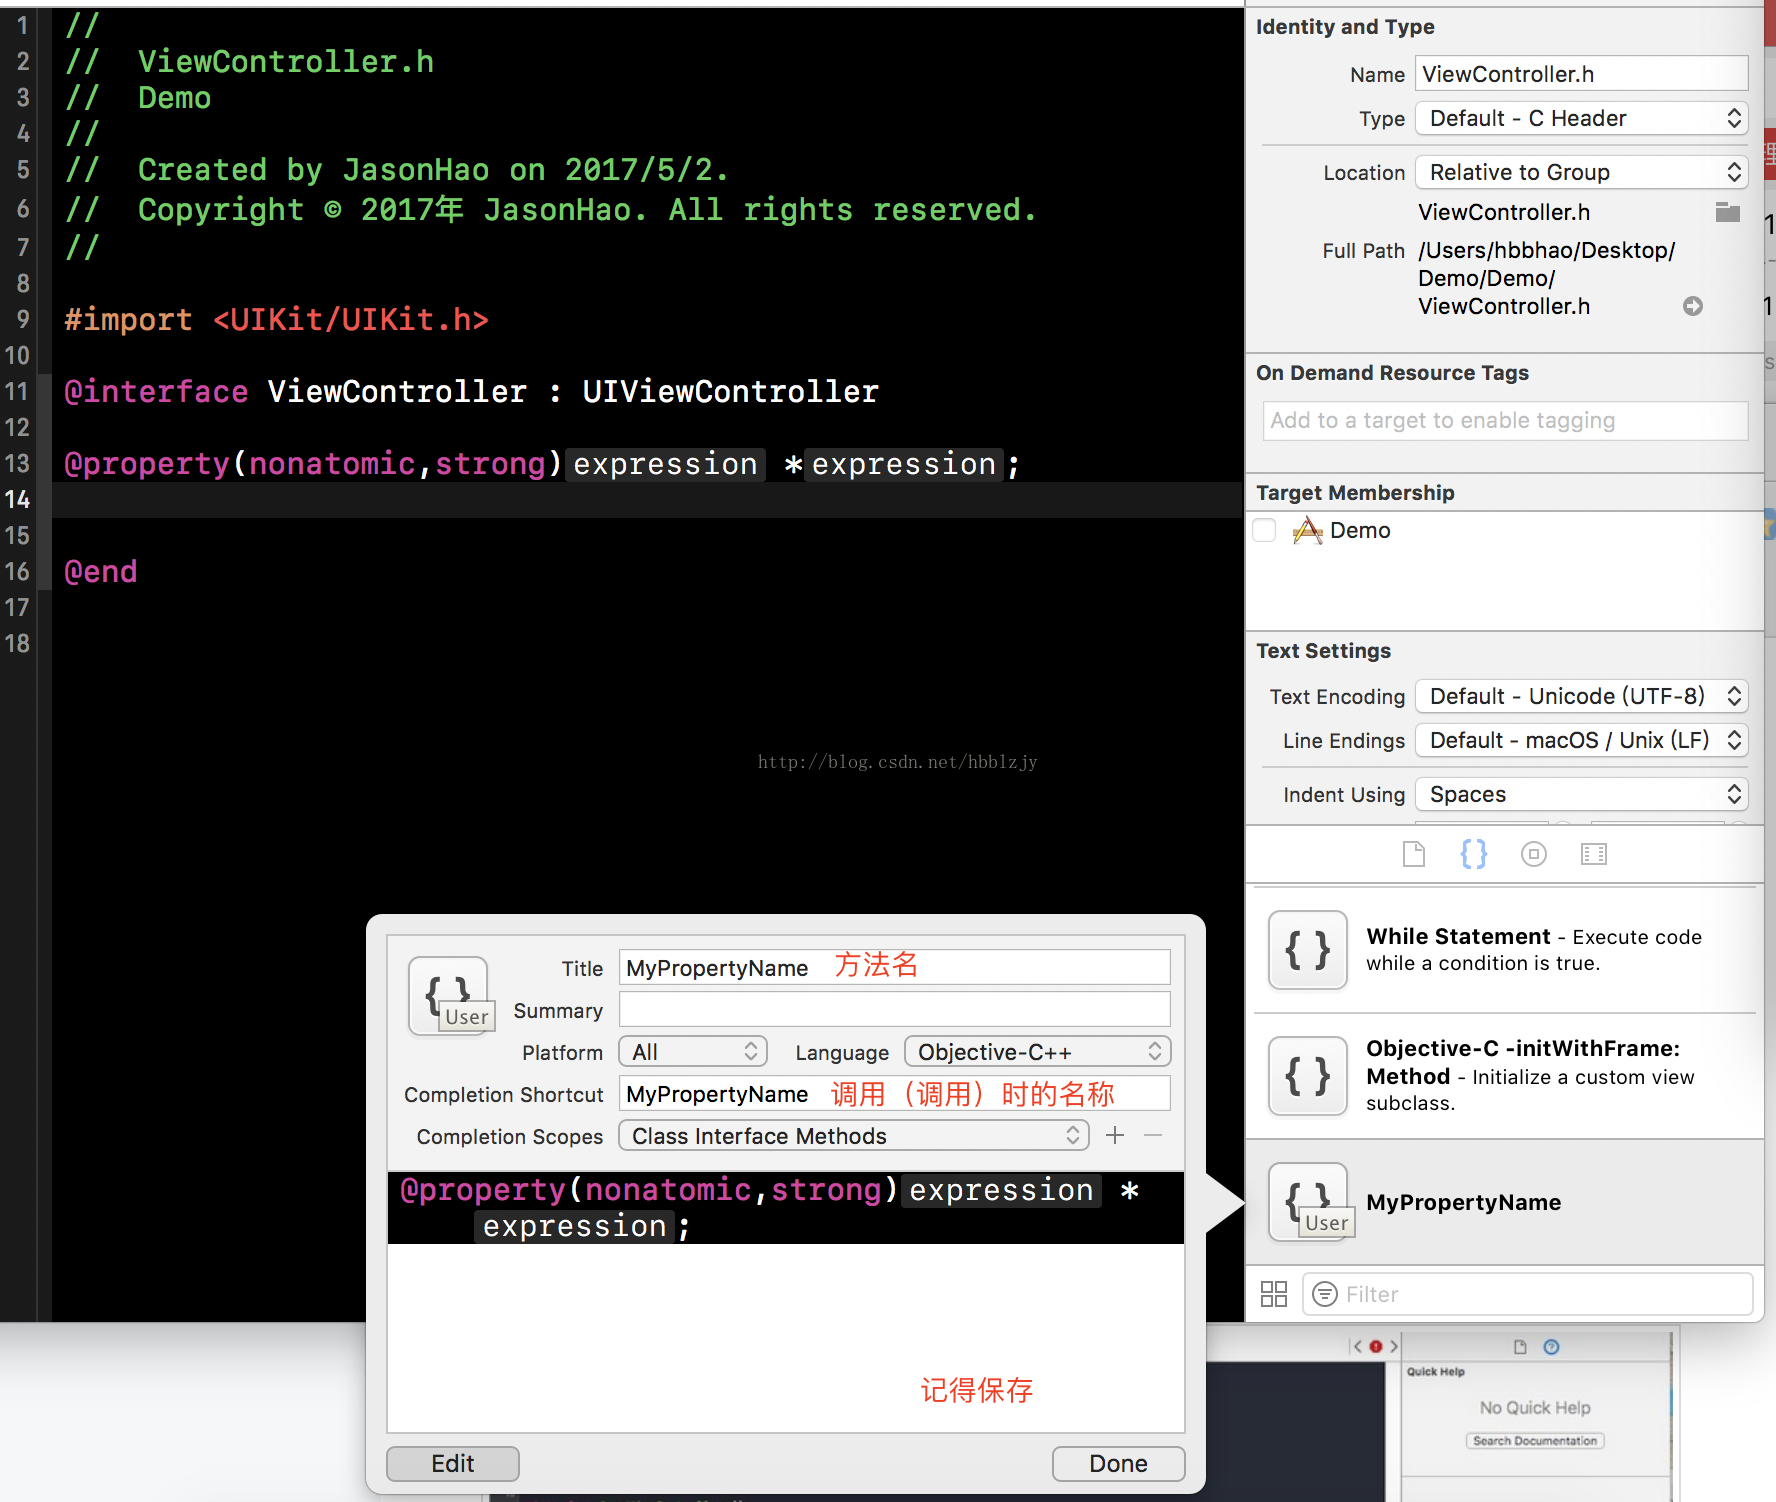
如果需要对已经存好的代码进行修改,只需找到,然后单击,点击edit即可,如果想删除,选中代码块,点击键盘上的delete键,会显示删除提示框,点击删除即可


  • 0
    点赞
  • 3
    收藏
    觉得还不错? 一键收藏
  • 打赏
    打赏
  • 1
    评论
常用代码整理: 12.判断邮箱格式是否正确的代码: //利用正则表达式验证 -(BOOL)isValidateEmail:(NSString *)email { NSString *emailRegex = @"[A-Z0-9a-z._%+-]+@[A-Za-z0-9.-]+\\.[A-Za-z]{2,4}"; NSPredicate *emailTest = [NSPredicate predicateWithFormat:@"SELF MATCHES%@",emailRegex]; return [emailTest evaluateWithObject:email]; } 13.图片压缩 用法:UIImage *yourImage= [self imageWithImageSimple:image scaledToSize:CGSizeMake(210.0, 210.0)]; //压缩图片 - (UIImage*)imageWithImageSimple:(UIImage*)image scaledToSize:(CGSize)newSize { // Create a graphics image context UIGraphicsBeginImageContext(newSize); // Tell the old image to draw in this newcontext, with the desired // new size [image drawInRect:CGRectMake(0,0,newSize.width,newSize.height)]; // Get the new image from the context UIImage* newImage = UIGraphicsGetImageFromCurrentImageContext(); // End the context UIGraphicsEndImageContext(); // Return the new image. return newImage; } 14.亲测可用的图片上传代码 - (IBAction)uploadButton:(id)sender { UIImage *image = [UIImage imageNamed:@"1.jpg"]; //图片名 NSData *imageData = UIImageJPEGRepresentation(image,0.5);//压缩比例 NSLog(@"字节数:%i",[imageData length]); // post url NSString *urlString = @"http://192.168.1.113:8090/text/UploadServlet"; //服务器地址 // setting up the request object now NSMutableURLRequest *request = [[NSMutableURLRequest alloc] init] ; [request setURL:[NSURL URLWithString:urlString]]; [request setHTTPMethod:@"POST"]; // NSString *boundary = [NSString stringWithString:@"---------------------------14737809831466499882746641449"]; NSString *contentType = [NSString stringWithFormat:@"multipart/form-data;boundary=%@",boundary]; [request addValue:contentType forHTTPHeaderField: @"Content-Type"]; // NSMutableData *body = [NSMutableData data]; [body appendData:[[NSString stringWithFormat:@"\r\n--%@\r\n",boundary] dataUsingEncoding:NSUTF8StringEncoding]]; [body appendData:[[NSString stringWithString:@"Content-Disposition:form-data; name=\"userfile\"; filename=\"2.png\"\r\n"] dataUsingEncoding:NSUTF8StringEncoding]]; //上传上去的图片名字 [body appendData:[[NSString stringWithString:@"Content-Type: application/octet-stream\r\n\r\n"] dataUsingEncoding:NSUTF8StringEncoding]]; [body appendData:[NSData dataWithData:imageData]]; [body appendData:[[NSString stringWithFormat:@"\r\n--%@--\r\n",boundary] dataUsingEncoding:NSUTF8StringEncoding]]; [request setHTTPBody:body]; // NSLog(@"1-body:%@",body); NSLog(@"2-request:%@",request); NSData *returnData = [NSURLConnection sendSynchronousRequest:request returningResponse:nil error:nil]; NSString *returnString = [[NSString alloc] initWithData:returnData encoding:NSUTF8StringEncoding]; NSLog(@"3-测试输出:%@",returnString); 15.给imageView加载图片 UIImage *myImage = [UIImage imageNamed:@"1.jpg"]; [imageView setImage:myImage]; [self.view addSubview:imageView]; 16.对图库的操作 选择相册: UIImagePickerControllerSourceTypesourceType=UIImagePickerControllerSourceTypeCamera; if (![UIImagePickerControllerisSourceTypeAvailable:UIImagePickerControllerSourceTypeCamera]) { sourceType=UIImagePickerControllerSourceTypePhotoLibrary; } UIImagePickerController * picker = [[UIImagePickerControlleralloc]init]; picker.delegate = self; picker.allowsEditing=YES; picker.sourceType=sourceType; [self presentModalViewController:picker animated:YES]; 选择完毕: -(void)imagePickerController:(UIImagePickerController*)pickerdidFinishPickingMediaWithInfo:(NSDictionary *)info { [picker dismissModalViewControllerAnimated:YES]; UIImage * image=[info objectForKey:UIImagePickerControllerEditedImage]; [self performSelector:@selector(selectPic:) withObject:imageafterDelay:0.1]; } -(void)selectPic:(UIImage*)image { NSLog(@"image%@",image); imageView = [[UIImageView alloc] initWithImage:image]; imageView.frame = CGRectMake(0, 0, image.size.width, image.size.height); [self.viewaddSubview:imageView]; [self performSelectorInBackground:@selector(detect:) withObject:nil]; } detect为自己定义的方法,编辑选取照片后要实现的效果 取消选择: -(void)imagePickerControllerDIdCancel:(UIImagePickerController*)picker { [picker dismissModalViewControllerAnimated:YES]; } 17.跳到下个View nextWebView = [[WEBViewController alloc] initWithNibName:@"WEBViewController" bundle:nil]; [self presentModalViewController:nextWebView animated:YES]; //创建一个UIBarButtonItem右边按钮 UIBarButtonItem *rightButton = [[UIBarButtonItem alloc] initWithTitle:@"右边" style:UIBarButtonItemStyleDone target:self action:@selector(clickRightButton)]; [self.navigationItem setRightBarButtonItem:rightButton]; 设置navigationBar隐藏 self.navigationController.navigationBarHidden = YES;// iOS开发之UIlabel多行文字自动换行 (自动折行) UIView *footerView = [[UIView alloc]initWithFrame:CGRectMake(10, 100, 300, 180)]; UILabel *label = [[UILabel alloc]initWithFrame:CGRectMake(10, 100, 300, 150)]; label.text = @"Hello world! Hello world!Hello world! Hello world! Hello world! Hello world! Hello world! Hello world!Hello world! Hello world! Hello world! Hello world! Hello world! Helloworld!"; //背景颜色为红色 label.backgroundColor = [UIColor redColor]; //设置字体颜色为白色 label.textColor = [UIColor whiteColor]; //文字居中显示 label.textAlignment = UITextAlignmentCenter; //自动折行设置 label.lineBreakMode = UILineBreakModeWordWrap; label.numberOfLines = 0; 30.代码生成button CGRect frame = CGRectMake(0, 400, 72.0, 37.0); UIButton *button = [UIButton buttonWithType:UIButtonTypeRoundedRect]; button.frame = frame; [button setTitle:@"新添加的按钮" forState: UIControlStateNormal]; button.backgroundColor = [UIColor clearColor]; button.tag = 2000; [button addTarget:self action:@selector(buttonClicked:) forControlEvents:UIControlEventTouchUpInside]; [self.view addSubview:button]; 31.让某个控件在View的中心位置显示: (某个控件,比如label,View)label.center = self.view.center; 32.好看的文字处理 以tableView中cell的textLabel为例子: cell.backgroundColor = [UIColorscrollViewTexturedBackgroundColor]; //设置文字的字体 cell.textLabel.font = [UIFont fontWithName:@"AmericanTypewriter" size:100.0f]; //设置文字的颜色 cell.textLabel.textColor = [UIColor orangeColor]; //设置文字的背景颜色 cell.textLabel.shadowColor = [UIColor whiteColor]; //设置文字的显示位置 cell.textLabel.textAlignment = UITextAlignmentCenter; 33. ———————-隐藏Status Bar—————————– 读者可能知道一个简易的方法,那就是在程序的viewDidLoad中加入 [[UIApplication sharedApplication]setStatusBarHidden:YES animated:NO]; 33. 更改AlertView背景 UIAlertView *theAlert = [[[UIAlertViewalloc] initWithTitle:@"Atention" message: @"I'm a Chinese!" delegate:nil cancelButtonTitle:@"Cancel" otherButtonTitles:@"Okay",nil] autorelease]; [theAlert show]; UIImage *theImage = [UIImageimageNamed:@"loveChina.png"]; theImage = [theImage stretchableImageWithLeftCapWidth:0topCapHeight:0]; CGSize theSize = [theAlert frame].size; UIGraphicsBeginImageContext(theSize); [theImage drawInRect:CGRectMake(5, 5, theSize.width-10, theSize.height-20)];//这个地方的大小要自己调整,以适应alertview的背景颜色的大小。 theImage = UIGraphicsGetImageFromCurrentImageContext(); UIGraphicsEndImageContext(); theAlert.layer.contents = (id)[theImage CGImage]; 34. 键盘透明 textField.keyboardAppearance = UIKeyboardAppearanceAlert; 状态栏的网络活动风火轮是否旋转 [UIApplication sharedApplication].networkActivityIndicatorVisible,默认值是NO。 35截取屏幕图片 //创建一个基于位图的图形上下文并指定大小为CGSizeMake(200,400) UIGraphicsBeginImageContext(CGSizeMake(200,400)); //renderInContext 呈现接受者及其子范围到指定的上下文 [self.view.layer renderInContext:UIGraphicsGetCurrentContext()]; //返回一个基于当前图形上下文的图片 UIImage *aImage = UIGraphicsGetImageFromCurrentImageContext(); //移除栈顶的基于当前位图的图形上下文 UIGraphicsEndImageContext(); //以png格式返回指定图片的数据 imageData = UIImagePNGRepresentation(aImage); 36更改cell选中的背景 UIView *myview = [[UIView alloc] init]; myview.frame = CGRectMake(0, 0, 320, 47); myview.backgroundColor = [UIColorcolorWithPatternImage:[UIImage imageNamed:@"0006.png"]]; cell.selectedBackgroundView = myview; 37显示图像: CGRect myImageRect = CGRectMake(0.0f, 0.0f, 320.0f, 109.0f); UIImageView *myImage = [[UIImageView alloc] initWithFrame:myImageRect]; [myImage setImage:[UIImage imageNamed:@"myImage.png"]]; myImage.opaque = YES; //opaque是否透明 [self.view addSubview:myImage]; 38.能让图片适应框的大小(没有确认) NSString*imagePath = [[NSBundle mainBundle] pathForResource:@"XcodeCrash"ofType:@"png"]; UIImage *image = [[UIImage alloc]initWithContentsOfFile:imagePath]; UIImage *newImage= [image transformWidth:80.f height:240.f]; UIImageView *imageView = [[UIImageView alloc]initWithImage:newImage]; [newImagerelease]; [image release]; [self.view addSubview:imageView]; 39.实现点击图片进行跳转的代码:生成一个带有背景图片的button,给button绑定想要的事件! UIButton *imgButton=[[UIButton alloc]initWithFrame:CGRectMake(0, 0, 120, 120)]; [imgButton setBackgroundImage:(UIImage *)[self.imgArray objectAtIndex:indexPath.row] forState:UIControlStateNormal]; imgButton.tag=[indexPath row]; [imgButton addTarget:self action:@selector(buttonClick:) forControlEvents:UIControlEventTouchUpInside];

“相关推荐”对你有帮助么?

  • 非常没帮助
  • 没帮助
  • 一般
  • 有帮助
  • 非常有帮助
提交
评论 1
添加红包

请填写红包祝福语或标题

红包个数最小为10个

红包金额最低5元

当前余额3.43前往充值 >
需支付:10.00
成就一亿技术人!
领取后你会自动成为博主和红包主的粉丝 规则
hope_wisdom
发出的红包

打赏作者

hbblzjy

你的鼓励将是我创作的最大动力

¥1 ¥2 ¥4 ¥6 ¥10 ¥20
扫码支付:¥1
获取中
扫码支付

您的余额不足,请更换扫码支付或充值

打赏作者

实付
使用余额支付
点击重新获取
扫码支付
钱包余额 0

抵扣说明:

1.余额是钱包充值的虚拟货币,按照1:1的比例进行支付金额的抵扣。
2.余额无法直接购买下载,可以购买VIP、付费专栏及课程。

余额充值