Angular中创建服务的三种方式factory、service、provider

1.英文版

AngularJS: Factory vs Service vs Provider

When you first get started with Angular, you’ll naturally find yourself flooding your controllers and scopes with unnecessary logic. It’s important to realize early on that your controller should be very thin; meaning, most of the business logic and persistent data in your application should be taken care of or stored in a service. I see a few questions a day on Stack Overflow regarding someone trying to have persistent data in his or her controller. That’s just not the purpose of a controller. For memory purposes, controllers are instantiated only when they are needed and discarded when they are not. Because of this, every time you switch a route or reload a page, Angular cleans up the current controller. Services however provide a means for keeping data around for the lifetime of an application while they also can be used across different controllers in a consistent manner.


Angular provides us with three ways to create and register our own service.


1) Factory

2) Service

3) Provider


TL;DR

1) When you’re using a Factory you create an object, add properties to it, then return that same object. When you pass this service into your controller, those properties on the object will now be available in that controller through your factory.

FactoryExample1

2) When you’re using Service, it’s instantiated with the ‘new’ keyword. Because of that, you’ll add properties to ‘this’ and the service will return ‘this’. When you pass the service into your controller, those properties on ‘this’ will now be available on that controller through your service.
ServiceExample2

3) Providers are the only service you can pass into your .config() function. Use a provider when you want to provide module-wide configuration for your service object before making it available.

ProviderExample3

NON TL;DR

In order to extensively show the difference between a Factory, Service, and Provider, we’re going to build the same service in three separate ways. The services are going to utilize the iTunes API as well as promises with $q.


1) Factory

Factories are the most popular way to create and configure a service. There’s really not much more than what the TL;DR said. You just create an object, add properties to it, then return that same object. Then when you pass the factory into your controller, those properties on the object will now be available in that controller through your factory. A more extensive example is below.

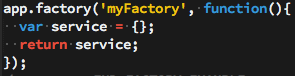
First we create an object, then return that object like so.
factory1-4

Now whatever properties we attach to ‘service’ will be available to us when we pass ‘myFactory’ into our controller.

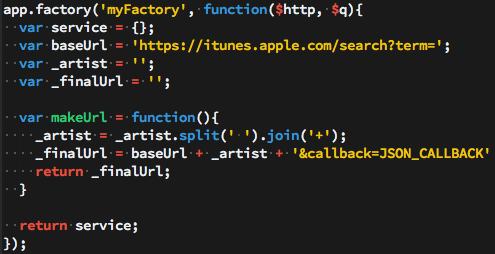
Now let’s add some ‘private’ variables to our callback function. These won’t be directly accessible from the controller, but we will eventually set up some getter/setter methods on ‘service’ to be able to alter these ‘private’ variables when needed.

factory4-5


Here you’ll notice we’re not attaching those variables/function to ‘service’. We’re simply creating them in order to either use or modify them later.

    •           baseUrl is the base URL that the iTunes API requires
    •           _artist is the artist we wish to lookup
    •           _finalUrl is the final and fully built URL to which we’ll make the call to iTunes
    •           makeUrl is a function that will create and return our iTunes friendly URL.

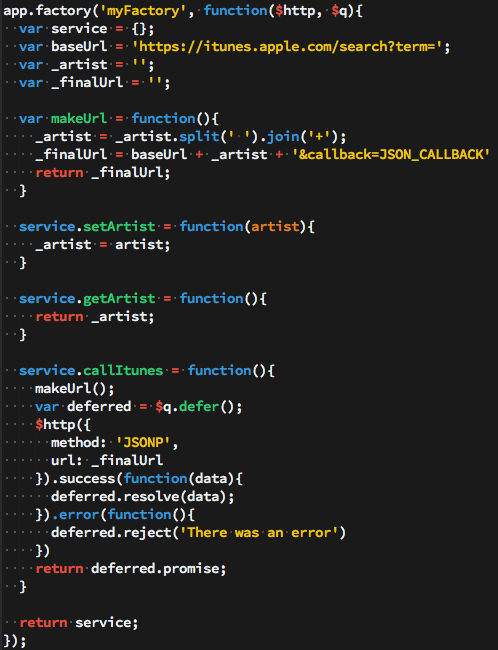
Now that our helper/private variables and function are in place, let’s add some properties to the ‘service’ object. Whatever we put on ‘service’ we’ll be able to directly use in whichever controller we pass ‘myFactory’ into.


We are going to create setArtist and getArtist methods that simply return or set the artist. We are also going to create a method that will call the iTunes API with our created URL. This method is going to return a promise that will fulfill once the data has come back from the iTunes API. If you haven’t had much experience using promises in Angular, I highly recommend doing a deep dive on them.


  •           setArtist accepts an artist and allows you to set the artist
  •           getArtist returns the artist
  •           callItunes first calls makeUrl() in order to build the URL we’ll use with our $http request. Then it sets up a promise object, makes an $http request with our final url, then because $http returns a promise, we are able to call .success or .error after our request. We then resolve our promise with the iTunes data, or we reject it with a message saying ‘There was an error’.

factory6


Now our factory is complete. We are now able to inject ‘myFactory’ into any controller and we’ll then be able to call our methods that we attached to our service object (setArtist, getArtist, and callItunes).

factory2-7


In the controller above we’re injecting in the ‘myFactory’ service. We then set properties on our $scope object that are coming from data from ‘myFactory’. The only tricky code above is if you’ve never dealt with promises before. Because callItunes is returning a promise, we are able to use the .then() method and only set $scope.data.artistData once our promise is fulfilled with the iTunes data. You’ll notice our controller is very ‘thin’. All of our logic and persistent data is located in our service, not in our controller.


2) Service

Perhaps the biggest thing to know when dealing with creating a Service is that  that it’s instantiated with the ‘new’ keyword. For you JavaScript gurus this should give you a big hint into the nature of the code. For those of  you with a limited background in JavaScript or for those who aren’t too familiar with what the ‘new’ keyword actually does, let’s review some JavaScript fundamentals that will eventually help us in understanding the nature of a Service.


To really see the changes that occur when you invoke a function with the ‘new’ keyword, let’s create a function and invoke it with the ‘new’ keyword, then let’s show what the interpreter does when it sees the ‘new’ keyword. The end results will both be the same.


First let’s create our Constructor.

personConstructor-8

This is a typical JavaScript constructor function. Now whenever we invoke the Person function using the ‘new’ keyword, ‘this’ will be bound to the newly created object.


Now let’s add a method onto our Person’s prototype so it will be available on every instance of our Person ‘class’.

person.prototype-9

Now, because we put the sayName function on the prototype, every instance of Person will be able to call the sayName function in order alert that instance’s name.


Now that we have our Person constructor function and our sayName function on its prototype, let’s actually create an instance of Person then call the sayName function.

personInstance-10


So all together the code for creating a Person constructor, adding a function to it’s prototype, creating a Person instance, and then calling the function on its prototype looks like this.

PersonCode-11


Now let’s look at what actually is happening when you use the ‘new’ keyword in JavaScript. First thing you should notice is that after using ‘new’ in our example, we’re able to call a method (sayName) on ‘tyler’ just as if it were an object – that’s because it is. So first, we know that our Person constructor is returning an object, whether we can see that in the code or not. Second, we know that because our sayName function is located on the prototype and not directly on the Person instance, the object that the Person function is returning must be delegating to its prototype on failed lookups. In more simple terms, when we call tyler.sayName() the interpreter says “OK, I’m going to look on the ‘tyler’ object we just created, locate the sayName function, then call it. Wait a minute, I don’t see it here – all I see is name and age, let me check the prototype. Yup, looks like it’s on the prototype, let me call it.”.


Below is code for how you can think about what the ‘new’ keyword is actually doing in JavaScript. It’s basically a code example of the above paragraph. I’ve put the ‘interpreter view’ or the way the interpreter sees the code inside of notes.

PersonCommented-12


Now having this knowledge of what the ‘new’ keyword really does in JavaScript, creating a Service in Angular should be easier to understand now.


The biggest thing to understand when creating a Service is knowing that Services are instantiated with the ‘new’ keyword. Combining that knowledge with our examples above, you should now recognize that you’ll be attaching your properties and methods directly to ‘this’ which will then be returned from the Service itself. Let’s take a look at this in action.


Unlike what we originally did with the Factory example, we don’t need to create an object then return that object because, like mentioned many times before, we used the ‘new’ keyword so the interpreter will create that object, have it delegate to it’s prototype, then return it for us without us having to do the work.


First things first, let’s create our ‘private’ and helper function. This should look very familiar since we did the exact same thing with our factory. I won’t explain what each line does here because I did that in the factory example, if you’re confused, re-read the factory example.

ServiceBase-13


Now, we’ll attach all of our methods that will be available in our controller to ‘this’.

serviceservice-14


Now just like in our factory, setArtist, getArtist, and callItunes will be available in whichever controller we pass myService into. Here’s the myService controller (which is almost exactly the same as our factory controller).
ServiceController-15


Like I mentioned before, once you really understand what ‘new’ does, Services are almost identical to factories in Angular.


3) Provider

The biggest thing to remember about Providers is that they’re the only service that you can pass into the app.config portion of your application. This is of huge importance if you’re needing to alter some portion of your service object before it’s available everywhere else in your application. Although very similar to Services/Factories, there are a few differences which we’ll discuss.


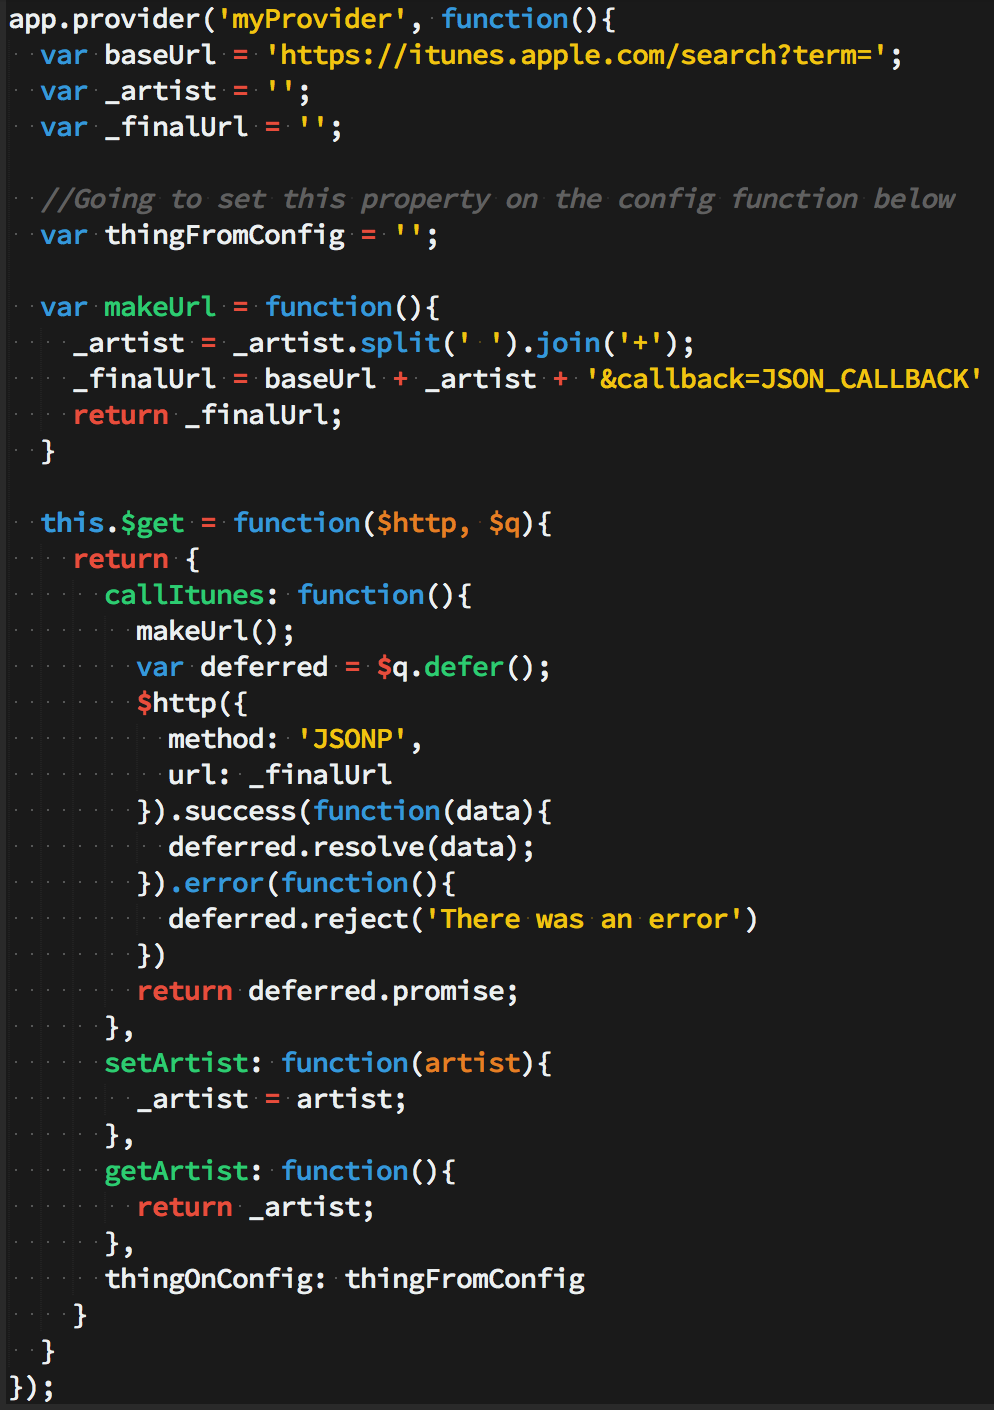
First we set up our Provider in a similar way we did with our Service and Factory. The variables below are our ‘private’ and helper function.

p16

*Again if any portion of the above code is confusing, check out the Factory section where I explain what it all does it greater details.


You can think of Providers as having three sections. The first section is the ‘private’ variables/functions that will be modified/set later (shown above). The second section is the variables/functions that will be available in your app.config function and are therefore available to alter before they’re available anywhere else (also shown above). It’s important to note that those variables need to be attached to the ‘this’ keyword. In our example, only ‘thingFromConfig’ will be available to alter in the app.config. The third section (shown below) is all the variables/functions that will be available in your controller when you pass in the ‘myProvider’ service into that specific controller.


When creating a service with Provider, the only properties/methods that will be available in your controller are those properties/methods which are returned from the $get() function. The code below puts $get on ‘this’ (which we know will eventually be returned from that function). Now, that $get function returns all the methods/properties we want to be available in the controller. Here’s a code example.

p17


Now the full Provider code looks like this
p18


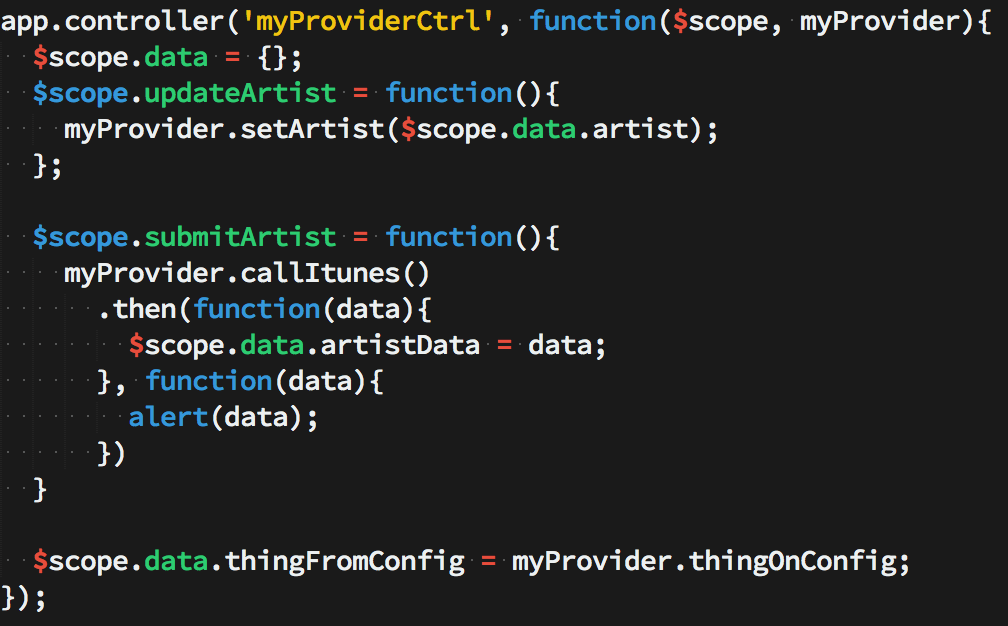
Now just like in our factory and Service, setArtist, getArtist, and callItunes will be available in whichever controller we pass myProvider into. Here’s the myProvider controller (which is almost exactly the same as our factory/Service controller).

ProviderCtrl-19

As mentioned before, the whole point of creating a service with Provider is to be able to alter some variables through the app.config function before the final object is passed to the rest of the application. Let’s see an example of that.

appconfig-20


Now you can see how ‘thingFromConfig’ is as empty string in our provider, but when that shows up in the DOM, it will be ‘This sentence was set…’.


Thank you for reading and I hoped this helped you to be able to discern the difference between Factory, Service, and Provider in Angular.


*To see the full code example and see the code in action, feel free to fork my repo at https://github.com/tylermcginnis33/AngularServices


2.中文版

当你初试 Angular 时,很自然地就会往 controller 和 scope 里堆满不必要的逻辑。一定要早点意识到,controller 这一层应该很薄;也就是说,应用里大部分的业务逻辑和持久化数据都应该放在 service 里。我每天都会在 Stack Overflow 上看到几个同类的问题,关于如何在 controller 里保存持久化数据。这就不是 controller 该干的事。出于内存性能的考虑,controller 只在需要的时候才会初始化,一旦不需要就会被抛弃。因此,每次当你切换或刷新页面的时候,Angular 会清空当前的 controller。与此同时,service 可以用来永久保存应用的数据,并且这些数据可以在不同的 controller 之间使用。

Angular 提供了3种方法来创建并注册我们自己的 service。

  1. Factory

  2. Service

  3. Provider


如果你是“太长的不看”

1) 用 Factory 就是创建一个对象,为它添加属性,然后把这个对象返回出来。你把 service 传进 controller 之后,在 controller 里这个对象里的属性就可以通过 factory 使用了。

FactoryExample1

2) Service 是用"new"关键字实例化的。因此,你应该给"this"添加属性,然后 service 返回"this"。你把 service 传进 controller 之后,在controller里 "this" 上的属性就可以通过 service 来使用了。

ServiceExample2

3) Providers 是唯一一种你可以传进 .config() 函数的 service。当你想要在 service 对象启用之前,先进行模块范围的配置,那就应该用 provider。

ProviderExample3


详细解释(对于不是“太长不看”的读者)

为了准确表现出 Factory、Service 和 Provider 之间的差别,下面我们用 3 种不同的方式来构建同一个服务。这个服务会用到 iTunes API 以及使用 $q 的 promise。

1) Factory

Factory 是创建和配置服务最常见的方式。除了“快速浏览”之外,其实没有什么要补充的。只需创建一个对象,为它添加属性,然后返回这个对象就可以了。当你把 factory 传进 controller 中,对象的这些属性就可以通过 factory 访问。更详细的例子如下:

首先创建一个对象,然后返回这个对象,如下。

factory1-4

现在如果我们把"myFactory"传进 controller 里,附加在 "service" 上的任何属性都可以访问到了。


现在让我们向回调函数中添加一些“private” 变量。当然 controller中是无法直接访问这些变量的,不过我们最终还是会在“service”中设置setter和个getter 方法,以便必要时修改这些“private”变量。

factory4-5

你可能注意到了,我们没有将变量/函数加到“service”中。我们只是简单的创建他们以便之后的使用和修改。

  •  baseUrl 是iTunes API要求的根URL

  •  _artist 是我们想要查找的艺术家

  • _finalUrl 是最终的权限定URL,即我们调用iTunes的入口

  • makeUrl 是一个创建并返回友好的iTunesURL的函数

既然我们的帮手/私有变量和函数放在的合适的位置,那么让我们向“service”对象中添加一些属性。无论我们向”service“中添加什么, 我们都能在任意一个我们传递进‘myFactory’ 的controller中使用。


我们来创建setArtist和getArtist方法来简单的返回或设置artist。同样创建一个方法使用我们创建的URL来调用iTunes API。这个方法将返回一个从iTunes API获取数据后便会满足的promise。如果你对Angular的promise接触不多,我强烈推荐你深入的学习一下它。

  • setArtist 接受一个artist并且允许你设置artist

  • getArtist 返回artist

  • callItunes 首先调用makeUrl()方法以便构建$http请求使用的URL。然后它会设置promise对象,让$http请求我们最终的URL, 再然后呢,因为$http返回一个promise,所以我们可以在请求后调用.success或.error。最后我们可以通过iTunes的数据来解析我们的promise,或者直接‘There was an error’来拒绝它。

factory6 


现在我们的factory完成了。我们可以将"myFactory"注入到任意controller中了,然后就可以调用我们添加到service对象中的方法了(setArtist,getArtist,和callItunes)。

factory2-7

在上面的controller中,我们注入了‘myFactory’ service对象。然后我们设置$scope 对象的属性。上面唯一棘手的代码是处理promise。因为callItunes返回一个promise对象,一旦我们的promise满足了,我们可以调用.then()方法以及设置$scope.data.artistData。你会注意到我们的controller是非常的“瘦”。因为我们所有的逻辑和持久化数据都存放在了service中而不是controller中。


2) Service

当我们创建一个Service时,我们所知道的最重要事可能就是Service通过new关键字实例化对象。这应该可以使熟悉JavaScript的人了解到了这段代码的作用。但对于那些JS背景有限,或者不太熟悉new关键字的作用的人来说可能有点困难。那就让我们来重温一下JavaScript的基本功能,以便帮助我们了解Service究竟做了什么。

让我们先定义一个函数,然后通过new关键字来调用它,看看当解释器遇到了new关键字的时候做了些什么工作,以便帮助我们了解使用new关键字来实例化一个函数时究竟有什么变化。这个的最终结果应该和Service是一样的。


首先,让我们定义一个构造器。

personConstructor-8

这个一个典型的JavaScript式的构造方法。现在,只要我们使用new关键字来调用Person函数,就会将'this'关键字绑定到新创建的对象上。

接下来,让我们给Person的prototype对象添加一个方法,这个方法对所有Person ‘类’的实例都是可用的。

person.prototype-9

现在,由于我们往prototype上添加了一个sayName方法,所以所有的Person实例都可以调用这个方法,并且输出对应实例的name值。

既然我们已经有了一个Person的构造器,并在在其prototype上定义了一个sayName方法,那就让我们去创建一个Person的实例,并调用这个sayName方法。

personInstance-10

接下来,我们把创建Person构造器、往其prototype上添加方法、创建一个Person实例,并调用sayName方法的代码写在一块,如下所示:

PersonCode-11


现在,让我们看一下当我们在JavaScript中使用new关键字的时候究竟发生了什么。首先你应该已经注意到的是,当我们在例子中使用了new关键字之后,我们可以通过'tyler'来调用方法(sayName),看上去好像tyler是一个对象——那是因为它确实成了一个对象。所以,我们知道的第一件事就是我们的Person构造器返回了一个对象(object)。其次,我们知道,由于我们的sayName方法是定义在Person的prototype上,而不是直接定义在Person的实例上的,所以Person函数返回的对象(tyler)一定是由于未找到sayName方法,进而去prototype寻找sayName方法的。用更通俗的话来说,当我们调用tyler.sayName()时,JS解释器说,“好吧,我先去我们刚创建的'tyler'对象上查找sayName方法,然后调用它。等一下,我没有在它上面找到sayName方法——我只看到了name和age,那让我去prototype找一下吧。没错,它在prototype上,那就让我调用它吧”。

下面的代码演示了在JavaScript中使用new关键之后所做的事。它是上面这一段文字的一个基本的代码示例。我已经把从JS解释器的角度来看整个过程的代码写在了注释里。

PersonCommented-12


现在,既然我们了解了在JavaScript中new关键字是如何工作的,那么在Angular中创建一个Service也应该变得容易理解了。

在创建一个Service时,需要理解的最重要的一件事就是我们使用new关键字去实例化Service对象。结合我们从上面的例子所了解到的知识,你应该已经意识到你可以将一些属性和方法直接添加到this上,之后,在创建Service对象时,this会被作为返回值返回。让我们来看一下这种工作方式。

我们不用像之前Factory中的例子那样创建一个对象,然后返回这个对象。因为我们使用了new关键字来调用,解释器会创建一个对象,并关联它的prototype对象,然后将该对象返回,而不用我们去做这些工作。


首先,让我们创建我们的私有辅助函数。它应该看起来和我们在factory中所作的工作很类似。由于我已经在factory的例子中解释过每一行代码的含义了,所以我不会在这里多作解释,如有疑惑,请再次回味一下factory的例子。

ServiceBase-13

接下来,我们将要把可以从控制器中访问的方法添加到‘this’上。

serviceservice-14

现在,和使用factory一样,所有将myService作为参数传入的控制器都可以访问到setArtist, getArtist, 和callItunes方法。下面是传入了myService的控制器(基本上和factory的控制器一样)。
ServiceController-15

正如我之前提到的那样,一旦你了解了new关键字的作用,你就会知道在Angular中,Services和Factories几乎一样。


3) Provider

要记住的关于Provider的最重要的事情是,它们是你可以传递到应用程序的app.config部分唯一的服务。如果你需要在你的服务对象可以在你的应用程序之外任何地方都可用之前改变它的某些部分,这是非常重要的。虽然Services/Factories很相似,但也有一些差异,我们将会讨论它们。

首先,我们用与我们建立Service 和 Factory类似的方式来建立我们的Provider。下面的变量是我们的'私人'和辅助功能。

ProviderBase-16

*同样地,如果上面的代码的任何部分令你纠结,请看下 Factory 部分,在那里我更详细地解释了这些代码的作用。


必须要注意的一点是只有这些变量和函数是可以在我们的app.config函数中访问的。这曾一度使我感到困惑,所以你最好也要知道这点不同之处。你可以把Provider想象成由两部分组成。第一部分的变量和函数是可以在app.config函数中访问的,因此你可以在它们被其他地方访问到之前来修改它们(如上所示)。第二部分(如下所示) 的变量和函数是可以在任何传入了’myProvider‘的控制器中进行访问的。

当你使用Provider创建一个service时,唯一的可以在你的控制器中访问的属性和方法是通过$get()函数返回内容。下面的代码将$get方法写在了’this‘(最终会被函数返回)上。现在,$get函数会返回所有我们希望在控制器中进行访问的方法和属性。下面是代码示例:

provider$get-17


现在,Provider的完整代码如下所示:

ProviderService-18

现在,与我们的Factory和Service类似,setArtist, getArtist, 和callItunes可以在任何一个传入了 myProvider 的控制器中访问。下面是myProvider的控制器(几乎和我们Factory/Service中的控制器一样)。

ProviderCtrl-19

正如前面提到的那样,使用Provider创建一个service的独特之处是,你可以在Provider对象传递到应用程序的其他部分之前在app.config函数对其进行修改。让我们来看一个对应的例子。

appconfig-20


现在你可以明白‘thingFromConfig’是怎么样地在我们的provider中是空字符串,而当它出现在DOM中时,它将是'This sentence was set…’。


3.区别

在Angular里面,services作为单例对象在需要到的时候被创建,只有在应用生命周期结束的时候(关闭浏览器)才会被清除。而controllers在不需要的时候就会被销毁了。

这就是为什么使用controllers在应用里面传递数据不可靠的原因,特别是使用routing的时候。Services are designed to be the glue between controllers, the minions of data, the slaves of functionality, the worker-bees of our application(就是说services在应用的controllers、 方法、数据之前起到了很关键的作用)


现在我们开始看怎么创建service。每个方法我们都会看到下面两个一样的参数:

  • name-我们要定义的service的名字

  • function-service方法

他们都创建了相同的底层对象类型。实例化后,他们都创建了一个service,这些对象没有什么功能上的差别。

1、factory()

Angular里面创建service最简单的方式是使用factory()方法。

factory()让我们通过返回一个包含service方法和数据的对象来定义一个service。在service方法里面我们可以注入services,比如 $http 和 $q等。

?
1
2
3
4
5
6
7
8
9
10
11
12
13
14
15
16
17
angular.module( 'myApp.services' )
.factory( 'User' function ($http) {  // injectables go here
   var  backendUrl =  "http://localhost:3000" ;   var  service = {    // our factory definition
     user: {},
     setName:  function (newName) { 
       service.user[ 'name' ] = newName; 
     },
     setEmail:  function (newEmail) {
       service.user[ 'email' ] = newEmail;
     },
     save:  function () {
       return  $http.post(backendUrl +  '/users' , {
         user: service.user
       });
     }
   };   return  service;
});


  • 在应用里面使用factory()方法

在应用里面可以很容易地使用factory ,需要到的时候简单地注入就可以了

?
1
2
3
4
angular.module( 'myApp' )
.controller( 'MainCtrl' function ($scope, User) {
   $scope.saveUser = User.save;
});


  • 什么时候使用factory()方法

在service里面当我们仅仅需要的是一个方法和数据的集合且不需要处理复杂的逻辑的时候,factory()是一个非常不错的选择。

注意:需要使用.config()来配置service的时候不能使用factory()方法

2、service()

service()通过构造函数的方式让我们创建service,我们可以使用原型模式替代javaScript原始的对象来定义service。

和factory()方法一样我们也可以在函数的定义里面看到服务的注入

?
1
2
3
4
5
6
7
8
9
10
11
12
13
14
15
16
17
angular.module( 'myApp.services' )
.service( 'User' function ($http) {  // injectables go here
   var  self =  this // Save reference
   this .user = {};
   this .backendUrl =  "http://localhost:3000" ;
   this .setName =  function (newName) {
     self.user[ 'name' ] = newName;
   }
   this .setEmail =  function (newEmail) {
     self.user[ 'email' ] = newEmail;
   }
   this .save =  function () {
     return  $http.post(self.backendUrl +  '/users' , {
       user: self.user
     })
   }
});


这里的功能和使用factory()方法的方式一样,service()方法会持有构造函数创建的对象。

  • 在应用里面使用service()方法

?
1
2
3
4
angular.module( 'myApp' )
.controller( 'MainCtrl' function ($scope, User) {
   $scope.saveUser = User.save;
});


  • 什么时候适合使用service()方法

service()方法很适合使用在功能控制比较多的service里面

注意:需要使用.config()来配置service的时候不能使用service()方法

3、provider()

provider()是创建service最底层的方式,这也是唯一一个可以使用.config()方法配置创建service的方法

不像上面提到的方法那样,我们在定义的this.$get()方法里面进行依赖注入

?
1
2
3
4
5
6
7
8
9
10
11
12
13
14
15
16
17
18
19
20
21
22
23
24
25
angular.module( 'myApp.services' )
.provider( 'User' function () {
   this .backendUrl =  "http://localhost:3000" ;
   this .setBackendUrl =  function (newUrl) {
     if  (url)  this .backendUrl = newUrl;
   }
   this .$get =  function ($http) {  // injectables go here
     var  self =  this ;
     var  service = {
       user: {},
       setName:  function (newName) {
         service.user[ 'name' ] = newName;
       },
       setEmail:  function (newEmail) {
         service.user[ 'email' ] = newEmail;
       },
       save:  function () {
         return  $http.post(self.backendUrl +  '/users' , {
           user: service.user
         })
       }
     };
     return  service;
   }
});


  • 在应用里面使用provider()方法

为了给service进行配置,我们可以将provider注入到.config()方法里面

?
1
2
3
4
angular.module( 'myApp' )
.config( function (UserProvider) {
   UserProvider.setBackendUrl( "http://myApiBackend.com/api" );
})


这样我们就可以和其他方式一样在应用里面使用这个service了

?
1
2
3
4
angular.module( 'myApp' )
.controller( 'MainCtrl' function ($scope, User) {
   $scope.saveUser = User.save;
});


  • 什么时候使用provider()方法

  1. 当我们希望在应用开始前对service进行配置的时候就需要使用到provider()。比如,我们需要配置services在不同的部署环境里面(开发,演示,生产)使用不同的后端处理的时候就可以使用到了

  2. 当我们打算发布开源provider()也是首选创建service的方法,这样就可以使用配置的方式来配置services而不是将配置数据硬编码写到代码里面。

还可以看看这篇翻译:http://www.oschina.net/translate/top-10-mistakes-angularjs-developers-make


4.AngularJS中的Service

关于AngularJS中的DI

在开始说AngularJS的Service之前,我们先来简单讲讲DI(Dependency Injection,通常中文称之为“依赖注入”)。

DI是一种软件设计模式,主要为了解决组件获取它的依赖组件的问题。DI的概念渗透在AngularJS的各个地方,AngularJS使用一个专门的子系统($injector)进行DI管理,这个过程包括了创建组件、解析、获取它的依赖组件,并将这些依赖组件回传给请求组件。


我们其实已经在不知不觉中使用DI了(比如在AngularJS自定义Directive中的出现过):

app.directive('myCurrentTime', ['$interval', 'dateFilter', function ($interval, dateFilter) {
}


上述代码片段在添加Controller时,其中$interval就是Controller中依赖注入Service的推荐方法。由于$injector的存在,对于我们只需将所需服务的名称传入我们的模块即可,底层的工作都将由$injector包办。

$injector的原理如下图:


AngularJS中使用DI添加Service的三种方法: 

方式1(内联注解,推荐使用):

app.controller('myController', ['$scope', 'dateFilter', function ($scope, dateFilter) { }]);


方式2($inject注解):

1 var MyController = function($scope, dateFilter) {
2   // ...
3 }
4 MyController.$inject = ['$scope', 'dateFilter'];
5 someModule.controller('MyController', MyController);


方式3(隐式注解,不推荐使用):

app.controller('myController', function ($scope, dateFilter) { });


推荐使用方式1的理由是:

  • 写法上比方法2更简单明了
  • 比方法3更可靠(由于Javascript可以被压缩,AngularJS又是通过解析服务名称找到对应Service的,因此Javascript压缩之后AngularJS将无法找到指定的Service,但字符串不会被压缩,因此单独以字符串指定Service的名称可以避免这个问题)


使用方式1或方式2的注意点:

由于上述第二点原因,AngularJS在编译Html时,由$injector将数组中Service的名称与方法体中的Service进行一一映射。这种映射关系必须遵守由AngularJS的约定:

  • 数组中Service名称的个数必须与方法体中Service名称的个数一致
  • 数组中Service的顺序必须与方法体中Serivce的顺序一致


如果为了编码规范需要强制使用显式DI(也就是方式1或者方式2),可使用ng-strict-di属性,这样AngularJS在遇到隐式DI(也就是方式3)时将会报错。

示例1:

复制代码
 1 <!DOCTYPE >
 2 <html>
 3 <head>
 4     <script src="/Scripts/angular.js"></script>
 5     <script type="text/javascript">
 6         (function () {
 7             var app = angular.module('diTest', []);
 8 
 9             app.controller('myController1', ['$scope', function ($scope) {
10             }]);
11 
12             // 方式1 隐式DI,在指定了ng-strict-di后,将会报错
13             //app.controller('myController1', function ($scope) {
14             //});
15 
16 
17 
18             var myController2 = function ($scope) {
19             };
20             myController2.$inject = ['$scope'];
21             app.controller('myController2', myController2);
22 
23             // 方式2 隐式DI,在指定了ng-strict-di后,将会报错
24             //var myController2 = function ($scope) {
25             //};
26             //app.controller('myController2', myController2);
27         })();
28     </script>
29 </head>
30 <body ng-app="diTest" ng-strict-di>
31     <div ng-controller="myController1 as myCtrl1">
32     </div>
33 
34     <div ng-controller="myController2 as myCtrl2">
35     </div>
36 </body>
37 </html>
复制代码


示例1中,因为body使用了ng-strict-di属性,因此当使用方式1或者方式2的隐式DI时,AngularJS将会抛出如下错误:


 AngularJS中的Services:

AngularJS提供了很多Services,常用的如$http,是集成在AngularJS和核心库中的,另外有一部分如$animate是独立的模块。由于篇幅问题,我们先以$http为例了解一下AngularJS的Service。

迄今为止我所有的AngularJS系列的文章中,所有的数据均是通过ng-init或者在$scope中初始化数组来完成的。但实际项目中,我们的数据都会从服务器获取。写个例子来演示一下这个过程。


Step 1,创建一个名为data.txt的文件,里面包含一个Json对象:

复制代码
{
    "students": [
        {
            "Name": "Jack", 
            "Age": 21
        }, 
        {
            "Name": "Alice", 
            "Age": 20
        }, 
        {
            "Name": "Tom", 
            "Age": 21
        }, 
        {
            "Name": "Sophie", 
            "Age": 19
        }
    ]
}
复制代码


Step 2,使用$http的get方法获取data.txt的数据,并将数据赋值给$scope.students:

复制代码
app.controller('myController', ['$scope', '$http', function ($scope, $http) {
    $scope.students = [];
    $http.get('data.txt').
        success(function (data, status, headers, config) {
            $scope.students = data.students;
            console.log(data);
           console.log(data.students);
             console.log($scope.students);
         }).
         error(function (data, status, headers, config) {
         });
 }]);
复制代码


Step 3,使用ng-repeat显示students的信息:

<div ng-repeat="stu in students">
    <p>Name: {{stu.Name}}</p>
    <p>Age: {{stu.Age}}</p>
    <br />
</div>


完整的Html代码如下:

  View Code


关于$http:

$http的基本调用格式:

$http(config).success(function(data,status,headers,config){ }).error(function(data,status,headers,config){ });


config为Json对象,完整参数说明如下:

  • method{string} - HTTP方法,示例值GET、POST等
  • url{string} - 请求资源的绝对或者相对路径,示例值 http://mytest.com/user/example 或 /myservice/user/example
  • params{Object.<string|Object>} - URL的请求参数部分,可以直接是一个完整的字符串也可以是一个对象,对象将被自动JSon序列化(一般给Get使用)
  • data{string|Object} - 请求参数内容(一般给Post使用)
  • headers{Object} - Http请求的Headers
  • xsrfHeaderName{string} - 防XSRF(跨站请求伪造)的Header名称
  • xsrfCookieName{string} - 防XSRF的Cookie名称
  • transformRequest{function(data,headersGetter)|Array.<function(data,headersGetter)>} - 自定义Http请求格式的方法
  • transformResponse{function(data, headersGetter, status)|Array.<function(data, headersGetter, status)>} - 自定义Http响应格式的方法
  • paramSerializer{string|function(Object):string} - 序列化params的方法
  • cache{boolean|Cache} - boolean类型指定是否缓存GET请求,或者指定一个由$cacheFactory创建的缓存实例
  • timeout{number|Promise} - number为请求超时时间(单位为毫秒);或者指定一个可以中断请求的promise
  • withCredentials{boolean} - 是否需要证书,详见:requests with credentials
  • responseType{string} - 返回类型,详见:requestType


 注意:由于是入门类文章,本章中对于以上各个参数的用法不深入展开了,这部分内容今后单独开一章来讨论。


$http调用原型中,方法success和error为$http调用返回的promise,promise是由AngularJS的核心服务$q提供的一种处理异步请求的实现方式,关于promise的细节,本篇也不做展开,可参考官方文档:https://docs.angularjs.org/api/ng/service/$q。我们只需知道,由于success和error是$http方法调用返回的promise(承诺),因此在异步完成$http方法的调用完成、失败或超时后,最终必定会调用success或者error方法。


$http的调用原型看起来比较复杂,为了便于使用,AngularJS提供了$http调用的快捷方式(如$http.get, $http.post等),其基本格式如下:

$http.get('/someUrl').success(successCallback);
$http.post('/someUrl', data).success(successCallback);


$http所有方法的快捷方式(其中[config]表示config为可选参数):


好了,通过本篇的介绍,我们已经基本了解了DI的概念,以及AngularJS中如何使用DI来完成Service的使用,我们还重点看了一下$http以及它的使用方式,当然,关于更多$http的细节今后会单独开一篇讨论的。


如果你和我一样也是AngularJS的新手,那通过这么多天的学习后,我们已经能使用AngularJS完成一个真正的Web网站的原型的搭建了:AngularJS负责前端,数据由后端服务提供。还犹豫什么呢,赶紧自己试试吧。


参考资料

AngularJS官方文档DI:https://docs.angularjs.org/guide/di

AngularJS官方文档Service:https://docs.angularjs.org/api/ng/service


  • 1
    点赞
  • 2
    收藏
    觉得还不错? 一键收藏
  • 0
    评论

“相关推荐”对你有帮助么?

  • 非常没帮助
  • 没帮助
  • 一般
  • 有帮助
  • 非常有帮助
提交
评论
添加红包

请填写红包祝福语或标题

红包个数最小为10个

红包金额最低5元

当前余额3.43前往充值 >
需支付:10.00
成就一亿技术人!
领取后你会自动成为博主和红包主的粉丝 规则
hope_wisdom
发出的红包
实付
使用余额支付
点击重新获取
扫码支付
钱包余额 0

抵扣说明:

1.余额是钱包充值的虚拟货币,按照1:1的比例进行支付金额的抵扣。
2.余额无法直接购买下载,可以购买VIP、付费专栏及课程。

余额充值