


UIAlertController 主要是给用户显示警告⚠信息
本来想讲的是UIAlertView 但是根据最新IOS 8官方文档 UIAlertView已经废弃了
而是采用UIAlertController实现上述目的
在iOS 8中,UIAlertController在功能上整合了UIAlertView以及UIActionSheet,UIAlertController以一种模块化替换的方式来代替这两货的功能和作用。是使用对话框(alert)还是使用上拉菜单(action sheet),就取决于在创建控制器时,您是如何设置首选样式的。
所以该章节其实讲的是两种UIView
不过还是让我们阅读一下UIAlertController的头文件 来看看到底添加了些什么
//
//  UIAlertController.h
//  UIKit
//
//  Copyright (c) 2014 Apple Inc. All rights reserved.
//

#import <UIKit/UIViewController.h>

typedef NS_ENUM(NSInteger, UIAlertActionStyle) {
    UIAlertActionStyleDefault = 0,
    UIAlertActionStyleCancel,
    UIAlertActionStyleDestructive
} NS_ENUM_AVAILABLE_IOS(8_0);

typedef NS_ENUM(NSInteger, UIAlertControllerStyle) {
    UIAlertControllerStyleActionSheet = 0,
    UIAlertControllerStyleAlert
} NS_ENUM_AVAILABLE_IOS(8_0);

NS_CLASS_AVAILABLE_IOS(8_0) @interface UIAlertAction : NSObject <NSCopying>

+ (instancetype)actionWithTitle:(NSString *)title style:(UIAlertActionStyle)style handler:(void (^)(UIAlertAction *action))handler;

@property (nonatomic, readonly) NSString *title;
@property (nonatomic, readonly) UIAlertActionStyle style;
@property (nonatomic, getter=isEnabled) BOOL enabled;

@end

NS_CLASS_AVAILABLE_IOS(8_0) @interface UIAlertController : UIViewController

+ (instancetype)alertControllerWithTitle:(NSString *)title message:(NSString *)message preferredStyle:(UIAlertControllerStyle)preferredStyle;

- (void)addAction:(UIAlertAction *)action;
@property (nonatomic, readonly) NSArray *actions;
- (void)addTextFieldWithConfigurationHandler:(void (^)(UITextField *textField))configurationHandler;
@property (nonatomic, readonly) NSArray *textFields;

@property (nonatomic, copy) NSString *title;
@property (nonatomic, copy) NSString *message;

@property (nonatomic, readonly) UIAlertControllerStyle preferredStyle;

@end
一部分一部分的分析
typedef NS_ENUM(NSInteger, UIAlertActionStyle) {
    UIAlertActionStyleDefault = 0,
    UIAlertActionStyleCancel,
    UIAlertActionStyleDestructive
} NS_ENUM_AVAILABLE_IOS(8_0);
总共三种样式 下图

左边是Cancel 右边是Default 其实也就只是字体的宽度变了

左边Cancel 右边Destructive 颜色变红了 或者是Apple 希望用户在进行一些比较重要的行为确认的时候希望能够让用户更加重视该选项的后果
typedef NS_ENUM(NSInteger, UIAlertControllerStyle) {
    UIAlertControllerStyleActionSheet = 0,
    UIAlertControllerStyleAlert
} NS_ENUM_AVAILABLE_IOS(8_0);
使用对话框(alert)还是使用上拉菜单(action sheet),就取决于在创建控制器时,您是如何设置首选样式的。
1.UIAlertControllerStyleAlert样式
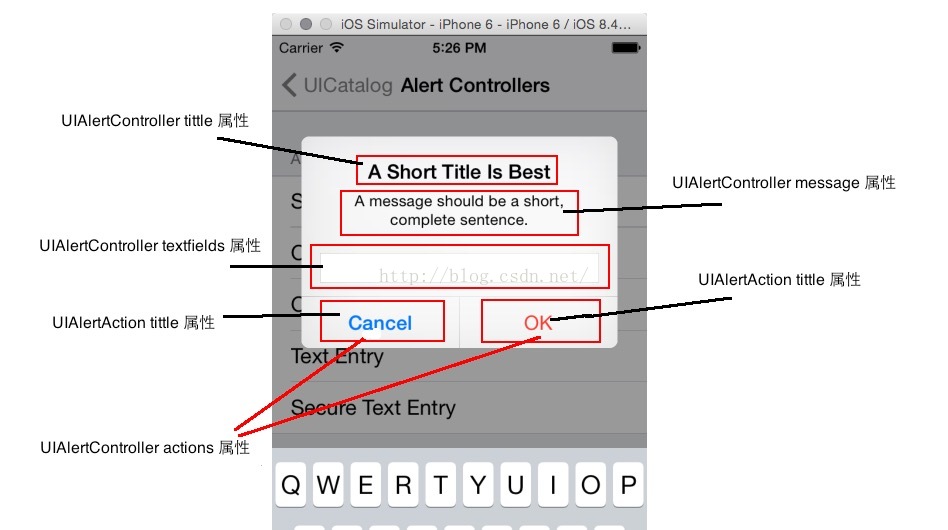
这里图没画好 UIAlertAction tittle 属性是指Cancel 和 OK
2.UIAlertControllerStyleActionSheet样式
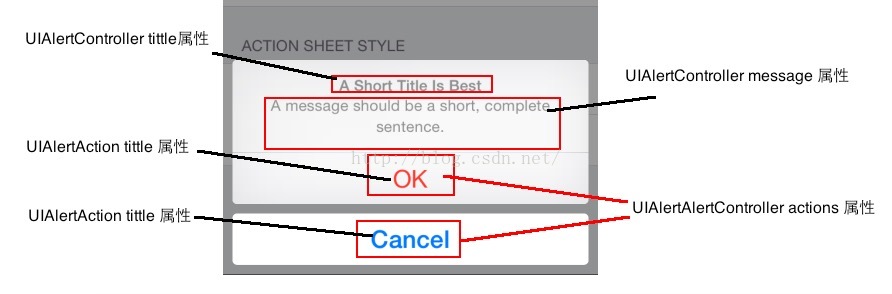
UIAlertControllerStyleActionSheet 样式下 是不能有 textFields属性存在的
通过分析完以上属性 我相信对于如何使用该UIView 应该有所心得了吧。
现在我们先创建一个 UIAlertControllerStyleAlert 样式的弹出警告窗口
第一步
创建UIAlertController
+ (instancetype)alertControllerWithTitle:(NSString *)title message:(NSString *)message preferredStyle:(UIAlertControllerStyle)preferredStyle;NSString *title = NSLocalizedString(@"A Short Title Is Best", nil);
NSString *message = NSLocalizedString(@"A message should be a short, complete sentence.", nil);
NSString *cancelButtonTitle = NSLocalizedString(@"Cancel", nil);
NSString *otherButtonTitle = NSLocalizedString(@"OK", nil);
UIAlertController *alertController = [UIAlertController alertControllerWithTitle:title message:message preferredStyle:UIAlertControllerStyleAlert];
// Add the text field for text entry.
[alertController addTextFieldWithConfigurationHandler:^(UITextField *textField) {
// If you need to customize the text field, you can do so here.
}];
UIAlertController *alertController = [UIAlertController alertControllerWithTitle:title message:message preferredStyle:UIAlertControllerStyleAlert];
第二步
创建UIAlertAction
+ (instancetype)actionWithTitle:(NSString *)title style:(UIAlertActionStyle)style handler:(void (^)(UIAlertAction *action))handler;handler参数的作用是 当用户触碰 比如上图中的OK所进行的处理的方法
创建两个UIAlertAction 点击后 在控制台输出 点击了什么Action
    // Create the actions.
    UIAlertAction *cancelAction = [UIAlertAction actionWithTitle:cancelButtonTitle style:UIAlertActionStyleCancel handler:^(UIAlertAction *action) {
        NSLog(@"The \"Text Entry\" alert's cancel action occured.");
    }];

    UIAlertAction *otherAction = [UIAlertAction actionWithTitle:otherButtonTitle style:UIAlertActionStyleDefault handler:^(UIAlertAction *action) {
        NSLog(@"The \"Text Entry\" alert's other action occured.");
    }];

    // Add the actions.
    [alertController addAction:cancelAction];
    [alertController addAction:otherAction];
最后我们要做的 只是在适当的时候弹出该AlertView即可
[self presentViewController:alertController animated:YES completion:nil];同理接下去我们创建一个UIAlertControllerStyleActionSheet的UIAlertController
这里直接贴代码了 唯一的不同的地方在于
UIAlertController *alertController = [UIAlertController alertControllerWithTitle:title message:message preferredStyle:UIAlertControllerStyleActionSheet];此处的样式不同
- (void)showOkayCancelActionSheet:(NSIndexPath *)selectedPath {
    NSString *title = NSLocalizedString(@"A Short Title Is Best", nil);
    NSString *message = NSLocalizedString(@"A message should be a short, complete sentence.", nil);
    NSString *cancelButtonTitle = NSLocalizedString(@"Cancel", nil);
    NSString *destructiveButtonTitle = NSLocalizedString(@"OK", nil);

    UIAlertController *alertController = [UIAlertController alertControllerWithTitle:title message:message preferredStyle:UIAlertControllerStyleActionSheet];

    // Create the actions.
    UIAlertAction *cancelAction = [UIAlertAction actionWithTitle:cancelButtonTitle style:UIAlertActionStyleCancel handler:^(UIAlertAction *action) {
        NSLog(@"The \"Okay/Cancel\" alert action sheet's cancel action occured.");
    }];

    UIAlertAction *destructiveAction = [UIAlertAction actionWithTitle:destructiveButtonTitle style:UIAlertActionStyleDestructive handler:^(UIAlertAction *action) {
        NSLog(@"The \"Okay/Cancel\" alert action sheet's destructive action occured.");
    }];


    // Add the actions.
    [alertController addAction:cancelAction];
    [alertController addAction:destructiveAction];


    [self presentViewController:alertController animated:YES completion:nil];
}综上所述UIAlertController在功能上整合了UIAlertView以及UIActionSheet极大的简化了开发难度
本章结束 谢谢
that's all
thx
Everything you see on Screen is UIView.


 3787
3787


 被折叠的 条评论
为什么被折叠?
被折叠的 条评论
为什么被折叠?
 到【灌水乐园】发言


