


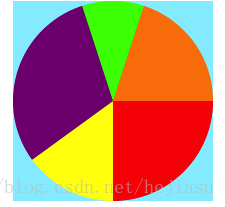
画饼状图其实就是画扇形,比如我们需要实现下面这个效果
画图思路:
1、根据数据源的个数来判断需要画多少个扇形(比如:25,15,30,10,20,说明我们要画5个扇形)
2、根据数据源判断每组数据占一个圆的多少(比如,startA:0,angle:25/100.0 *M_PI *2,endA:startA+angle)
3、下一个扇形的大小起点就是上一个扇形的结束点(比如,startA:end,angle:15/100.0 *M_PI *2,endA:startA+angle)
4、以此类推。。。
@interface PieChartView:UIView
@end

@implementation PieChartView

- (void)drawRect:(CGRect)rect{

    //数据源
    NSArray *numberArray = @[@25,@15,@30,@10,@20];
    NSArray *colorArray = @[[UIColor redColor],[UIColor yellowColor],[UIColor purpleColor],[UIColor greenColor],[UIColor orangeColor]];

    //半径
    CGFloat radius = rect.size.width / 2;
    //中心点
    CGPoint center = CGPointMake(radius, radius);

    //起始角度
    CGFloat startA = 0;
    //弧度
    CGFloat angle = 0;
    //结束角度
    CGFloat endA = 0;


    for (int i = 0; i < numberArray.count; i ++) {

        startA = endA;
        angle = [numberArray[i] floatValue] / 100.0 * M_PI * 2;
        endA = startA + angle;

        [self pieChartWithCenter:center withRadius:radius withStartAngle:startA withEndAngle:endA withColor:colorArray[i]];

    }

}

-(void)pieChartWithCenter:(CGPoint)center withRadius:(CGFloat)radius withStartAngle:(CGFloat)startA withEndAngle:(CGFloat)endA withColor:(UIColor*)color{

    //画弧
    UIBezierPath *path = [UIBezierPath bezierPathWithArcCenter:center radius:radius startAngle:startA endAngle:endA clockwise:YES];

    //添加一根线到圆心
    [path addLineToPoint:center];

    //设置颜色(描边和填充通用)
    [color setFill];

    [path fill];
}


@end最后,附上相关的demo,Git:(https://github.com/hejiasu/Drawing)


 2084
2084


 被折叠的 条评论
为什么被折叠?
被折叠的 条评论
为什么被折叠?
 到【灌水乐园】发言


