


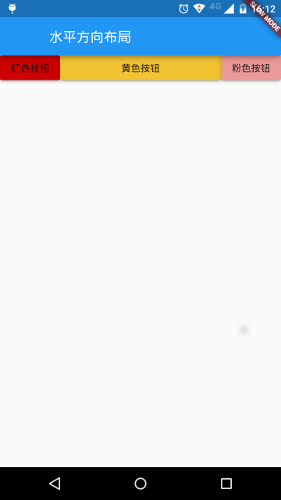
水平布局
Row控件即水平布局控件,能够将子控件水平排列。
Row子控件有灵活与不灵活的两种,Row首先列出不灵活的子控件,减去它们的总宽度,计算还有多少可用的空间。然后Row按照Flexible.flex属性确定的比例在可用空间中列出灵活的子控件。要控制灵活子控件,需要使用Flexible控件:
import 'package:flutter/material.dart';
class LayoutDemo extends StatelessWidget {
@override
Widget build(BuildContext context) {
return new Scaffold(
appBar: new AppBar(
title: new Text('水平方向布局'),
),
body: new Row(
children: <Widget>[
new RaisedButton(
onPressed: () {
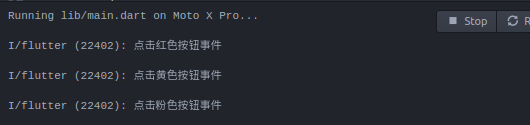
print('点击红色按钮事件');
},
color: const Color(0xffcc0000),
child: new Text('红色按钮'),
),
new Flexible(
flex: 1,
child: new RaisedButton(
onPressed: () {
print('点击黄色按钮事件');
},
color: const Color(0xfff1c232),
child: new Text('黄色按钮'),
),
),
new RaisedButton(
onPressed: () {
print('点击粉色按钮事件');
},
color: const Color(0xffea9999),
child: new Text('粉色按钮'),
),
]
),
);
}
}
void main() {
runApp(
new MaterialApp(
title: 'Flutter教程',
home: new LayoutDemo(),
),
);
}
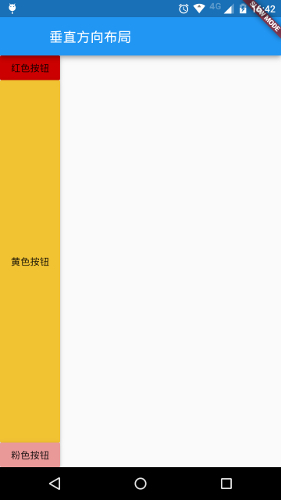
垂直布局
Column控件即垂直布局控件,能够将子控件垂直排列。
与Row控件一样,Column控件的子控件也有分灵活与不灵活的。首先Column列出不灵活的子控件,减去它们的总高度,计算还有多少可用空间。然后Column按照Flexible.flex属性确定的比例在可用空间中列出灵活的子控件。要控制灵活子控件,需要使用Flexible控件:
import 'package:flutter/material.dart';
class LayoutDemo extends StatelessWidget {
  @override
  Widget build(BuildContext context) {
    return new Scaffold(
      appBar: new AppBar(
        title: new Text('垂直方向布局'),
      ),
      body: new Column(
        children: <Widget>[
          new RaisedButton(
            onPressed: () {
              print('点击红色按钮事件');
            },
            color: const Color(0xffcc0000),
            child: new Text('红色按钮'),
          ),
          new Flexible(
            flex: 1,
            child: new RaisedButton(
              onPressed: () {
                print('点击黄色按钮事件');
              },
              color: const Color(0xfff1c232),
              child: new Text('黄色按钮'),
            ),
          ),
          new RaisedButton(
            onPressed: () {
              print('点击粉色按钮事件');
            },
            color: const Color(0xffea9999),
            child: new Text('粉色按钮'),
          ),
        ]
      ),
    );
  }
}
void main() {
  runApp(
    new MaterialApp(
      title: 'Flutter教程',
      home: new LayoutDemo(),
    ),
  );
}


 1589
1589

 被折叠的 条评论
为什么被折叠?
被折叠的 条评论
为什么被折叠?
 到【灌水乐园】发言


