


本文英文原版及代码下载:http://www.asp.net/learn/security/tutorial-11-cs.aspx
Security Tutorials系列文章第十一章:Role-Based Authorization
在前面的文章《User-Based Authorization》里我们看到了如何利用URL authorization来指定哪些用户可以访问某些页面.我们在Web.config文件里稍做配置,就可以让ASP.NET只允许被授权的用户访问某个页面,比如,我们可以明确指出该页面只允许Tito 和 Bob访问;或者除了Sam外的所有人都可以访问.
除了URL authorization外,我们还研究了从“显式地”和“编程的方式”根据当前访问用户来控制页面显示数据和提供的功能.具体来说,我们创建了一个页面来列出当前目录的内容。任何人都可以访问该页面,但只有通过认证的用户才可以访问文件的内容,且只有用户Tito可以删除文件.
如果使用“user-by-user”原则的authorization rules的话,在用户很多的情况下,授权规则的使用和维护都是一个噩梦. 而更具维护性的办法是使用基于角色的授权规则.幸好,我们可以像使用基于用户的授权那样使用基于角色的授权.我们可以对URL authorization rules运用基于角色的规则.比如,LoginView控件对通过认证的用户和匿名用户呈现不同页面内容,不过我们还可以对其进行设置,根据用户所属角色的不同而显示不同的内容.此外,Roles API包含的方法可以判断登录用户所属的角色.
本文首先探讨Roles framework是如何将用户所属的角色和该用户可以访问到的安全内容(security context)关联起来;然后考察如何运用基于角色的URL authorization rules,再接下来我们将看到通过显式和编程的方式,使ASP.NET页面展示不同的数据,提供不同的功能.
Understanding How Roles are Associated with a User’s Security Context 任何时候,当一个请求进入ASP.NET处理管道(pipeline)的时候,该请求都会与一个安全内容(security context)关联起来,其中包括了用于鉴别请求者的信息.当使用forms authentication的时候,将会用一个认证票据(authentication ticket)来“表明身份”(identity token).就像我们在前面的文章《An Overview of Forms Authentication》和《Forms Authentication Configuration and Advanced Topics》里探讨过的那样,管道内部会用一个名为FormsAuthenticationModule的来负责判断请求人的身份,当然,这是发生在AuthenticateRequest event事件里的.
如果发现了一个有效的,没有过期的认证票据的话,FormsAuthenticationModule就对该票据进行解码,以确定请求者的身份.它还会创建一个新的cPrincipal object对象,并赋值给HttpContext.User object对象.另外,某个principal——比如GenericPrincipal——的目的是用于鉴别认证用户的name以及属于什么role.因此,很明显,所有的principal objects对象都有一个Identity属性以及IsInRole(roleName) method方法. 不过很遗憾,FormsAuthenticationModule对记录role信息不感兴趣,因此它创建的GenericPrincipal object对象并没有包含任何的role信息.
如果我们激活了Roles framework的话,FormsAuthenticationModule过了就该RoleManagerModule HTTP Module出场了,它在PostAuthenticateRequest event(该事件发生在AuthenticateRequest event事件之后)事件里对认证用户所属的角色进行判断.如果请求是一个认证用户发出的,那么RoleManagerModule就会对FormsAuthenticationModule创建的GenericPrincipal object对象进行二次操作,用一个RolePrincipal object替换掉它. 而RolePrincipal class类使用Roles API来确定用户属于哪种角色.
图1揭示的是当运用forms authentication 和 the Roles framework时ASP.NET pipeline的处理流程.最先执行的是FormsAuthenticationModule,通过认证票据来鉴别用户,并创建一个新的GenericPrincipal object对象,接下来,执行RoleManagerModule,它用一个RolePrincipal object对象对GenericPrincipal object对象进行重写.
如果是一个匿名用户访问站点的话,不管是FormsAuthenticationModule还是RoleManagerModule都不会创建principal object对象.
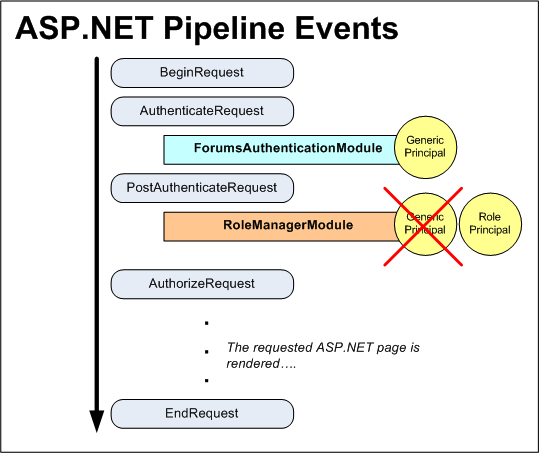 图1
图1
Caching Role Information in a Cookie
RolePrincipal object对象的IsInRole(roleName) method方法调用Roles.GetRolesForUser方法来获取用户的角色信息,以判断,用户是否属于“roleName”这个角色.但使用SqlRoleProvider的时候, 会导致对存储角色信息数据库执行查询.在使用基于角色的URL authorization rules时,每次对某个页面的请求都会调用RolePrincipal的IsInRole方法,不过Roles framework不会在每次处理请求的时候查询数据库,而是将用户的role信息缓存在一个cookie里.
如果将Roles framework配置为将用户的角色信息缓存到一个cookie里面,那么,在ASP.NET pipeline的EndRequest event事件里,RoleManagerModule将创建一个cookie. 在以后的后续请求里,该cookie就会在PostAuthenticateRequest(当创建了RolePrincipal object对象之后)里用到.如果该cookie是有效的,且未过期,那么就对cookie里的数据解析,以装填user的roles信息.这样一来的话,就避免了使RolePrincipal必须调用Roles class类以判断用户的角色信息.图2描述了这个流程.

图2
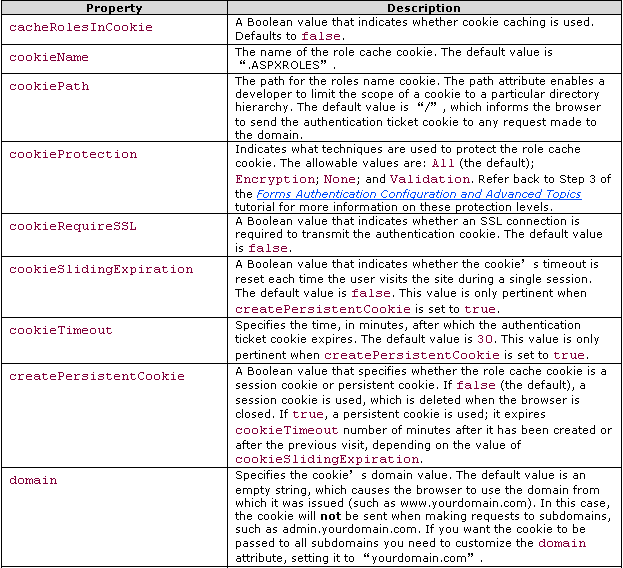
默认时,并没有启用将角色信息缓存到cookie里.我们可以在Web.config文件的<roleManager>进行配置以启用.我们在前面的文章《Creating and Managing Roles》里探讨了使用<roleManager> element元素来指定Role providers,因此,在你的Web.config文件里已经有了该元素.role cache cookie的设置是作为 <roleManager>元素的属性进行指定的,具体的设置见如下的表1. 注意: 表里的列出的配置项指定了作为最终缓存role信息的cookie的属性.关于cookies的更多信息,比如它们是如何工作的,它们有哪些属性等,请参阅文章《this Cookies tutorial》

让我们配置我们的应用程序以使用非持久性的role cache cookies.为此,对Web.config文件里的<roleManager>元素更新,以包含与cookie相关的属性:
<roleManager enabled="true"

          defaultProvider="SecurityTutorialsSqlRoleProvider"

          cacheRolesInCookie="true"

          createPersistentCookie="false"

          cookieProtection="All">

     <providers>

     ...

     </providers>

</roleManager>
我对<roleManager>元素做了更新,添加了3个属性:cacheRolesInCookie, createPersistentCookie, 以及cookieProtection. 将cacheRolesInCookie设为true的话,RoleManagerModule就会自动的将user的roles信息缓存到一个cookie,而不用每次发送请求时都必须探测用户的role信息.我明确的分别将createPersistentCookie 和 cookieProtection属性设置为false和All了.不过从技术的角度来说,我没有必要指定这些值,因为这些都是默认值.我只样做的目的是明确的表明我不使用持久化的cookies(persistent cookies)并且,这些cookie都经过加密和验证(encrypted and validated).
要做的就这些了!从此,Roles framework就会将users的roles信息缓存进cookies.如果用户的浏览器不支持cookies,或cookies不知何故被删除或丢失了,都没太大的关系.因为在无cookie(或cookie有问题或过期了)的情况下,RolePrincipal object将调用Roles class. 注意: Microsoft的Patterns & Practices团队不推荐使用持久化的role cache cookies.因为不使用持久化的role cache cookie就足以够满足提供role membership信息了,如果某个黑客通过某种方法获取了某个有效用户的cookie,他就可以假扮该用户进行操作了.如果cookie持久保存在用户的浏览器里,那么这种可能性就增大了.关于该完全问题以及其他的安全问题,请参阅《Security Question List for ASP.NET 2.0》
Step 1: Defining Role-Based URL Authorization Rules
正如我在前面的《User-Based Authorization》文章里探讨的那样, URL authorization提供了以user-by-user 或 role-by-role原则来限制对一系列页面的访问. URL authorization rules可以在Web.config文件里通过<authorization>元素里的<allow> 和 <deny>子元素来进行明确的限制.除了使用与用户相关的authorization rules外,每个<allow> 和 <deny>子元素还可以包括
.某个role .或一系列以逗号隔开的role
比如,URL authorization rules允许属于Administrators 和 Supervisors角色的用户访问,而禁止其他的用户访问.
<authorization>

  <allow roles="Administrators, Supervisors" />

  <deny users="*" />

</authorization>
上面代码里的<allow>元素允许Administrators 和 Supervisors角色包含的用户访问;而<deny>元素则禁止所有的用户访问.
让我们来进行配置,让ManageRoles.aspx, UsersAndRoles.aspx, 和CreateUserWizardWithRoles.aspx页面只允许Administrators角色包含的用户可以访问;而RoleBasedAuthorization.aspx页面仍然允许所有用户访问.因此,在Roles文件夹里添加一个Web.config文件.
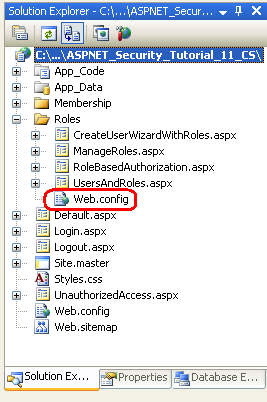
图3
接下来,在Web.config文件里添加如下的代码:
<?xml version="1.0"?>

<configuration>

 <system.web>

          <authorization>

               <allow roles="Administrators" />

               <deny users="*"/>

          </authorization>

   </system.web>

 <!-- Allow all users to visit RoleBasedAuthorization.aspx -->

<location path="RoleBasedAuthorization.aspx">

          <system.web>

               <authorization>

                    <allow users="*" />

               </authorization>

          </system.web>

     </location>

</configuration>
代码里,<system.web>部分的<authorization>元素指出只有Administrators角色包含的用户才可以访问Roles文件夹里的资源,而<location>元素则专门针对RoleBasedAuthorization.aspx页面定义了URL authorization rules,允许所有的用户访问该页面.
保存对Web.config文件的改动后,以非Administrators角色的用户登录,并访问其中一个受保护的页面.那么UrlAuthorizationModule会将发现你无法访问请求的资源,因此FormsAuthenticationModule会将你重导航到登录页面,而登录页面又会将你重导航到UnauthorizedAccess.aspx页面(见图4).为什么会从登录页面从导航到UnauthorizedAccess.aspx页面呢?因为我们在前面的《User-Based Authorization》文章的第2步里为登录页面添加的代码.具体来说,如果登录页面的查询字符串包含一个ReturnUrl参数——该参数说明用户因为尝试访问了他无权访问的页面而被重导航到登录页面,那么登录页面就会自动将用户再重导航到UnauthorizedAccess.aspx页面.
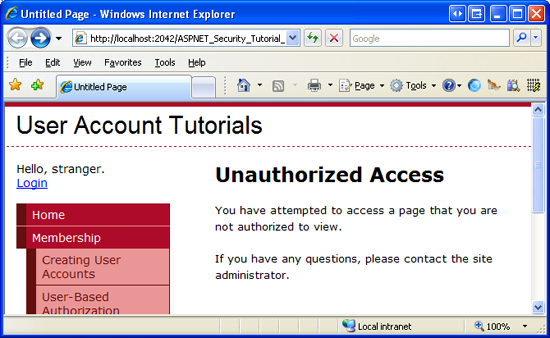
图4
注销,再以属于Administrators角色的某个用户登录,现在你就可以访问这3个受保护的页面了.
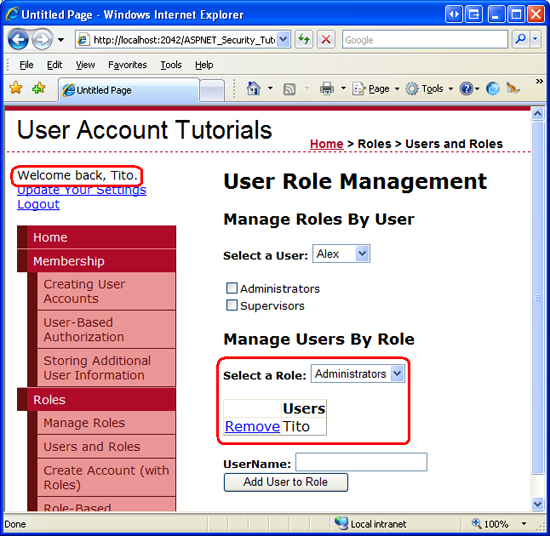
图5
注意: 当指定URL authorization rules时——不管是基于用户的或基于角色的,很重要的一点必须牢记——这些规则是按从顶部到底部,一条条分析的.如果某一条匹配,那么就允许或禁止用户访问 ,这取决于是否在<allow> 或 <deny>元素里找到匹配的规则.如果没有找到匹配的规则,那么用户总是用权访问资源的.因此,如果你想对一个或多个用户帐户进行限制,那么很重要的一点是,在对URL authorization进行配置的时候,你必须将一个<deny>元素作为最后的一个元素.如果你的规则里没有包含一个<deny>元素,那么所有的用户都有权访问资源.更多详情,请参阅前面的《User-Based Authorization》文章的“A Look at How the UrlAuthorizationModule Uses the Authorization Rules to Grant or Deny Access”章节.
Step 2: Limiting Functionality Based On the Currently Logged In User’s Roles
URL authorization仅仅很简略地指定这样的授权规则:允许或禁止某些用户访问某个页面(或某个文件夹下的所有页面以及子文件夹里的所有页面).然而某些时候我们要需要所有的用户访问某个页面,只是根据他的角色不同限制页面提供的功能而已.因此,就需要根据用户的角色来显示或隐藏数据,或者为属于某个特定角色的用户提供额外的功能.
我们可以通过显式或编程的方式(或2种方式结合)来实现这种授权规则,在接下来的章节我们用显式的方式,利用 LoginView控件来实现。然后,我们再考察编程来实现的方式。不过,在此之前,我们要先创建相应的页面。
我们创建一个页面,在里面有一个GridView控件,用来列出系统里所有的用户帐户。该GridView控件将包含用户的username、email地址、最后一次登陆的时间、以及用户注释等信息。另外,GridView控件还应包含编辑和删除功能。最开始我们运行所有用户都可以使用编辑和删除功能,在后面的“Using the LoginView Control” 和 “Programmatically Limiting Functionality”部分,我们将看如何根据用户角色的不同而启用或禁用这些功能。
注意:
我们将创建的ASP.NET页面将用一个GridView控件来展示用户帐户。由于本系列关注的是 forms authentication, authorization, user accounts,以及roles,因此我不打算花过多的时间来探讨 GridView控件内部的处理细节。虽然本文是按一步步来的方式构建的页面,但并没有过多的阐述为什么这么做的原因,关于这些方面的更深入的探讨,请参阅我的《Working with Data in ASP.NET 2.0 》系列文章。
打开Roles文件夹里的RoleBasedAuthorization.aspx页面,拖一个GridView控件到页面,设其id为UserGrid.在后面我们将写代码,调用Membership.GetAllUsers方法,并将最终的MembershipUserCollection对象绑定到该GridView控件。而MembershipUserCollection包含了一个MembershipUser对象,对应系统里的每个用户帐户;另外,MembershipUser对象包含了的属性有UserName,Email ,LastLoginDate等。
在我们写代码绑定用户帐户到控件前,我们先来定义GridView的字段。从GridView的智能标签里点“Edit Columns”,以开启Fields对话框(见图6).在里面弃选“Auto-generate fields” checkbox。由于我们希望GridView包含编辑和删除功能,因此添加一个CommandField,设其ShowEditButton 和 ShowDeleteButton属性为True.接下来,添加4个字段以显示UserName, Email, LastLoginDate, 和 Comment属性。为2个只读的属性(UserName和LastLoginDate)使用BoundField;而对2个可编辑的字段(Email和Comment)使用TemplateFields。
第一个BoundField显示UserName属性,设其HeaderText 和 DataField属性为“UserName”,由于该字段不能编辑,因此将其ReadOnly属性设为True.再LastLoginDate BoundField的HeaderText设为Last Login”而其DataField属性为“LastLoginDate”. 我们再对输出进行定制,以只显示日期(而不是日期和时间),因此,将该BoundField的HtmlEncode属性设为False,并将DataFormatString属性设置为“{0:d}”.当然,其ReadOnly属性也为True.
另外将那2个TemplateFields的HeaderText属性设置为“Email” 和 “Comment”.
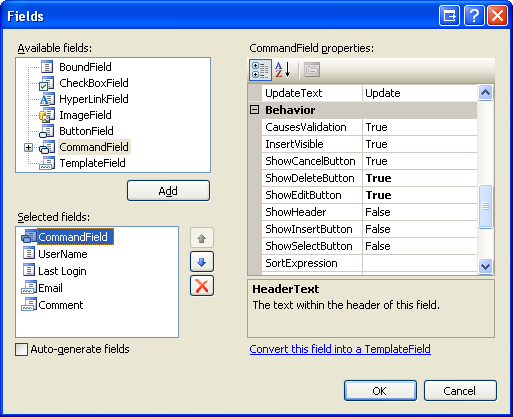
图6
我们还要为“Email” 和 “Comment” TemplateFields定义ItemTemplate 和 EditItemTemplate.向这2个TemplateFields的ItemTemplate里添加一个Label控件,分别设置其Text属性为Email和 Comment。
对“Email” TemplateField而言,添加一个名为Email的TextBox控件到其EditItemTemplate里,将其Text属性双向绑定到Email属性。另外再在EditItemTemplate里添加一RequiredFieldValidator和RegularExpressionValidator,以确保用户提供的电邮是有效的。 对“Comment” TemplateField添加一个多行的名为Comment的TextBox到EditItemTemplate里,分别设其Columns 和 Rows属性为40 和 4,最后采用双向绑定的方式将其Text属性绑定到Comment属性。
这样一来,你的声明代码看起来和下面的差不多:
<asp:TemplateField HeaderText="Email">
<ItemTemplate>
<asp:Label runat="server" ID="Label1" Text='<%# Eval("Email")%>'></asp:Label>
</ItemTemplate>
<EditItemTemplate>
<asp:TextBox runat="server" ID="Email" Text='<%# Bind("Email")%>'></asp:TextBox>
<asp:RequiredFieldValidator ID="RequiredFieldValidator1" runat="server"
ControlToValidate="Email" Display="Dynamic"
ErrorMessage="You must provide an email address."
SetFocusOnError="True">*</asp:RequiredFieldValidator>
<asp:RegularExpressionValidator ID="RegularExpressionValidator1" runat="server"
ControlToValidate="Email" Display="Dynamic"
ErrorMessage="The email address you have entered is not valid. Please fix
this and try again."
SetFocusOnError="True"
ValidationExpression="/w+([-+.']/w+)*@/w+([-.]/w+)*/./w+([-.]/w+)*">*
</asp:RegularExpressionValidator>
</EditItemTemplate>
</asp:TemplateField>
<asp:TemplateField HeaderText="Comment">
<ItemTemplate>
<asp:Label runat="server" ID="Label2" Text='<%# Eval("Comment")%>'></asp:Label>
</ItemTemplate>
<EditItemTemplate>
<asp:TextBox runat="server" ID="Comment" TextMode="MultiLine"
Columns="40" Rows="4" Text='<%# Bind("Comment")%>'>
</asp:TextBox>
</EditItemTemplate>
</asp:TemplateField>
但编辑或删除用户帐户的时候,我们需要知道用户的UserName属性,因此将GridView的DataKeyNames属性设置为“UserName”,这样我们就可以通过GridView的DataKeys来获取了。
最后,在页面上添加一个ValidationSummary控件,设其ShowMessageBox属性为True,ShowSummary属性为False。这样,但用户提供的电邮地址有误时就再客户端显示一个警示信息。
<asp:ValidationSummary ID="ValidationSummary1"
runat="server"
ShowMessageBox="True"
ShowSummary="False" />
显式方法就是这样的,接下来我们要将用户帐户绑定到GridView里。再RoleBasedAuthorization.aspx的后台代码里添加一个BindUserGrid方法,将Membership.GetAllUsers方法返回的MembershipUserCollection绑定到UserGrid GridView里,在Page_Load事件处理器里调用该方法:
protected void Page_Load(object sender, EventArgs e)
{
if (!Page.IsPostBack)
BindUserGrid();
}
private void BindUserGrid()
{
MembershipUserCollection allUsers = Membership.GetAllUsers();
UserGrid.DataSource = allUsers;
UserGrid.DataBind();
}
这样,在浏览器里登陆时,如图7所示,GridView便列出了系统里用户帐户的信息。
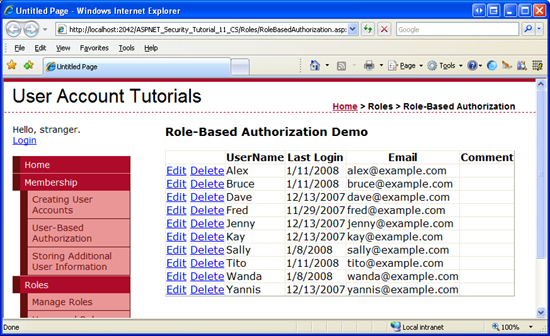 图7
图7
注意:
UserGrid GridView并没有进行分页显示,该界面对那种有很多用户帐户的情况并不适合。一种解决办法是你启用GridView的分页功能。Membership.GetAllUsers method有2个重载;一个是没有输入参数,返回所有的用户帐户,另一个是要2个int参数,一个表示页面索引,一个表示页面大小,因此只返回指定的用户帐户。自然,第二种方法要高效的多。如果你的系统有数千个用户帐户,那么你最好在界面里进行对用户帐户进行过滤,比如,只显示那些以指定字符开头的用户帐户,比如Membership.FindUsersByName method就是好的例证。我们将在后面的文章你构建这样的界面。
对GridView控件而言,但绑定到某个配置恰当的数据源控件,比如SqlDataSource 或 ObjectDataSource的时候,GridView就可以提供内置的编辑和删除支持。不过对我们的UserGrid GridView而言,我们是通过编程来对其进行绑定的,因此我们需要手写代码来执行编辑和删除的功能。具体来说,我们要为GridView控件的RowEditing, RowCancelingEdit, RowUpdating ,RowDeleting事件创建事件处理器,但用户点击GridView的 Edit, Cancel, Update,或Delete按钮时就会触发这些事件。
我们来为GridView的RowEditing, RowCancelingEdit,和RowUpdating事件创建事件处理器,如下:
protected void UserGrid_RowEditing(object sender, GridViewEditEventArgs e)
{
// Set the grid's EditIndex and rebind the data
UserGrid.EditIndex = e.NewEditIndex;
BindUserGrid();
}
protected void UserGrid_RowCancelingEdit(object sender, GridViewCancelEditEventArgs e) {
// Revert the grid's EditIndex to -1 and rebind the data
UserGrid.EditIndex = -1;
BindUserGrid();
}
protected void UserGrid_RowUpdating(object sender, GridViewUpdateEventArgs e) {
// Exit if the page is not valid
if (!Page.IsValid)
return;
// Determine the username of the user we are editing
string UserName = UserGrid.DataKeys[e.RowIndex].Value.ToString();
// Read in the entered information and update the user
TextBox EmailTextBox = UserGrid.Rows[e.RowIndex].FindControl("Email") as TextBox;
TextBox CommentTextBox = UserGrid.Rows[e.RowIndex].FindControl("Comment") as TextBox;
// Return information about the user
MembershipUser UserInfo = Membership.GetUser(UserName);
// Update the User account information
UserInfo.Email = EmailTextBox.Text.Trim();
UserInfo.Comment = CommentTextBox.Text.Trim();
Membership.UpdateUser(UserInfo);
// Revert the grid's EditIndex to -1 and rebind the data
UserGrid.EditIndex = -1;
BindUserGrid(); }
RowEditing 和 RowCancelingEdit 事件处器仅仅设置GridView的EditIndex属性,然后将一系列的用户帐户进行绑定. 有趣的是RowUpdating事件处理器,该事件处理器最开始确保数据有效,然后从DataKeys collection里将要编辑的用户帐户的UserName值获取出来,再编程引用2个TemplateFields的 EditItemTemplates里的Email 和 Comment TextBox.它们的Text属性分别包含了编辑的email地址和备注(comment).
为了通过Membership API来更新用户帐户,我们首先需要通过Membership.GetUser(userName)方法来获取用户信息。对返回的MembershipUser object对象的Email和Comment属性,我们用用户在编辑界面里的TextBoxes里输入的信息进行更新。最好再调用Membership.UpdateUser来保存改动,最后RowUpdating事件处理器将GridView转换到预编辑界面(pre-editing interface)。
接下来,我们再创建RowDeleting事件处理器,如下:
protected void UserGrid_RowDeleting(object sender, GridViewDeleteEventArgs e)
{
// Determine the username of the user we are editing
string UserName = UserGrid.DataKeys[e.RowIndex].Value.ToString();
// Delete the user Membership.DeleteUser(UserName);
// Revert the grid's EditIndex to -1 and rebind the data
UserGrid.EditIndex = -1;
BindUserGrid();
}
上述代码首先从GridView的DataKeys collection里获取UserName值,再传递给Membership类的DeleteUser method. 该方法从系统里删除用户帐户,包括相关的membership数据(比如用户所属的角色等),删除用户后,再将GridView的EditIndex设置为-1(这是为了防止这种情况:当用户点击Delete时,有可能其他行正处于编辑状态),再调用BindUserGrid方法。
注意:
当前的删除按钮在删除用户帐户时没有任何形式的确认信息,我建议你添加某些形式的确认信息,以防止误删除的情况,其中一种最简单的行为是通过客户端确认对话框来实现。更多信息请见《Adding Client-Side Confirmation When Deleting》
为了测试页面,我们要能够编辑任何用户的email地址和comment信息,也要能够删除任何的用户帐户。由于RoleBasedAuthorization.aspx页面对所有用户都可见,任何人—甚至匿名用户—都可以访问该页面,编辑和删除用户帐户!让我们对页面进行更新,只允许属于Supervisors 和 Administrators角色的用户才可以编辑用户的电邮地址和备注,而只有Administrators角色的用户才可以删除用户。
在下面的“Using the LoginView Control”部分,我们将看到基于用户角色的LoginView控件的用法。如果一个属于Administrators的用户登陆该页面,那么我们将看如何来编辑和删除用户帐户;如果Supervisors角色的用户登陆该页面的时候,我们看如何编辑用户帐户;如果是匿名用户或不属于Administrators和Supervisors角色的用户登陆页面,那么我们将显示一个消息指出他们不能编辑和删除用户帐户信息。而在“Programmatically Limiting Functionality”章节,我们将写代码根据用户的角色来在界面上显示和隐藏编辑和删除按钮。
Using the LoginView Control
正如我们在前面文章里看到的那样,LoginView对匿名和认证用户分别展示不同的界面是很有用的,同时也可以根据角色的不同展示不同的界面也是很有用的。
在UserGrid GridView上面添加一个LoginView控件,如我们在前面探讨的那样,LoginView控件有2个内置的模板
AnonymousTemplate 和 LoggedInTemplate. 在这2个模板里添加一个简要消息,提示用户他们不能编辑或删除任何用户信息。
<asp:LoginView ID="LoginView1" runat="server">
<LoggedInTemplate>
You are not a member of the Supervisors or Administrators roles. Therefore you
cannot edit or delete any user information.
</LoggedInTemplate>
<AnonymousTemplate>
You are not logged into the system. Therefore you cannot edit or delete any user information.
</AnonymousTemplate>
</asp:LoginView>
除了AnonymousTemplate 和 LoggedInTemplate模板,LoginView控件还包含RoleGroups,它是与角色相关的模板。每个RoleGroup都有一个Roles属性,指出该RoleGroup运用于哪个角色。另外,Roles属性可被设为一个单独角色(如“Administrators”),或以逗号分开的多个角色(如“Administrators, Supervisors”)。
在智能标签里点击“Edit RoleGroups”,打开RoleGroup Collection Editor.添加2个新的RoleGroups,分别设其Roles属性为“Administrators” 和“Supervisors”.
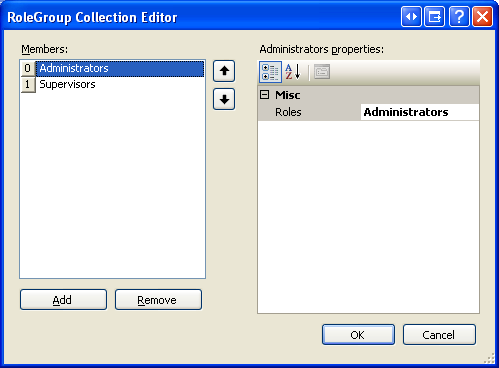
图8
点击OK关闭RoleGroup Collection Editor,这样将更新LoginView的声明标记以包含一个<RoleGroups>节点以及<asp:RoleGroup>子元素。对RoleGroups进行编辑以使Supervisors角色的用户可以编辑用户帐户;而Administrators角色的用户可以编辑和删除用户帐户。代码如下:
<asp:LoginView ID="LoginView1" runat="server">
<RoleGroups>
<asp:RoleGroup Roles="Administrators">
<ContentTemplate>
As an Administrator, you may edit and delete user accounts. Remember: With great power comes great responsibility!
</ContentTemplate>
</asp:RoleGroup>
<asp:RoleGroup Roles="Supervisors">
<ContentTemplate>
As a Supervisor, you may edit users' Email and Comment information.
Simply click the Edit button, make your changes, and then click Update.
</ContentTemplate>
</asp:RoleGroup>
</RoleGroups>
<LoggedInTemplate>
You are not a member of the Supervisors or Administrators roles.
Therefore you cannot edit or delete any user information.
</LoggedInTemplate>
<AnonymousTemplate>
You are not logged into the system. Therefore you cannot edit or delete any user information.
</AnonymousTemplate>
</asp:LoginView>
在浏览器里对页面进行测试。开始匿名访问,你将看到这个消息:“You are not logged into the system. Therefore you cannot edit or delete any user information.” ;再以非Supervisors 或 Administrators角色的用户登陆,你将看到这样的消息:“You are not a member of the Supervisors or Administrators roles. Therefore you cannot edit or delete any user information.”
接下来,以一个Supervisors角色的用户登陆,你将看到针对Supervisors角色的信息(如图9),如果你以 Administrators角色的用户登陆你将看到针对Administrators角色的信息(如图10).
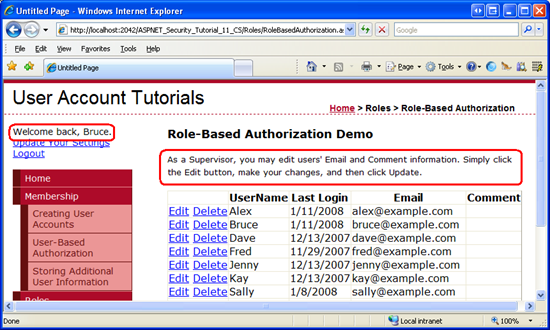
图9

图10
如截屏9和10所示,LoginView控件只能呈现一个模板,即使定义了多个模板。Bruce 和 Tito都是登陆的认证用户,但LoginView控件呈现的是相应的RoleGroup模板而不是LoggedInTemplate模板。此外,Tito即属于Administrators也属于Supervisors角色,而LoginView控件呈现的是针对Administrators角色的模板而不是针对Supervisors的模板。
图11演示的是LoginView控件判断呈现哪个模板的流程。注意,这里不止指定了一个RoleGroup,但LoginView将呈现第一个满足要求的模板。具体来说,如果我们将Supervisors RoleGroup做为第一个RoleGroup,而将Administrators作为第二个,那么但Tito登陆时,他将会看到Supervisors message。
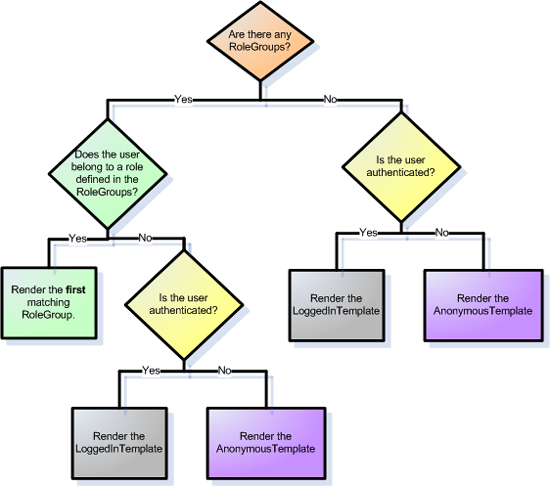
图11
Programmatically Limiting Functionality
但LoginView根据访问页面的用户的角色不同而显示不同的界面效果时,Edit 和 Cancel按钮对所有人都是可见的,但访问者是匿名用户或不属于Supervisors 或 Administrators角色时,我们需要隐藏Edit 或Delete按钮。为了完成这个效果我们需要写代码来引用CommandField的 Edit 和 Delete LinkButtons,如果必要的话就将其Visible属性设为false.
编程对CommandField引用的最简单方法是将其转换为一个template。为此,在智能标签里点击“Edit Columns”, 选中CommandField,再点“Convert this field into a TemplateField”,这样就将CommandField转换为一个包含ItemTemplate 和EditItemTemplate的TemplateField,其中ItemTemplate包含了Edit 和 Delete LinkButtons;而EditItemTemplate里有Update 和 Cancel LinkButtons。
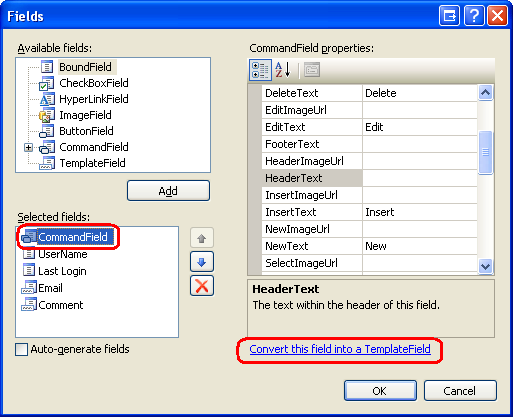
图12
分别将ItemTemplate里的Edit 和 Delete LinkButtons的id设为EditButton 和 DeleteButton,如下:
<asp:TemplateField ShowHeader="False">
<EditItemTemplate>
<asp:LinkButton ID="LinkButton1" runat="server" CausesValidation="True"
CommandName="Update" Text="Update"></asp:LinkButton>
<asp:LinkButton ID="LinkButton2" runat="server" CausesValidation="False"
CommandName="Cancel" Text="Cancel"></asp:LinkButton>
</EditItemTemplate>
<ItemTemplate>
<asp:LinkButton ID="EditButton" runat="server" CausesValidation="False"
CommandName="Edit" Text="Edit"></asp:LinkButton>
<asp:LinkButton ID="DeleteButton" runat="server" CausesValidation="False"
CommandName="Delete" Text="Delete"></asp:LinkButton>
</ItemTemplate>
</asp:TemplateField>
任何时候但数据绑定到GridView时,GridView将在DataSource属性里遍历这些记录,并生成对应的GridViewRow对象, 但GridViewRow创建好时,即触发RowCreated event事件;为了对匿名用户隐藏Edit 和 Delete按钮,我们要对该事件创建一个事件处理器来编程引用Edit 和 Delete LinkButtons,设置其Visible属性。
为RowCreated event创建事件处理器,如下:
protected void UserGrid_RowCreated(object sender, GridViewRowEventArgs e)
{
if (e.Row.RowType == DataControlRowType.DataRow && e.Row.RowIndex != UserGrid.EditIndex)
{
// Programmatically reference the Edit and Delete LinkButtons
LinkButton EditButton = e.Row.FindControl("EditButton") as LinkButton;
LinkButton DeleteButton = e.Row.FindControl("DeleteButton") as LinkButton;
EditButton.Visible = (User.IsInRole("Administrators") || User.IsInRole("Supervisors"));
DeleteButton.Visible = User.IsInRole("Administrators");
}
}
牢记,所有的GridView rows都会触发RowCreated事件,包括header, footer, pager interface等等,而我们只想处理那些非编辑模式的的data row里的Edit 和 Delete按钮(因为处于编辑模式里的行包含的是Update 和 Cancel按钮而不是Edit 和 Delete按钮).这样的过滤是通过一个if语句来达到的。
如果我们处理的data row处于非编辑模式,那么就引用Edit 和 Delete LinkButtons并根据User object的 IsInRole(roleName)方法返回的布尔值来设置其Visible属性。我们知道User object引用的是RoleManagerModule创建的principal,因此,IsInRole(roleName)方法使用Roles API来判断当前用户是否属于角色"roleName".
注意:
我们也可以直接调用Roles class类,将上述代码里的User.IsInRole(roleName)调用换成对Roles.IsUserInRole(roleName)的调用。但在这里我决定使用principal object对象的IsInRole(roleName)方法,因此它的效率比直接使用Roles API要高。在前面的文章我们配置role manager以将用户的角色信息缓冲在一个cookie里.只有当调用IsInRole(roleName)方法时才会使用到缓冲的cookie数据;而直接调用Roles API的话将总是调用对角色存储(role store)的访问.就算没有将角色信息缓冲在cookie里, 一般来说调用
principal object对象的IsInRole(roleName)方法也要高效一些,因为,第一次调用方法后就将查询结果缓冲到一个 cookie里,而Roles API则不然,它不执行任何的缓存。由于GridView里的每一行都会触发一次RowCreated事件,那么调用User.IsInRole(roleName)的话只会对role store执行一次查询,而Roles.IsUserInRole(roleName)则会执行N次查询,N代表显示在控件里的user accounts条数.
如果登陆页面的用户属于Administrators 或 Supervisors角色,那么就将Edit按钮的Visible属性设置为true,反之为false;而只有但用户为Administrators角色成员时Delete按钮的Visible属性才设为true。
在浏览器里测试,如果你匿名登陆或以非Administrators 或 Supervisors角色的帐户登陆的话,该CommandField为空;它依然存在,只是显示为一个长条,没有包含Edit 或 Delete按钮。
注意:
我们也可以对非Supervisor或非Administrator角色的用户完全隐藏CommandField,不过我将这做为练习留给读者。
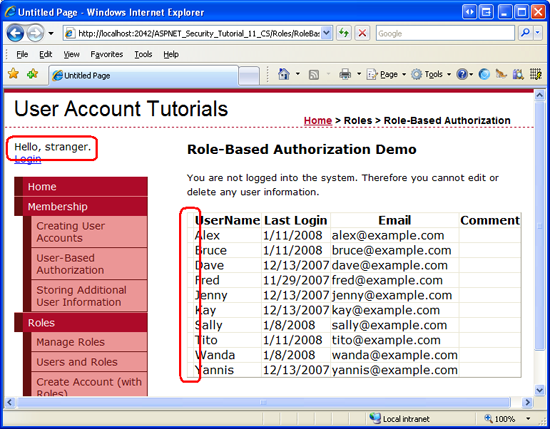
图13
如果一个用户属于Supervisors(但不属于Administrators),那么他将只能看到Edit按钮。
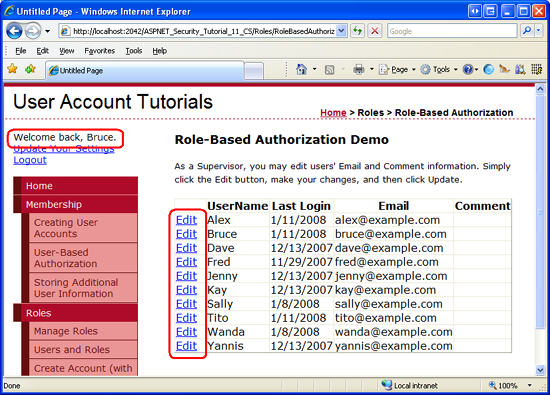
图14
但属于Administrator的用户登陆时,他将看到Edit 和 Delete按钮。
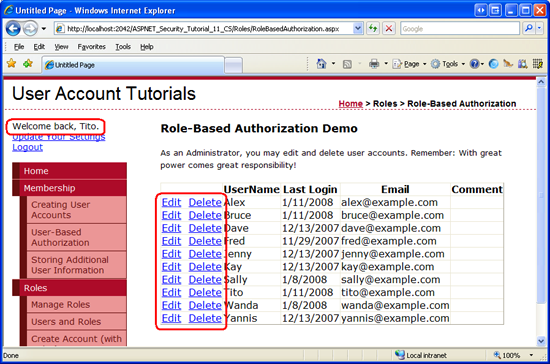
图15
Step 3: Applying Role-Based Authorization Rules to Classes and Methods
在第2步里,我们只允许属于Supervisors 和 Administrators角色的用户使用编辑功能;只有Administrators角色的用户有删除的功能,我们是通过对未授权的用户隐藏了相应的用户界面元素来实现的;但这样做并不是很完美的,比如可能在稍后的哪个时间里我们又在页面添加了其他的界面元素,或我们忘记了对未授权的用户进行隐藏;或者某个黑客发现了某种途径来获取该ASP.NET页面以执行他期望的操作。
要使未授权的用户不能使用某些功能的一种比较简单的方式是用PrincipalPermission attribute属性来对类或方法进行修饰.但.NET runtime调用某个类或执行它的某个方法时,它要进行检查以确保当前的安全内容(security context)有权使用.我们可以利用PrincipalPermission attribute属性提供的机制来定义这些规则.
我们看看前面的《User-Based Authorization tutorial》文章里使用PrincipalPermission attribute的用法.具体来说,我们对GridView的SelectedIndexChanged 和RowDeleting事件处理器进行了修饰,这样分别只有授权的用户和用户帐户为Tito的可以使用.此外,PrincipalPermission attribute也能和roles一起很好的工作。
我们来演示对GridView的RowUpdating 和 RowDeleting事件处理器使用PrincipalPermission attribute属性,以禁止未授权的用户执行这2个事件,所有要做的就是在这2个函数定义上添加相应的属性。
[PrincipalPermission(SecurityAction.Demand, Role = "Administrators")]
[PrincipalPermission(SecurityAction.Demand, Role = "Supervisors")]
protected void UserGrid_RowUpdating(object sender, GridViewUpdateEventArgs e)
{ ... }
[PrincipalPermission(SecurityAction.Demand, Role = "Administrators")]
protected void UserGrid_RowDeleting(object sender, GridViewDeleteEventArgs e)
{
... }
其中RowUpdating事件处理器的属性指出只有属于Administrators 或 Supervisors角色的用户才可以执行该事件处理器;而RowDeleting的属性指出只有Administrators角色的成员才可以执行.
注意:
PrincipalPermission attribute属于System.Security.Permissions命名空间,因此你要将该命名空间引入进来。
如果一个非Administrator角色的用户尝试执行RowDeleting事件处理器或一个非Supervisor或Administrator角色的用户尝试执行RowUpdating 事件处理器时,.NET runtime都会抛出一个SecurityException异常.
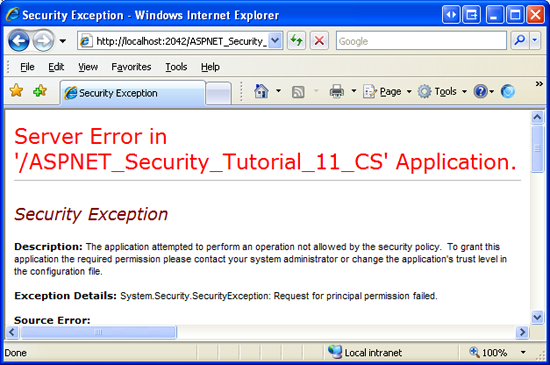
图16
除了ASP.NET页面外,很多应用程序也有包含了诸如Business Logic 和 Data Access Layers层的体系机构。这些层一般来说是以类库(Class Libraries)的形式来执行的,为执行业务逻辑或数据相关的函数提供类和方法.对这些层应用授权规则的时候PrincipalPermission attribute也是很有用的.
关于如何使用PrincipalPermission attribute属性来对类或方法定义授权规则的更多详情,请参阅Scott Guthrie的博文《Adding Authorization Rules to Business and Data Layers Using PrincipalPermissionAttributes》
结语:
在本文,我们看到了如何基于用户的角色指定笼统或精细的授权规则.ASP.NET的URL authorization授权规则允许页面开发人员指定允许或禁止哪些人访问哪些页面.正如我们在前面的文章《User-Based Authorization》里看到那样,URL authorization授权规则可以是基于user-by-user的原则;不过正如我们在本文第一步你看到的那样,也可以运用基于role-by-role的原则.
精细的授权规则可以通过显式或编程的方式来指定.在第2步,我们看到了如何使用LoginView控件的RoleGroups属性,根据登陆用户的角色来呈现不同的输出效果.我们也探讨了通过编程的方式判断某个用户是否属于某个角色,来调整页面的功能。
祝编程愉快!


 2372
2372


 被折叠的 条评论
为什么被折叠?
被折叠的 条评论
为什么被折叠?
 到【灌水乐园】发言


