


 本文探讨了如何自定义UIActivityIndicator,通过讲解实现过程,介绍CAShapeLayer和CAGradientLayer的使用,旨在提供自定义控件的思路。文章包含一个简单的demo展示,代码仅供学习,不建议直接应用。
原创blog,转载请注明出处
blog.csdn.net/hello_hwc
前言
这个系列的本身不是为了写一些东西让读者拿过去就直接可以用的。过段时间我会在github上传一些拿去就可以用的。这个系列的本身是希望抛砖引玉,提供一些自定义控件的思路。
本文的内容
- 阐述了实现自定义UIActivityIndicator的过程
希望通过本文,读者能够学会
- CAShapeLayer的简单使用
- CAGradientLayer的简单使用
自定义控件的一些思路
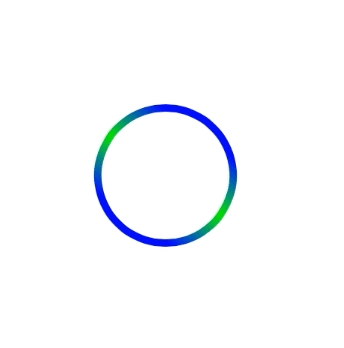
一 demo效果
二 实现的过程
- 用_shapeLayer定义环形路径
_shapeLayer = [CAShapeLayer layer];
        _shapeLayer.bounds = CGRectMake(0, 0, 100,100);
        _shapeLayer.position = CGPointMake(50,50);
        _shapeLayer.strokeColor = [UIColor blueColor].CGColor;
        _shapeLayer.fillColor = [UIColor clearColor].CGColor;
        CGMutablePathRef path = CGPathCreateMutable();
        _shapeLayer.lineWidth = 5.0;
//        _shapeLayer.backgroundColor = [UIColor purpleColor].CGColor;
        CGPathAddArc(path, nil,50, 50,45,0,2*M_PI,YES);
        _shapeLayer.path = path;
2 用CAGradientLayer定义渐变,用上文的环形路径去截取。
 _indicatorLayer = [[CAGradientLayer alloc] init];
        _indicatorLayer.bounds = CGRectMake(0, 0, 100,100);
        _indicatorLayer.position = CGPointMake(50,50);
        _indicatorLayer.colors = @[(id)[UIColor blueColor].CGColor,
                                   (id)[UIColor greenColor].CGColor,
                                   (id)[UIColor blueColor].CGColor];
        _indicatorLayer.locations  = @[@(0.25), @(0.5), @(0.75)];
 最低0.47元/天 解锁文章


 152
152

 被折叠的 条评论
为什么被折叠?
被折叠的 条评论
为什么被折叠?
 到【灌水乐园】发言


