


执行 su命令
public static boolean runRootCommand(String command) {
Process process = null;
DataOutputStream os = null;
try {
process = Runtime.getRuntime().exec("su");
os = new DataOutputStream(process.getOutputStream());
os.writeBytes(command+"\n");
os.writeBytes("exit\n");
os.flush();
process.waitFor();
} catch (Exception e) {
Log.d("*** DEBUG ***", "Unexpected error - Here is what I know: "+e.getMessage());
return false;
}
finally {
try {
if (os != null) {
os.close();
}
process.destroy();
} catch (Exception e) {
// nothing
}
}
return true;
}
public static boolean runChmod777(String myfile) {
Process process = null;
try {
process = Runtime.getRuntime().exec("su -c chmod 0777 myfile");
process.waitFor();
} catch (Exception e) {
Log.d("*** DEBUG ***", "Unexpected error - Here is what I know: "+e.getMessage());
return false;
}
finally {
try {
process.destroy();
} catch (Exception e) {
// nothing
}
}
return true;
}
ADB是android debug bridge的缩写,负责计算机与Android设备的几乎所有通信和协作,可以认为是连接两者的桥梁。
其完整源代码路径:system\core\adb
1、首先查看其Android.mk文件,确认会生成哪此文件。
可执行进程由两部分组成:
adb或adb.exe,运行于PC端,包括Linux、Windows、Mac OS等系统之中,通常是x86架构上
LOCAL_MODULE := adbd
ifeq ($(TARGET_SIMULATOR),true)
include $(BUILD_HOST_EXECUTABLE)
else
include $(BUILD_EXECUTABLE)
endif
adbd,运行于Android设备的底层Linux平台上,或者运行于虚拟机平台上
盒子上如此运行:init.rc 脚本添加:
service adbd /sbin/adbd
disabled
利用ADB_HOST宏定义编译不同的代码
2、主体介绍一下
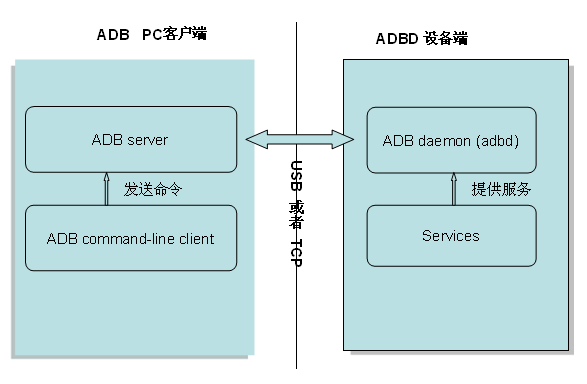
现在分析一下整个adb通讯由哪些模块或组件构成呢?
一、adb server 服务端:
这是一个守护进程长期运行于后台(runs on the host machine),没有控制台界面.
其主要工作有两部分:
1):管理PC中的Android模拟器,以及通过USB线连接到PC的Android设备,负责维持运行于其中的
adbd进程与自身的数据通道;
2):实现PC与设备/模拟器之间的数据拷贝。
主要代码文件:
二、adb client 客户端:
提供给用户的命令行工具,对用户暴露了上述install、push、shell等接口,与用户交互
其主要工作是解析这些命令的参数,做必要预处理,然后转移为指令或数据,发送给adb服务端。
adb服务端再将指令数据转发到模拟器或设备中,由adbd处理,产生结果,再通过adb服务端接收回来。
三、adb service 服务:
由此服务给adbd提供功能,即由这个模块完成,主要分为Host Services及 Local Services两类
四、ADB daemon (adbd) 守护进程
作为后台进程运行于Android device or emulated system,提供连接 ADB server的功能
(through USB for devices, through TCP for emulators)
其通讯典型结构如下:
3、以常用命令为实例
常用的指令如下:
adb push <local> <remote> - copy file/dir to device
adb pull <remote> [<local>] - copy file/dir from device
adb shell - run remote shell interactively
adb install [-l] [-r] [-s] <file> - push this package file to the device and install it
adb kill-server - kill the server if it is running
connect <host>[:<port>] - connect to a device via TCP/IP
Port 5555 is used by default if no port number is specified.
所有这些cmd处理函数都在:\system\core\adb\Commandline.c 中:
int adb_commandline(int argc, char **argv)
为了更好的理解这些命令,有必须找到代码理解一下这些命令的处理主要函数:
函数启动点: adb.c 中的main函数,根据ADB_HOST决定执行哪些代码:
int main(int argc, char **argv)
{
...
adb_trace_init();
#if ADB_HOST
adb_sysdeps_init();
return adb_commandline(argc - 1, argv + 1); //这里运行PC端,用于命令发送
#else
start_device_log();
return adb_main(0, DEFAULT_ADB_PORT); //运行于android系统的盒子或设备上,用于命令接收及反馈
#endif
}
先分析PC端这边:
a、首先建立adb server:
有两种方式,
手工建立:adb fork-server server 调用:adb_main(is_daemon, server_port);
默认5037端口,也可以设置:service.adb.tcp.port 这个属性获取
自动建立:调用 launch_server(server_port),利用 CreateProcess 或者fork建立后台进程进行运行
// child process
int result = execl(path, "adb", "fork-server", "server", NULL);
这个进程利用fdevent_loop();处理所有数据及消息
b、ADB command-line client即发送命令界面:
主要处理函数:int adb_commandline(int argc, char **argv)
主要利用如下几个函数:
adb_query 查询
adb_connect 连接
adb_status 获取状态
命令发送格式:
1. A 4-byte hexadecimal string giving the length of the payload
2. Followed by the payload itself.
服务端收到后回复:
1. For success, the 4-byte "OKAY" string
2. For failure, the 4-byte "FAIL" string, followed by a
4-byte hex length, followed by a string giving the reason
for failure.
3. As a special exception, for 'host:version', a 4-byte
hex string corresponding to the server's internal version number
以上两者通讯利用socket进行数据传递
然后分析设备服务端:
主要集中在函数:fdevent_loop();
主要分析一下数据transport这块,文件Transport.c
void init_transport_registration(void)
{
adb_socketpair(s) //创建socket pair用于处理异步注册事件
transport_registration_send = s[0];
transport_registration_recv = s[1];
// 在transport_registration_recv上安装一个transport_registration_func异步事情回调函数
fdevent_install(&transport_registration_fde,
transport_registration_recv,
transport_registration_func,
0);
...
}
异步如何触发的呢?
register_transport
-->transport_write_action(transport_registration_send, &m)
remove_transport
-->transport_write_action(transport_registration_send, &m)
此时会将事件写入socket pair的写入端,而接收端:
void fdevent_loop()
{
...
for(;;) {
while((fde = fdevent_plist_dequeue())) {
unsigned events = fde->events;
fde->events = 0;
fde->state &= (~FDE_PENDING);
dump_fde(fde, "callback");
//这个回调函数是在:fdevent_install 函数中注册的:fde->func = func;
fde->func(fde->fd, events, fde->arg);
}
}
}
然后利用transport_read_action读取异步事情,那么数据处理在哪里呢?
transport_registration_func
-->
/* don't create transport threads for inaccessible devices */
if (t->connection_state != CS_NOPERM) {
if(adb_thread_create(&input_thread_ptr, input_thread, t)){
fatal_errno("cannot create input thread");
}
if(adb_thread_create(&output_thread_ptr, output_thread, t)){
fatal_errno("cannot create output thread");
}
}
在这里会创建两个线程 output thread和 input thread用于做异步 IO,
=============================================================================
根据 adb的文档说明, output线程和 input线程的引人主要是为了解决 USB endpoint不支持非
阻塞读写,所以就专门为 usb读操作开一个output线程,为usb写操作创建一个input线程。
所以,数据流方向是远程连接->output线程->主线程->input线程->远程连接。刚开始时,
output线程会发一个 SYNC消息给input线程,启动这个transport。
static void *input_thread(void *_t)
{
D("to_remote: starting input_thread for %p, reading from fd %d\n",t, t->fd);
for(;;){
read_packet(t->fd, &p);
t->write_to_remote(p, t);
}
}
static void *output_thread(void *_t)
{
D("from_remote: data pump for transport %p\n", t);
for(;;) {
p = get_apacket();
t->read_from_remote(p, t);
write_packet(t->fd, &p);
}
}
=============================================================================
说一下我开始疑惑的问题解决:
adb shell 命令处理:
if(!strcmp(argv[0], "shell")) {
if(argc < 2) {
return interactive_shell();
}
}
int interactive_shell(void)
{
fd = adb_connect("shell:");
adb_thread_create(&thr, stdin_read_thread, fds);
}
而服务端处理:
#if ADB_HOST
#define SHELL_COMMAND "/bin/sh"
#else
#define SHELL_COMMAND "/system/bin/sh"
#endif
int service_to_fd(const char *name)
{
if(!HOST && !strncmp(name, "shell:", 6)) {
if(name[6]) {
ret = create_subprocess(SHELL_COMMAND, "-c", name + 6);
} else {
ret = create_subprocess(SHELL_COMMAND, "-", 0);
}
}
...
}
单独创建出一个进程进行处理shell命令
static int create_subprocess(const char *cmd, const char *arg0, const char *arg1)
{
pid = fork();
if(pid == 0){
execl(cmd, cmd, arg0, arg1, NULL);
}else
...
}
adb install xxx.apk 处理方式:
if(!strcmp(argv[0], "install")) {
if (argc < 2) return usage();
return install_app(ttype, serial, argc, argv);
}
if(!strcmp(argv[0], "uninstall")) {
if (argc < 2) return usage();
return uninstall_app(ttype, serial, argc, argv);
}
安装apk:
int install_app(transport_type transport, char* serial, int argc, char** argv)
{
//下载路径
const char *const DATA_DEST = "/data/local/tmp/%s";
const char *const SD_DEST = "/sdcard/tmp/%s";
const char* where = DATA_DEST;
//将apk文件写入到to目录下
if (!(err = do_sync_push(filename, to, 1 /* verify APK */))) {
/* file in place; tell the Package Manager to install it */
argv[argc - 1] = to; /* destination name, not source location */
pm_command(transport, serial, argc, argv);
delete_file(transport, serial, to);
}
...
}
通知android系统进行安装apk包
static int pm_command(transport_type transport, char* serial,
int argc, char** argv)
{
snprintf(buf, sizeof(buf), "shell:pm");
//通知包管理器安装apk应用,即使用pm命令安装应用
send_shellcommand(transport, serial, buf);
return 0;
}
usage: pm [list|path|install|uninstall]
pm list packages [-f]
pm list permission-groups
pm list permissions [-g] [-f] [-d] [-u] [GROUP]
pm list instrumentation [-f] [TARGET-PACKAGE]
pm list features
pm path PACKAGE
pm install [-l] [-r] [-t] [-i INSTALLER_PACKAGE_NAME] [-s] [-f] PATH
pm uninstall [-k] PACKAGE
pm enable PACKAGE_OR_COMPONENT
pm disable PACKAGE_OR_COMPONENT
pm setInstallLocation [0/auto] [1/internal] [2/external]
最后:
其完整源代码路径:system\core\adb
1、首先查看其Android.mk文件,确认会生成哪此文件。
可执行进程由两部分组成:
LOCAL_MODULE := adb
include $(BUILD_HOST_EXECUTABLE)adb或adb.exe,运行于PC端,包括Linux、Windows、Mac OS等系统之中,通常是x86架构上
LOCAL_MODULE := adbd
ifeq ($(TARGET_SIMULATOR),true)
include $(BUILD_HOST_EXECUTABLE)
else
include $(BUILD_EXECUTABLE)
endif
adbd,运行于Android设备的底层Linux平台上,或者运行于虚拟机平台上
盒子上如此运行:init.rc 脚本添加:
service adbd /sbin/adbd
disabled
利用ADB_HOST宏定义编译不同的代码
2、主体介绍一下
现在分析一下整个adb通讯由哪些模块或组件构成呢?
一、adb server 服务端:
这是一个守护进程长期运行于后台(runs on the host machine),没有控制台界面.
其主要工作有两部分:
1):管理PC中的Android模拟器,以及通过USB线连接到PC的Android设备,负责维持运行于其中的
adbd进程与自身的数据通道;
2):实现PC与设备/模拟器之间的数据拷贝。
主要代码文件:
二、adb client 客户端:
提供给用户的命令行工具,对用户暴露了上述install、push、shell等接口,与用户交互
其主要工作是解析这些命令的参数,做必要预处理,然后转移为指令或数据,发送给adb服务端。
adb服务端再将指令数据转发到模拟器或设备中,由adbd处理,产生结果,再通过adb服务端接收回来。
三、adb service 服务:
由此服务给adbd提供功能,即由这个模块完成,主要分为Host Services及 Local Services两类
四、ADB daemon (adbd) 守护进程
作为后台进程运行于Android device or emulated system,提供连接 ADB server的功能
(through USB for devices, through TCP for emulators)
其通讯典型结构如下:
3、以常用命令为实例
常用的指令如下:
adb push <local> <remote> - copy file/dir to device
adb pull <remote> [<local>] - copy file/dir from device
adb shell - run remote shell interactively
adb install [-l] [-r] [-s] <file> - push this package file to the device and install it
adb kill-server - kill the server if it is running
connect <host>[:<port>] - connect to a device via TCP/IP
Port 5555 is used by default if no port number is specified.
所有这些cmd处理函数都在:\system\core\adb\Commandline.c 中:
int adb_commandline(int argc, char **argv)
为了更好的理解这些命令,有必须找到代码理解一下这些命令的处理主要函数:
函数启动点: adb.c 中的main函数,根据ADB_HOST决定执行哪些代码:
int main(int argc, char **argv)
{
...
adb_trace_init();
#if ADB_HOST
adb_sysdeps_init();
return adb_commandline(argc - 1, argv + 1); //这里运行PC端,用于命令发送
#else
start_device_log();
return adb_main(0, DEFAULT_ADB_PORT); //运行于android系统的盒子或设备上,用于命令接收及反馈
#endif
}
先分析PC端这边:
a、首先建立adb server:
有两种方式,
手工建立:adb fork-server server 调用:adb_main(is_daemon, server_port);
默认5037端口,也可以设置:service.adb.tcp.port 这个属性获取
自动建立:调用 launch_server(server_port),利用 CreateProcess 或者fork建立后台进程进行运行
// child process
int result = execl(path, "adb", "fork-server", "server", NULL);
这个进程利用fdevent_loop();处理所有数据及消息
b、ADB command-line client即发送命令界面:
主要处理函数:int adb_commandline(int argc, char **argv)
主要利用如下几个函数:
adb_query 查询
adb_connect 连接
adb_status 获取状态
命令发送格式:
1. A 4-byte hexadecimal string giving the length of the payload
2. Followed by the payload itself.
服务端收到后回复:
1. For success, the 4-byte "OKAY" string
2. For failure, the 4-byte "FAIL" string, followed by a
4-byte hex length, followed by a string giving the reason
for failure.
3. As a special exception, for 'host:version', a 4-byte
hex string corresponding to the server's internal version number
以上两者通讯利用socket进行数据传递
然后分析设备服务端:
主要集中在函数:fdevent_loop();
主要分析一下数据transport这块,文件Transport.c
void init_transport_registration(void)
{
adb_socketpair(s) //创建socket pair用于处理异步注册事件
transport_registration_send = s[0];
transport_registration_recv = s[1];
// 在transport_registration_recv上安装一个transport_registration_func异步事情回调函数
fdevent_install(&transport_registration_fde,
transport_registration_recv,
transport_registration_func,
0);
...
}
异步如何触发的呢?
register_transport
-->transport_write_action(transport_registration_send, &m)
remove_transport
-->transport_write_action(transport_registration_send, &m)
此时会将事件写入socket pair的写入端,而接收端:
void fdevent_loop()
{
...
for(;;) {
while((fde = fdevent_plist_dequeue())) {
unsigned events = fde->events;
fde->events = 0;
fde->state &= (~FDE_PENDING);
dump_fde(fde, "callback");
//这个回调函数是在:fdevent_install 函数中注册的:fde->func = func;
fde->func(fde->fd, events, fde->arg);
}
}
}
然后利用transport_read_action读取异步事情,那么数据处理在哪里呢?
transport_registration_func
-->
/* don't create transport threads for inaccessible devices */
if (t->connection_state != CS_NOPERM) {
if(adb_thread_create(&input_thread_ptr, input_thread, t)){
fatal_errno("cannot create input thread");
}
if(adb_thread_create(&output_thread_ptr, output_thread, t)){
fatal_errno("cannot create output thread");
}
}
在这里会创建两个线程 output thread和 input thread用于做异步 IO,
=============================================================================
根据 adb的文档说明, output线程和 input线程的引人主要是为了解决 USB endpoint不支持非
阻塞读写,所以就专门为 usb读操作开一个output线程,为usb写操作创建一个input线程。
所以,数据流方向是远程连接->output线程->主线程->input线程->远程连接。刚开始时,
output线程会发一个 SYNC消息给input线程,启动这个transport。
static void *input_thread(void *_t)
{
D("to_remote: starting input_thread for %p, reading from fd %d\n",t, t->fd);
for(;;){
read_packet(t->fd, &p);
t->write_to_remote(p, t);
}
}
static void *output_thread(void *_t)
{
D("from_remote: data pump for transport %p\n", t);
for(;;) {
p = get_apacket();
t->read_from_remote(p, t);
write_packet(t->fd, &p);
}
}
=============================================================================
说一下我开始疑惑的问题解决:
adb shell 命令处理:
if(!strcmp(argv[0], "shell")) {
if(argc < 2) {
return interactive_shell();
}
}
int interactive_shell(void)
{
fd = adb_connect("shell:");
adb_thread_create(&thr, stdin_read_thread, fds);
}
而服务端处理:
#if ADB_HOST
#define SHELL_COMMAND "/bin/sh"
#else
#define SHELL_COMMAND "/system/bin/sh"
#endif
int service_to_fd(const char *name)
{
if(!HOST && !strncmp(name, "shell:", 6)) {
if(name[6]) {
ret = create_subprocess(SHELL_COMMAND, "-c", name + 6);
} else {
ret = create_subprocess(SHELL_COMMAND, "-", 0);
}
}
...
}
单独创建出一个进程进行处理shell命令
static int create_subprocess(const char *cmd, const char *arg0, const char *arg1)
{
pid = fork();
if(pid == 0){
execl(cmd, cmd, arg0, arg1, NULL);
}else
...
}
adb install xxx.apk 处理方式:
if(!strcmp(argv[0], "install")) {
if (argc < 2) return usage();
return install_app(ttype, serial, argc, argv);
}
if(!strcmp(argv[0], "uninstall")) {
if (argc < 2) return usage();
return uninstall_app(ttype, serial, argc, argv);
}
安装apk:
int install_app(transport_type transport, char* serial, int argc, char** argv)
{
//下载路径
const char *const DATA_DEST = "/data/local/tmp/%s";
const char *const SD_DEST = "/sdcard/tmp/%s";
const char* where = DATA_DEST;
//将apk文件写入到to目录下
if (!(err = do_sync_push(filename, to, 1 /* verify APK */))) {
/* file in place; tell the Package Manager to install it */
argv[argc - 1] = to; /* destination name, not source location */
pm_command(transport, serial, argc, argv);
delete_file(transport, serial, to);
}
...
}
通知android系统进行安装apk包
static int pm_command(transport_type transport, char* serial,
int argc, char** argv)
{
snprintf(buf, sizeof(buf), "shell:pm");
//通知包管理器安装apk应用,即使用pm命令安装应用
send_shellcommand(transport, serial, buf);
return 0;
}
usage: pm [list|path|install|uninstall]
pm list packages [-f]
pm list permission-groups
pm list permissions [-g] [-f] [-d] [-u] [GROUP]
pm list instrumentation [-f] [TARGET-PACKAGE]
pm list features
pm path PACKAGE
pm install [-l] [-r] [-t] [-i INSTALLER_PACKAGE_NAME] [-s] [-f] PATH
pm uninstall [-k] PACKAGE
pm enable PACKAGE_OR_COMPONENT
pm disable PACKAGE_OR_COMPONENT
pm setInstallLocation [0/auto] [1/internal] [2/external]
最后:
源码的OVERVIEW.txt文件中对它们的关系进行了描述。而protocol.txt描述了各模块之间通信协作的协议格式。


 1953
1953


 被折叠的 条评论
为什么被折叠?
被折叠的 条评论
为什么被折叠?
 到【灌水乐园】发言


