


认识地表水的反射:
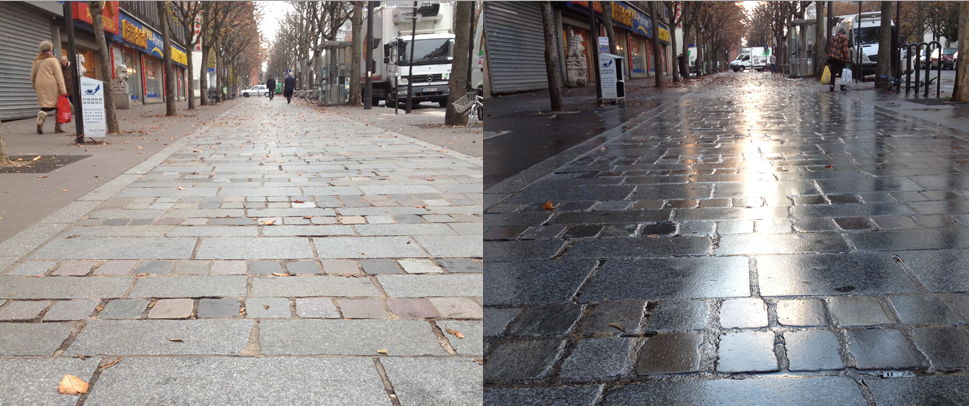
1.“一道残阳铺水中” 效果
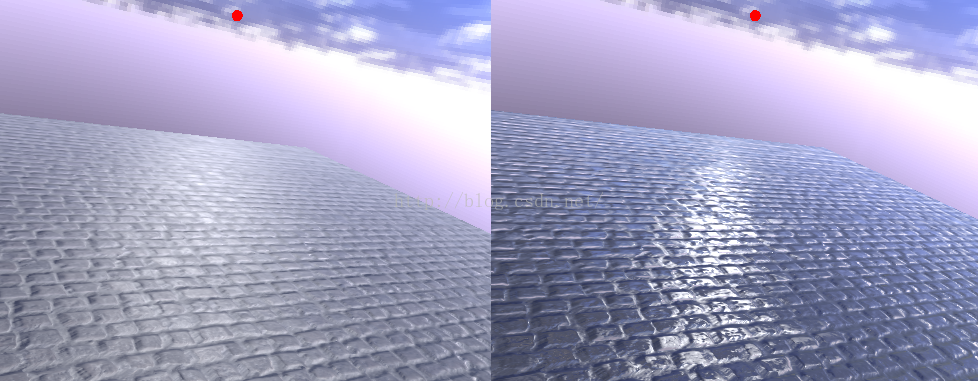
表面粗糙的物品被水淋湿之后,根据菲涅尔反射原理,水表面会有镜面的效果。漫反射被镜面反射取代。粗糙的地表在反射光的时候,会在地面有“一道残阳铺水中”的效果,根据文献[1],
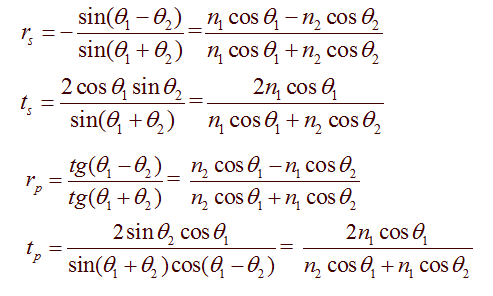
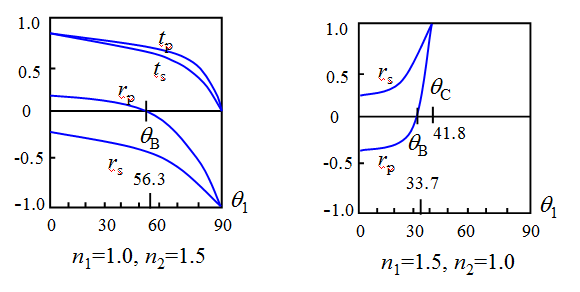
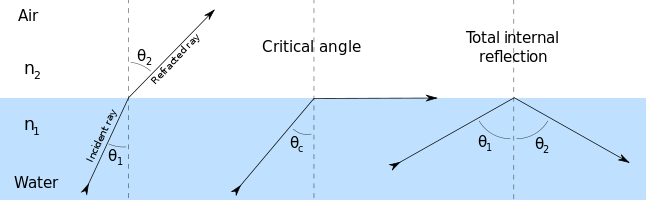
菲涅尔原理: 下图绘出了在、n1<n2和n1 >n2 两种情况下,反射系数、透射系数随入射角q 1的变化曲线。
2. “Darker when in water””
根据文献[2] ,因为光线出来水面的时候,会被水面给反射回去一部分光,即达到我们眼睛的光更少了,所以看起来会比干燥表面暗些

3. 湿润对材质反光的主要影响
湿润对 表面黑色以及很光亮的物品影响是比较小的,因为光线本来就很少或者说很多,湿润减少的部分光线没有产生很大的影响。如下图,反射率在中间部分,干燥以及湿润的相差是最大的,两端的相差都比较小。

综上,低反射率,表面粗糙,以及多孔的材质会有更多的 wetting effect.
水主要影响 材质,水积累和水洼
Type 1: 干燥区域
Type 2: 湿地区域:即湿润,但是没有积水的地方
Type 3:湿透区域:比如水洼的边缘,the water remains to some extent but no puddles are formed.
Type 4:水洼区域;
对于Type 2, 在文献[1] 中,建议设置5到10 的镜面反射系数,0.1到0.3 的漫反射系数。 DoWetProcess 函数中使用 WetLevel 来控制地表的湿度,0表示干燥1表示湿润。该值在雨水开始的时候逐渐增加,雨停止时候就慢慢减少,即模拟水面风干的的过程。
void DoWetProcess(inout float3 Diffuse, inout float Gloss, float WetLevel)
{
	//water influence on material BRDF
	diffuse *= lerp(1.0, 0.3, WetLevel);
	// not the same boost factor than the paper
	Gloss  = min(Gloss * lerp(1.0, 2,5, WetLevel), 1.0);
}
//Water influence on material BRDF
DoWetProcess(Diffuse, Gloss, WetLevel);
此处还没有对 法线做处理,当地表湿润的时候,我们还是使用之前的发现贴图。如下图所示:
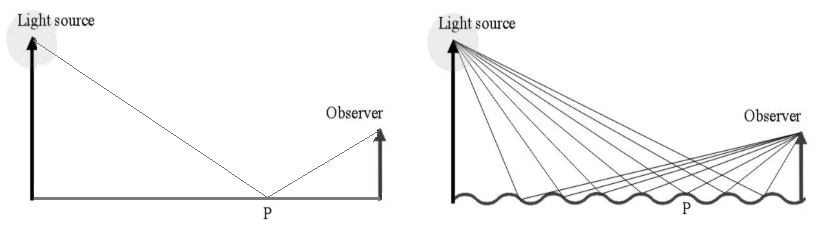
"A wavy water surface contains many inclinations from which light originating from the source is reflected to the observer" 因为表面roughness,观察者会看到一条闪光区域
对于Type 4,文献[2]中建议使用双层反射模型。现在我们简单的通过调整水面的BRDF参数和湿润表面的漫反射系数。对于Type3,可以通过在Type 2 和Type 4之间做个lerp 插值。(貌似游戏中建筑的地表不会有水洼,只有野外才有,那要根据 高度图)。 这里使用顶点颜色的alpha 值表示洼的深度
AccumulateWater = VertexColor.a;
//Type 2 Wet region
DoWetProcess(Diffuse, Gloss, WetLevel);
//Apply accumulated water effect
//when AccumulatedWater is 1.0 we are in Type 4
// so full water properties, in between we are in Type 3
//water is smooth
Gloss = lerp(Gloss, 1.0, AcculatedWater);
//Water F0 specular is 0.02 (based on IOR 折射率 of 1.33)
specular = lerp(Specular, 0.02, AccumulatedWater);
N            = lerp(N, float3(0,0,1),AccumulateWater);
其中lerp (x,y,s) 函数表示 取值 x*(1-s) + y*s
为了模拟出在地表凹凸间隙的水积累效果,我们可以使用一些地图的信息:
heightMap 高度图 : 就像之前通过alpha 值确定水洼那样,我们可以根据高度图黑色表示可以积水,白色表示没有积水。过度状态用lerp。目前为止,我们使用了定点颜色以及地图的高度信息。flood levels 是0 的时候表示没有积水, 1 表示有满满的积水。 中间的状态,使用深度信息来确定积水。
如下代码使用该两种因子来模拟积累水
// Get depth/ accumulation water information
float2 AccumulatedWaters
//Get the "size" of the accumulated water in a hole/ cracks
AccumulatedWaters.x = min(FloodLevel.x, 1.0 - Heightmap);
//Get the size of the accumlated water in puddle taking into accout the
// marging(0.4 constant here)
AccumulatedWaters.y = saturate((FloodLevel.y - VertexColor.g)/0.4);
//Mix vertex color and height map accumulated water by taking the higher
float AccumulatedWater = max(AccumulatedWaters,x, AccumulateWaters.y);
第一:模拟水洼的大小变化,下雨变大,雨停变小。此时,使用flood level 替代 water level. 当flood level 大于像素深度的时候, 该像素在水下面。这样通过food level 的改变,可以控制水洼的周围的浮现或者隐退。
if flood level is greater than pixel depth we are underwater(1)
if flood level is lesser than pixel depth and a transition size (we chose 0.4 in the code),we are dry(0)
if flood level is between we are drenched and linearly interpolate the accumulated water value
saturate((FloodLevel.y - VertexColor.g) / 0.4)"saturate(x)" The x parameter, clamped within the range of 0 to 1.
第二:我们需要处理间隙的积水。这里的积水不用关系size 的改变。
min(FloodLevel.x , 1.0 - Heightmap)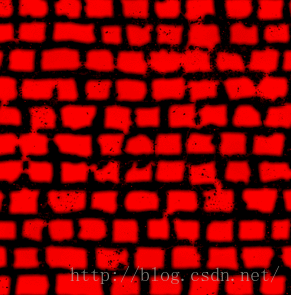
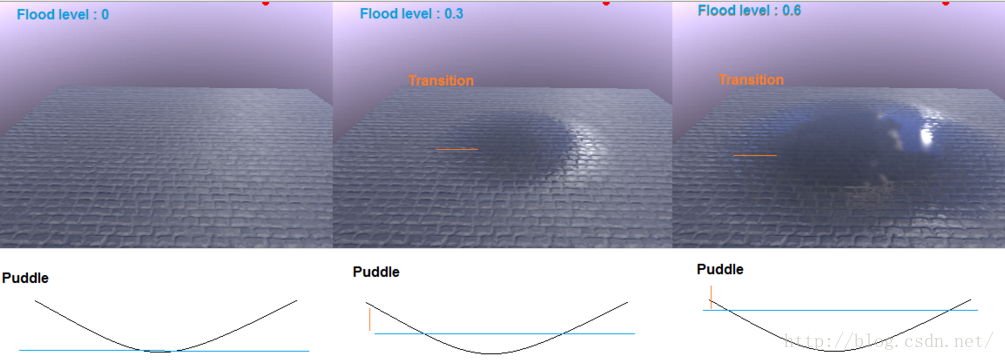
如下是通过调整不同的flood leve 得到不同的地表间隙的积水效果,可以看到,随着flood level 的变大holes 加深,即积水变多,反射效果变强
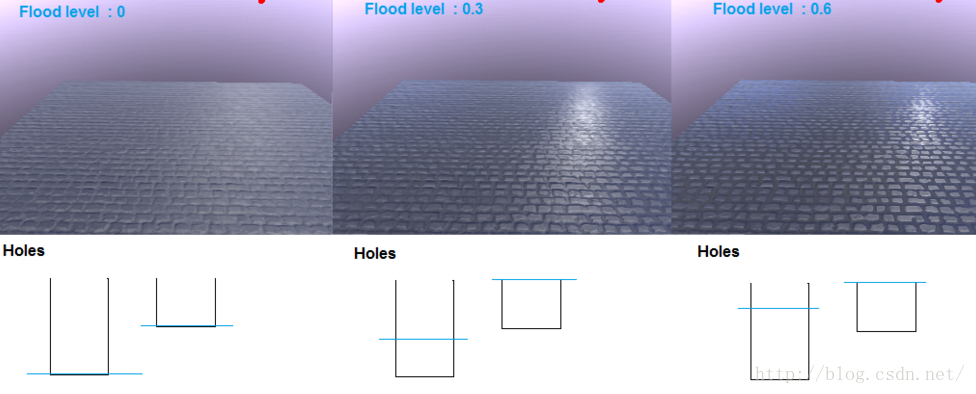
高度图或者顶点颜色的白色部分是不会有积水的。黑色部分允许在水下面。水洼地区不受下雨因素影响。
//WetLevel could be 0 but we can still require to have wet surface
// if there is accumlated water
float NewWetLevel = saturate(WetLevel + AccumulateWater);
// Calculate the surface wet BRDF parameters for the new wet level
DoWetProcess(Diffuse, Gloss, NewWetLevel);
Gloss = lerp(Gloss, 1.0, AccumulateWater);
Specular  = lerp(Specular, 0.02, AccumulatedWater);
N = lerp(N, float3(0,0,1),AccumulatedWater)
采用两种flood level,一个是凹凸间隙,一个是水洼,因为他们的变化时间是不一样的。flood level 在于水的积累,二水的积累去决定于 Rain intensity 以及 已经下雨的时间。
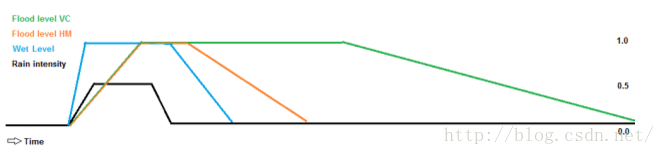
如上图,Rain intensity 升高到0.5, 即开始下雨。蓝色的 Wet level 也迅速升高到1. 一定时间之后,flood level(绿色) 升高,可以覆盖到所有的水洼以及间隙。当停止下雨之后,需要一定的时间,wetlevel 降到 0. 橙色的Height map ,因为坑洼水较多,需要更多的时间降低到0.
Rippel in puddles and thin water layer 水中的涟漪
水中涟漪,大多数游戏中使用动态的涟漪法线贴图,消耗较大。简单的方法即使用动态的纹理,涟漪过于模式化。 从纹理中获取动态的圈圈。
float3 ComputeRipple(float2 UV, float CurrentTime, float Weight)
{
    float4 Ripple = tex2D(RippleTexture, UV);
    Ripple.yz = Ripple.yz * 2 - 1; // Decompress perturbation

    float DropFrac = frac(Ripple.w + CurrentTime); // Apply time shift
    float TimeFrac = DropFrac - 1.0f + Ripple.x;
    float DropFactor = saturate(0.2f + Weight * 0.8f - DropFrac);
    float FinalFactor = DropFactor * Ripple.x *
                        sin( clamp(TimeFrac * 9.0f, 0.0f, 3.0f) * PI);

    return float3(Ripple.yz * FinalFactor * 0.35f, 1.0f);
}
当RianIntensity 增加的时候,需要产生更多的ripples。 通过使用不同频率,时间来融合不同的层,达到多变的效果。混合层根据rain intensity。
// This are just visually tweak value
float4 TimeMul = float4(1.0f, 0.85f, 0.93f, 1.13f);
float4 TimeAdd = float4(0.0f, 0.2f, 0.45f, 0.7f);
float4 Times = (Time * TimeMul + TimeAdd) * 1.6f;
Times = frac(Times);
// Generate four shifted layer of animated circle
float3 Ripple1 = ComputeRipple(UVRipple + float2( 0.25f,0.0f), Times.x, Weights.x);
float3 Ripple2 = ComputeRipple(UVRipple + float2(-0.55f,0.3f), Times.y, Weights.y);
float3 Ripple3 = ComputeRipple(UVRipple + float2(0.6f, 0.85f), Times.z, Weights.z);
float3 Ripple4 = ComputeRipple(UVRipple + float2(0.5f,-0.75f), Times.w, Weights.w);
// We enable one layer by quarter intensity and progressively blend in the
// current layer
float4 Weights = RainIntensity - float4(0, 0.25, 0.5, 0.75);
Weights = saturate(Weights * 4);
// Compose normal of the four layer based on weights
float4 Z = lerp(1, float4(Ripple1.z, Ripple2.z, Ripple3.z, Ripple4.z), Weights);
float3 Normal = float3( Weights.x * Ripple1.xy +
Weights.y * Ripple2.xy +
Weights.z * Ripple3.xy +
Weights.w * Ripple4.xy,
Z.x * Z.y * Z.z * Z.w);
// return result
return float4(normalize(Normal) * 0.5 + 0.5, 1);
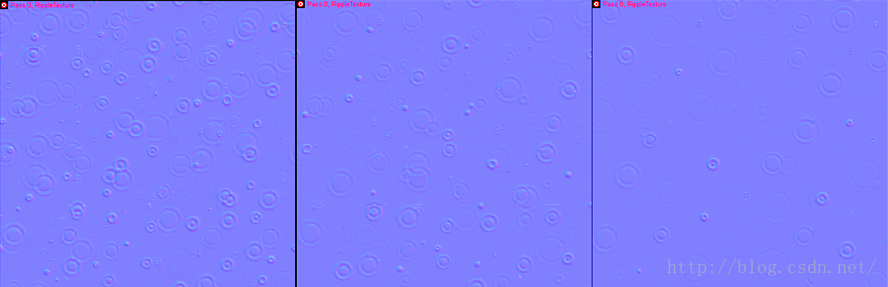
生成 ripple normal map。 based on the rain intensity.
float NewWetLevel = saturate(WetLevel + AccumulatedWater);
DoWetProcess(Diffuse, Gloss, NewWetLevel);

float3 RippleNormal = tex2D(RippleTexture, WorldPos.xy * ScaleFactor)*2.0-1.0;
// For clarity add this extra line, but in practice it is not
// require, RippleNormal is neutral when rain is off
float3 WaterNormal = lerp(float3(0, 0, 1), RippleNormal, RainIntensityOn);

Gloss = lerp(Gloss, 1.0, AccumulatedWater);
Specular = lerp(Specular, 0.02, AccumulatedWater);
N     = lerp(N, WaterNormal, AccumulatedWater);
Generate Ripple Texture Pixshader:
// enable or disable to use the animation timeline or not - change in Main pass too
#define USE_TIMELINE 1

sampler2D RippleTexture;

float Time;
float TextureSize;

#if USE_TIMELINE
float AnimationLength;
sampler2D TimelineTexture;
#else
float RainIntensity;
#endif

#define PI 3.141592653

// Compute a ripple layer for the current time
float3 ComputeRipple(float2 UV, float CurrentTime, float Weight)
{
   float4 Ripple = tex2D(RippleTexture, UV);
   Ripple.yz = Ripple.yz * 2.0 - 1.0;

   float DropFrac = frac(Ripple.w + CurrentTime);
   float TimeFrac = DropFrac - 1.0 + Ripple.x;
   float DropFactor = saturate(0.2 + Weight * 0.8 - DropFrac);
   float FinalFactor = DropFactor * Ripple.x * sin( clamp(TimeFrac * 9.0, 0.0f, 3.0) * PI);

   return float3(Ripple.yz * FinalFactor * 0.35, 1.0);
}

float4 ps_main(float4 ScreenPosition: TEXCOORD0) : COLOR0
{
#if USE_TIMELINE
   float  AnimTime = fmod(Time, AnimationLength); // Time is in seconds
   float4 AnimateValues = tex2Dlod(TimelineTexture, float4(AnimTime / AnimationLength, 0.5, 0.0, 0.0));
   float  RainIntensity = AnimateValues.x;
#endif

   // BEGIN CPU CODE
   float4 TimeMul = float4(1.0f, 0.85f, 0.93f, 1.13f);
   float4 TimeAdd  = float4(0.0f, 0.2f, 0.45f, 0.7f);
   float GlobalMul = 1.6f;

   float4 Times = (Time * TimeMul + TimeAdd) * GlobalMul;

   Times = frac(Times);
   // END CPU CODE

   float2 UV =  .zw;
   float2 UVRipple = UV;

   float4 Weights = RainIntensity - float4(0, 0.25, 0.5, 0.75);
   Weights = saturate(Weights * 4);

   float3 Ripple1 = ComputeRipple(UVRipple + float2( 0.25f,0.0f), Times.x, Weights.x);
   float3 Ripple2 = ComputeRipple(UVRipple + float2(-0.55f,0.3f), Times.y, Weights.y);
   float3 Ripple3 = ComputeRipple(UVRipple + float2(0.6f, 0.85f), Times.z, Weights.z);
   float3 Ripple4 = ComputeRipple(UVRipple + float2(0.5f,-0.75f), Times.w, Weights.w);

   // Merge the 4 layers
   float4 Z = lerp(1, float4(Ripple1.z, Ripple2.z, Ripple3.z, Ripple4.z), Weights);
   float3 Normal = float3( Weights.x * Ripple1.xy +
                           Weights.y * Ripple2.xy +
                           Weights.z * Ripple3.xy +
                           Weights.w * Ripple4.xy,
                           Z.x * Z.y * Z.z * Z.w);

   float3 TextureNormal = normalize(Normal);

   // Compress
   return float4(TextureNormal.rgb * 0.5 + 0.5, 1);
}
Main Pass: Pixshader
// enable or disable to use the animation timeline or not - Change in GenerateRippleTexture too
#define USE_TIMELINE 1

struct PS_INPUT
{
   float4 Position:    POSITION0;
   float2 Texture:     TEXCOORD0;
   float3 Normal:      TEXCOORD1;
   float3 Tangent:     TEXCOORD2;
   float3 Binormal:    TEXCOORD3;
   float4 Color:       TEXCOORD4;
   float3 ViewDir:     TEXCOORD5;
   float4 Pos:         TEXCOORD6;
   float4 ScreenPos:   TEXCOORD7;
};

struct PS_OUTPUT
{
   float4 Color  : COLOR0;
};

sampler2D TexHeight;
sampler2D TexNormal;
sampler2D TexDiffuse;
sampler   TexCube;

float3    LightPosition;
float3    LightDirection;
float     LightIntensity;

#if USE_TIMELINE
float     Time;
float     AnimationLength;
#else
float2    FloodLevel; // HM, VC
float     WetLevel;
float     RainIntensity;
#endif

float4    vViewPosition;

sampler2D RippleTexture;
sampler2D TimelineTexture;

float3 SampleEnvmap(float3 R, float Gloss, float3 PositionWS)
{
   // Use SkyLDR envmap from default cubemapgen package
   // Cubemap pre-filtered with ModifiedCubemapgen
   // http://seblagarde.wordpress.com/2012/06/10/amd-cubemapgen-for-physically-based-rendering/
   // CosinePower filter with mipmap filtering: NumMipmap 9, ExcludeBase enable, Gloss Scale 11, Gloss Bias 0

   // Think to put trilinear filtering in RM cubemap setting
   // LDR cubemap, should be HDR, small boost of 1.4 and pow to better see the result.
   return pow(1.4 * texCUBElod(TexCube, float4(float3(R.x, R.z, -R.y), (1.0 - Gloss) * 8.0)) + 0.5, 2.2);
}


void DoWetProcess(inout float3 Diffuse, inout float Gloss, float WetLevel)
{
   // Water influence on material BRDF
   Diffuse    *= lerp(1.0, 0.3, WetLevel);                   // Attenuate diffuse
   Gloss       = min(Gloss * lerp(1.0, 2.5, WetLevel), 1.0); // Boost gloss
}

PS_OUTPUT ps_main( PS_INPUT Input )
{
#if USE_TIMELINE
   float  AnimTime = fmod(Time, AnimationLength); // Time is in seconds
   float4 AnimateValues = tex2Dlod(TimelineTexture, float4(AnimTime / AnimationLength, 0.5, 0.0, 0.0));
   float2 FloodLevel = AnimateValues.zw; // HM, VC
   float  WetLevel = AnimateValues.y;
   float  RainIntensity = AnimateValues.x;
#endif

   // CAUTION : RenderMonkey is Y-up
   PS_OUTPUT Output;

   // Hack : Binormal seems broken, recontruct it as mesh is simple
   Input.Binormal = cross(Input.Tangent, Input.Normal);

   // LS to TS
   float3x3 NBTMatrix = float3x3(Input.Tangent, Input.Binormal, Input.Normal);
   // Eye in tangent space for bump offset
   float3 V_ts = mul(vViewPosition, NBTMatrix);

   // Tile texture by 4
   float2 UV = Input.Texture * 4.0;
   float  Heightmap = tex2D(TexHeight, UV).r;

   // BumpOffset
   float BumpStrenght = 0.0003; // Magic value for this scene
   UV = UV + vViewPosition.xy * (Heightmap - 0) * BumpStrenght;

   // Gather material BRDF Parameter
   // Convert to linear lighting
   float3 BaseDiffuse = pow(tex2D(TexDiffuse, UV).rgb, 2.2);
   float3 N = tex2D(TexNormal, UV).rgb * 2.0 - 1.0;
   // TS to LS by inverse matrix - note LS is WS in this app
   N = mul(NBTMatrix, N);

   // Glossiness store in alpha channel of the normal map
   float  Gloss = tex2D(TexNormal, UV).a;
   float3 Specular = 0.04; // Default specular value for dieletric

   /
   // Rain effets - Specific code

   // Parameter to customize heightmap for rain if needed
   // because it could not match the one for bumpoffset.
   float  ScaleHeight = 1.0f;
   float  BiasHeight = 0.0f;
   Heightmap = Heightmap * ScaleHeight + BiasHeight;

   // Get depth/accumulation water information
   float2 AccumulatedWaters;
   // Get the "size" of the accumulated water in a hole/cracks
   AccumulatedWaters.x      = min(FloodLevel.x, 1.0 - Heightmap);
   // Get the size of the accumlated water in puddle taking into account the
   // marging (0.4 constant here)
   AccumulatedWaters.y      = saturate((FloodLevel.y - Input.Color.g) / 0.4);
   // Mix vertex color and height map accumulated water by taking the higher
   float  AccumulatedWater  = max(AccumulatedWaters.x, AccumulatedWaters .y);

   // Ripple part
   // 0.05 to scale world uv of this app
   float3 RippleNormal  = tex2D(RippleTexture, Input.Pos.xz * 0.05) * 2 - 1;
   RippleNormal = mul(NBTMatrix, RippleNormal);
   // saturate(RainIntensity * 100.0) to be 1 when RainIntensity is > 0 and 0 else
   float3 WaterNormal  = lerp(float3(0, 1, 0), RippleNormal, saturate(RainIntensity * 100.0)); // World space

   float NewWetLevel = saturate(WetLevel + AccumulatedWater);

   // Water influence on material BRDF (no modification of the specular term for now)
   // Type 2 : Wet region
   DoWetProcess(BaseDiffuse, Gloss, NewWetLevel);

   // Apply accumulated water effect
   // When AccumulatedWater is 1.0 we are in Type 4
   // so full water properties, in between we are in Type 3
   // Water is smooth
   Gloss    = lerp(Gloss, 1.0, AccumulatedWater);
   // Water F0 specular is 0.02 (based on IOR of 1.33)
   Specular = lerp(Specular, 0.02, AccumulatedWater);
   N        = lerp(N, WaterNormal, AccumulatedWater);

   // End Rain effect specific code


   // Precalc many values for lighting equation
   float3 V = normalize(Input.ViewDir);
   float3 L = normalize(LightPosition - Input.Pos);
   float3 H = normalize(L + V);

   float  dotVH = saturate(dot(V, H));
   float  dotNH = saturate(dot(N, H));
   float  dotNL = saturate(dot(N, L));
   float  dotNV = saturate(dot(N, V));

   float3 R = reflect(V, N);
   float3 ReflColor = SampleEnvmap(R, Gloss, Input.Pos);

   // Fresnel for cubemap and Fresnel for direct lighting
   float3 SpecVH = Specular + (1.0 - Specular) * pow(1.0 - dotVH, 5.0);
   // Use fresnel attenuation from Call of duty siggraph 2011 talk
   float3 SpecNV = Specular + (1.0 - Specular) * pow(1.0 - dotNV, 5.0) / (4.0 - 3.0 * Gloss);

   // Convert Gloss [0..1] to SpecularPower [0..2048]
   float  SpecPower = exp2(Gloss * 11);

   // Lighting
   float3 DiffuseLighting     = dotNL * BaseDiffuse;
   // Normalized specular lighting
   float3 SpecularLighting    = SpecVH * ((SpecPower + 2.0) / 8.0) * pow(dotNH, SpecPower) * dotNL;
   float3 AmbientSpecLighting = ReflColor * SpecNV;

   float3 FinalColor = LightIntensity * (DiffuseLighting + SpecularLighting) + AmbientSpecLighting;

   // Linear to gamme space
   Output.Color = float4(pow(FinalColor, 1.0 / 2.2), 1.0);

   return Output;
}
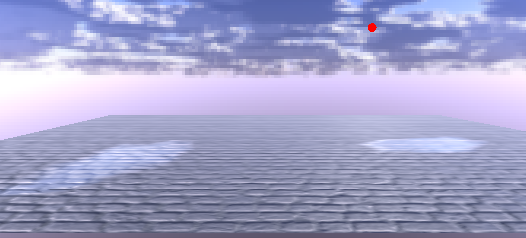
整体效果如下:

Refference:
1. The glitter path: an everyday life phenomenon relation physics to other disciplines. H.Joachim Schlichting
2. Hobbs, “Darker when wet”, http://www.abc.net.au/science/articles/2010/11/11/3063513.htm
2. A Lighting Model Aiming at Drive Simulators;


 230
230


 被折叠的 条评论
为什么被折叠?
被折叠的 条评论
为什么被折叠?
 到【灌水乐园】发言


