List概述
List和Vector都是STL的序列式容器,唯一不同的地方就在于:Vector是一段连续的内存空间,List则是一段不连续的内存空间,相比于Vector来说,List在每次插入和删除的时候,只需要配置或释放一个元素空间,对于任何位置的插入和删除操作,List永远能做到常数时间。但是,List由于不连续的内存空间,导致不支持随机寻址,所以尺有所长寸有所短,在程序中选择使用那种容器还要视元素的构造复杂度和存取行为而定。
List的节点
List的节点结构如下:
template <class T>
struct __list_node
{
typedef void* void_pointer;
void_pointer next;
void_pointer prev;
T data;
};
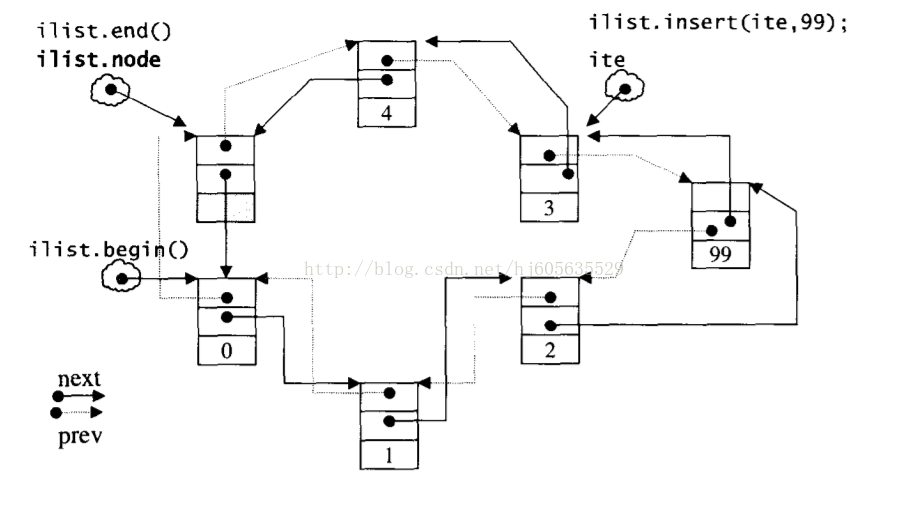
从节点结构可以看出,List就是一个双向链表,其结构如下图所示:
List的迭代器
在Vector中,由于是连续的存储空间,支持随机存取,所以其迭代器可以直接用普通指针代替。但是,在List中行不通。List必须有能力指向List的节点,并有能力进行正确的递增、递减、取值和成员存取等操作。
List是一个双向链表,迭代器必须具备前移、后退的能力,所以List的迭代器是一个Bidirectional Iterator!在Vector中如果进行插入和删除操作后迭代器会失效,List有一个重要的性质就是插入和接合操作都不会造成原有的List迭代器失效。而且,再删除一个节点时,也仅有指向被删除元素的那个迭代器失效,其他迭代器不受任何影响。下面来看看List迭代器的源码。
template<class T, class Ref, class Ptr>
struct __list_iterator
{
typedef __list_iterator<T, T&, T*> iterator;
typedef __list_iterator<T, const T&, const T*> const_iterator;
typedef __list_iterator<T, Ref, Ptr> self;
typedef bidirectional_iterator_tag iterator_category;
typedef T value_type;
typedef Ptr pointer;
typedef Ref reference;
typedef size_t size_type;
typedef ptrdiff_t difference_type;
typedef __list_node<T>* link_type;
link_type node;
__list_iterator(link_type x) : node(x) {}
__list_iterator() {}
__list_iterator(const iterator& x) : node(x.node) {}
bool operator==(const self& x) const { return node == x.node; }
bool operator!=(const self& x) const { return node != x.node; }
reference operator*() const { return (*node).data; }
pointer operator->() const { return &(operator*()); }
self& operator++()
{
node = (link_type)((*node).next);
return *this;
}
self operator++(int)
{
self tmp = *this;
++*this;
return tmp;
}
self& operator--()
{
node = (link_type)((*node).prev);
return *this;
}
self operator--(int)
{
self tmp = *this;
--*this;
return tmp;
}
}
- 1
- 2
- 3
- 4
- 5
- 6
- 7
- 8
- 9
- 10
- 11
- 12
- 13
- 14
- 15
- 16
- 17
- 18
- 19
- 20
- 21
- 22
- 23
- 24
- 25
- 26
- 27
- 28
- 29
- 30
- 31
- 32
- 33
- 34
- 35
- 36
- 37
- 38
- 39
- 40
- 41
- 42
- 43
- 44
- 45
- 46
- 47
- 48
- 49
- 50
- 51
- 52
- 53
- 54
- 55
- 56
- 57
- 58
- 59
- 60
- 61
- 62
- 63
List的迭代器实现了==,!=,++,–,取值和成员调用等操作,由于是存放在不连续的内存空间,所以并不支持vector那样的p+n的操作。
List的数据结构
List的数据结构个List的节点数据结构是分开定义的,SGI的List不仅是一个双向链表,而且还是一个环状双向链表,所以它只需要一个指针,就能完整表现一个链表。
template <class T, class Alloc = alloc>
class list
{
protected:
typedef void* void_pointer;
typedef __list_node<T> list_node;
typedef simple_alloc<list_node, Alloc> list_node_allocator;
link_type node;
}
List构造函数
List提供了一个空构造函数,如下:
list() { empty_initialize(); }
void empty_initialize()
{
node = get_node();
node->next = node;
node->prev = node;
}
另外,List还提供了带参的构造函数,支持如下初始化操作:
List<int> myList(5,1);
其构造函数源码如下:
list(size_type n, const T& value) { fill_initialize(n, value); }
void fill_initialize(size_type n, const T& value)
{
empty_initialize();
insert(begin(), n, value);
}
void insert(iterator pos, int n, const T& x)
{
insert(pos, (size_type)n, x);
}
template <class T, class Alloc>
void list<T, Alloc>::insert(iterator position, size_type n, const T& x)
{
for ( ; n > 0; --n)
insert(position, x);
}
iterator insert(iterator position, const T& x)
{
link_type tmp = create_node(x);
tmp->next = position.node;
tmp->prev = position.node->prev;
(link_type(position.node->prev))->next = tmp;
position.node->prev = tmp;
return tmp;
}
- 1
- 2
- 3
- 4
- 5
- 6
- 7
- 8
- 9
- 10
- 11
- 12
- 13
- 14
- 15
- 16
- 17
- 18
- 19
- 20
- 21
- 22
- 23
- 24
- 25
- 26
- 27
- 28
- 29
- 30
- 31
- 32
- 33
- 34
- 35
- 1
- 2
- 3
- 4
- 5
- 6
- 7
- 8
- 9
- 10
- 11
- 12
- 13
- 14
- 15
- 16
- 17
- 18
- 19
- 20
- 21
- 22
- 23
- 24
- 25
- 26
- 27
- 28
- 29
- 30
- 31
- 32
- 33
- 34
- 35
STL的List提供了很多种构造函数,此处我列举了其中一个,以此为例。
List的其他操作函数
get_node
此函数用来配置一个节点。
link_type get_node() {
return list_node_allocator::allocate();
}
put_node
此函数用来释放一个节点。
void put_node(link_type p) {
list_node_allocator::deallocate(p);
}
create_node
此函数用来配置并构造一个节点,并初始化其值
link_type create_node(const T& x)
{
link_type p = get_node();
construct(&p->data, x);
return p;
}
destory_node
此函数用来析构一个节点。
void destroy_node(link_type p)
{
destroy(&p->data);
put_node(p);
}
insert
此函数用来在制定位置插入一个节点(上面提到过这个函数,这里重复一下,List的主要插入工作都交给这个函数),该函数是一个重载函数,其有多种形式。
iterator insert(iterator position, const T& x)
{
link_type tmp = create_node(x);
tmp->next = position.node;
tmp->prev = position.node->prev;
(link_type(position.node->prev))->next = tmp;
position.node->prev = tmp;
return tmp;
}
template <class T, class Alloc> template <class InputIterator>
void list<T, Alloc>::insert(iterator position,
InputIterator first, InputIterator last)
{
for ( ; first != last; ++first)
insert(position, *first);
}
iterator insert(iterator position) { return insert(position, T()); }
- 1
- 2
- 3
- 4
- 5
- 6
- 7
- 8
- 9
- 10
- 11
- 12
- 13
- 14
- 15
- 16
- 17
- 18
- 19
- 20
- 21
- 22
- 1
- 2
- 3
- 4
- 5
- 6
- 7
- 8
- 9
- 10
- 11
- 12
- 13
- 14
- 15
- 16
- 17
- 18
- 19
- 20
- 21
- 22
push_back
在尾部插入元素,有了上面的insert函数之后,push_back就比较容易实现了。
void push_back(const T& x) { insert(end(), x); }
pop_front
void push_front(const T& x) { insert(begin(), x); }
earse
移除迭代器所指的元素
iterator erase(iterator position)
{
link_type next_node = link_type(position.node->next);
link_type prev_node = link_type(position.node->prev);
prev_node->next = next_node;
next_node->prev = prev_node;
destroy_node(position.node);
return iterator(next_node);
}
template <class T, class Alloc>
list<T, Alloc>::iterator list<T, Alloc>::erase(iterator first, iterator last)
{
while (first != last) erase(first++);
return last;
}
- 1
- 2
- 3
- 4
- 5
- 6
- 7
- 8
- 9
- 10
- 11
- 12
- 13
- 14
- 15
- 16
- 17
- 18
- 19
- 20
- 1
- 2
- 3
- 4
- 5
- 6
- 7
- 8
- 9
- 10
- 11
- 12
- 13
- 14
- 15
- 16
- 17
- 18
- 19
- 20
pop_front
移除头节点元素,有了上述的erase函数,就很方便的实现了。
void pop_front() { erase(begin()); }
pop_back
移除链表中最后一个元素
void pop_back()
{
iterator tmp = end();
erase(--tmp);
}
clear
清除链表中的所有节点,也就是一个一个的清除
template <class T, class Alloc>
void list<T, Alloc>::clear()
{
link_type cur = (link_type) node->next;
while (cur != node) {
link_type tmp = cur;
cur = (link_type) cur->next;
destroy_node(tmp);
}
node->next = node;
node->prev = node;
}
remove
将链表中值为value的节点移除
template <class T, class Alloc>
void list<T, Alloc>::remove(const T& value)
{
iterator first = begin();
iterator last = end();
while (first != last) {
iterator next = first;
++next;
if (*first == value) erase(first);
first = next;
}
}
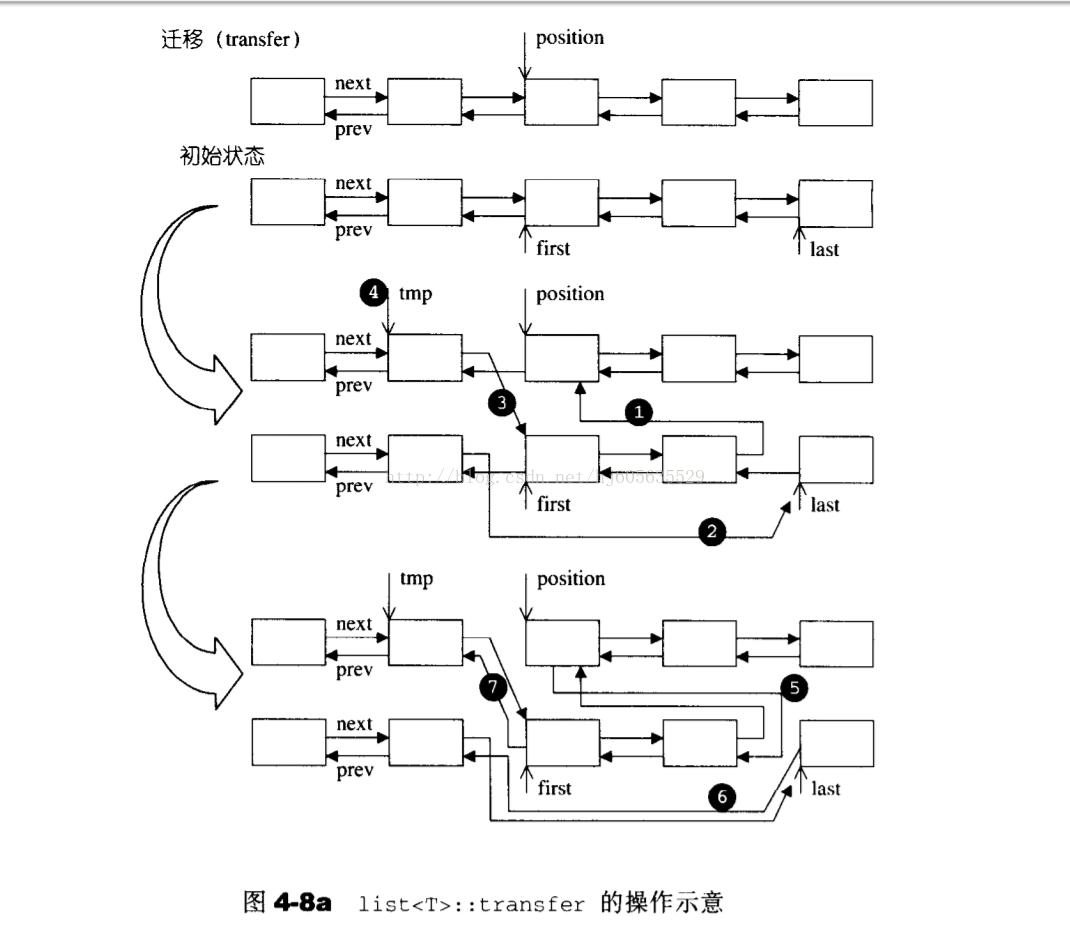
transfer
将某段连续范围内的元素迁移到指定位置。(非公开接口)
void transfer(iterator position, iterator first, iterator last)
{
    if (position != last)
    {
        (*(link_type((*last.node).prev))).next = position.node;
        (*(link_type((*first.node).prev))).next = last.node;
        (*(link_type((*position.node).prev))).next = first.node;
        link_type tmp = link_type((*position.node).prev);
        (*position.node).prev = (*last.node).prev;
        (*last.node).prev = (*first.node).prev;
        (*first.node).prev = tmp;
    }
}
这里借用侯捷先生的《STL源码剖析》中的一幅图来说明这个过程。
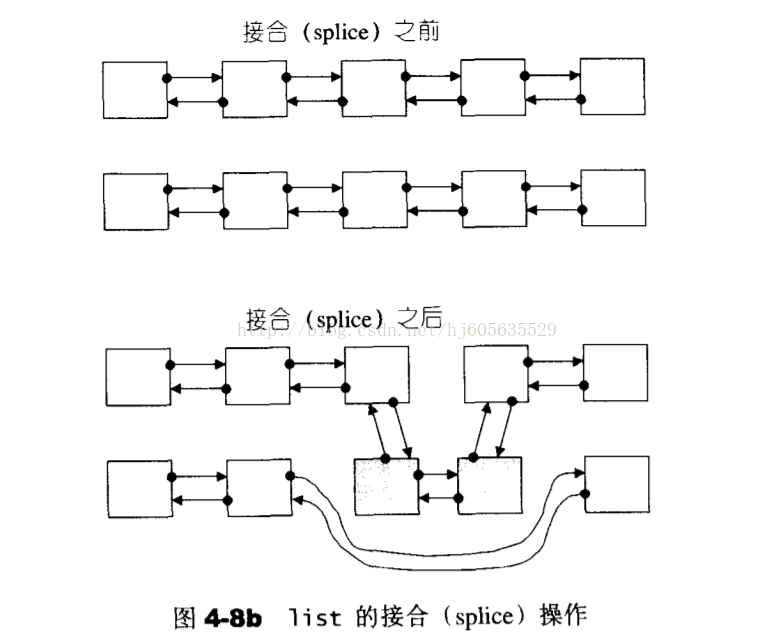
splice
List提供的接合函数是Splice,上述transfer是非公开的函数。splice函数有如下几个版本:
void splice(iterator position, list& x)
{
if (!x.empty())
transfer(position, x.begin(), x.end());
}
void splice(iterator position, list&, iterator i)
{
iterator j = i;
++j;
if (position == i || position == j) return;
transfer(position, i, j);
}
void splice(iterator position, list&, iterator first, iterator last)
{
if (first != last)
transfer(position, first, last);
}
- 1
- 2
- 3
- 4
- 5
- 6
- 7
- 8
- 9
- 10
- 11
- 12
- 13
- 14
- 15
- 16
- 17
- 18
- 19
- 20
- 21
- 22
- 1
- 2
- 3
- 4
- 5
- 6
- 7
- 8
- 9
- 10
- 11
- 12
- 13
- 14
- 15
- 16
- 17
- 18
- 19
- 20
- 21
- 22
merge
此函数用来合并两个链表,这里两个链表必须是已拍好序的。
template <class T, class Alloc>
void list<T, Alloc>::merge(list<T, Alloc>& x)
{
iterator first1 = begin();
iterator last1 = end();
iterator first2 = x.begin();
iterator last2 = x.end();
while (first1 != last1 && first2 != last2)
if (*first2 < *first1) {
iterator next = first2;
transfer(first1, first2, ++next);
first2 = next;
}
else
++first1;
if (first2 != last2) transfer(last1, first2, last2);
}
- 1
- 2
- 3
- 4
- 5
- 6
- 7
- 8
- 9
- 10
- 11
- 12
- 13
- 14
- 15
- 16
- 17
- 18
- 1
- 2
- 3
- 4
- 5
- 6
- 7
- 8
- 9
- 10
- 11
- 12
- 13
- 14
- 15
- 16
- 17
- 18
reverse
此函数用来反转链表,其具体实现如下:
template <class T, class Alloc>
void list<T, Alloc>::reverse()
{
if (node->next == node || link_type(node->next)->next == node) return;
iterator first = begin();
++first;
while (first != end()) {
iterator old = first;
++first;
transfer(begin(), old, first);
}
}


 530
530


 被折叠的 条评论
为什么被折叠?
被折叠的 条评论
为什么被折叠?
 到【灌水乐园】发言


