


前言
到目前为止,已经简单学习了Spring的Core模块、也会怎么与Struts2框架进行整合了….于是我们就开启了Spring的AOP模块了…在讲解AOP模块之前,首先我们来讲解一下cglib代理、以及怎么手动实现AOP编程
cglib代理
在讲解cglib之前,首先我们来回顾一下静态代理和动态代理….我之前就写过了静态代理、动态代理的博文:http://blog.csdn.net/hon_3y/article/details/70655966
由于静态代理需要实现目标对象的相同接口,那么可能会导致代理类会非常非常多….不好维护—->因此出现了动态代理
动态代理也有个约束:目标对象一定是要有接口的,没有接口就不能实现动态代理…..—–>因此出现了cglib代理
cglib代理也叫子类代理,从内存中构建出一个子类来扩展目标对象的功能!
- CGLIB是一个强大的高性能的代码生成包,它可以在运行期扩展Java类与实现Java接口。它广泛的被许多AOP的框架使用,例如Spring AOP和dynaop,为他们提供方法的interception(拦截)。
编写cglib代理
接下来我们就讲讲怎么写cglib代理:
- 需要引入cglib – jar文件, 但是spring的核心包中已经包括了cglib功能,所以直接引入spring-core-3.2.5.jar即可。
- 引入功能包后,就可以在内存中动态构建子类
- 代理的类不能为final,否则报错【在内存中构建子类来做扩展,当然不能为final,有final就不能继承了】
- 目标对象的方法如果为final/static, 那么就不会被拦截,即不会执行目标对象额外的业务方法。
//需要实现MethodInterceptor接口
public class ProxyFactory implements MethodInterceptor{

    // 维护目标对象
    private Object target;
    public ProxyFactory(Object target){
        this.target = target;
    }

    // 给目标对象创建代理对象
    public Object getProxyInstance(){
        //1. 工具类
        Enhancer en = new Enhancer();
        //2. 设置父类
        en.setSuperclass(target.getClass());
        //3. 设置回调函数
        en.setCallback(this);
        //4. 创建子类(代理对象)
        return en.create();
    }


    @Override
    public Object intercept(Object obj, Method method, Object[] args,
            MethodProxy proxy) throws Throwable {

        System.out.println("开始事务.....");

        // 执行目标对象的方法
        Object returnValue = method.invoke(target, args);

        System.out.println("提交事务.....");

        return returnValue;
    }

}
- 测试:
public class App {

    public static void main(String[] args) {

        UserDao userDao = new UserDao();

        UserDao factory = (UserDao) new ProxyFactory(userDao).getProxyInstance();

        factory.save();
    }
}
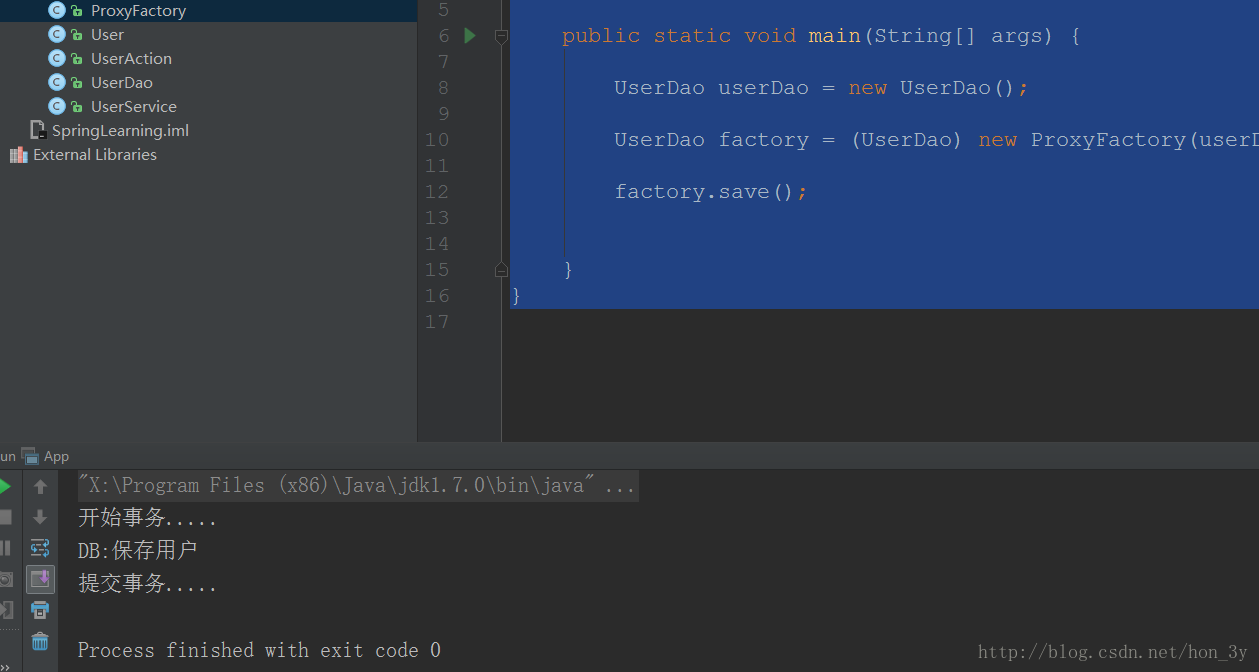
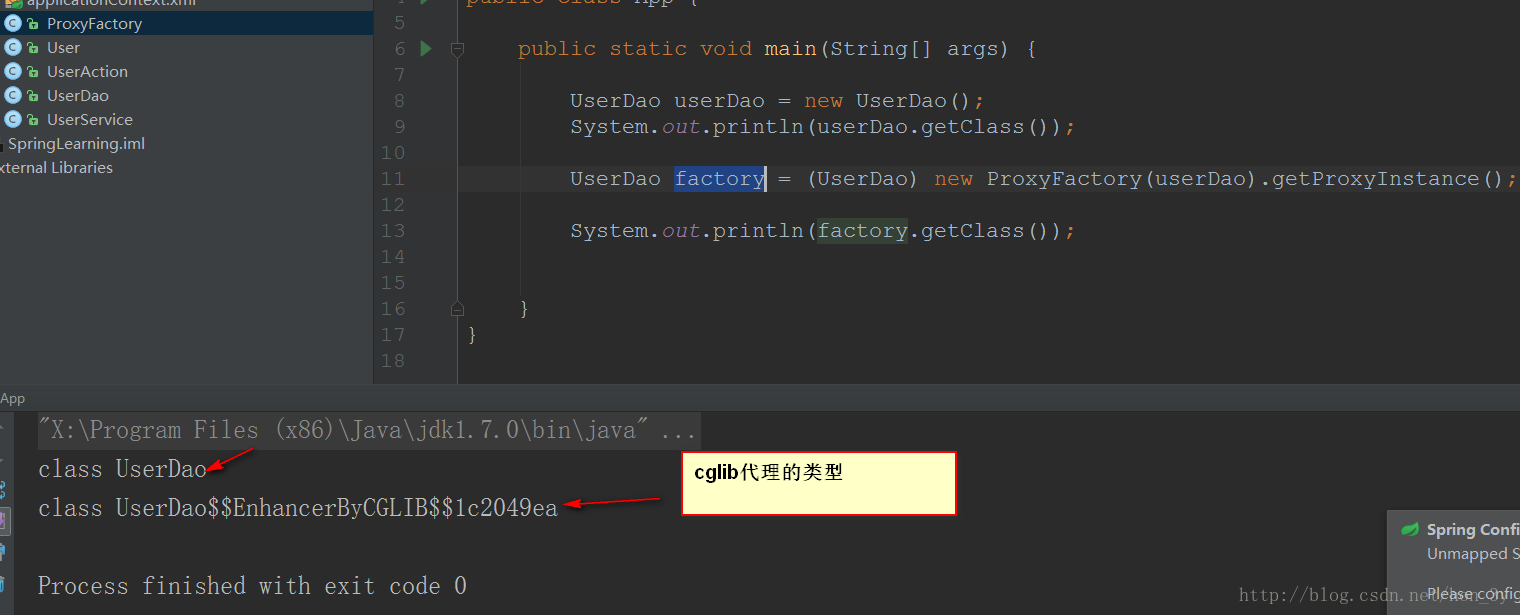
使用cglib就是为了弥补动态代理的不足【动态代理的目标对象一定要实现接口】
手动实现AOP编程
AOP 面向切面的编程:
- AOP可以实现“业务代码”与“关注点代码”分离
下面我们来看一段代码:
// 保存一个用户
public void add(User user) {
        Session session = null;
        Transaction trans = null;
        try {
            session = HibernateSessionFactoryUtils.getSession();   // 【关注点代码】
            trans = session.beginTransaction();    // 【关注点代码】

            session.save(user);     // 核心业务代码

            trans.commit();     //…【关注点代码】

        } catch (Exception e) {
            e.printStackTrace();
            if(trans != null){
                trans.rollback();   //..【关注点代码】

            }
        } finally{
            HibernateSessionFactoryUtils.closeSession(session);   ..【关注点代码】

        }
} - 关注点代码,就是指重复执行的代码。
- 业务代码与关注点代码分离,好处?
- 关注点代码写一次即可;
- 开发者只需要关注核心业务;
- 运行时期,执行核心业务代码时候动态植入关注点代码; 【代理】
案例分析:
- IUser接口
public interface IUser {

    void save();
}
我们一步一步来分析,首先我们的UserDao有一个save()方法,每次都要开启事务和关闭事务
//@Component  -->任何地方都能用这个
@Repository  //-->这个在Dao层中使用
    public class UserDao {

    public void save() {

        System.out.println("开始事务");
        System.out.println("DB:保存用户");
        System.out.println("关闭事务");

    }


}- 在刚学习java基础的时候,我们知道:如果某些功能经常需要用到就封装成方法:
//@Component  -->任何地方都能用这个
@Repository  //-->这个在Dao层中使用
    public class UserDao {

    public void save() {

        begin();
        System.out.println("DB:保存用户");
        close();

    }

    public void begin() {
        System.out.println("开始事务");
    }
    public void close() {
        System.out.println("关闭事务");
    }
}- 现在呢,我们可能有多个Dao,都需要有开启事务和关闭事务的功能,现在只有UserDao中有这两个方法,重用性还是不够高。因此我们抽取出一个类出来
public class AOP {

    public void begin() {
        System.out.println("开始事务");
    }
    public void close() {
        System.out.println("关闭事务");
    }
}
- 在UserDao维护这个变量,要用的时候,调用方法就行了。
@Repository  //-->这个在Dao层中使用
public class UserDao {


    AOP aop;

    public void save() {

        aop.begin();
        System.out.println("DB:保存用户");
        aop.close();

    }

}
- 现在的开启事务、关闭事务还是需要我在userDao中手动调用。还是不够优雅。。我想要的效果:当我在调用userDao的save()方法时,动态地开启事务、关闭事务。因此,我们就用到了代理。当然了,真正执行方法的都是userDao、要干事的是AOP,因此在代理中需要维护他们的引用。
public class ProxyFactory {
    //维护目标对象
    private static Object target;

    //维护关键点代码的类
    private static AOP aop;
    public static Object getProxyInstance(Object target_, AOP aop_) {

        //目标对象和关键点代码的类都是通过外界传递进来
        target = target_;
        aop = aop_;

        return Proxy.newProxyInstance(
                target.getClass().getClassLoader(),
                target.getClass().getInterfaces(),
                new InvocationHandler() {
                    @Override
                    public Object invoke(Object proxy, Method method, Object[] args) throws Throwable {

                        aop.begin();
                        Object returnValue = method.invoke(target, args);
                        aop.close();

                        return returnValue;
                    }
                }
        );
    }
}
工厂静态方法:
- 把AOP加入IOC容器中
//把该对象加入到容器中
@Component
public class AOP {

    public void begin() {
        System.out.println("开始事务");
    }
    public void close() {
        System.out.println("关闭事务");
    }
}- 把UserDao放入容器中
@Component
public class UserDao {

    public void save() {

        System.out.println("DB:保存用户");

    }

}- 在配置文件中开启注解扫描,使用工厂静态方法创建代理对象
<?xml version="1.0" encoding="UTF-8"?>
<beans xmlns="http://www.springframework.org/schema/beans"
xmlns:xsi="http://www.w3.org/2001/XMLSchema-instance"
xmlns:p="http://www.springframework.org/schema/p"
xmlns:context="http://www.springframework.org/schema/context"
xsi:schemaLocation="
http://www.springframework.org/schema/beans
http://www.springframework.org/schema/beans/spring-beans.xsd
http://www.springframework.org/schema/context
http://www.springframework.org/schema/context/spring-context.xsd">
<bean id="proxy" class="aa.ProxyFactory" factory-method="getProxyInstance">
<constructor-arg index="0" ref="userDao"/>
<constructor-arg index="1" ref="AOP"/>
</bean>
<context:component-scan base-package="aa"/>
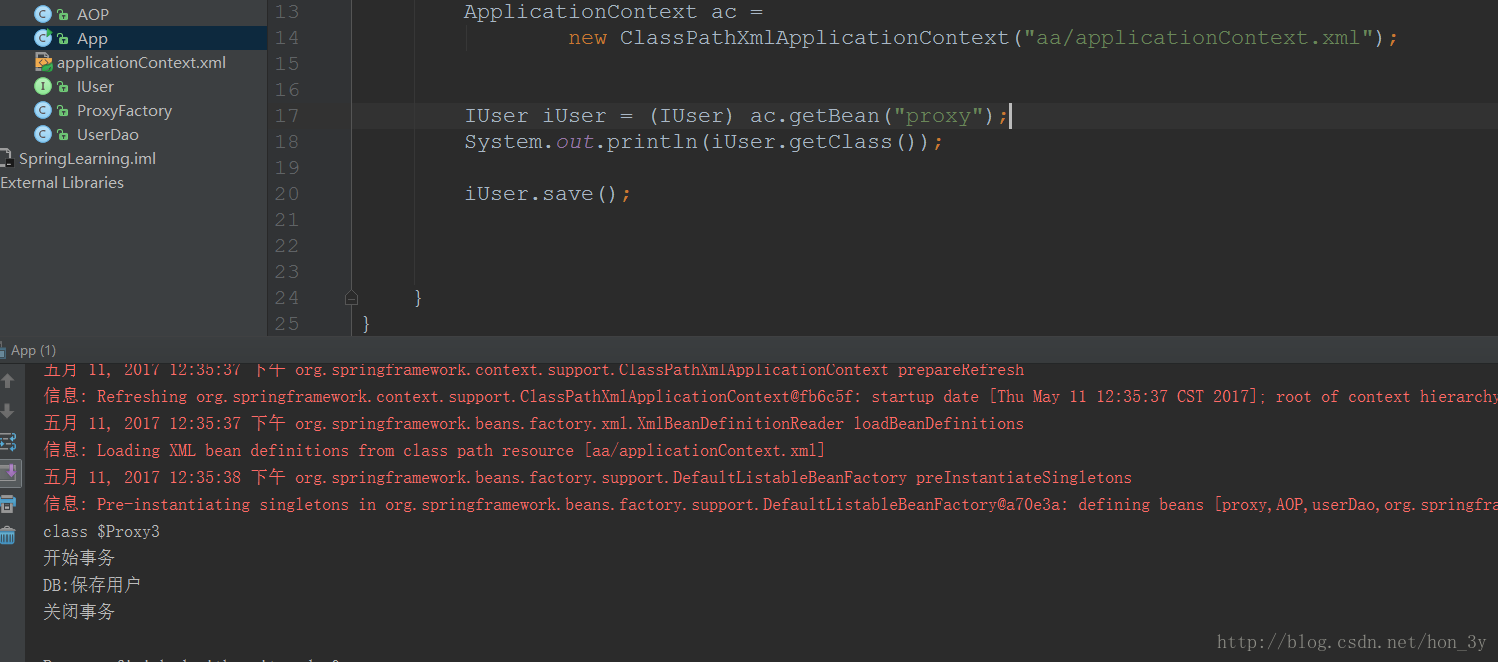
</beans>测试,得到UserDao对象,调用方法
public class App {

    public static void main(String[] args) {

        ApplicationContext ac =
                new ClassPathXmlApplicationContext("aa/applicationContext.xml");


        IUser iUser = (IUser) ac.getBean("proxy");

        iUser.save();


    }
}
工厂非静态方法
上面使用的是工厂静态方法来创建代理类对象。我们也使用一下非静态的工厂方法创建对象。
package aa;

import java.lang.reflect.InvocationHandler;
import java.lang.reflect.Method;
import java.lang.reflect.Proxy;

/**
 * Created by ozc on 2017/5/11.
 */

public class ProxyFactory {

    public Object getProxyInstance(final Object target_, final AOP aop_) {

        //目标对象和关键点代码的类都是通过外界传递进来

        return Proxy.newProxyInstance(
                target_.getClass().getClassLoader(),
                target_.getClass().getInterfaces(),
                new InvocationHandler() {
                    @Override
                    public Object invoke(Object proxy, Method method, Object[] args) throws Throwable {

                        aop_.begin();
                        Object returnValue = method.invoke(target_, args);
                        aop_.close();

                        return returnValue;
                    }
                }
        );
    }
}
配置文件:先创建工厂,再创建代理类对象
<?xml version="1.0" encoding="UTF-8"?>
<beans xmlns="http://www.springframework.org/schema/beans"
       xmlns:xsi="http://www.w3.org/2001/XMLSchema-instance"
       xmlns:p="http://www.springframework.org/schema/p"
       xmlns:context="http://www.springframework.org/schema/context"
       xsi:schemaLocation="
        http://www.springframework.org/schema/beans
        http://www.springframework.org/schema/beans/spring-beans.xsd
        http://www.springframework.org/schema/context
        http://www.springframework.org/schema/context/spring-context.xsd">


    <!--创建工厂-->
    <bean id="factory" class="aa.ProxyFactory"/>


    <!--通过工厂创建代理-->
    <bean id="IUser" class="aa.IUser" factory-bean="factory" factory-method="getProxyInstance">
        <constructor-arg index="0" ref="userDao"/>
        <constructor-arg index="1" ref="AOP"/>
    </bean>


    <context:component-scan base-package="aa"/>


</beans>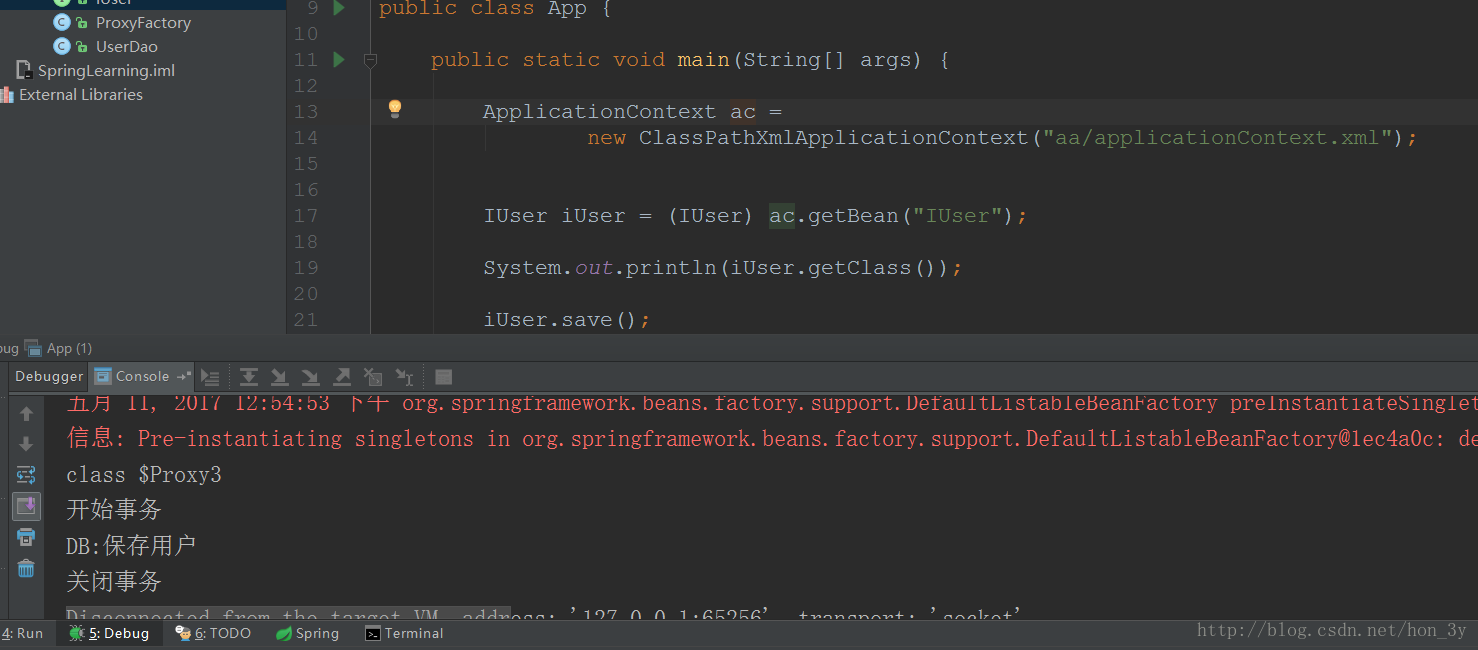


 322
322


 被折叠的 条评论
为什么被折叠?
被折叠的 条评论
为什么被折叠?
 到【灌水乐园】发言


