


一、quartz简介
Quartz是OpenSymphony开源组织在Job scheduling领域又一个开源项目,它可以与J2EE与J2SE应用程序相结合(Spring集成Quartz的介绍)也可以单独使用。Quartz可以用来创建简单或为运行十个,百个,甚至是好几万个Jobs这样复杂的程序。Jobs可以做成标准的Java组件或 EJBs。Quartz的最新版本为Quartz 2.2.3。
二、quartz的单独使用
/**
 * <p>
 * This is just a simple job that says "Hello" to the world.
 * </p>
 *
 */
public class HelloJob implements Job {

    private static Logger _log = LoggerFactory.getLogger(HelloJob.class);

    /**
     * <p>
     * Empty constructor for job initilization
     * </p>
     * <p>
     * Quartz requires a public empty constructor so that the
     * scheduler can instantiate the class whenever it needs.
     * </p>
     */
    public HelloJob() {
    }

    /**
     * <p>
     * Called by the <code>{@link org.quartz.Scheduler}</code> when a
     * <code>{@link org.quartz.Trigger}</code> fires that is associated with
     * the <code>Job</code>.
     * </p>
     *
     * @throws JobExecutionException
     *             if there is an exception while executing the job.
     */
    public void execute(JobExecutionContext context)
        throws JobExecutionException {

        // Say Hello to the World and display the date/time
        _log.info("Hello World! - " + new Date());
    }

}/**
* This Example will demonstrate how to start and shutdown the Quartz scheduler and how
*to schedule a job to run in
* Quartz.
*
*/
public class SimpleExample {
public void run() throws Exception {
Logger log = LoggerFactory.getLogger(SimpleExample.class);
//1.获取scheduler对象,用quartz默认的
SchedulerFactory sf = new StdSchedulerFactory();
Scheduler sched = sf.getScheduler();
// 计算下一分钟的时间
Date runTime = evenMinuteDate(new Date());
// 2.定义一个作业job,指明job的名称,所在组的名称,以及绑定job类
JobDetail job = newJob(HelloJob.class).withIdentity("job1", "group1").build();
// 3.定义一个触发该job的触发器,设置触发规则
Trigger trigger = newTrigger().withIdentity("trigger1", "group1").startAt(runTime).build();
// 4.将job和trigger设置到调度器中
sched.scheduleJob(job, trigger);
// 5.启动调度
sched.start();
// wait long enough so that the scheduler as an opportunity to
// run the job!
try {
// wait 65 seconds to show job
Thread.sleep(65L * 1000L);
// executing...
} catch (Exception e) {
//
}
// 6.停止调度
sched.shutdown(true);
}
public static void main(String[] args) throws Exception {
SimpleExample example = new SimpleExample();
example.run();
}
}Scheduler可以将Trigger绑定到某一JobDetail中, 这样当Trigger触发时, 对应的Job就被执行。一个Job可以对应多个Trigger, 但一个Trigger只能对应一个Job。可以通过SchedulerFactory创建一个Scheduler实例。Scheduler拥有一个SchedulerContext,它类似于ServletContext,保存着Scheduler上下文信息,Job和Trigger都可以访问SchedulerContext内的信息。SchedulerContext内部通过一个Map,以键值对的方式维护这些上下文数据,SchedulerContext为保存和获取数据提供了多个put()和getXxx()的方法。可以通过Scheduler# getContext()获取对应的SchedulerContext实例;
1.1getScheduler方法
public Scheduler getScheduler() throws SchedulerException {
        if (cfg == null) {
	    //初始化加载配置信息
            initialize();
        }
	//判断缓存中有没有创建过的Scheduler
        SchedulerRepository schedRep = SchedulerRepository.getInstance();

        Scheduler sched = schedRep.lookup(getSchedulerName());

        if (sched != null) {
            if (sched.isShutdown()) {
                schedRep.remove(getSchedulerName());
            } else {
                return sched;
            }
        }
	//创建Scheduler 。。。。。
        sched = instantiate();

        return sched;
    }
1.2接着看创建instantiate()方法
方法很长,主要是进行所用到信息的创建,比如JobStore,ThreadPool,QuartzScheduler,ThreadExecutor等,主要看下ThreadPool和QuartzScheduler的创建
private Scheduler instantiate() throws SchedulerException {
	......
       	// Get ThreadPool Properties 默认采用的是SimpleThreadPool
        String tpClass = cfg.getStringProperty(PROP_THREAD_POOL_CLASS, SimpleThreadPool.class.getName());

        if (tpClass == null) {
            initException = new SchedulerException(
                    "ThreadPool class not specified. ");
            throw initException;
        }

        try {
            tp = (ThreadPool) loadHelper.loadClass(tpClass).newInstance();
        } catch (Exception e) {
            initException = new SchedulerException("ThreadPool class '"
                    + tpClass + "' could not be instantiated.", e);
            throw initException;
        }
	 ......
    //这里就是创建Quartz内部调度器和Quartz主线程的地方。主线程会在QuartzScheduler的构造函数中创
    //建并启动
    qs = new QuartzScheduler(rsrcs, idleWaitTime, dbFailureRetry);

     // Create Scheduler ref...
     Scheduler scheduler = instantiate(rsrcs, qs);
	 ......
}
1.3线程池创建
    存放池中所有的线程引用
private List<WorkerThread> workers;
//存放空闲线程
private LinkedList<WorkerThread> availWorkers = new LinkedList<WorkerThread>();
//存放工作线程
private LinkedList<WorkerThread> busyWorkers = new LinkedList<WorkerThread>();
public void initialize() throws SchedulerConfigException {

        if(workers != null && workers.size() > 0) // already initialized...
            return;

        if (count <= 0) {
            throw new SchedulerConfigException(
                    "Thread count must be > 0");
        }
        if (prio <= 0 || prio > 9) {
            throw new SchedulerConfigException(
                    "Thread priority must be > 0 and <= 9");
        }

        if(isThreadsInheritGroupOfInitializingThread()) {
            threadGroup = Thread.currentThread().getThreadGroup();
        } else {
            // follow the threadGroup tree to the root thread group.
            threadGroup = Thread.currentThread().getThreadGroup();
            ThreadGroup parent = threadGroup;
            while ( !parent.getName().equals("main") ) {
                threadGroup = parent;
                parent = threadGroup.getParent();
            }
            threadGroup = new ThreadGroup(parent, schedulerInstanceName + "-SimpleThreadPool");
            if (isMakeThreadsDaemons()) {
                threadGroup.setDaemon(true);
            }
        }


        if (isThreadsInheritContextClassLoaderOfInitializingThread()) {
            getLog().info(
                    "Job execution threads will use class loader of thread: "
                            + Thread.currentThread().getName());
        }

        // create the worker threads and start them
	    //createWorkerThreads方法中会根据配置的池大小创建线程实例。并启动池中每一个线程
	    //这里启动的线程就是上面说到的等待Runnable(JobRunShell)的线程。
        Iterator<WorkerThread> workerThreads = createWorkerThreads(count).iterator();
        while(workerThreads.hasNext()) {
            WorkerThread wt = workerThreads.next();
            wt.start();
            availWorkers.add(wt);
        }
    }
来看createWorkerThreads(),创建workerThread线程,并放到workers中
protected List<WorkerThread> createWorkerThreads(int createCount) {
        workers = new LinkedList<WorkerThread>();
        for (int i = 1; i<= createCount; ++i) {
            String threadPrefix = getThreadNamePrefix();
            if (threadPrefix == null) {
                threadPrefix = schedulerInstanceName + "_Worker";
            }
            WorkerThread wt = new WorkerThread(this, threadGroup,
                threadPrefix + "-" + i,
                getThreadPriority(),
                isMakeThreadsDaemons());
            if (isThreadsInheritContextClassLoaderOfInitializingThread()) {
                wt.setContextClassLoader(Thread.currentThread()
                        .getContextClassLoader());
            }
            workers.add(wt);
        }

        return workers;
    }
wt.start();
availWorkers.add(wt);
接着启动线程并将其添加到空闲线程中。看其run方法
public void run() {
            boolean ran = false;
            //run为AtomicBoolean保证原子性操作,内部是采用 (volatile关键字)private volatile int value;
            while (run.get()) {
                try {
                    synchronized(lock) {
                        // Runnable为空(外界还没有给JobRunShell)的时候,这个线程无限等待
                        while (runnable == null && run.get()) {
                            lock.wait(500);
                        }

                        if (runnable != null) {
                            ran = true;
                            // 这里就是JobRunShell的run方法,也就是作业最终被调用的地方。
                            runnable.run();
                        }
                    }
                } catch (InterruptedException unblock) {
                    // do nothing (loop will terminate if shutdown() was called
                    try {
                        getLog().error("Worker thread was interrupt()'ed.", unblock);
                    } catch(Exception e) {
                        // ignore to help with a tomcat glitch
                    }
                } catch (Throwable exceptionInRunnable) {
                    try {
                        getLog().error("Error while executing the Runnable: ",
                            exceptionInRunnable);
                    } catch(Exception e) {
                        // ignore to help with a tomcat glitch
                    }
                } finally {
                    synchronized(lock) {
                        runnable = null;
                    }
                    // repair the thread in case the runnable mucked it up...
                    if(getPriority() != tp.getThreadPriority()) {
                        setPriority(tp.getThreadPriority());
                    }

                    if (runOnce) {
                           run.set(false);
                        // 如果只执行一次则执行完成后该对象不放入空闲线程队列中
                        clearFromBusyWorkersList(this);
                    } else if(ran) {
                        ran = false;
                        // 将该对象从工作线程队列中删除,并且放入空闲队列中。这个方法实际上就是线程的回收
                        makeAvailable(this);
                    }

                }
            }

            //if (log.isDebugEnabled())
            try {
                getLog().debug("WorkerThread is shut down.");
            } catch(Exception e) {
                // ignore to help with a tomcat glitch
            }
        }
1.4QuartzScheduler
线程池的代码大概就是这样,下面跟踪QuartzScheduler的构造函数。这个类会创建Quartz的主线程。
public QuartzScheduler(QuartzSchedulerResources resources, long idleWaitTime, @Deprecated long dbRetryInterval)
        throws SchedulerException {
        ......
        this.schedThread = new QuartzSchedulerThread(this, resources);
        ThreadExecutor schedThreadExecutor = resources.getThreadExecutor();
        schedThreadExecutor.execute(this.schedThread);    //默认用的是DefaultThreadExecutor
}
QuartzSchedulerThread构造函数,发现一开始paused被置为true,run方法已知在等在,直到scheduler.start()方法执行,而后run方法一直处于循环状态,取出待执行的任务执行
QuartzSchedulerThread(QuartzScheduler qs, QuartzSchedulerResources qsRsrcs, boolean setDaemon, int threadPrio) {
        super(qs.getSchedulerThreadGroup(), qsRsrcs.getThreadName());
        this.qs = qs;
        this.qsRsrcs = qsRsrcs;
        this.setDaemon(setDaemon);
        if(qsRsrcs.isThreadsInheritInitializersClassLoadContext()) {
            log.info("QuartzSchedulerThread Inheriting ContextClassLoader of thread: " + Thread.currentThread().getName());
            this.setContextClassLoader(Thread.currentThread().getContextClassLoader());
        }

        this.setPriority(threadPrio);

        // start the underlying thread, but put this object into the 'paused'
        // state
        // so processing doesn't start yet...    线程已知在等待
        paused = true;
        halted = new AtomicBoolean(false);
    }
QuartzSchedulerThread创建完成后,线程执行方法执行,看其run方法。
public void run() {

while (!halted.get()) {

try {

synchronized (sigLock) {

// paused 就是等待外界的信号量,

// 需要信号量pausedc=false才能开始工作 QuartzScheduler.start()方法中会设置pausedc=false
 while (paused && !halted.get()) {
 try {
 // wait until togglePause(false) is called...
 sigLock.wait(1000L);
 } catch (InterruptedException ignore) {
 }
 }

 if (halted.get()) {
 break;
 }

// 当线程池中有空闲线程时才执行(这里也不是严格的,如果配置的没有空闲线程则创建一个新的)

int availTreadCount = qsRsrcs.getThreadPool().blockForAvailableThreads();

if(availTreadCount > 0) {
......
// 这里会找到下一个要触发的线程。具体的方法在下面会分析。

trigger = qsRsrcs.getJobStore().acquireNextTrigger(ctxt, now + idleWaitTime);

//等待线程到trigger的真正触发时间。。。

// 创建JobRunShell,要执行的作业就在这里面

JobRunShell shell = null;

try {
 shell = qsRsrcs.getJobRunShellFactory().createJobRunShell(bndle);
 shell.initialize(qs, bndle);
 } catch (SchedulerException se) {。。。}

// 这里就是将JobRunShell交给线程池的地方

if (qsRsrcs.getThreadPool().runInThread(shell) == false) {。。。}

......
}
看其线程池中的runInThread方法,就可以明了线程池的使用了
public boolean runInThread(Runnable runnable) {
        if (runnable == null) {
            return false;
        }

        synchronized (nextRunnableLock) {

            handoffPending = true;

            // Wait until a worker thread is available
            while ((availWorkers.size() < 1) && !isShutdown) {
                try {
                    nextRunnableLock.wait(500);
                } catch (InterruptedException ignore) {
                }
            }

            if (!isShutdown) {
                WorkerThread wt = (WorkerThread)availWorkers.removeFirst();
                busyWorkers.add(wt);
                wt.run(runnable);
            } else {
                // If the thread pool is going down, execute the Runnable
                // within a new additional worker thread (no thread from the pool).
                WorkerThread wt = new WorkerThread(this, threadGroup,
                        "WorkerThread-LastJob", prio, isMakeThreadsDaemons(), runnable);
                busyWorkers.add(wt);
                workers.add(wt);
                wt.start();
            }
            nextRunnableLock.notifyAll();
            handoffPending = false;
        }

        return true;
    }
跟踪JobStore的acquireNextTrigger方法(这里是RAMJobStore)
// 实际上RAMJobStore持有一个TreeSet<Trigger> timeTriggers,排序方式是按触发时间排的。触发时间越早的排在前面。

// 所以这里只要取timeTriggers的first并验证就可以了。

public Trigger acquireNextTrigger(SchedulingContext ctxt, long noLaterThan) {
 TriggerWrapper tw = null;

synchronized (lock) {

while (tw == null) {
 try {
 tw = (TriggerWrapper) timeTriggers.first();
 } catch (java.util.NoSuchElementException nsee) {
 return null;
 }

if (tw == null) {
 return null;
 }

if (tw.trigger.getNextFireTime() == null) {
 timeTriggers.remove(tw);
 tw = null;
 continue;
 }

timeTriggers.remove(tw);

if (applyMisfire(tw)) {
 if (tw.trigger.getNextFireTime() != null) {
 timeTriggers.add(tw);
 }
 tw = null;
 continue;
 }

if(tw.trigger.getNextFireTime().getTime() > noLaterThan) {
 timeTriggers.add(tw);
 return null;
 }

tw.state = TriggerWrapper.STATE_ACQUIRED;

tw.trigger.setFireInstanceId(getFiredTriggerRecordId());
 Trigger trig = (Trigger) tw.trigger.clone();
 return trig;
 }
 }

return null;
 }
设置job和trigger不看,看5,启动调度
public void start() throws SchedulerException {

if (shuttingDown|| closed) {
 throw new SchedulerException(
 "The Scheduler cannot be restarted after shutdown() has been called.");
 }

if (initialStart == null) {
 initialStart = new Date();
 this.resources.getJobStore().schedulerStarted();
 startPlugins();
 }

// 这里就是将主线程的pause信号量置为false的地方

schedThread.togglePause(false);

getLog().info(
 "Scheduler " + resources.getUniqueIdentifier() + " started.");

 notifySchedulerListenersStarted();
 }
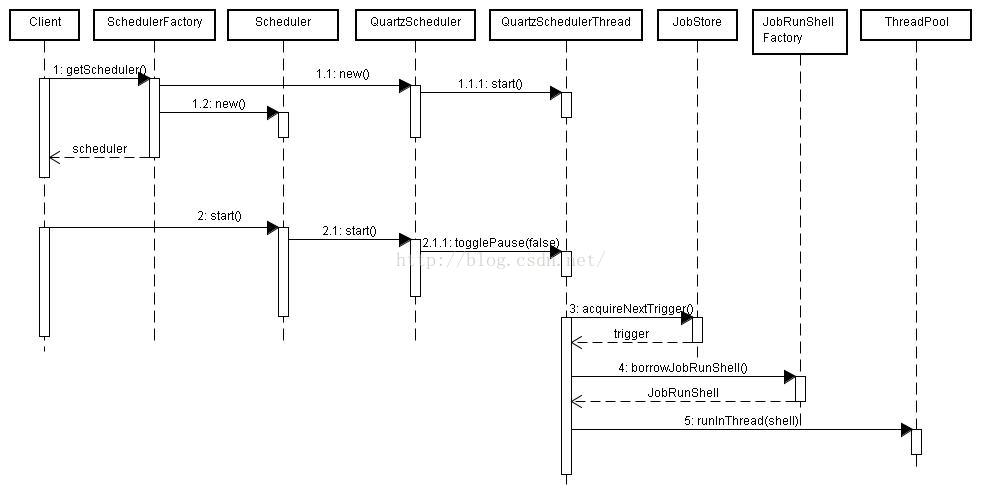
总结:起初创建并初始化Quartz线程池(TreadPool),并启动它。刚启动时线程池中每个线程都处于等待状态,等待外界给他分配Runnable(持有作业对象的线程)。然后会初始化并启动Quartz的主线程(QuartzSchedulerThread),该线程自启动后就会等待外界的信号量开始工作。外界给出工作信号量之后,该主线程的run方法才实质上开始工作。run方法会一直处于循环状态,run中会获取JobStore中下一次要触发的作业,拿到之后会一直等待到该作业的真正触发时间,然后将该作业包装成一个JobRunShell对象(该对象实现了Runnable接口,其实看是上面TreadPool中等待外界分配给他的Runnable),然后将刚创建的JobRunShell交给线程池,由线程池负责执行作业。线程池收到Runnable后,从线程池一个线程启动Runnable,然后将该线程回收至空闲线程中。JobRunShell对象的run方法就是最终通过反射调用作业的地方。
Quartz是运用最广的任务调度框架,它最核心的组成部分是Scheduler、Trigger、JobDetail,然后给Scheduler配置个线程QuartzSchedulerThread,此线程在Scheduler初始化时启动,等待Scheduler start,然后从JobStore里拿到最近要触发的Trigger,以线程等待的方式等到trigger触发时间点,之后就是执行trigger所关联的JobDetail,最后清扫战场。Scheduler初始化、start和trigger执行的时序图如下所示:
public void afterPropertiesSet() throws Exception {

/**

* schedulerFactoryClass默认是StdSchedulerFactory,initSchedulerFactory方法没有仔细看,应该是读取配置信息

*/

SchedulerFactory schedulerFactory = (SchedulerFactory)BeanUtils.instantiateClass(this.schedulerFactoryClass);

initSchedulerFactory(schedulerFactory);

。。。

// 所有的工作都是在createScheduler方法中做的:创建线程池、创建并启动主线程。

// 但这里创建的主线程并没有实质上的开始工作,他要等待外界的信号量

try {
 this.scheduler = createScheduler(schedulerFactory, this.schedulerName);
 populateSchedulerContext();
 }

。。。

// registerListeners注册监听器,这个方法没有仔细看过

// registerJobsAndTriggers方法就是读取配置的作业和他们的触发器的地方

registerListeners();
 registerJobsAndTriggers();

}

跟踪createScheduler方法(这里返回的Scheduler对象就是最终要返回的Scheduler任务调度者):

protected Scheduler createScheduler(SchedulerFactory schedulerFactory, String schedulerName)
 throws SchedulerException {

。。。

// 这里创建的是StdScheduler,调用方法的自然也是StdSchedulerFactory

Scheduler newScheduler = schedulerFactory.getScheduler();

。。。

}


 1502
1502


 被折叠的 条评论
为什么被折叠?
被折叠的 条评论
为什么被折叠?
 到【灌水乐园】发言


