


接上级要求论坛需要记录用户的源端口信息,现将实现该功能的方法贴上来以供参考。先说明一下我测试的环境是Disciz X3
一、简单的插件安装法
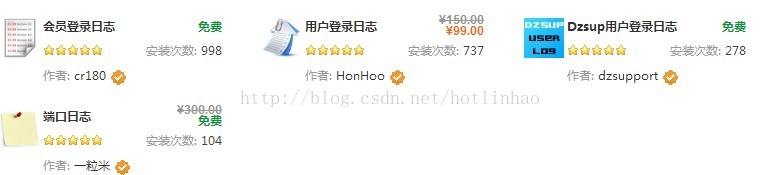
进论坛管理后台依次点击“应用” 应用中心,在应用中心中搜索日志,本人安装的是 dzsup用户登录日志(该日志仅记录用户登录的信息,上级安装发贴也要有记录)。
还有一个是“端口日志” 该插件只记录发贴的IP和端口(上级要求记录用户登录的源端口)所以这两个都安装就可以了。
二、有权限的用户可以修改数据库、程序、以及模板来自己设置。
因为目前这两个插件还是免费的,但如果收费的话我们就要另想办法、要不就出钱购买。
步骤如下:
1、修改数据库
a.增加会员状态表字段,端口IP端口、最后访问端口、类型CHAR 长度 6
ALTER TABLE  `pre_common_member_status` ADD  `regipport` CHAR( 6 ) NOT NULL DEFAULT  '0' AFTER  `lastip` ,
ADD  `lastipport` CHAR( 6 ) NOT NULL DEFAULT  '0' AFTER  `regipport`
b.增加帖子表字段、发贴时的端口
ALTER TABLE `pre_forum_post` ADD `useport` CHAR( 6 ) NOT NULL DEFAULT '0' AFTER `useip`2. 修改程序文件
2.1. 修改用户注册时的程序文件
source\class\tab\table_common_member.php 292行 搜索 'lastip' => (string) $Ip 下面增加两行
'regipport' => (int) $_SERVER['REMOTE_PORT'],
'lastipport' => (int) $_SERVER['REMOTE_PORT'],
2.2 source\class\class_member.php 121行
搜索:C::t('common_member_status')->update($_G['uid'], array('lastip' => $_G['clientip'], 'lastvisit' =>TIMESTAMP, 'lastactivity' => TIMESTAMP));
改为:
C::t('common_member_status')->update($_G['uid'], array('lastip' => $_G['clientip'],'lastipport'=>$_SERVER['REMOTE_PORT'], 'lastvisit' =>TIMESTAMP, 'lastactivity' => TIMESTAMP));$this->pid = insertpost(array(
'fid' => $this->forum['fid'],
'tid' => $this->thread['tid'],
'first' => '0',
'author' => $this->member['username'],
'authorid' => $this->member['uid'],
'subject' => $this->param['subject'],
'dateline' => $this->param['timestamp'] ? $this->param['timestamp'] : getglobal('timestamp'),
'message' => $this->param['message'],
'useip' => $this->param['clientip'] ? $this->param['clientip'] : getglobal('clientip'),
'invisible' => $pinvisible,
'anonymous' => $this->param['isanonymous'],
'usesig' => $usesig,
'htmlon' => $htmlon,
'bbcodeoff' => $bbcodeoff,
'smileyoff' => $smileyoff,
'parseurloff' => $parseurloff,
'attachment' => '0',
'status' => $status,
'useport' => (int) $_SERVER['REMOTE_PORT'], //Dusion 2013/6/25增加
));2.4 source\class\model\model_forum_thread.php 同2.3 202行
$this->pid = insertpost(array(
			'fid' => $this->forum['fid'],
			'tid' => $this->tid,
			'first' => '1',
			'author' => $this->member['username'],
			'authorid' => $this->member['uid'],
			'subject' => $this->param['subject'],
			'dateline' => $this->param['publishdate'],
			'message' => $this->param['message'],
			'useip' => $this->param['clientip'] ? $this->param['clientip'] : getglobal('clientip'),
			'invisible' => $this->param['pinvisible'],
			'anonymous' => $this->param['isanonymous'],
			'usesig' => $this->param['usesig'],
			'htmlon' => $this->param['htmlon'],
			'bbcodeoff' => $this->param['bbcodeoff'],
			'smileyoff' => $this->param['smileyoff'],
			'parseurloff' => $this->param['parseurloff'],
			'attachment' => '0',
			'tags' => $this->param['tagstr'],
			'replycredit' => 0,
			'status' => $this->param['pstatus'],
			'useport' =>  (int) $_SERVER['REMOTE_PORT'], //Dusion 2013/6/25增加
		));
到此,程序部分就改完了。暂时还看不到效果。
3 修改模板文件
3.1 template\default\home\space_profile_body.htm 154 行
</em>$space[regip] 后面增加:<!--{if $space[regipport] != 0}-->$space[regipport]<!--{/if}-->
 </em>$space[lastip] 后面增加:<!--{if $space[lastipport] != 0}-->$space[lastipport]<!--{/if}-->
3.2 template\default\forum\topicadmin_getip.htm 在<b>$member[useip] 后面增加:
<!--{if $member[useport] != 0}-->$member[useport]<!--{/if}-->至此所有工作都完成了。下面上一些测试的结果图片。
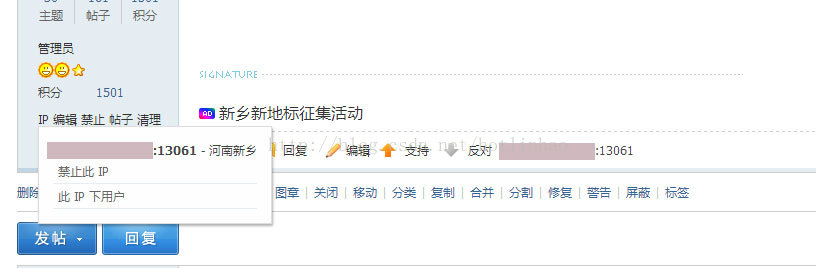
如果是管理员的话在用户名下方的IP上点右键可以看到IP以及端口,该处的内容是通过 修改程序来实现的。
帖子下方的IP和端口(盖着IP的地方)是通过插件来实现的。

该图是管理员查看用户的详细资料时看到的信息 IP后跟着的就是端口号。

该图是通过后台安装的插件用户登录日志1.0.1来看到的效果
希望对有用的人有帮助!!目前端口日志1.1是临时免费时间,应该还有一个多月如果要安装的话就抓紧了!!如果你是一个phper也可 以自己修改程序来实现。


 1496
1496


 被折叠的 条评论
为什么被折叠?
被折叠的 条评论
为什么被折叠?
 到【灌水乐园】发言


