


转载自http://www.acyouzi.com/2017/06/15/azkaban/
简介
因为 azkaban 功能比较简单,所以在实际使用中存在一些需求用对 azkaban 进行定制,比如:
- 跨 Flow 依赖
- 在 job 执行失败时短信报警
- Flow 的 start node 可能需要检测满足一定条件再触发(时间,数据是否就绪)
- 可能需要设置 job 优先级,在集群资源紧张时,优先完成高优先级作业
因而需要对 azkaban 的源码有一定的了解,所以花费了几天时间,读了一下 azkaban 的源码,下面是做的笔记:
从 flow 提交开始
当我们提交一个 job 时,数据提交到:http://host/manager, 参数中带着一个 action 的值为 upload,根据这写能找到一坨 zip 上传相关的代码,当然这些都不是重点,重点是:ProjectManager#uploadProject 方法,在这个方法中完成了对 zip 包的解析、构建 flow、flow 保存到数据库。
ProjectManager#uploadProject 方法中有这样一行代码:
final Map<String, ValidationReport> reports = validatorManager.validate(project, file);
这个方法内部会调用经过层层调用,最终会调用 DirectoryFlowLoader#loadProjectFromDir 方法,此方法就是从 job 文件构建 flow 的方法:
public void loadProjectFlow(final Project project, final File baseDirectory) {
  this.propsList = new ArrayList<>();
  this.flowPropsList = new ArrayList<>();
  this.jobPropsMap = new HashMap<>();
  this.nodeMap = new HashMap<>();
  this.flowMap = new HashMap<>();
  this.errors = new HashSet<>();
  this.duplicateJobs = new HashSet<>();
  this.nodeDependencies = new HashMap<>();
  this.rootNodes = new HashSet<>();
  this.flowDependencies = new HashMap<>();

  // Load all the props files and create the Node objects
  loadProjectFromDir(baseDirectory.getPath(), baseDirectory, null);

  jobPropertiesCheck(project);

  // Create edges and find missing dependencies
  resolveDependencies();

  // Create the flows.
  buildFlowsFromDependencies();

  // Resolve embedded flows
  resolveEmbeddedFlows();
}
这里面的几个方法调用就是构建 flow 的几个步骤,job 加载,属性检查,依赖处理,构建 flow, 子流处理。
下面先来看 job 文件加载:
private void loadProjectFromDir(final String base, final File dir, Props parent) {
  final File[] propertyFiles = dir.listFiles(new SuffixFilter(PROPERTY_SUFFIX));
  Arrays.sort(propertyFiles);

  for (final File file : propertyFiles) {
    final String relative = getRelativeFilePath(base, file.getPath());
    try {
      parent = new Props(parent, file);
      parent.setSource(relative);

      final FlowProps flowProps = new FlowProps(parent);
      this.flowPropsList.add(flowProps);
    } catch (final IOException e) {
      this.errors.add("Error loading properties " + file.getName() + ":"
          + e.getMessage());
    }

    this.logger.info("Adding " + relative);
    this.propsList.add(parent);
  }

  // Load all Job files. If there's a duplicate name, then we don't load
  final File[] jobFiles = dir.listFiles(new SuffixFilter(JOB_SUFFIX));
  for (final File file : jobFiles) {
    final String jobName = getNameWithoutExtension(file);
    try {
      if (!this.duplicateJobs.contains(jobName)) {
        if (this.jobPropsMap.containsKey(jobName)) {
          this.errors.add("Duplicate job names found '" + jobName + "'.");
          this.duplicateJobs.add(jobName);
          this.jobPropsMap.remove(jobName);
          this.nodeMap.remove(jobName);
        } else {
          final Props prop = new Props(parent, file);
          final String relative = getRelativeFilePath(base, file.getPath());
          prop.setSource(relative);

          final Node node = new Node(jobName);
          final String type = prop.getString("type", null);
          if (type == null) {
            this.errors.add("Job doesn't have type set '" + jobName + "'.");
          }

          node.setType(type);

          node.setJobSource(relative);
          if (parent != null) {
            node.setPropsSource(parent.getSource());
          }

          // Force root node
          if (prop.getBoolean(CommonJobProperties.ROOT_NODE, false)) {
            this.rootNodes.add(jobName);
          }

          this.jobPropsMap.put(jobName, prop);
          this.nodeMap.put(jobName, node);
        }
      }
    } catch (final IOException e) {
      this.errors.add("Error loading job file " + file.getName() + ":"
          + e.getMessage());
    }
  }

  final File[] subDirs = dir.listFiles(DIR_FILTER);
  for (final File file : subDirs) {
    loadProjectFromDir(base, file, parent);
  }
}
逻辑很好理解,总结一下:
- 先读取 .properties,再读取 job
- 先读取父文件夹,再读取子文件夹
jobPropertiesCheck 是对一下配置的取值是否合法的检测
resolveDependencies 不仅会检查依赖是否存在还会创建依赖的边:
private void resolveDependencies() {
  // Add all the in edges and out edges. Catch bad dependencies and self
  // referrals. Also collect list of nodes who are parents.
  for (final Node node : this.nodeMap.values()) {
    final Props props = this.jobPropsMap.get(node.getId());

    if (props == null) {
      this.logger.error("Job props not found!! For some reason.");
      continue;
    }

    final List<String> dependencyList =
        props.getStringList(CommonJobProperties.DEPENDENCIES,
            (List<String>) null);

    if (dependencyList != null) {
      Map<String, Edge> dependencies = this.nodeDependencies.get(node.getId());
      if (dependencies == null) {
        dependencies = new HashMap<>();

        for (String dependencyName : dependencyList) {
          dependencyName =
              dependencyName == null ? null : dependencyName.trim();
          if (dependencyName == null || dependencyName.isEmpty()) {
            continue;
          }

          final Edge edge = new Edge(dependencyName, node.getId());
          final Node dependencyNode = this.nodeMap.get(dependencyName);
          if (dependencyNode == null) {
            if (this.duplicateJobs.contains(dependencyName)) {
              edge.setError("Ambiguous Dependency. Duplicates found.");
              dependencies.put(dependencyName, edge);
              this.errors.add(node.getId() + " has ambiguous dependency "
                  + dependencyName);
            } else {
              edge.setError("Dependency not found.");
              dependencies.put(dependencyName, edge);
              this.errors.add(node.getId() + " cannot find dependency "
                  + dependencyName);
            }
          } else if (dependencyNode == node) {
            // We have a self cycle
            edge.setError("Self cycle found.");
            dependencies.put(dependencyName, edge);
            this.errors.add(node.getId() + " has a self cycle");
          } else {
            dependencies.put(dependencyName, edge);
          }
        }

        if (!dependencies.isEmpty()) {
          this.nodeDependencies.put(node.getId(), dependencies);
        }
      }
    }
  }
}
总结一下:
- 解析每个 node 的 dependences 属性,检查依赖的 node 是否存在,是否只有一个
-
最后得到的数据结构如下:
Edge: (sourceNode,targetNode)
dependencies: [(sourceNode.name, Edge),...]
nodeDependencies:[(targetNode.name,dependencies),...]
然后是 buildFlowsFromDependencies :
private void buildFlowsFromDependencies() {
  // 根据上面提给出的数据结构来看这段代码
  final HashSet<String> nonRootNodes = new HashSet<>();
  for (final Map<String, Edge> edges : this.nodeDependencies.values()) {
    for (final String sourceId : edges.keySet()) {
      // 这里拿到的都是被依赖过的 node ,也就是逻辑上不可能是 rootnode 的节点
      // root node 指的是没有依赖的节点
      nonRootNodes.add(sourceId);
    }
  }

  // Now create flows. Bad flows are marked invalid
  final Set<String> visitedNodes = new HashSet<>();
  for (final Node base : this.nodeMap.values()) {
    // Root nodes can be discovered when parsing jobs
    // 找到 root 节点
    // root 节点是 prop 中配置指定的 node (CommonJobProperties.ROOT_NODE)
    // 或者不在 nonRootNodes 中的节点
    if (this.rootNodes.contains(base.getId())
        || !nonRootNodes.contains(base.getId())) {
      this.rootNodes.add(base.getId());
      final Flow flow = new Flow(base.getId());
      final Props jobProp = this.jobPropsMap.get(base.getId());

      // Dedup with sets
      final List<String> successEmailList =
          jobProp.getStringList(CommonJobProperties.SUCCESS_EMAILS,
              Collections.EMPTY_LIST);
      final Set<String> successEmail = new HashSet<>();
      for (final String email : successEmailList) {
        successEmail.add(email.toLowerCase());
      }

      final List<String> failureEmailList =
          jobProp.getStringList(CommonJobProperties.FAILURE_EMAILS,
              Collections.EMPTY_LIST);
      final Set<String> failureEmail = new HashSet<>();
      for (final String email : failureEmailList) {
        failureEmail.add(email.toLowerCase());
      }

      final List<String> notifyEmailList =
          jobProp.getStringList(CommonJobProperties.NOTIFY_EMAILS,
              Collections.EMPTY_LIST);
      for (String email : notifyEmailList) {
        email = email.toLowerCase();
        successEmail.add(email);
        failureEmail.add(email);
      }
      flow.addFailureEmails(failureEmail);
      flow.addSuccessEmails(successEmail);
      flow.addAllFlowProperties(this.flowPropsList);
      constructFlow(flow, base, visitedNodes);
      flow.initialize();
      this.flowMap.put(base.getId(), flow);
    }
  }
}
上面方法中比较重要的地方都已经注释过了,其中还调用了两个方法比较重要的方法,constructFlow,flow.initialize()
private void constructFlow(final Flow flow, final Node node, final Set<String> visited) {
  visited.add(node.getId());

  flow.addNode(node);
  if (SpecialJobTypes.EMBEDDED_FLOW_TYPE.equals(node.getType())) {
    final Props props = this.jobPropsMap.get(node.getId());
    final String embeddedFlow = props.get(SpecialJobTypes.FLOW_NAME);

    Set<String> embeddedFlows = this.flowDependencies.get(flow.getId());
    if (embeddedFlows == null) {
      embeddedFlows = new HashSet<>();
      this.flowDependencies.put(flow.getId(), embeddedFlows);
    }

    node.setEmbeddedFlowId(embeddedFlow);
    embeddedFlows.add(embeddedFlow);
  }
  final Map<String, Edge> dependencies = this.nodeDependencies.get(node.getId());

  if (dependencies != null) {
    for (Edge edge : dependencies.values()) {
      if (edge.hasError()) {
        flow.addEdge(edge);
      } else if (visited.contains(edge.getSourceId())) {
        // We have a cycle. We set it as an error edge
        edge = new Edge(edge.getSourceId(), node.getId());
        edge.setError("Cyclical dependencies found.");
        this.errors.add("Cyclical dependency found at " + edge.getId());
        flow.addEdge(edge);
      } else {
        // This should not be null
        flow.addEdge(edge);
        final Node sourceNode = this.nodeMap.get(edge.getSourceId());
        constructFlow(flow, sourceNode, visited);
      }
    }
  }

  visited.remove(node.getId());
}
在这个方法中先判断是不是 embedded Flow,如果是 embedded 类型则记录一下,后续会有处理,然后在正式处理逻辑中会对边环形边的情况做判断。然后就是递归的处理后续 node
public void initialize() {
  if (this.startNodes == null) {
    this.startNodes = new ArrayList<>();
    this.endNodes = new ArrayList<>();
    for (final Node node : this.nodes.values()) {
      // If it doesn't have any incoming edges, its a start node
      if (!this.inEdges.containsKey(node.getId())) {
        this.startNodes.add(node);
      }

      // If it doesn't contain any outgoing edges, its an end node.
      if (!this.outEdges.containsKey(node.getId())) {
        this.endNodes.add(node);
      }
    }

    for (final Node node : this.startNodes) {
      node.setLevel(0);
      this.numLevels = 0;
      recursiveSetLevels(node);
    }
  }
}
initialize 中初始化了几个比较重要的变量: startNodes(没有入度)、endNodes(没有出度)
再有一个 resolveEmbeddedFlows 的步骤整个流的解析就完成,解析完后流会被保存到 mysql 中。可以看一看从 mysql 中解析出来的流的格式:
{
  "metadata": {},
  "project.id": 2,
  "nodes": [
    {
      "layout": {
        "level": 1
      },
      "jobSource": "azkaban_jobs/test2.job",
      "expectedRuntime": 1,
      "id": "test2",
      "jobType": "command"
    },
    {
      "layout": {
        "level": 2
      },
      "jobSource": "azkaban_jobs/test3.job",
      "expectedRuntime": 1,
      "id": "test3",
      "jobType": "command"
    },
    {
      "layout": {
        "level": 1
      },
      "embeddedFlowId": "sub3",
      "jobSource": "azkaban_jobs/subflow.job",
      "expectedRuntime": 1,
      "id": "subflow",
      "jobType": "flow"
    },
    {
      "layout": {
        "level": 0
      },
      "jobSource": "azkaban_jobs/test1.job",
      "expectedRuntime": 1,
      "id": "test1",
      "jobType": "command"
    }
  ],
  "edges": [
    {
      "source": "test2",
      "target": "test3"
    },
    {
      "source": "test1",
      "target": "test2"
    },
    {
      "source": "subflow",
      "target": "test3"
    },
    {
      "source": "test1",
      "target": "subflow"
    }
  ],
  "failure.email": [],
  "success.email": [],
  "id": "test3",
  "type": "flow",
  "version": 3,
  "mailCreator": "default",
  "props": [],
  "layedout": false
}
Schedule
要触发 flow 的执行需要先添加调度,现在的 azkaban 调度现在是通过写 cron 表达式来配置,配置调度不是重点流程,就不具体分析了,可以看看一调度信息保存到数据库中的格式:
{
  "triggerCondition": {
    "nextCheckTime": "1497081600000",
    "expression": "BasicTimeChecker_1.eval()",
    "checkers": [
      {
        "checkerJson": {
          "nextCheckTime": "1497081600000",
          "cronExpression": "0 0 1 ? * *",
          "period": "null",
          "skipPastChecks": "true",
          "timezone": "America/Los_Angeles",
          "firstCheckTime": "1496996216550",
          "isRecurring": "true",
          "id": "BasicTimeChecker_1",
          "type": "BasicTimeChecker"
        },
        "type": "BasicTimeChecker"
      }
    ]
  },
  "resetOnTrigger": "true",
  "triggerId": "2",
  "source": "SimpleTimeTrigger",
  "resetOnExpire": "true",
  "expireActions": [],
  "submitTime": "1496996216550",
  "submitUser": "azkaban",
  "lastModifyTime": "1496996216556",
  "context": {},
  "actions": [
    {
      "actionJson": {
        "submitUser": "azkaban",
        "actionId": "executeFlowAction",
        "executionOptions": {
          "failureAction": "FINISH_CURRENTLY_RUNNING",
          "memoryCheck": true,
          "queueLevel": 0,
          "concurrentOption": "skip",
          "notifyOnFirstFailure": false,
          "notifyOnLastFailure": false,
          "successEmailsOverride": false,
          "failureEmails": [],
          "disabled": [],
          "flowParameters": {},
          "successEmails": [],
          "mailCreator": "default",
          "failureEmailsOverride": false
        },
        "type": "ExecuteFlowAction",
        "projectName": "test",
        "projectId": "2",
        "flowName": "test3"
      },
      "type": "ExecuteFlowAction"
    }
  ],
  "expireCondition": {
    "nextCheckTime": "2524608000000",
    "expression": "EndTimeChecker_1.eval()",
    "checkers": [
      {
        "checkerJson": {
          "nextCheckTime": "2524608000000",
          "period": "null",
          "skipPastChecks": "false",
          "timezone": "America/Los_Angeles",
          "firstCheckTime": "1496996216550",
          "isRecurring": "false",
          "id": "EndTimeChecker_1",
          "type": "BasicTimeChecker"
        },
        "type": "BasicTimeChecker"
      }
    ]
  },
  "status": "READY",
  "info": {}
}
调度检查是在 AzkabanWebServer 启动的时候单独启动了一个线程去检查,在 AzkabanWebServer.java 的 configureRoutes 方法中会调用 app.getTriggerManager().start()
public void start() throws TriggerManagerException {

  try {
    // expect loader to return valid triggers
    List<Trigger> triggers = triggerLoader.loadTriggers();
    for (Trigger t : triggers) {
      runnerThread.addTrigger(t);
      triggerIdMap.put(t.getTriggerId(), t);
    }
  } catch (Exception e) {
    logger.error(e);
    throw new TriggerManagerException(e);
  }

  runnerThread.start();
}
runnerThread 是 TriggerScannerThread 类的实例,在 run 方法会调用 TriggerScannerThread#checkAllTriggers 去检查是否满足触发条件:
private void checkAllTriggers() throws TriggerManagerException {
  // sweep through the rest of them
  for (Trigger t : triggers) {
    try {
      scannerStage = "Checking for trigger " + t.getTriggerId();

      if (t.getStatus().equals(TriggerStatus.READY)) {

        /**
         * Prior to this change, expiration condition should never be called though
         * we have some related code here. ExpireCondition used the same BasicTimeChecker
         * as triggerCondition do. As a consequence, we need to figure out a way to distinguish
         * the previous ExpireCondition and this commit's ExpireCondition.
         */
        if (t.getExpireCondition().getExpression().contains("EndTimeChecker") && t.expireConditionMet()) {
          onTriggerPause(t);
        } else if (t.triggerConditionMet()) {
          onTriggerTrigger(t);
        }
      }
      if (t.getStatus().equals(TriggerStatus.EXPIRED) && t.getSource().equals("azkaban")) {
        removeTrigger(t);
      } else {
        t.updateNextCheckTime();
      }
    } catch (Throwable th) {
      //skip this trigger, moving on to the next one
      logger.error("Failed to process trigger with id : " + t, th);
    }
  }
}
如果满足触发条件会走 onTriggerTrigger 方法,层层调用能见到这样一段代码:
if (isMultiExecutorMode()) {
  //Take MultiExecutor route
  executorLoader.addActiveExecutableReference(reference);
  queuedFlows.enqueue(exflow, reference);
} else {
  // assign only local executor we have
  Executor choosenExecutor = activeExecutors.iterator().next();
  executorLoader.addActiveExecutableReference(reference);
  try {
    dispatch(reference, exflow, choosenExecutor);
  } catch (ExecutorManagerException e) {
    executorLoader.removeActiveExecutableReference(reference
      .getExecId());
    throw e;
  }
}
这里判断是不是多 executor 模式,如果是进入 queuedFlows 队列等待分配,如果不是则直接 dispatch, QueueProcessorThread 用来消费 queuedFlows 中的消息,真正进行 executor 选择和分发的方法如下:
private void selectExecutorAndDispatchFlow(ExecutionReference reference,
  ExecutableFlow exflow, Set<Executor> availableExecutors)
  throws ExecutorManagerException {
  synchronized (exflow) {
    Executor selectedExecutor = selectExecutor(exflow, availableExecutors);
    if (selectedExecutor != null) {
      try {
        dispatch(reference, exflow, selectedExecutor);
      } catch (ExecutorManagerException e) {
        logger.warn(String.format(
          "Executor %s responded with exception for exec: %d",
          selectedExecutor, exflow.getExecutionId()), e);
        handleDispatchExceptionCase(reference, exflow, selectedExecutor,
          availableExecutors);
      }
    } else {
      handleNoExecutorSelectedCase(reference, exflow);
    }
  }
}
关于 selectExecutor 可以先从配置文件开始看,配置文件配置了 filters 有哪些,还有 NumberOfAssignedFlowComparator, Memory, LastDispatched, CpuUsage 的权重。
azkaban.use.multiple.executors=true
azkaban.executorselector.filters=StaticRemainingFlowSize,MinimumFreeMemory,CpuStatus
azkaban.executorselector.comparator.NumberOfAssignedFlowComparator=1
azkaban.executorselector.comparator.Memory=1
azkaban.executorselector.comparator.LastDispatched=1
azkaban.executorselector.comparator.CpuUsage=1
selectExecutor 方法就是根据上面这些配置选择出合适的 Executor。具体比较逻辑在 ExecutorComparator 类中。
选择出合适的 Executor 之后会通过 dispatch 分发
private void dispatch(ExecutionReference reference, ExecutableFlow exflow,
  Executor choosenExecutor) throws ExecutorManagerException {
  exflow.setUpdateTime(System.currentTimeMillis());

  executorLoader.assignExecutor(choosenExecutor.getId(),
    exflow.getExecutionId());
  try {
    callExecutorServer(exflow, choosenExecutor,
      ConnectorParams.EXECUTE_ACTION);
  } catch (ExecutorManagerException ex) {
    logger.error("Rolling back executor assignment for execution id:"
      + exflow.getExecutionId(), ex);
    executorLoader.unassignExecutor(exflow.getExecutionId());
    throw new ExecutorManagerException(ex);
  }
  reference.setExecutor(choosenExecutor);

  // move from flow to running flows
  runningFlows.put(exflow.getExecutionId(),
    new Pair<ExecutionReference, ExecutableFlow>(reference, exflow));

  logger.info(String.format(
    "Successfully dispatched exec %d with error count %d",
    exflow.getExecutionId(), reference.getNumErrors()));
}
assignExecutor 把要执行的 flow 保存到 mysql 中。callExecutorServer 向 Executor 中发送消息( 发送到 xxx:/executor )
Executor 处理逻辑
private void handleAjaxExecute(final HttpServletRequest req,
    final Map<String, Object> respMap, final int execId) throws ServletException {
  try {
    this.flowRunnerManager.submitFlow(execId);
  } catch (final ExecutorManagerException e) {
    e.printStackTrace();
    logger.error(e.getMessage(), e);
    respMap.put(RESPONSE_ERROR, e.getMessage());
  }
}
在 submitFlow 方法中会去创建 FlowRunner,然后设置一些 job 运行相关的参数(NumJobThreads),然后提交到 executorService 等待分配线程运行。FlowRunner 的 run 方法会调用 runFlow 方法,下面看 runFlow 方法:
private void runFlow() throws Exception {
  this.logger.info("Starting flows");
  runReadyJob(this.flow);
  updateFlow();

  while (!this.flowFinished) {
    synchronized (this.mainSyncObj) {
      if (this.flowPaused) {
        try {
          this.mainSyncObj.wait(CHECK_WAIT_MS);
        } catch (final InterruptedException e) {
        }

        continue;
      } else {
        if (this.retryFailedJobs) {
          retryAllFailures();
        } else if (!progressGraph()) {
          try {
            this.mainSyncObj.wait(CHECK_WAIT_MS);
          } catch (final InterruptedException e) {
          }
        }
      }
    }
  }

  this.logger.info("Finishing up flow. Awaiting Termination");
  this.executorService.shutdown();

  updateFlow();
  this.logger.info("Finished Flow");
}
此方法先在 runReadyJob 中尝试运行 job,然后在 while 循环中进行失败重试和已就绪依赖 Job 的执行。
private void retryAllFailures() throws IOException {
  this.logger.info("Restarting all failed jobs");

  this.retryFailedJobs = false;
  this.flowKilled = false;
  this.flowFailed = false;
  this.flow.setStatus(Status.RUNNING);

  final ArrayList<ExecutableNode> retryJobs = new ArrayList<>();
  resetFailedState(this.flow, retryJobs);

  for (final ExecutableNode node : retryJobs) {
    if (node.getStatus() == Status.READY
        || node.getStatus() == Status.DISABLED) {
      runReadyJob(node);
    } else if (node.getStatus() == Status.SUCCEEDED) {
      for (final String outNodeId : node.getOutNodes()) {
        final ExecutableFlowBase base = node.getParentFlow();
        runReadyJob(base.getExecutableNode(outNodeId));
      }
    }

    runReadyJob(node);
  }

  updateFlow();
}
retryAllFailures 是进行失败重试的方法,同时也负责推进 DAG 的执行,resetFailedState 去获取需要重试的点和 执行成功的点(用于推进 DAG), 然后载下面的循环中判断状态,如果状态为 SUCCESS 则获取依赖这个节点的节点,尝试执行(因为同时可能依赖别的节点,所以 runReadyJob 中并不一定能执行)
private boolean runReadyJob(final ExecutableNode node) throws IOException {
  if (Status.isStatusFinished(node.getStatus())
      || Status.isStatusRunning(node.getStatus())) {
    return false;
  }

  final Status nextNodeStatus = getImpliedStatus(node);
  if (nextNodeStatus == null) {
    return false;
  }

  if (nextNodeStatus == Status.CANCELLED) {
    this.logger.info("Cancelling '" + node.getNestedId()
        + "' due to prior errors.");
    node.cancelNode(System.currentTimeMillis());
    finishExecutableNode(node);
  } else if (nextNodeStatus == Status.SKIPPED) {
    this.logger.info("Skipping disabled job '" + node.getId() + "'.");
    node.skipNode(System.currentTimeMillis());
    finishExecutableNode(node);
  } else if (nextNodeStatus == Status.READY) {
    // ExecutableFlowBase
    // Flow 或者 EmbeddedFlows
    if (node instanceof ExecutableFlowBase) {
      final ExecutableFlowBase flow = ((ExecutableFlowBase) node);
      this.logger.info("Running flow '" + flow.getNestedId() + "'.");
      flow.setStatus(Status.RUNNING);
      flow.setStartTime(System.currentTimeMillis());
      prepareJobProperties(flow);
      // Flow 前面讲到初始化时有一个 startNodes 变量被初始化
      for (final String startNodeId : ((ExecutableFlowBase) node).getStartNodes()) {
        final ExecutableNode startNode = flow.getExecutableNode(startNodeId);
        runReadyJob(startNode);
      }
    } else {
      runExecutableNode(node);
    }
  }
  return true;
}
方法中通过 getImpliedStatus 来获取 node 是否能够执行的状态,getImpliedStatus 中会判断节点本身状态以及上游节点状态来确定节点是否能够执行,runExecutableNode 构建 JobRunner 提交到线程池中。
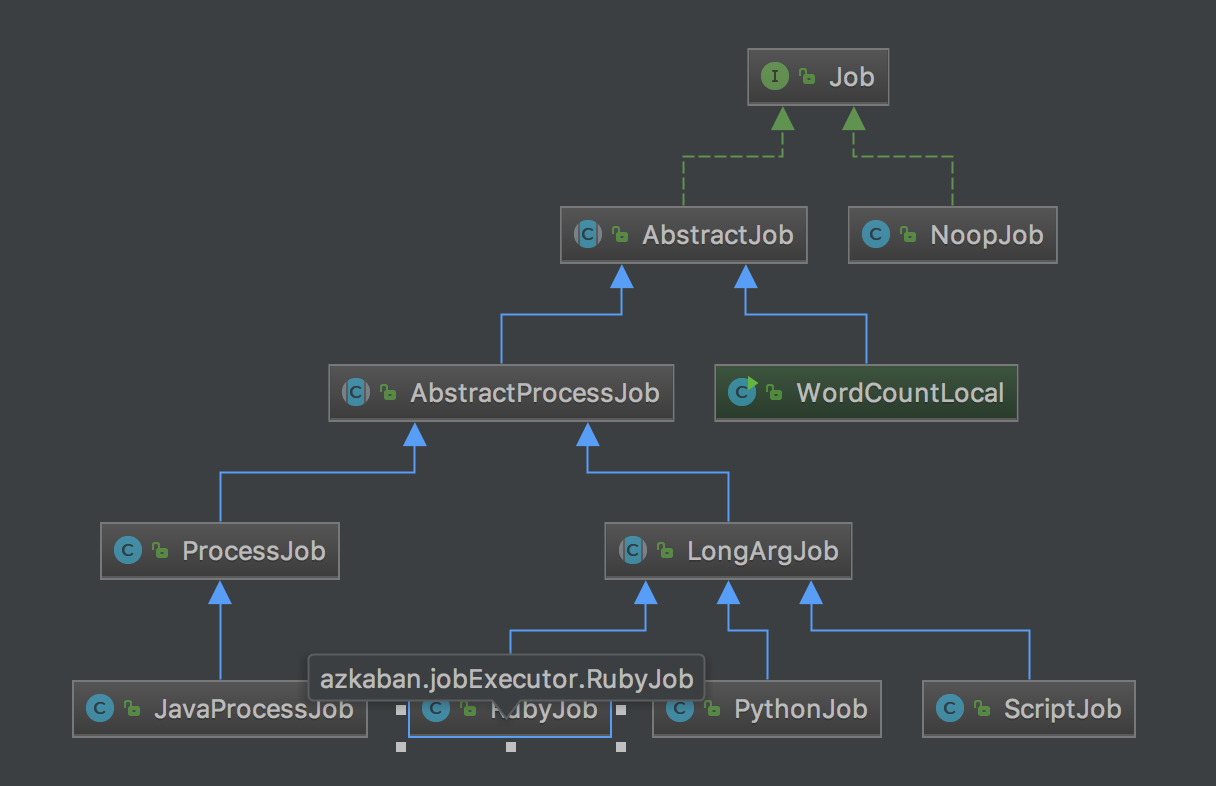
Job
JobRunner 提交到线程池中后会运行 run 方法,调用 runJob, 最终调用 Job 的 run 方法,job 有很多类型,但是内部处理逻辑都比较简单,下面是类关系图:


 326
326


 被折叠的 条评论
为什么被折叠?
被折叠的 条评论
为什么被折叠?
 到【灌水乐园】发言


