


Services
Service是一个应用程序组件,它可以在后台之中持续运行并且不用提供用户的操作界面,相当于一个幕后工作者。其他的应用程序也可以自己启动一个服务,然后该服务会自动在后台运行,即使你切换到另一个程序之中。除此之外,android允许一个组件绑定到某一个服务上并与之交互甚至可以是进程间交互,也就是我们所说的IPC。那么,service能做什么呢,例如,从网络缓存数据、后台播放音乐、文件I/O流、与contentprovider交互,这些都可以从后台使用service来完成。
Service的两种状态形式:
Started: 当一个应用程序启动(activity启动)时,如果它调用startService()方法就会启动service启动。一旦启动,service就会一直在后台运行,甚至当启动它的activity被销毁,service也不会停止。通常来讲,启动service一般都是一个比较单一的操作而不会调用服务去得到返回值。例如,从网络上获取数据,当数据获取完成之后,服务应该自己结束。
Bound: 当一个应用程序启动,如果它调用bindService(),那么service就会处于绑定状态。被绑定的服务提供一个客户端—服务接口,它允许程序和服务进行交互,发送请求,得到结果,甚至使用IPC交互。只要一个应用程序绑定到这个服务上才会启动绑定service。多个应用程序都可以绑定到这个服务上,但是当所有的应用程序都取消了绑定,那么这个bound的服务就被销毁了。
可能读者会觉得,是不是既要想实现started又想实现Bound的话,就要分开写两个service?事实上不是的,你只需要实现不同的回调方法就可以了:onStartCommand()允许应用程序启动service和onBind()允许应用程序绑定它。然后,你可能又会产生一个疑问:service是根据谁去结束自己的呢?后面我们会讲到这个问题。
不管你的程序是不是启动或者绑定了这个service,任何其他的应用程序都可以使用通过Intent来启动这个service。然后,你可以声明这个service为私有的,在manifest中声明,阻塞和其他应用程序通信。这个问题会在Declaring the service in the manifest中详细讨论。
(注:service要在启动它的主线程中线程之中运行,service不会主动启动自己的线程,它也不会运行在其他的进程中(除非你进行了指定)。这就是说,如果你想要你的service去执行一个耗时的操作(播放MP3或者下载网络数据),你就可以创建一个新的线程来执行这个耗时操作。通过使用分线程,你可以降低android出现ANR风险而这样一来你的主线程就可以去与其他activity去交互了)
Service基础
想要创建service,你要创建一个service的子类,在你的实现里,你需要重载一些回调方法,这些方法可以让你很好的掌握service的生命周期。以下四个方法你一定要重载:
onStartCommand(): 当另一个组件,比如activity要求启动service,它会调用startService()方法,这样系统调用onStartCommand()方法。一旦这个方法被执行,那么它就会在后台一直运行下去。如果你调用了startService(),当你的任务结束之后,你要自己想着把这个service结束,通过调用stopSelf()或者stopService()方法。如果你只是想绑定到这个service,就没必要重载这个方法。
onBind():当另一个组件需要绑定到这个service上,它会调用bindService(),然后系统会执行onBind()方法。你对于这个方法进行实现的时候,一定要返回一个IBinder接口让组件与服务进行交互。你一定会总要实现这个方法,但是如果你不想要绑定,设IBinder的返回值为null。
onCreate():它有些类似于activity的形式,当service首次启动的时候,就会调用这个方法,而且有且只能被调用一次。
onDestory():当service不再使用的时候,系统就会调用这个方法。你的service应该实现这个方法来清理service,作为线程,注册监听,接收方法等。
Service停止的两种方法:
如果一个组件通过startService()开启了服务,那么它的停止方式有两种:该组件调用stopSelf()停止,其他组件调用stopService()。
如果一个组件通过bindService()开启了服务,那么只要没有组件绑定在这个服务上,那么系统就会停掉它。
当然,如果系统内存比较低,android系统为了保证activity能正常交互就会强制关闭服务。但是这种情况发生的时候不包括activity绑定到service上或者service需要在前台运行(后面会有针对这种情况的讨论)。此外,当你的service在后台长时间运行时,android系统会记录下这个service,并放在list中。当发生内存不够的情况时,这个service会首当其冲的就被杀掉。所以,在设计service的时候,你一定要让它在被停掉之后给系统发送一个通知,以便可以迅速返回(可以调用onStartCommand()方法)。
下面这个例子,将会展示如何设计service的各个状态,以及如何在其他组件中使用这个service。
步骤一、在manifest文件中声明service
<manifest ... >
...
<application ... >
<service android:name=".ExampleService" />
...
</application>
</manifest>
在service的节点中,除了name之外还包含许多其他的信息,包括开启service的需求和service应该在哪个进程中运行。但是name节点是一定要写的,而且这个name,声明了之后就尽量不要再修改了。
为了确定你的app是安全的,永远都要明确一个intent什么时候开启或者绑定你的service,还有就是不要为service声明intent-filters。关键的问题是如果你也不知道需要让哪个service启动,那么你还提供一个intent filters吧,但是记得从intent里把该组件的名字剔除掉,然后通过setPackage()为了intent设置一个包,这样可以有效的消除歧义。
步骤二、创建一个service
Service是其他组件通过调用startServie()方法启动的,然后再调用serivce的onStartCommand()方法。
当service被开启之后,它就有自己独立的生命周期在后台运行了,尽管开启它的组件已经被销毁了,它还是可以继续跑。也就是说,这种情况下它的停止方式就是上文所说的两种方式。
Activity可以通过调用startService()方法开启serivce,然后传递一个intent,用于指明service和向serivce发送数据。Service通过onStartCommand()方法接收传过来的消息。
举个例子,假如一个activity需要保存一些数据到在线数据库中,这个activity就可以开启一个服务并通过startStartService()中传递intent的方式把数据发送过去。Service在onStartCommand()方法中接收该intent,连接到internet并且开始发送数据。当传输完成之后,service自己停掉随即被销毁。
通常情况下,你有两种类可以继承来实现service
Service: 这是所有serivces的基类,当你继承了它,你就要注意要创建一个新的线程去做service该做的东西。
IntentService: 这是service的一个子类,它可以使用一个已经工作的线程来解决所有的开启需求。如果你不需要让你的sevice接收多个同时的需求,你最好还是继承IntentSEervice。你只需要实现onHandlerIntent()方法,用于在后台接收开启服务的需求。继承IntentService类
IntentService需要做以下几个方面的事:
·创建一个默认工作线程用于执行所有发送到onStartCommand()方法中的intent。
·创建一个工作队列把需要执行的intent都放在里面,然后一条一条的发送到onHandlerIntent()方法中。
·所有intent方法发送完毕,结束这个service。
·实现默认的onBind()方法并返回空值。
·实现默认的onStartCommand()方法,把intent放在工作队列里,在发送到onHanlerIntent()方法中。
具体请看下面的这段代码:
public class HelloIntentServiceextends IntentService {
/**
* A constructor is required, and must call the super IntentService(String)
* constructor with a name for the worker thread.
*/
public HelloIntentService() {
super("HelloIntentService");
}
/**
* The IntentService calls this method from the default workerthread with
* the intent that started the service. When this method returns,IntentService
* stops the service, as appropriate.
*/
@Override
protected void onHandleIntent(Intent intent) {
// Normally we would do some work here, like download afile.
// For our sample, we just sleep for 5 seconds.
long endTime = System.currentTimeMillis() + 5*1000;
while (System.currentTimeMillis() < endTime) {
synchronized (this) {
try {
wait(endTime - System.currentTimeMillis());
} catch (Exception e) {
}
}
}
}
}
如果你想要重载其他的回调方法,例如onCreate(),onStarCommand()或者onDestory(),一定要调用super关键字,这样IntentService才能正确的管理那些正在运行的service。例如:
@Override
public int onStartCommand(Intent intent, int flags, int startId) {
Toast.makeText(this, "service starting", Toast.LENGTH_SHORT).show();
return super.onStartCommand(intent,flags,startId);
}
除了onHandleIntent(),你有一个方法可以不用调用super关键字,那就是onBind()。
接下来我们讲述一下,如何继承service:
public class HelloServiceextends Service {
private Looper mServiceLooper;
private ServiceHandler mServiceHandler;
// Handler that receives messages from the thread
private final class ServiceHandler extends Handler {
public ServiceHandler(Looper looper) {
super(looper);
}
@Override
public void handleMessage(Message msg) {
// Normally we would do some work here, likedownload a file.
// For our sample, we just sleep for 5seconds.
long endTime = System.currentTimeMillis() + 5*1000;
while (System.currentTimeMillis() <endTime) {
synchronized (this) {
try {
wait(endTime - System.currentTimeMillis());
} catch (Exceptione) {
}
}
}
// Stop the service using the startId, sothat we don't stop
// the service in the middle of handlinganother job
stopSelf(msg.arg1);
}
}
@Override
public void onCreate() {
// Start up the thread running the service. Note that wecreate a
// separate thread because the service normally runs in theprocess's
// main thread, which we don't want to block. We also makeit
// background priority so CPU-intensive work will not disrupt ourUI.
HandlerThread thread = new HandlerThread("ServiceStartArguments",
Process.THREAD_PRIORITY_BACKGROUND);
thread.start();
// Get the HandlerThread's Looper and use it for our Handler
mServiceLooper = thread.getLooper();
mServiceHandler = new ServiceHandler(mServiceLooper);
}
@Override
public int onStartCommand(Intent intent, int flags, int startId) {
Toast.makeText(this, "service starting", Toast.LENGTH_SHORT).show();
// For each start request, send a message to start a joband deliver the
// start ID so we know which request we're stopping whenwe finish the job
Message msg = mServiceHandler.obtainMessage();
msg.arg1 = startId;
mServiceHandler.sendMessage(msg);
// If we get killed, after returning from here, restart
return START_STICKY;
}
@Override
public IBinder onBind(Intent intent) {
// We don't provide binding, so return null
return null;
}
@Override
public void onDestroy() {
Toast.makeText(this, "service done", Toast.LENGTH_SHORT).show();
}
}
值得一提的是,onStartCommand()方法一定要返回一个integer,这个整数用于描述系统该如何运行这个service,而且返回的值要是下面的三个之一:
START_NO_STICKY: 如果系统在onStartCommand()方法之后结束了service,那就不用在创建service了,除非还有挂起的intent。这是一种非常安全的方法用于避免运行不必要的服务。
START_STICKY: 如果系统在onStartCommand()方法之后结束了service,又创建了服务并且调用了onStartCommand()方法,但是不发送intent。相反,系统调用onStartCommand()发送一个空的intent,除非还有挂起的intent启动service。在这种情况下,就发送这些intent。这里参数可能比较难以理解,但是举个例子就会说的比较直白,比如影音播放器,不会执行指令,但是会一直在后台执行等待工作。
START_REDELIVER_INTENT: 这种情况比较适合下载文件
开启服务
你可以从activity中开启或者从另一个应用程序通过Intent来启动service。系统调用服务的onStartCommand()方法。(你永远不应该直接调用onStartCommand())。
例如:
Intent intent =new Intent(this.HelloService.class);
startService(intent);
startService方法会立刻返回并且android系统会调用service的onStartCommand()方法。如果service还没跑起来,那系统就首先调用onCreate(),然后调用onStartCommand()。
如果serivce也没有提供绑定,那么由startService()方法传递的intent仅仅只是一个交流的形式而不存在实际意义。然后,如果你想要得到返回值,那么启动service的应用汇创建PendingIntent用于广播,并且把pendingintent传递到service中用于启动service。Service可以使用广播发送结果。停止服务
服务是有自己的生命周期的,那就是说,系统不会轻易的停止服务,一旦有stopSelf或者stopService,系统就会尽快的执行它。
但是如果一个service接收到了多个请求,你不应该停止该服务。为了避免这个问题,你可以用stopSelf(int)来保证你的请求停止service。
(注:你一定要停止service,因为service浪费内存浪费电,属于android程序员大忌)
创建一个绑定的服务
绑定的服务允许应用组件通过bindService()来绑定到远程的service来创建连接。
这个使用环境就是A开启了服务,B或C或D想调用这个服务,就可以用BindService来使用,这也叫IPC。为了创建一个绑定的serivce,你必须实现onBind()回调方法返回一个IBinder,把它作为与service交互的接口。其他应用组件调用bindSrevice()返回接口并开始调用服务中的方法,没有应用组件使用这个serivce的时候,系统就会主动的结束它。
有很多的方法可以用来实现boundservice,它会比started servcei更复杂一些,所以我会在下一次着重讲解Bound Service,它与AIDL同是进程间通信的问题,但是它相对于AIDL要简单。这篇文章算是Bound Service 和 AIDL的一个概括。
给用户发送通知
一旦运行,service就可以通过Toast和Status通知用户。也就是我们经常说的吐司和通知条。通知条是一个好东西啊,这个留着以后再学习;
在前台运行服务
前台运行的好处就是系统不能主动杀死它。但是前台服务必须要提供一个通知给状态条,替代“Ongoing“头,意味着通知不能被销毁除非service停止或者在前台被移除了。
什么情况下要使用Foreground()呢,比如,你实现一个音乐播放器,当用户处于锁屏的状态时,他也是想要播放歌曲的,而且他还得切歌,看歌词,这些东西,前台运行服务就可以很好的实现。
代码如下:
Notification notification = new Notification(R.drawable.icon,getText(R.string.ticker_text),
System.currentTimeMillis());
Intent notificationIntent = new Intent(this, ExampleActivity.class);
PendingIntent pendingIntent = PendingIntent.getActivity(this, 0,notificationIntent, 0);
notification.setLatestEventInfo(this, getText(R.string.notification_title),
getText(R.string.notification_message),pendingIntent);
startForeground(ONGOING_NOTIFICATION_ID, notification);
了解service的生命周期
Service要比activity的生命周期要简单的多,但是你要注意的是,service的是可以偷摸在后台运行滴。
·已经运行的服务
当其他应用组件调用startService()方法时,这个service会一直运行直到调用stopSelf()方法。另一个组件就得调用stopService()来停止服务。
·绑定的服务
开绑定服务就是调用BindService方法,并实现IBinder的接口,断开绑定就是unbindService()方法。
然而,startService和BindService是可以放在一个service中,不是完全隔离的。举个例子:在后台运行的music服务已经通过startService()启动了。这个时候后台音乐服务是通过发过来的intent调用的。然后,用户可能想做一些对于播放器的控制,比如获得歌曲名称,这时activity就能通过调用bindService绑定到service中,在这种情况下,你执行stopService()和stopSelf()就不能停止这个服务了,这就属于有多个应用组件绑定到service中。实现生命周期的例子:
public class ExampleServiceextends Service {
int mStartMode; // indicates how to behaveif the service is killed
IBinder mBinder; // interface for clientsthat bind
boolean mAllowRebind; // indicates whether onRebind should beused
@Override
public void onCreate(){
// The service is being created
}
@Override
public int onStartCommand(Intentintent, int flags, int startId) {
// The service is starting, due to a call to startService()
return mStartMode;
}
@Override
public IBinder onBind(Intentintent) {
// A client is binding to the service with bindService()
return mBinder;
}
@Override
public boolean onUnbind(Intentintent) {
// All clients have unbound with unbindService()
return mAllowRebind;
}
@Override
public void onRebind(Intentintent) {
// A client is binding to the service with bindService(),
// after onUnbind() has already been called
}
@Override
public void onDestroy(){
// The service is no longer used and is beingdestroyed
}
}
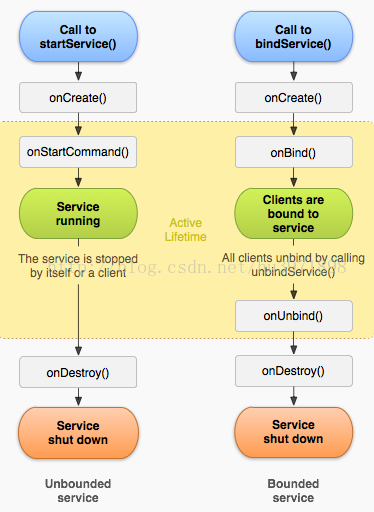
根据上图我们会发现:
·Service的生命周期就是在onCreate()和onDestory()之间
·service或者通过onStartCommand()启动,或者通过onBind()方式启动。如果service启动了,那么active time 和生命周期是同时结束的。
读者个人的理解:了解了service之后,我们就可以实现一些东西了,虽然service在后台,我们不经常能看到。但是这个东西确实是非常重要,要不也不能和activity、contentprovider、broadreceiver并称android的四大组件。开这篇博客的目的就是为了可以更好地理解service,为下篇文章bound service做铺垫,它和AIDL都可以实现进程间的通信,但是bound service会相对简单一些,而且API上也说,咱们大部分的应用程序用到bound service就够用了。
欢迎大家一起讨论交流,翻译能力有限,不足的地方,欢迎斧正。


 4万+
4万+


 被折叠的 条评论
为什么被折叠?
被折叠的 条评论
为什么被折叠?
 到【灌水乐园】发言


