


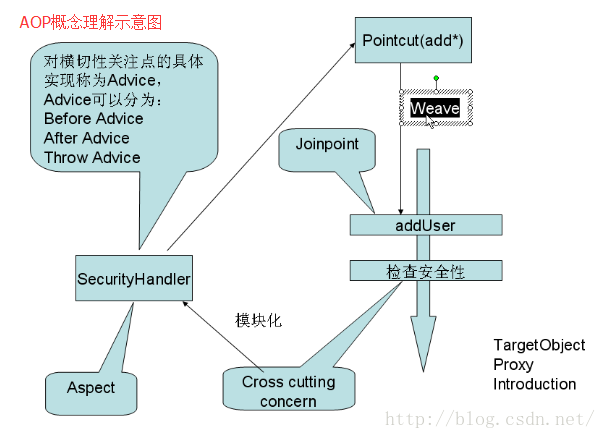
【回顾】
    上篇博客,我们了解了AOP的相关概念,本篇博客,将介绍Annotation(注解)和静态配置文件两种方式实现AOP,从而让我们更加清楚AOP相关概念对应的代码。下面我们还是从示意图出发,一点点挖掘。
【Annotation(注解)方式】
    1. Spring依赖包配置
        * spring.jar
        * log4j.jar
        * commons-logging.jar
        在此基础上还需要增加aspectj下的两个(aspectjrt.jar和aspectjweaver.jar)jar包
    2. 将横切性关注点模块化,建立相关的类(SecurityHandler).并采用注解指定SecurityHandler为Aspect,采用注解定义Advice和Pointcut。
package com.bjpowernode.spring;
import org.aspectj.lang.annotation.Aspect;
import org.aspectj.lang.annotation.Before;
import org.aspectj.lang.annotation.Pointcut;
@Aspect //注解,定义Aspect,模块化后的横切性关注点对应的类是SecurityHandler
public class SecurityHandler {
    /**
     * 注解,定义Pointcut,Pointcut的名称为addAddMethod(),此方法没有返回值和参数
     * 该方法就是一个标识,不进行调用
     */
    @Pointcut("execution(* add*(..))")
    private void addAddMethod(){};
    /**
     * 注解,定义Advice,表示我们的Advice应用到哪些Pointcut订阅的Joinpoint上
     */
    @Before("addAddMethod()")
    private void checkSecurity() {
        System.out.println("-------checkSecurity-------");
    }
} 3.提供Spring的配置文件,启用Aspectj对Annotation的支持,并且将目标类和Aspect类配置到IOC容器中。
<?xml version="1.0" encoding="UTF-8"?>
<beans xmlns="http://www.springframework.org/schema/beans"
         xmlns:xsi="http://www.w3.org/2001/XMLSchema-instance"
         xmlns:aop="http://www.springframework.org/schema/aop"
         xmlns:tx="http://www.springframework.org/schema/tx"
         xsi:schemaLocation="http://www.springframework.org/schema/beans http://www.springframework.org/schema/beans/spring-beans-2.0.xsd
           http://www.springframework.org/schema/aop http://www.springframework.org/schema/aop/spring-aop-2.0.xsd
           http://www.springframework.org/schema/tx http://www.springframework.org/schema/tx/spring-tx-2.0.xsd">

    <!-- 启用AspectJ对Annotation的支持 -->
    <aop:aspectj-autoproxy/>
    <!-- 配置目标类 -->
    <bean id="userManager" class="com.bjpowernode.spring.UserManagerImpl"/>
    <!-- 配置Aspect -->
    <bean id="securityHandler" class="com.bjpowernode.spring.SecurityHandler"/>
</beans>
4. 客户端代码
package com.bjpowernode.spring;
import org.springframework.beans.factory.BeanFactory;
import org.springframework.context.support.ClassPathXmlApplicationContext;
public class Client {
    public static void main(String[] args) {
        BeanFactory factory = new ClassPathXmlApplicationContext("applicationContext.xml");
        UserManager userManager = (UserManager)factory.getBean("userManager");
        userManager.addUser("张三", "123");
    }
}
【配置文件方式】 1. 同样引入对应的jar包 2. 将之前的注解都删除,只需要方法即可。
package com.bjpowernode.spring;
public class SecurityHandler {
    private void checkSecurity() {
        System.out.println("-------checkSecurity-------");
    }
}
3. 配置文件中描述AOP相关的标签。
<?xml version="1.0" encoding="UTF-8"?>
<beans xmlns="http://www.springframework.org/schema/beans"
         xmlns:xsi="http://www.w3.org/2001/XMLSchema-instance"
         xmlns:aop="http://www.springframework.org/schema/aop"
         xmlns:tx="http://www.springframework.org/schema/tx"
         xsi:schemaLocation="http://www.springframework.org/schema/beans http://www.springframework.org/schema/beans/spring-beans-2.0.xsd
           http://www.springframework.org/schema/aop http://www.springframework.org/schema/aop/spring-aop-2.0.xsd
           http://www.springframework.org/schema/tx http://www.springframework.org/schema/tx/spring-tx-2.0.xsd">
    <bean id="userManager" class="com.bjpowernode.spring.UserManagerImpl"/>
    <bean id="securityHandler" class="com.bjpowernode.spring.SecurityHandler"/>
    <!-- 配置AOP标签 -->
    <aop:config>
        <!-- 配置AOP中aspect标签 -->
        <aop:aspect id="securityAspect" ref="securityHandler">
            <!--
            以add开头的方法
            <aop:pointcut id="addAddMethod" expression="execution(* add*(..))"/>
             -->
             <!--
             com.bjpowernode.spring包下所有的类所有的方法
            <aop:pointcut id="addAddMethod" expression="execution(* com.bjpowernode.spring.*.*(..))"/>
             -->
             <!-- com.bjpowernode.spring包下所有的类所有add方法 -->
            <aop:pointcut id="addAddMethod" expression="execution(* com.bjpowernode.spring.*.add*(..)) || execution(* com.bjpowernode.spring.*.del*(..))"/>
             <!-- 配置AOP中advice应用的时机 -->
            <aop:before method="checkSecurity" pointcut-ref="addAddMethod"/>
        </aop:aspect>
    </aop:config>
</beans>其实,这两种方法都和动态代理实现的方式相同。而Annotation方式支持自定义注解,想何时实现关注点,只需要在代码中进行对应的注解即可。而配置文件方式与Annotation方式不同的是,配置文件方式不需要在代码中加入各种注解,只需要在配置文件中用上AOP的各种标签配置即可。


 264
264


 被折叠的 条评论
为什么被折叠?
被折叠的 条评论
为什么被折叠?
 到【灌水乐园】发言


