转载地址:http://blog.csdn.net/c386890506/article/details/52603807
1.Notification(通知)
自从Notification被引入之后,苹果就不断的更新优化,但这些更新优化只是小打小闹,直至现在iOS 10开始真正的进行大改重构,这让开发者也体会到UserNotifications的易用,功能也变得非常强大。
iOS 9 以前的通知
1.在调用方法时,有些方法让人很难区分,容易写错方法,这让开发者有时候很苦恼。
2.应用在运行时和非运行时捕获通知的路径还不一致。
3.应用在前台时,是无法直接显示远程通知,还需要进一步处理。
4.已经发出的通知是不能更新的,内容发出时是不能改变的,并且只有简单文本展示方式,扩展性根本不是很好。
iOS 10 开始的通知
1.所有相关通知被统一到了UserNotifications.framework框架中。
2.增加了撤销、更新、中途还可以修改通知的内容。
3.通知不在是简单的文本了,可以加入视频、图片,自定义通知的展示等等。
4.iOS 10相对之前的通知来说更加好用易于管理,并且进行了大规模优化,对于开发者来说是一件好事。
5.iOS 10开始对于权限问题进行了优化,申请权限就比较简单了(本地与远程通知集成在一个方法中)。
如果使用了推送:
2.ATS的问题
iOS 9中默认非HTTS的网络是被禁止的,当然我们也可以把NSAllowsArbitraryLoads设置为YES禁用ATS。不过iOS 10从2017年1月1日起苹果不允许我们通过这个方法跳过ATS,也就是说强制我们用HTTPS,如果不这样的话提交App可能会被拒绝。但是我们可以通过NSExceptionDomains来针对特定的域名开放HTTP可以容易通过审核。
NSExceptionDomains方式 设置域。可以简单理解成,把不支持https协议的接口设置成http的接口。
具体方法:
1)、在项目的info.plist中添加一个Key:App Transport Security Settings,类型为字典类型。
2)、然后给它添加一个Exception Domains,类型为字典类型;
3)、把需要的支持的域添加給Exception Domains。其中域作为Key,类型为字典类型。
4)、每个域下面需要设置3个属性:NSIncludesSubdomains、NSExceptionRequiresForwardSecrecy、NSExceptionAllowsInsecureHTTPLoads。
如图: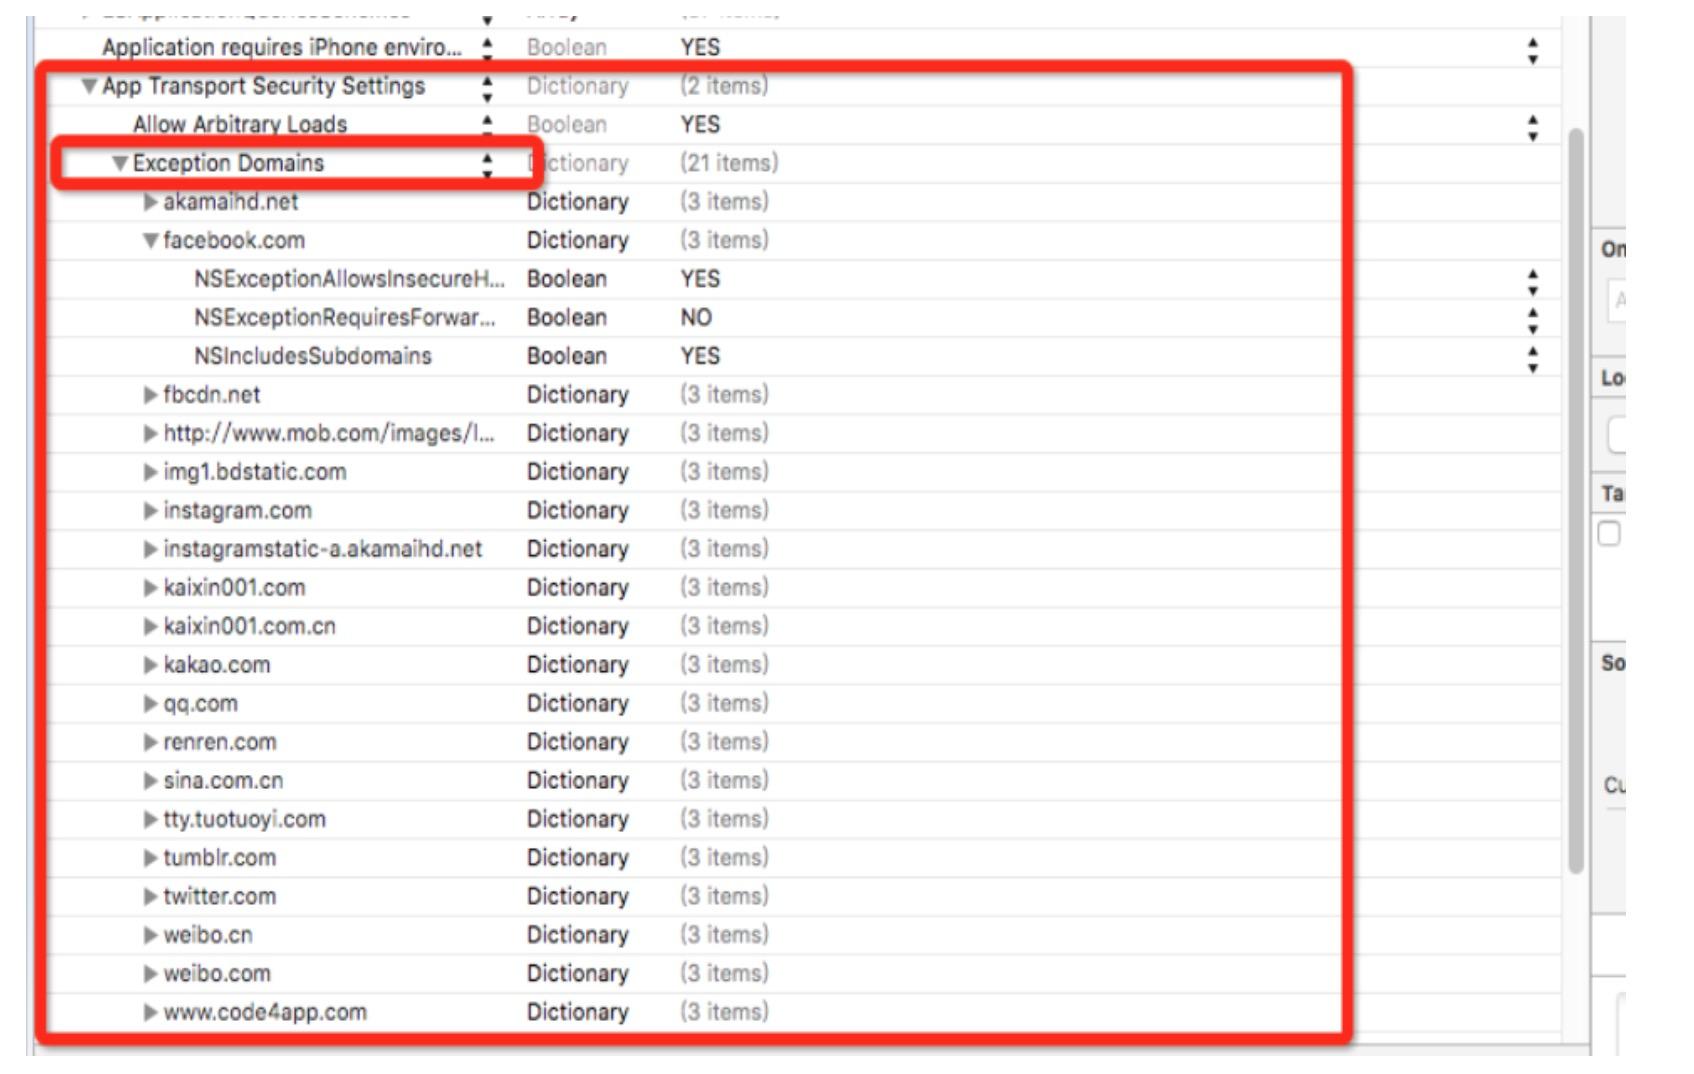
细节提示:在iOS9以后的系统中如果使用到网络图片,也要注意网络图片是否是HTTP的哦,如果是,也要把图片的域设置哦!
3.iOS 10 隐私权限设置
iOS 10 开始对隐私权限更加严格,如果你不设置就会直接崩溃,现在很多遇到崩溃问题了,一般解决办法都是在info.plist文件添加对应的Key-Value就可以了。
(错误: This app attempts to access privacy-sensitive data without a usage description. The app’s Info.plist must contain an NSPhotoLibraryUsageDescription key with a string value explaining to the user how the app uses this data.—访问相册失败,请求权限
This app attempts to access privacy-sensitive data without a usage description. The app’s Info.plist must contain an NSCameraUsageDescription key with a string value explaining to the user how the app uses this data.–访问相机(二维码识别等)错误,要求相机权限
)
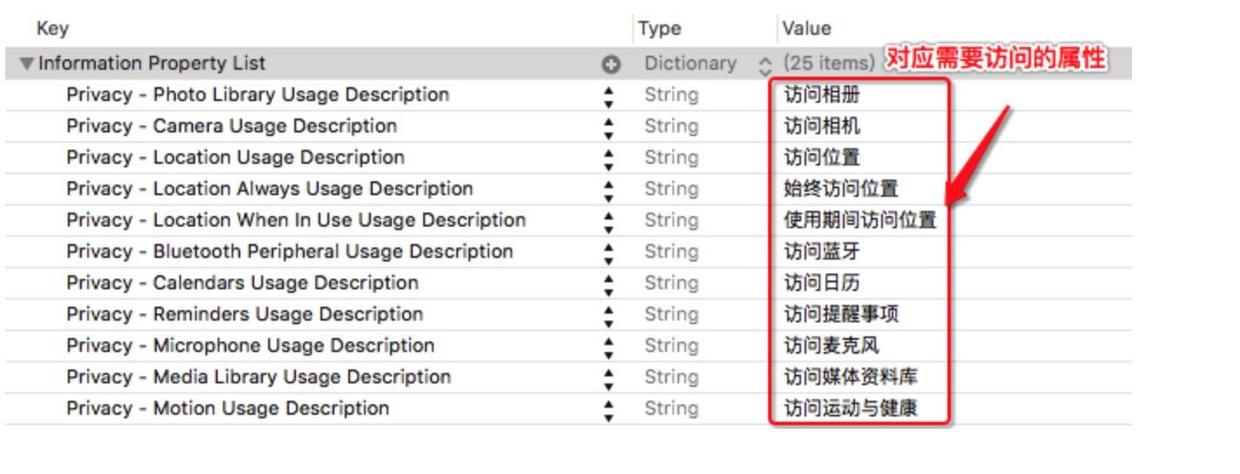
以上Value值,圈出的红线部分的文字是展示给用户看的,必须添加。
4.Xcode 8 运行一堆没用的logs解决办法
Xcode8代码出现ubsystem: com.apple.UIKit, category: HIDEventFiltered, enable_level: 0, persist_level: 0, default_ttl: 0, info_ttl: 0, debug_ttl: 0, generate_symptoms: 0,,enable_oversize: 1, privacy_setting: 2, enable_private_data: 0 2016-09-14 17:18:55.843428 MyApp[6880:340837]
自己新建的一个工程啥也没干就打印一堆烂七八糟的东西,我觉得这个应该是Xcode 8的问题,
具体也没细研究,解决办法是设置OS_ACTIVITY_MODE : disable
【product】-【scheme】-【Edit Scheme】-【Run】-【Argument】-【Environment Variable】添加keyValue【OS_ACTIVITY_MODE disable】可以停止输出打印此日志
5.iOS 10 UIStatusBar方法过期:
在我们开发中有可能用到UIStatusBar一些属性,在iOS 10 中这些方法已经过期了,如果你的项目中有用的话就得需要适配。
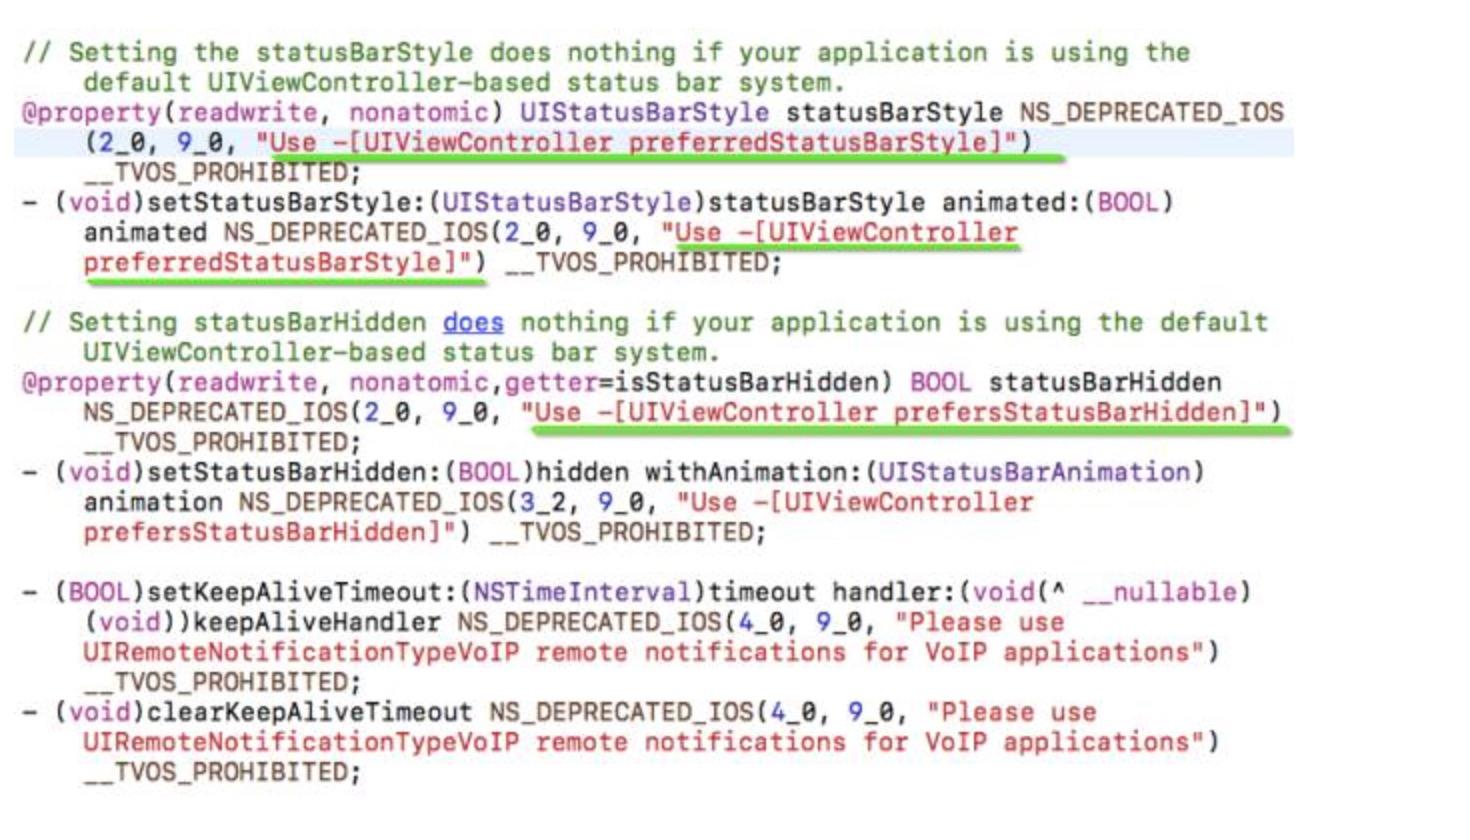
UIStatusBarStyle 和 prefersStatusBarHidden这两个属性是readonly readonly readonly也就是说我们如果在iOS 10中调用,你需要使用preferredStatusBar比如这样:
//iOS 10
<code class="hljs haml has-numbering" style="display: block; padding: 0px; background-color: transparent; color: inherit; box-sizing: border-box; font-family: 'Source Code Pro', monospace;font-size:undefined; white-space: pre; border-top-left-radius: 0px; border-top-right-radius: 0px; border-bottom-right-radius: 0px; border-bottom-left-radius: 0px; word-wrap: normal; background-position: initial initial; background-repeat: initial initial;">-<span class="ruby" style="box-sizing: border-box;"> (<span class="hljs-constant" style="box-sizing: border-box;">BOOL</span>)prefersStatusBarHidden{
</span>    return YES;
}
-<span class="ruby" style="box-sizing: border-box;"> (<span class="hljs-constant" style="box-sizing: border-box;">UIStatusBarStyle</span>)preferredStatusBarStyle {
</span>
  return UIStatusBarStyleDefault;

}
</code><ul class="pre-numbering" style="box-sizing: border-box; position: absolute; width: 50px; background-color: rgb(238, 238, 238); top: 0px; left: 0px; margin: 0px; padding: 6px 0px 40px; border-right-width: 1px; border-right-style: solid; border-right-color: rgb(221, 221, 221); list-style: none; text-align: right;"><li style="box-sizing: border-box; padding: 0px 5px;">1</li><li style="box-sizing: border-box; padding: 0px 5px;">2</li><li style="box-sizing: border-box; padding: 0px 5px;">3</li><li style="box-sizing: border-box; padding: 0px 5px;">4</li><li style="box-sizing: border-box; padding: 0px 5px;">5</li><li style="box-sizing: border-box; padding: 0px 5px;">6</li><li style="box-sizing: border-box; padding: 0px 5px;">7</li><li style="box-sizing: border-box; padding: 0px 5px;">8</li><li style="box-sizing: border-box; padding: 0px 5px;">9</li></ul>
6.iOS 10 UICollectionView 性能优化
随着开发者对UICollectionView的信赖,项目中用的地方也比较多,但是还是存在一些问题,比如有时会卡顿、加载慢等。所以iOS 10 对UICollectionView进一步的优化。
UICollectionView cell pre-fetching预加载机制UICollectionView and UITableView prefetchDataSource 新增的API针对self-sizing cells 的改进Interactive reordering
在iOS 10 之前,UICollectionView上面如果有大量cell,当用户活动很快的时候,整个UICollectionView的卡顿会很明显,为什么会造成这样的问题,这里涉及到了iOS 系统的重用机制,当cell准备加载进屏幕的时候,整个cell都已经加载完成,等待在屏幕外面了,也就是整整一行cell都已经加载完毕,这就是造成卡顿的主要原因,专业术语叫做:掉帧.要想让用户感觉不到卡顿,我们的app必须帧率达到60帧/秒,也就是说每帧16毫秒要刷新一次.
iOS 10 之前UICollectionViewCell的生命周期是这样的:
1.用户滑动屏幕,屏幕外有一个cell准备加载进来,把cell从reusr队列拿出来,然后调用prepareForReuse方法,在这个方法里面,可以重置cell的状态,加载新的数据;
2.继续滑动,就会调用cellForItemAtIndexPath方法,在这个方法里面给cell赋值模型,然后返回给系统;
3.当cell马上进去屏幕的时候,就会调用willDisplayCell方法,在这个方法里面我们还可以修改cell,为进入屏幕做最后的准备工作;
iOS 10 UICollectionViewCell的生命周期是这样的:
1.用户滑动屏幕,屏幕外有一个cell准备加载进来,把cell从reusr队列拿出来,然后调用prepareForReuse方法,在这里当cell还没有进去屏幕的时候,就已经提前调用这个方法了,对比之前的区别是之前是cell的上边缘马上进去屏幕的时候就会调用该方法,而iOS 10 提前到cell还在屏幕外面的时候就调用;
2.在cellForItemAtIndexPath中创建cell,填充数据,刷新状态等操作,相比于之前也提前了;
3.用户继续滑动的话,当cell马上就需要显示的时候我们再调用willDisplayCell方法,原则就是:何时需要显示,何时再去调用willDisplayCell方法;
4.当cell完全离开屏幕以后,会调用didEndDisplayingCell方法,跟之前一样,cell会进入重用队列.
在iOS 10 之前,cell只能从重用队列里面取出,再走一遍生命周期,并调用cellForItemAtIndexPath创建或者生成一个cell.在iOS 10 中,系统会cell保存一段时间,也就是说当用户把cell滑出屏幕以后,如果又滑动回来,cell不用再走一遍生命周期了,只需要调用willDisplayCell方法就可以重新出现在屏幕中了.
iOS 10 中,系统是一个一个加载cell的,二以前是一行一行加载的,这样就可以提升很多性能;iOS 10 新增加的Pre-Fetching预加载这个是为了降低UICollectionViewCell在加载的时候所花费的时间,在 iOS 10 中,除了数据源协议和代理协议外,新增加了一个UICollectionViewDataSourcePrefetching协议,这个协议里面定义了两个方法:
<code class="hljs erlang has-numbering" style="display: block; padding: 0px; background-color: transparent; color: inherit; box-sizing: border-box; font-family: 'Source Code Pro', monospace;font-size:undefined; white-space: pre; border-top-left-radius: 0px; border-top-right-radius: 0px; border-bottom-right-radius: 0px; border-bottom-left-radius: 0px; word-wrap: normal; background-position: initial initial; background-repeat: initial initial;"><span class="hljs-pp" style="box-sizing: border-box;">- <span class="hljs-params" style="color: rgb(102, 0, 102); box-sizing: border-box;">(void)</span>collectionView:<span class="hljs-params" style="color: rgb(102, 0, 102); box-sizing: border-box;">(<span class="hljs-variable" style="box-sizing: border-box;">UICollectionView</span> *)</span>collectionView prefetchItemsAtIndexPaths:<span class="hljs-params" style="color: rgb(102, 0, 102); box-sizing: border-box;">(<span class="hljs-variable" style="box-sizing: border-box;">NSArray</span>*)</span>indexPaths NS_AVAILABLE_IOS<span class="hljs-params" style="color: rgb(102, 0, 102); box-sizing: border-box;">(<span class="hljs-number" style="color: rgb(0, 102, 102); box-sizing: border-box;">10</span>_0)</span>;
-<span class="hljs-params" style="color: rgb(102, 0, 102); box-sizing: border-box;">(void)</span>collectionView:<span class="hljs-params" style="color: rgb(102, 0, 102); box-sizing: border-box;">(<span class="hljs-variable" style="box-sizing: border-box;">UICollectionView</span>*)</span>collectionView cancelPrefetchingForItemsAtIndexPaths:<span class="hljs-params" style="color: rgb(102, 0, 102); box-sizing: border-box;">(<span class="hljs-variable" style="box-sizing: border-box;">NSArray</span>*)</span>indexPaths  NS_AVAILABLE_IOS<span class="hljs-params" style="color: rgb(102, 0, 102); box-sizing: border-box;">(<span class="hljs-number" style="color: rgb(0, 102, 102); box-sizing: border-box;">10</span>_0)</span>;</span></code><ul class="pre-numbering" style="box-sizing: border-box; position: absolute; width: 50px; background-color: rgb(238, 238, 238); top: 0px; left: 0px; margin: 0px; padding: 6px 0px 40px; border-right-width: 1px; border-right-style: solid; border-right-color: rgb(221, 221, 221); list-style: none; text-align: right;"><li style="box-sizing: border-box; padding: 0px 5px;">1</li><li style="box-sizing: border-box; padding: 0px 5px;">2</li></ul>
在ColletionView prefetchItemsAt indexPaths这个方法是异步预加载数据的,当中的indexPaths数组是有序的,就是item接收数据的顺序;
CollectionView cancelPrefetcingForItemsAt indexPaths这个方法是可选的,可以用来处理在滑动中取消或者降低提前加载数据的优先级.
注意:这个协议并不能代替之前读取数据的方法,仅仅是辅助加载数据.
Pre-Fetching预加载对UITableViewCell同样适用.
7.iOS 10 UIColor 新增方法
以下是官方文档的说明:
Most graphics frameworks throughout the system, including Core Graphics, Core Image, Metal, and AVFoundation, have substantially improved support for extended-range pixel formats and wide-gamut color spaces. By extending this behavior throughout the entire graphics stack, it is easier than ever to support devices with a wide color display. In addition, UIKit standardizes on working in a new extended sRGB color space, making it easy to mix sRGB colors with colors in other, wider color gamuts without a significant performance penalty.
(译:大多数图形架构整个系统,包括核心图形核心形象,金属,和AVFoundation,有扩展范围的像素格式和宽色域的色彩空间大幅改善的支持。通过将此行为扩展到整个图形堆栈中,它比以往任何时候都更容易支持具有宽颜色显示的设备。此外,UIKit规范在新扩展的sRGB色彩空间工作,因此很容易与其他颜色混合的sRGB颜色,更宽的色域不显著的性能损失。)
Here are some best practices to adopt as you start working with Wide Color.
(译:这里是一些最佳实践,采用你开始与多种颜色的工作)
In iOS 10, the UIColor class uses the extended sRGB color space and its initializers no longer clamp raw component values to between 0.0 and 1.0. If your app relies on UIKit to clamp component values (whether you’re creating a color or asking a color for its component values), you need to change your app’s behavior when you link against iOS 10.
(译:在iOS 10中,该UIColor类使用扩展的sRGB色彩空间和初始化不再夹原成分值在0和1之间。如果你的应用程序依赖UIKit夹紧元件值(无论你是创建一个颜色或要求颜色其组件的值),你需要改变你的应用程序的行为时,你的链接和iOS 10。)
When performing custom drawing in a UIView on an iPad Pro (9.7 inch), the underlying drawing environment is configured with an extended sRGB color space.
(译:当执行在iPad上亲一个UIView的自定义绘制(9.7英寸),基本的绘图环境配置一个扩展的sRGB色彩空间。)
If your app renders custom image objects, use the new UIGraphicsImageRenderer class to control whether the destination bitmap is created using an extended-range or standard-range format.
(译:如果你的应用程序提供自定义的图像对象,使用新的uigraphicsimagerenderer类控制是否目标位图是使用扩展的范围或标准格式创建。)
If you are performing your own image processing on wide-gamut devices using a lower level API, such as Core Graphics or Metal, you should use an extended range color space and a pixel format that supports 16-bit floating-point component values. When clamping of color values is necessary, you should do so explicitly.
(译:如果您正在使用较低级别的接口,如核心图形或金属,在宽色域设备上执行自己的图像处理,则应该使用扩展的范围颜色空间和支持16位浮点组件值的像素格式。当对颜色值进行夹紧是必要的,你应该明确地这样做。)
Core Graphics, Core Image, and Metal Performance Shaders provide new options for easily converting colors and images between color spaces.
(译:图形核心,核心形象,和金属的性能提供了新的选择,很容易着色的颜色和图像之间的颜色空间转换。)
因为之前我们都是用RGB来设置颜色,反正用起来也不是特别多样化,这次新增的方法应该就是一个弥补吧。所以在iOS 10 苹果官方建议我们使用sRGB,因为它性能更好,色彩更丰富。如果你自己为UIColor写了一套分类的话也可尝试替换为sRGB,UIColor类中新增了两个Api如下:
<code class="hljs objectivec has-numbering" style="display: block; padding: 0px; background-color: transparent; color: inherit; box-sizing: border-box; font-family: 'Source Code Pro', monospace;font-size:undefined; white-space: pre; border-top-left-radius: 0px; border-top-right-radius: 0px; border-bottom-right-radius: 0px; border-bottom-left-radius: 0px; word-wrap: normal; background-position: initial initial; background-repeat: initial initial;">+(<span class="hljs-built_in" style="color: rgb(102, 0, 102); box-sizing: border-box;">UIColor</span> *)colorWithDisplayP3Red:(<span class="hljs-built_in" style="color: rgb(102, 0, 102); box-sizing: border-box;">CGFloat</span>)displayP3Red green:(<span class="hljs-built_in" style="color: rgb(102, 0, 102); box-sizing: border-box;">CGFloat</span>)green blue:(<span class="hljs-built_in" style="color: rgb(102, 0, 102); box-sizing: border-box;">CGFloat</span>)blue alpha:(<span class="hljs-built_in" style="color: rgb(102, 0, 102); box-sizing: border-box;">CGFloat</span>)alpha NS_AVAILABLE_IOS(<span class="hljs-number" style="color: rgb(0, 102, 102); box-sizing: border-box;">10</span>_0);

-(<span class="hljs-built_in" style="color: rgb(102, 0, 102); box-sizing: border-box;">UIColor</span> *)initWithDisplayP3Red:(<span class="hljs-built_in" style="color: rgb(102, 0, 102); box-sizing: border-box;">CGFloat</span>)displayP3Red green:(<span class="hljs-built_in" style="color: rgb(102, 0, 102); box-sizing: border-box;">CGFloat</span>)green blue:(<span class="hljs-built_in" style="color: rgb(102, 0, 102); box-sizing: border-box;">CGFloat</span>)blue alpha:(<span class="hljs-built_in" style="color: rgb(102, 0, 102); box-sizing: border-box;">CGFloat</span>)alpha NS_AVAILABLE_IOS(<span class="hljs-number" style="color: rgb(0, 102, 102); box-sizing: border-box;">10</span>_0);</code><ul class="pre-numbering" style="box-sizing: border-box; position: absolute; width: 50px; background-color: rgb(238, 238, 238); top: 0px; left: 0px; margin: 0px; padding: 6px 0px 40px; border-right-width: 1px; border-right-style: solid; border-right-color: rgb(221, 221, 221); list-style: none; text-align: right;"><li style="box-sizing: border-box; padding: 0px 5px;">1</li><li style="box-sizing: border-box; padding: 0px 5px;">2</li><li style="box-sizing: border-box; padding: 0px 5px;">3</li></ul>
8.iOS 10 UITextContentType
// The textContentType property is to provide the keyboard with extra information about the semantic intent of the text document.@property(nonatomic,copy) UITextContentType textContentType NS_AVAILABLE_IOS(10_0); // default is nil
在iOS 10 UITextField添加了textContentType枚举,指示文本输入区域所期望的语义意义。
使用此属性可以给键盘和系统信息,关于用户输入的内容的预期的语义意义。例如,您可以指定一个文本字段,用户填写收到一封电子邮件确认uitextcontenttypeemailaddress。当您提供有关您期望用户在文本输入区域中输入的内容的信息时,系统可以在某些情况下自动选择适当的键盘,并提高键盘修正和主动与其他文本输入机会的整合。
9.iOS 10 字体随着手机系统字体而改变
当我们手机系统字体改变了之后,那我们App的label也会跟着一起变化,这需要我们写很多代码来进一步处理才能实现,但是iOS 10 提供了这样的属性adjustsFontForContentSizeCategory来设置。因为没有真机,具体实际操作还没去实现,如果理解错误帮忙指正。
<code class="hljs objectivec has-numbering" style="display: block; padding: 0px; background-color: transparent; color: inherit; box-sizing: border-box; font-family: 'Source Code Pro', monospace;font-size:undefined; white-space: pre; border-top-left-radius: 0px; border-top-right-radius: 0px; border-bottom-right-radius: 0px; border-bottom-left-radius: 0px; word-wrap: normal; background-position: initial initial; background-repeat: initial initial;"><span class="hljs-built_in" style="color: rgb(102, 0, 102); box-sizing: border-box;">UILabel</span> *myLabel = [<span class="hljs-built_in" style="color: rgb(102, 0, 102); box-sizing: border-box;">UILabel</span> new];  <span class="hljs-comment" style="color: rgb(136, 0, 0); box-sizing: border-box;">/*
UIFont 的preferredFontForTextStyle: 意思是指定一个样式,并让字体大小符合用户设定的字体大小。
*/</span>


myLabel<span class="hljs-variable" style="color: rgb(102, 0, 102); box-sizing: border-box;">.font</span> =[<span class="hljs-built_in" style="color: rgb(102, 0, 102); box-sizing: border-box;">UIFont</span> preferredFontForTextStyle: UIFontTextStyleHeadline]; <span class="hljs-comment" style="color: rgb(136, 0, 0); box-sizing: border-box;">/*
指示是否应自动更新相应元素的字体时,装置的uicontentsizecategory。
这个属性生效,元素的字体必须使用+ preferredfontfortextstyle:
或+ preferredfontfortextstyle:compatiblewithtraitcollection:一个有效的uifonttextstyle。
*/</span>

<span class="hljs-comment" style="color: rgb(136, 0, 0); box-sizing: border-box;">//是否更新字体的变化</span>

myLabel<span class="hljs-variable" style="color: rgb(102, 0, 102); box-sizing: border-box;">.adjustsFontForContentSizeCategory</span> = <span class="hljs-literal" style="color: rgb(0, 102, 102); box-sizing: border-box;">YES</span>;</code><ul class="pre-numbering" style="box-sizing: border-box; position: absolute; width: 50px; background-color: rgb(238, 238, 238); top: 0px; left: 0px; margin: 0px; padding: 6px 0px 40px; border-right-width: 1px; border-right-style: solid; border-right-color: rgb(221, 221, 221); list-style: none; text-align: right;"><li style="box-sizing: border-box; padding: 0px 5px;">1</li><li style="box-sizing: border-box; padding: 0px 5px;">2</li><li style="box-sizing: border-box; padding: 0px 5px;">3</li><li style="box-sizing: border-box; padding: 0px 5px;">4</li><li style="box-sizing: border-box; padding: 0px 5px;">5</li><li style="box-sizing: border-box; padding: 0px 5px;">6</li><li style="box-sizing: border-box; padding: 0px 5px;">7</li><li style="box-sizing: border-box; padding: 0px 5px;">8</li><li style="box-sizing: border-box; padding: 0px 5px;">9</li><li style="box-sizing: border-box; padding: 0px 5px;">10</li><li style="box-sizing: border-box; padding: 0px 5px;">11</li><li style="box-sizing: border-box; padding: 0px 5px;">12</li><li style="box-sizing: border-box; padding: 0px 5px;">13</li><li style="box-sizing: border-box; padding: 0px 5px;">14</li></ul>
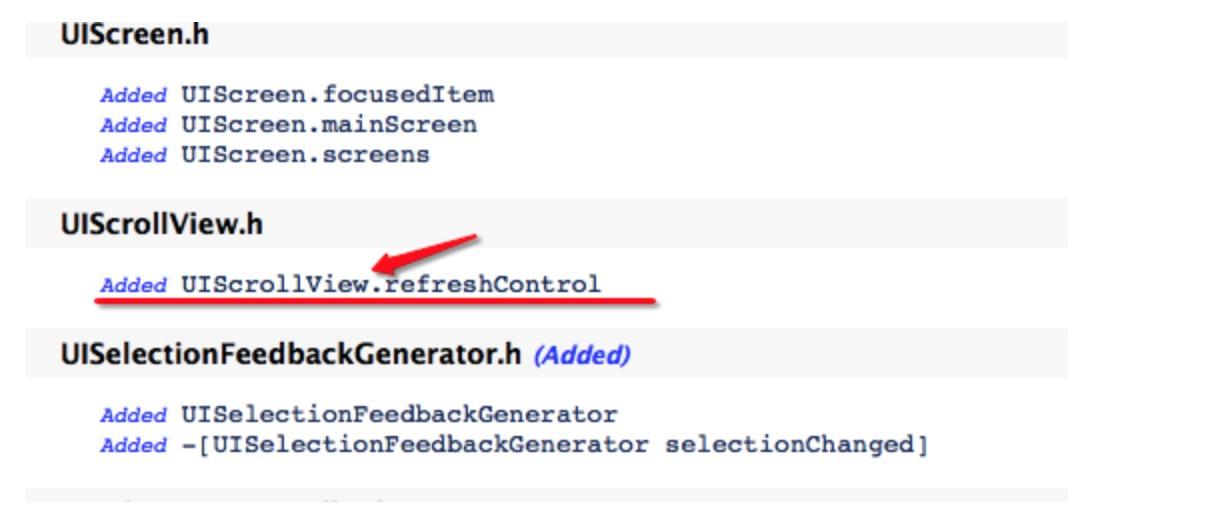
iOS 10 以后只要是继承UIScrollView那么就支持刷新功能:
<code class="hljs objectivec has-numbering" style="display: block; padding: 0px; background-color: transparent; color: inherit; box-sizing: border-box; font-family: 'Source Code Pro', monospace;font-size:undefined; white-space: pre; border-top-left-radius: 0px; border-top-right-radius: 0px; border-bottom-right-radius: 0px; border-bottom-left-radius: 0px; word-wrap: normal; background-position: initial initial; background-repeat: initial initial;"><span class="hljs-keyword" style="color: rgb(0, 0, 136); box-sizing: border-box;">@property</span> (<span class="hljs-keyword" style="color: rgb(0, 0, 136); box-sizing: border-box;">nonatomic</span>, <span class="hljs-keyword" style="color: rgb(0, 0, 136); box-sizing: border-box;">strong</span>, nullable) UIRefreshControl *refreshControl NS_AVAILABLE_IOS(<span class="hljs-number" style="color: rgb(0, 102, 102); box-sizing: border-box;">10</span>_0) __TVOS_PROHIBITED;
- (instancetype)init;

<span class="hljs-keyword" style="color: rgb(0, 0, 136); box-sizing: border-box;">@property</span> (<span class="hljs-keyword" style="color: rgb(0, 0, 136); box-sizing: border-box;">nonatomic</span>, <span class="hljs-keyword" style="color: rgb(0, 0, 136); box-sizing: border-box;">readonly</span>, getter=isRefreshing) <span class="hljs-built_in" style="color: rgb(102, 0, 102); box-sizing: border-box;">BOOL</span> refreshing;

<span class="hljs-keyword" style="color: rgb(0, 0, 136); box-sizing: border-box;">@property</span> (null_resettable, <span class="hljs-keyword" style="color: rgb(0, 0, 136); box-sizing: border-box;">nonatomic</span>, <span class="hljs-keyword" style="color: rgb(0, 0, 136); box-sizing: border-box;">strong</span>) <span class="hljs-built_in" style="color: rgb(102, 0, 102); box-sizing: border-box;">UIColor</span> *tintColor;
<span class="hljs-keyword" style="color: rgb(0, 0, 136); box-sizing: border-box;">@property</span> (nullable, <span class="hljs-keyword" style="color: rgb(0, 0, 136); box-sizing: border-box;">nonatomic</span>, <span class="hljs-keyword" style="color: rgb(0, 0, 136); box-sizing: border-box;">strong</span>) NSAttributedString *attributedTitle UI_APPEARANCE_SELECTOR;

<span class="hljs-comment" style="color: rgb(136, 0, 0); box-sizing: border-box;">// May be used to indicate to the refreshControl that an external event has initiated the refresh action</span>
- (<span class="hljs-keyword" style="color: rgb(0, 0, 136); box-sizing: border-box;">void</span>)beginRefreshing NS_AVAILABLE_IOS(<span class="hljs-number" style="color: rgb(0, 102, 102); box-sizing: border-box;">6</span>_0);
<span class="hljs-comment" style="color: rgb(136, 0, 0); box-sizing: border-box;">// Must be explicitly called when the refreshing has completed</span>
- (<span class="hljs-keyword" style="color: rgb(0, 0, 136); box-sizing: border-box;">void</span>)endRefreshing NS_AVAILABLE_IOS(<span class="hljs-number" style="color: rgb(0, 102, 102); box-sizing: border-box;">6</span>_0);

</code><ul class="pre-numbering" style="box-sizing: border-box; position: absolute; width: 50px; background-color: rgb(238, 238, 238); top: 0px; left: 0px; margin: 0px; padding: 6px 0px 40px; border-right-width: 1px; border-right-style: solid; border-right-color: rgb(221, 221, 221); list-style: none; text-align: right;"><li style="box-sizing: border-box; padding: 0px 5px;">1</li><li style="box-sizing: border-box; padding: 0px 5px;">2</li><li style="box-sizing: border-box; padding: 0px 5px;">3</li><li style="box-sizing: border-box; padding: 0px 5px;">4</li><li style="box-sizing: border-box; padding: 0px 5px;">5</li><li style="box-sizing: border-box; padding: 0px 5px;">6</li><li style="box-sizing: border-box; padding: 0px 5px;">7</li><li style="box-sizing: border-box; padding: 0px 5px;">8</li><li style="box-sizing: border-box; padding: 0px 5px;">9</li><li style="box-sizing: border-box; padding: 0px 5px;">10</li><li style="box-sizing: border-box; padding: 0px 5px;">11</li><li style="box-sizing: border-box; padding: 0px 5px;">12</li><li style="box-sizing: border-box; padding: 0px 5px;">13</li><li style="box-sizing: border-box; padding: 0px 5px;">14</li></ul>
11.iOS 10 判断系统版本正确姿势
判断系统版本是我们经常用到的,尤其是现在大家都有可能需要适配iOS 10,那么问题就出现了,如下图:

我们得到了答案是:
<code class="hljs cs has-numbering" style="display: block; padding: 0px; background-color: transparent; color: inherit; box-sizing: border-box; font-family: 'Source Code Pro', monospace;font-size:undefined; white-space: pre; border-top-left-radius: 0px; border-top-right-radius: 0px; border-bottom-right-radius: 0px; border-bottom-left-radius: 0px; word-wrap: normal; background-position: initial initial; background-repeat: initial initial;"><span class="hljs-comment" style="color: rgb(136, 0, 0); box-sizing: border-box;">//值为 1 [[[[UIDevice currentDevice] systemVersion] substringToIndex:1] integerValue]</span>

<span class="hljs-comment" style="color: rgb(136, 0, 0); box-sizing: border-box;">//值为10.000000 [[UIDevice currentDevice] systemVersion].floatValue,</span>

<span class="hljs-comment" style="color: rgb(136, 0, 0); box-sizing: border-box;">//值为10.0 [[UIDevice currentDevice] systemVersion]</span></code><ul class="pre-numbering" style="box-sizing: border-box; position: absolute; width: 50px; background-color: rgb(238, 238, 238); top: 0px; left: 0px; margin: 0px; padding: 6px 0px 40px; border-right-width: 1px; border-right-style: solid; border-right-color: rgb(221, 221, 221); list-style: none; text-align: right;"><li style="box-sizing: border-box; padding: 0px 5px;">1</li><li style="box-sizing: border-box; padding: 0px 5px;">2</li><li style="box-sizing: border-box; padding: 0px 5px;">3</li><li style="box-sizing: border-box; padding: 0px 5px;">4</li><li style="box-sizing: border-box; padding: 0px 5px;">5</li></ul>
所以说判断系统方法最好还是用后面的两种方法,哦~我忘记说了[[UIDevice currentDevice] systemVersion].floatValue这个方法也是不靠谱的,好像在8.3版本输出的值是8.2,记不清楚了反正是不靠谱的,所以建议大家用[[UIDevice currentDevice] systemVersion]这个方法!
Swift判断如下:
<code class="hljs php has-numbering" style="display: block; padding: 0px; background-color: transparent; color: inherit; box-sizing: border-box; font-family: 'Source Code Pro', monospace;font-size:undefined; white-space: pre; border-top-left-radius: 0px; border-top-right-radius: 0px; border-bottom-right-radius: 0px; border-bottom-left-radius: 0px; word-wrap: normal; background-position: initial initial; background-repeat: initial initial;"><span class="hljs-keyword" style="color: rgb(0, 0, 136); box-sizing: border-box;">if</span> <span class="hljs-comment" style="color: rgb(136, 0, 0); box-sizing: border-box;">#available(iOS 10.0, *) {</span>

<span class="hljs-comment" style="color: rgb(136, 0, 0); box-sizing: border-box;">// iOS 10.0</span>

<span class="hljs-keyword" style="color: rgb(0, 0, 136); box-sizing: border-box;">print</span>(<span class="hljs-string" style="color: rgb(0, 136, 0); box-sizing: border-box;">"iOS 10.0"</span>);

} <span class="hljs-keyword" style="color: rgb(0, 0, 136); box-sizing: border-box;">else</span> { }
</code><ul class="pre-numbering" style="box-sizing: border-box; position: absolute; width: 50px; background-color: rgb(238, 238, 238); top: 0px; left: 0px; margin: 0px; padding: 6px 0px 40px; border-right-width: 1px; border-right-style: solid; border-right-color: rgb(221, 221, 221); list-style: none; text-align: right;"><li style="box-sizing: border-box; padding: 0px 5px;">1</li><li style="box-sizing: border-box; padding: 0px 5px;">2</li><li style="box-sizing: border-box; padding: 0px 5px;">3</li><li style="box-sizing: border-box; padding: 0px 5px;">4</li><li style="box-sizing: border-box; padding: 0px 5px;">5</li><li style="box-sizing: border-box; padding: 0px 5px;">6</li><li style="box-sizing: border-box; padding: 0px 5px;">7</li><li style="box-sizing: border-box; padding: 0px 5px;">8</li></ul>
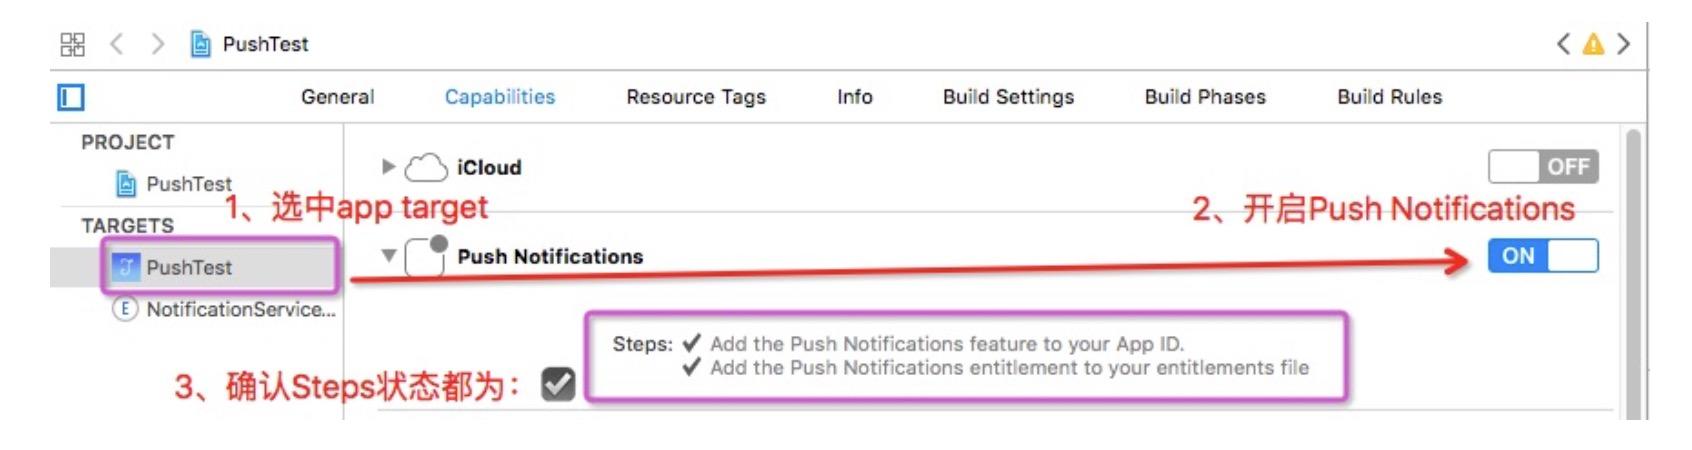
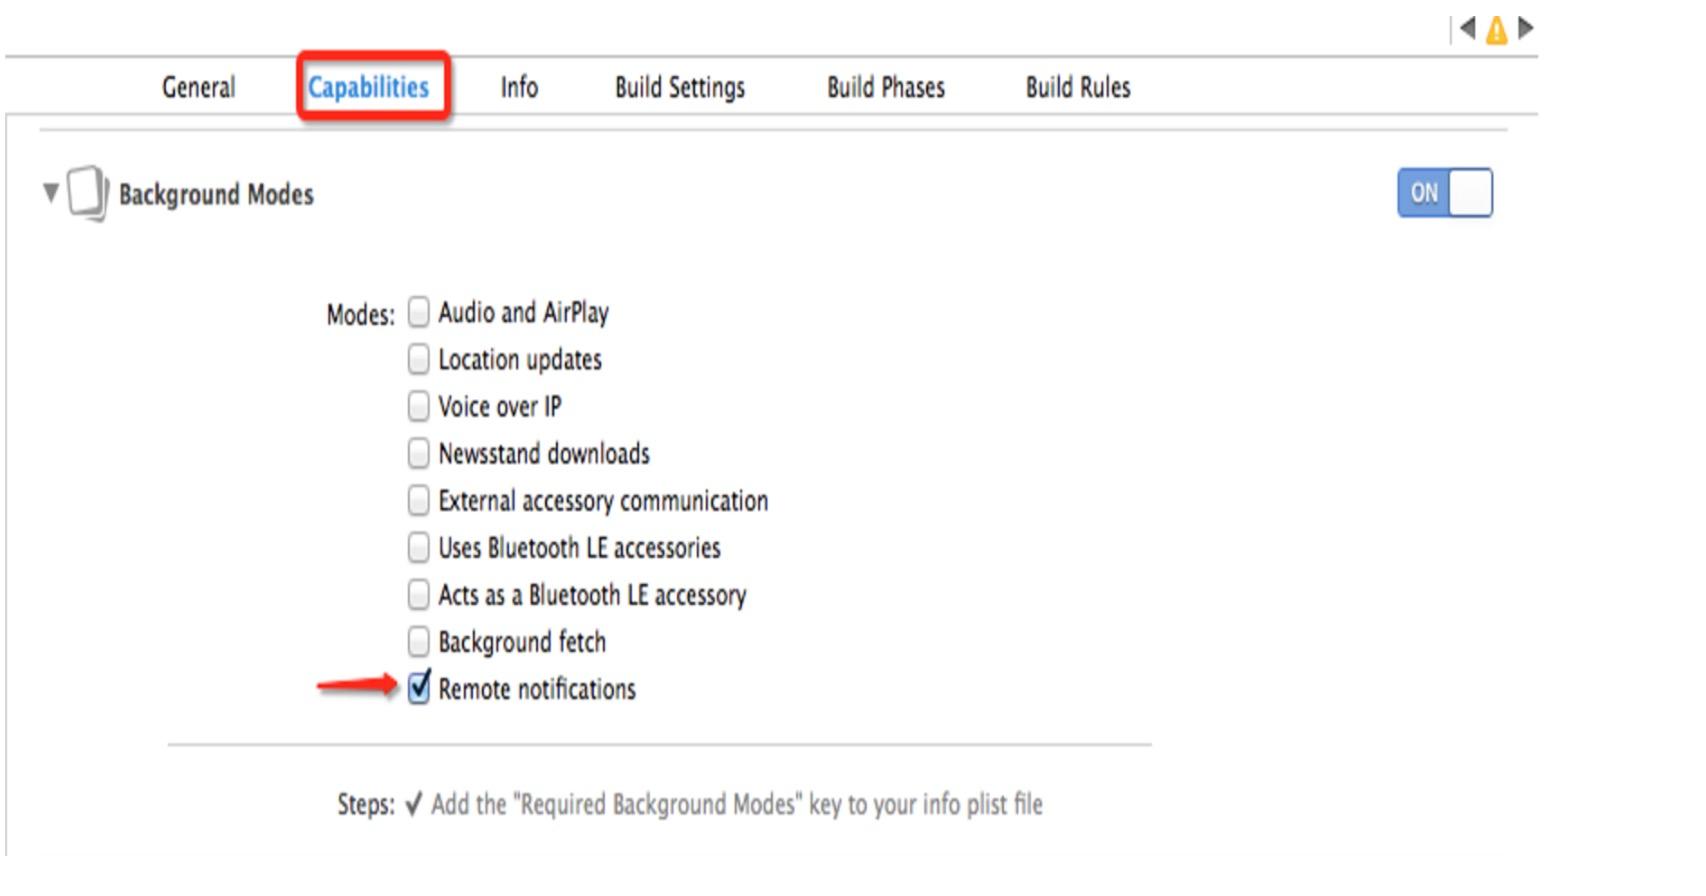
12.推送的时候,开启Remote notificationsYou’ve implemented -[application:didReceiveRemoteNotification:fetchCompletionHandler:],
but you still need to add “remote-notification” to the list of your supported UIBackgroundModes in your Info.plist.
解决方案:需要在Xcode 中修改应用的 Capabilities 开启Remote notifications,请参考下图:
13.One of the two will be used. Which one is undefined.”
objc[5114]:Class PLBuildVersion is implemented in both /Applications/Xcode.app/Contents/Developer/Platforms/iPhoneSimulator.platform/Developer/SDKs/iPhoneSimulator.sdk/System/Library/PrivateFrameworks/AssetsLibraryServices.framework/AssetsLibraryServices (0x1109a5910) and /Applications/Xcode.app/Contents/Developer/Platforms/iPhoneSimulator.platform/Developer/SDKs/iPhoneSimulator.sdk/System/Library/PrivateFrameworks/PhotoLibraryServices.framework/PhotoLibraryServices (0x110738210). One of the two will be used. Which one is undefined.
在模拟器中、发现“One of the two will be used. Which one is undefined.”日志
查找资料发现原因:objc runtime 对所用app使用同一个命名空间(flat namespace),运行机制如下:
首先二进制映像被加载,检查程序依赖关系
每一个二进制映像被加载的同时,程序的objc classes在objc runtime命名空间中注册
如果具有相同名称的类被再次加载,objc runtime的行为是不可预知的。一种可能的情况是任意一个程序的该类会被加载(这应该也是默认动作)
14.Xcode 8 Command + / 不能注释
解决方法:在终端输入
//sudo /usr/libexec/xpccachectl
重启电脑即可.
另外:Xcode 推出来快速文本注释:Command +Option +/
<code class="hljs java has-numbering" style="display: block; padding: 0px; background-color: transparent; color: inherit; box-sizing: border-box; font-family: 'Source Code Pro', monospace;font-size:undefined; white-space: pre; border-top-left-radius: 0px; border-top-right-radius: 0px; border-bottom-right-radius: 0px; border-bottom-left-radius: 0px; word-wrap: normal; background-position: initial initial; background-repeat: initial initial;"><span class="hljs-javadoc" style="color: rgb(136, 0, 0); box-sizing: border-box;">/**
 <#Description#>

<span class="hljs-javadoctag" style="color: rgb(102, 0, 102); box-sizing: border-box;"> @param</span> frame <#frame description#>

<span class="hljs-javadoctag" style="color: rgb(102, 0, 102); box-sizing: border-box;"> @return</span> <#return value description#>
 */</span>
- (instancetype)initWithFrame:(CGRect)frame
{
    <span class="hljs-keyword" style="color: rgb(0, 0, 136); box-sizing: border-box;">if</span> (self = [<span class="hljs-keyword" style="color: rgb(0, 0, 136); box-sizing: border-box;">super</span> initWithFrame:frame]) {
        [self initUiConfig];
    }
    <span class="hljs-keyword" style="color: rgb(0, 0, 136); box-sizing: border-box;">return</span> self;
}</code><ul class="pre-numbering" style="box-sizing: border-box; position: absolute; width: 50px; background-color: rgb(238, 238, 238); top: 0px; left: 0px; margin: 0px; padding: 6px 0px 40px; border-right-width: 1px; border-right-style: solid; border-right-color: rgb(221, 221, 221); list-style: none; text-align: right;"><li style="box-sizing: border-box; padding: 0px 5px;">1</li><li style="box-sizing: border-box; padding: 0px 5px;">2</li><li style="box-sizing: border-box; padding: 0px 5px;">3</li><li style="box-sizing: border-box; padding: 0px 5px;">4</li><li style="box-sizing: border-box; padding: 0px 5px;">5</li><li style="box-sizing: border-box; padding: 0px 5px;">6</li><li style="box-sizing: border-box; padding: 0px 5px;">7</li><li style="box-sizing: border-box; padding: 0px 5px;">8</li><li style="box-sizing: border-box; padding: 0px 5px;">9</li><li style="box-sizing: border-box; padding: 0px 5px;">10</li><li style="box-sizing: border-box; padding: 0px 5px;">11</li><li style="box-sizing: border-box; padding: 0px 5px;">12</li><li style="box-sizing: border-box; padding: 0px 5px;">13</li><li style="box-sizing: border-box; padding: 0px 5px;">14</li></ul>
15证书问题

这个问题刚开始估计大家都会碰到也是第一个要解决的问题
这个问题就是一个证书的设置问题,下面看两张图
正常我们会在BuildeSettings中设置证书:
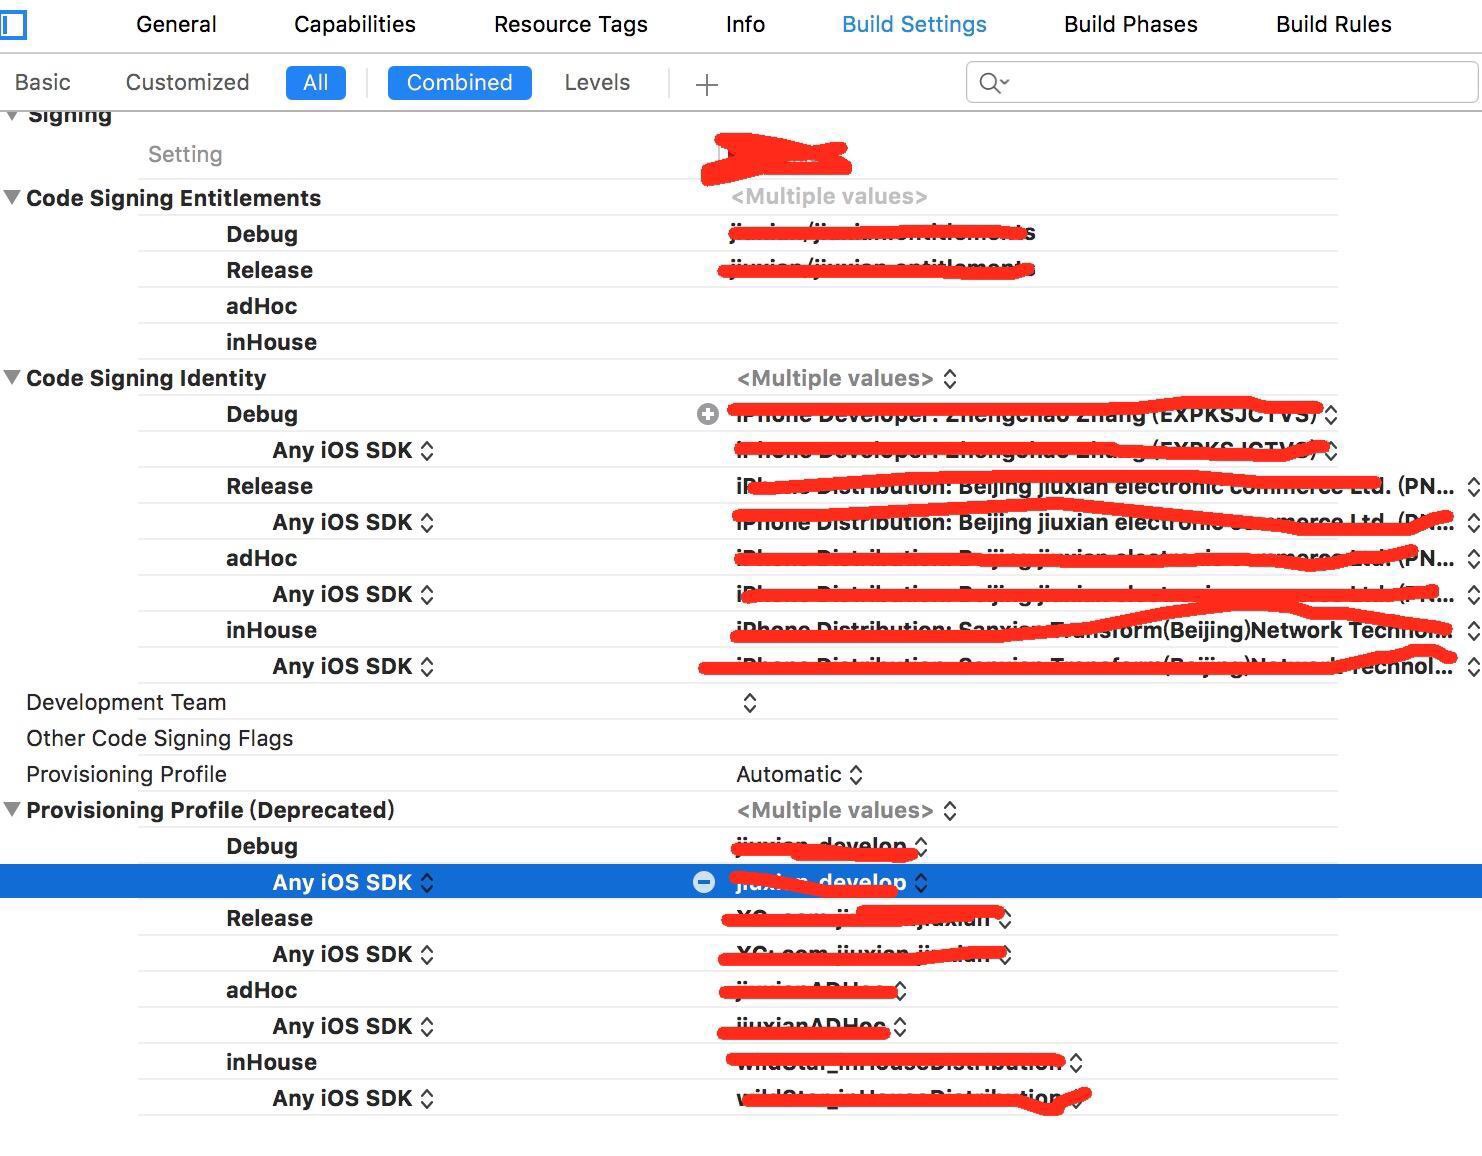
但是在xcode8.0中我们看到下面的新特性:
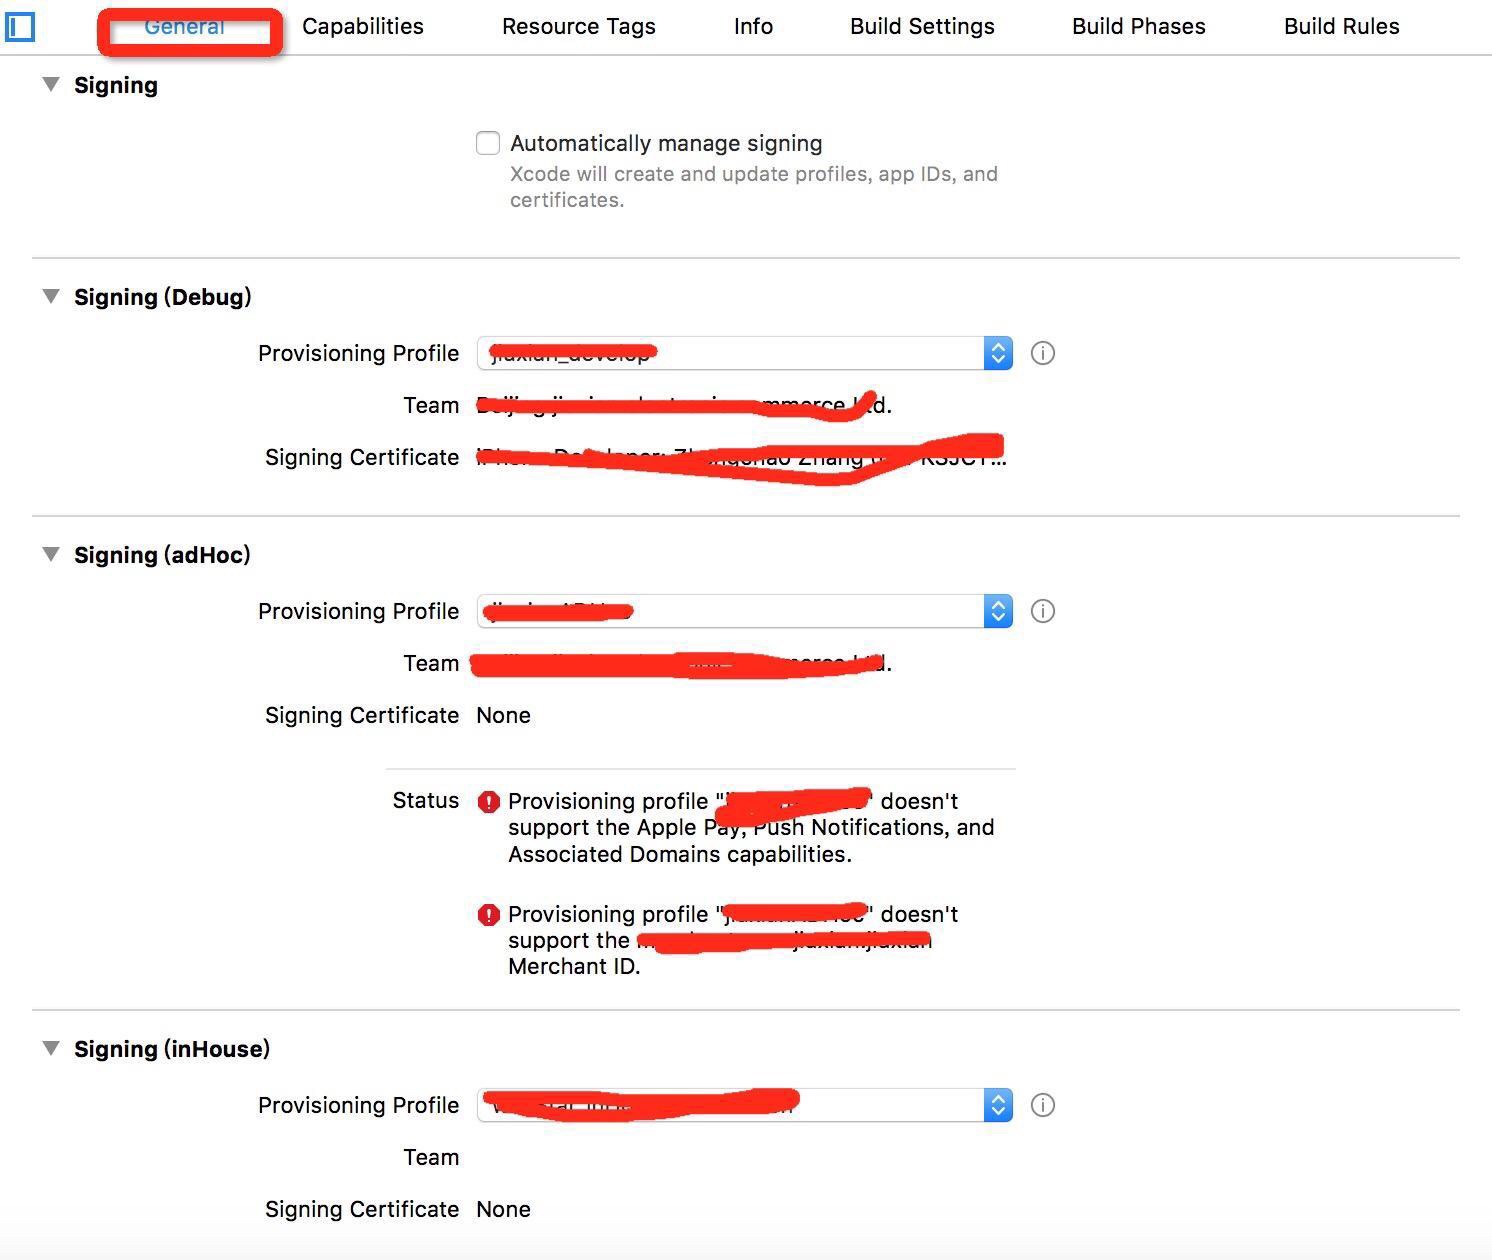
相信大家都能看到在Genreal下面会有Siging,没错这就是新特性,为了方便用户来管理,大家可以选择Automatically manage signing。需要输入开发者账号!如果没有账号也没关系,在下面也可以选择Debug、Realease、inHouse模式下对应的证书也可以!
但是 但是 但是 如果你的证书如果是通配符类型的,但是你的app包含了比如推送、apple pay、他会报错提示你未报含xx.id的manteid等等。所以你要生成针对你app的bundleid对应的证书!
16跳转到app内的隐私数据设置页面
我们知道用户没开启,肯定要提醒用户去设置开启的吧,所以我们要跳转到app的隐私数据界面。如何调用呢
iOS10 之前调用方法:
<code class="hljs objectivec has-numbering" style="display: block; padding: 0px; background-color: transparent; color: inherit; box-sizing: border-box; font-family: 'Source Code Pro', monospace;font-size:undefined; white-space: pre; border-top-left-radius: 0px; border-top-right-radius: 0px; border-bottom-right-radius: 0px; border-bottom-left-radius: 0px; word-wrap: normal; background-position: initial initial; background-repeat: initial initial;"><span class="hljs-built_in" style="color: rgb(102, 0, 102); box-sizing: border-box;">NSURL</span>*url=[<span class="hljs-built_in" style="color: rgb(102, 0, 102); box-sizing: border-box;">NSURL</span> URLWithString:@<span class="hljs-string" style="color: rgb(0, 136, 0); box-sizing: border-box;">"prefs:root=LOCATION_SERVICES"</span>];
                                   [[<span class="hljs-built_in" style="color: rgb(102, 0, 102); box-sizing: border-box;">UIApplication</span> sharedApplication] openURL:url];</code><ul class="pre-numbering" style="box-sizing: border-box; position: absolute; width: 50px; background-color: rgb(238, 238, 238); top: 0px; left: 0px; margin: 0px; padding: 6px 0px 40px; border-right-width: 1px; border-right-style: solid; border-right-color: rgb(221, 221, 221); list-style: none; text-align: right;"><li style="box-sizing: border-box; padding: 0px 5px;">1</li><li style="box-sizing: border-box; padding: 0px 5px;">2</li></ul>
但是iOS10 之后不能再调用此方法进行跳转隐私设置界面.
iOS10之后:
1)定义一个宏方便调用
<code class="hljs cs has-numbering" style="display: block; padding: 0px; background-color: transparent; color: inherit; box-sizing: border-box; font-family: 'Source Code Pro', monospace;font-size:undefined; white-space: pre; border-top-left-radius: 0px; border-top-right-radius: 0px; border-bottom-right-radius: 0px; border-bottom-left-radius: 0px; word-wrap: normal; background-position: initial initial; background-repeat: initial initial;"><span class="hljs-comment" style="color: rgb(136, 0, 0); box-sizing: border-box;">//-----------------------系统权限设置路径(iOS8以后适用)---------------------</span>
<span class="hljs-comment" style="color: rgb(136, 0, 0); box-sizing: border-box;">//url</span>
<span class="hljs-preprocessor" style="color: rgb(68, 68, 68); box-sizing: border-box;">#<span class="hljs-keyword" style="box-sizing: border-box;">define</span> SettingURL [NSURL URLWithString:UIApplicationOpenSettingsURLString]</span>
<span class="hljs-comment" style="color: rgb(136, 0, 0); box-sizing: border-box;">//调到设置</span>
<span class="hljs-preprocessor" style="color: rgb(68, 68, 68); box-sizing: border-box;">#<span class="hljs-keyword" style="box-sizing: border-box;">define</span> GoToSetting <span class="hljs-keyword" style="box-sizing: border-box;">if</span>([[UIApplication sharedApplication] canOpenURL:SettingURL]) { \</span>
                        [[UIApplication sharedApplication] openURL:SettingURL];}}</code><ul class="pre-numbering" style="box-sizing: border-box; position: absolute; width: 50px; background-color: rgb(238, 238, 238); top: 0px; left: 0px; margin: 0px; padding: 6px 0px 40px; border-right-width: 1px; border-right-style: solid; border-right-color: rgb(221, 221, 221); list-style: none; text-align: right;"><li style="box-sizing: border-box; padding: 0px 5px;">1</li><li style="box-sizing: border-box; padding: 0px 5px;">2</li><li style="box-sizing: border-box; padding: 0px 5px;">3</li><li style="box-sizing: border-box; padding: 0px 5px;">4</li><li style="box-sizing: border-box; padding: 0px 5px;">5</li><li style="box-sizing: border-box; padding: 0px 5px;">6</li></ul>
调用
<code class="hljs cs has-numbering" style="display: block; padding: 0px; background-color: transparent; color: inherit; box-sizing: border-box; font-family: 'Source Code Pro', monospace;font-size:undefined; white-space: pre; border-top-left-radius: 0px; border-top-right-radius: 0px; border-bottom-right-radius: 0px; border-bottom-left-radius: 0px; word-wrap: normal; background-position: initial initial; background-repeat: initial initial;"><span class="hljs-comment" style="color: rgb(136, 0, 0); box-sizing: border-box;">//去设置</span>
        <span class="hljs-keyword" style="color: rgb(0, 0, 136); box-sizing: border-box;">if</span> (IOS8_OR_LATER) {
            GoToSetting;
        }</code><ul class="pre-numbering" style="box-sizing: border-box; position: absolute; width: 50px; background-color: rgb(238, 238, 238); top: 0px; left: 0px; margin: 0px; padding: 6px 0px 40px; border-right-width: 1px; border-right-style: solid; border-right-color: rgb(221, 221, 221); list-style: none; text-align: right;"><li style="box-sizing: border-box; padding: 0px 5px;">1</li><li style="box-sizing: border-box; padding: 0px 5px;">2</li><li style="box-sizing: border-box; padding: 0px 5px;">3</li><li style="box-sizing: border-box; padding: 0px 5px;">4</li></ul>
2,方法中直接调用
[[UIApplication sharedApplication] openURL:[NSURL URLWithString:UIApplicationOpenSettingsURLString]];
17真彩色的显示
真彩色的显示会根据光感应器来自动的调节达到特定环境下显示与性能的平衡效果,如果需要这个功能的话,可以在info.plist里配置(在Source Code模式下):
<code class="hljs has-numbering" style="display: block; padding: 0px; background-color: transparent; color: inherit; box-sizing: border-box; font-family: 'Source Code Pro', monospace;font-size:undefined; white-space: pre; border-top-left-radius: 0px; border-top-right-radius: 0px; border-bottom-right-radius: 0px; border-bottom-left-radius: 0px; word-wrap: normal; background-position: initial initial; background-repeat: initial initial;">UIWhitePointAdaptivityStyle</code><ul class="pre-numbering" style="box-sizing: border-box; position: absolute; width: 50px; background-color: rgb(238, 238, 238); top: 0px; left: 0px; margin: 0px; padding: 6px 0px 40px; border-right-width: 1px; border-right-style: solid; border-right-color: rgb(221, 221, 221); list-style: none; text-align: right;"><li style="box-sizing: border-box; padding: 0px 5px;">1</li></ul>
它有五种取值,分别是:
<code class="hljs cs has-numbering" style="display: block; padding: 0px; background-color: transparent; color: inherit; box-sizing: border-box; font-family: 'Source Code Pro', monospace;font-size:undefined; white-space: pre; border-top-left-radius: 0px; border-top-right-radius: 0px; border-bottom-right-radius: 0px; border-bottom-left-radius: 0px; word-wrap: normal; background-position: initial initial; background-repeat: initial initial;">UIWhitePointAdaptivityStyleStandard <span class="hljs-comment" style="color: rgb(136, 0, 0); box-sizing: border-box;">// 标准模式</span>
UIWhitePointAdaptivityStyleReading <span class="hljs-comment" style="color: rgb(136, 0, 0); box-sizing: border-box;">// 阅读模式</span>
UIWhitePointAdaptivityStylePhoto <span class="hljs-comment" style="color: rgb(136, 0, 0); box-sizing: border-box;">// 图片模式</span>
UIWhitePointAdaptivityStyleVideo <span class="hljs-comment" style="color: rgb(136, 0, 0); box-sizing: border-box;">// 视频模式</span>
UIWhitePointAdaptivityStyleStandard <span class="hljs-comment" style="color: rgb(136, 0, 0); box-sizing: border-box;">// 游戏模式</span></code><ul class="pre-numbering" style="box-sizing: border-box; position: absolute; width: 50px; background-color: rgb(238, 238, 238); top: 0px; left: 0px; margin: 0px; padding: 6px 0px 40px; border-right-width: 1px; border-right-style: solid; border-right-color: rgb(221, 221, 221); list-style: none; text-align: right;"><li style="box-sizing: border-box; padding: 0px 5px;">1</li><li style="box-sizing: border-box; padding: 0px 5px;">2</li><li style="box-sizing: border-box; padding: 0px 5px;">3</li><li style="box-sizing: border-box; padding: 0px 5px;">4</li><li style="box-sizing: border-box; padding: 0px 5px;">5</li></ul>
如果你的项目是游戏类的,就选择UIWhitePointAdaptivityStyleStandard这个模式,五种模式的显示效果是从上往下递减,也就是说如果你的项目是图片处理类的,你选择的是阅读模式,给选择太好的效果会影响性能.


 6798
6798


 被折叠的 条评论
为什么被折叠?
被折叠的 条评论
为什么被折叠?
 到【灌水乐园】发言


