


什么是AppWidget?AppWidget就是我们平常在桌面上见到的那种一个个的小窗口,利用这个小窗口可以给用户提供一些方便快捷的操作。本篇打算从以下几个点来介绍AppWidget:
1.如何创建一个简单的AppWidget
2.如何使得AppWidget与客户端程序交互
下面我们来创建一个简单的AppWidget
1、定义AppWidgetProviderInfor:在res/xml文件夹中定义一个名为 :example_appwidget_info.xml,这个名字随便取。它是提供AppWidget元数据;设置在桌面上显示的大小
example_appwidget_info.xml
<appwidget-provider xmlns:android="http://schemas.android.com/apk/res/android"
    android:minWidth="294dp"
    android:minHeight="72dp"
    android:updatePeriodMillis="86400000"
    android:initialLayout="@layout/example_appwidget">
    <!-- initiallayout设置引用 的布局文件 -->
 </appwidget-provider>
2、为App Widget指定样式和布局;在桌面上显示的内容,布局,就像main.xml布局一样,做为example_appwidget_info.xml的initialLayout参数的值,用这个布局文件来初始化example_appwidget_info.xml。
<?xml version="1.0" encoding="utf-8"?>
<LinearLayout xmlns:android="http://schemas.android.com/apk/res/android"
    android:orientation="vertical"
    android:layout_width="fill_parent"
    android:layout_height="fill_parent"
    >
<TextView
	android:id="@+id/widgetTextId"
    android:layout_width="fill_parent"
    android:layout_height="wrap_content"
    android:text="firstWidgetText"
    android:background="#000000"
    />
</LinearLayout>
3、实现继承AppWidgetProvider这个类;
这个类有五个方法:都需要继承:(下面按照当第一次加载Widget到删除的时候,这些方法运行的顺序)
1、onReceive(Context context, Intent intent) Implements onReceive(Context, Intent) to dispatch calls to the various other methods on AppWidgetProvider.
2、onEnabled(Context context) Called in response to the ACTION_APPWIDGET_ENABLED broadcast when the a AppWidget for this provider is instantiated. Override this method to implement your own AppWidget functionality.
3、onUpdate(Context context, AppWidgetManager appWidgetManager, int[] appWidgetIds) Called in response to the ACTION_APPWIDGET_UPDATE broadcast when this AppWidget provider is being asked to provide RemoteViews for a set of AppWidgets. Override this method to implement your own AppWidget functionality.
4、onDeleted(Context context, int[] appWidgetIds) Called in response to the ACTION_APPWIDGET_DELETED broadcast when one or more AppWidget instances have been deleted. Override this method to implement your own AppWidget functionality.
5、onDisabled(Context context) Called in response to the ACTION_APPWIDGET_DISABLED broadcast, which is sent when the last AppWidget instance for this provider is deleted. Override this method to implement your own AppWidget functionality.
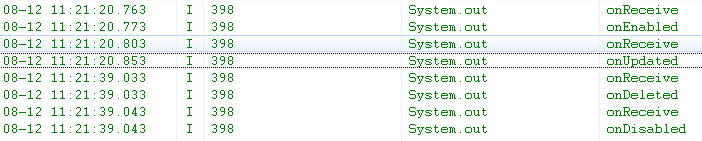
基中onReceive负责进行接受广播,控制运行哪一个函数,每一个操作都会首先运行这个方法,再调用其它的方法。所以在Widget一次加载到删除过程中,onReceive会执行4次;
如下图:注意message
下面看代码:ExampleAppWidgetProvider.java
public class ExampleAppWidgetProvider extends AppWidgetProvider {
	@Override
	public void onUpdate(Context context, AppWidgetManager appWidgetManager,
			int[] appWidgetIds) {
		System.out.println("onupdate");
		super.onUpdate(context, appWidgetManager, appWidgetIds);
	}

	@Override
	public void onDeleted(Context context, int[] appWidgetIds) {
		System.out.println("onDeleted");
		super.onDeleted(context, appWidgetIds);
	}

	@Override
	public void onDisabled(Context context) {
		System.out.println("onDisabled");
		super.onDisabled(context);
	}

	@Override
	public void onEnabled(Context context) {
		System.out.println("onEnabled");
		super.onEnabled(context);
	}
} 
下面再来看看如何在AppWidget中添加按钮,添加监听事件。
1、在example_appwidget_info.xml文件里添加Button迫使
2、添加TargetActivity
只是用来响应点击事件,在此例中没有实际意义
public class TargetActivity extends Activity {
	@Override
	protected void onCreate(Bundle savedInstanceState) {
		super.onCreate(savedInstanceState);
		setContentView(R.layout.main);
	}
}
3、在AndroidManifest.xml文件注册TargetActivity
4、重写ExampleAppWidgetProvider类的onUpdate方法,在第一次创建WidGet的时候,向按钮添加监听。并用PendingIntent,和RemoteView两个类,对事件进行处理;
public void onUpdate(Context context, AppWidgetManager appWidgetManager,
			int[] appWidgetIds) {
		System.out.println("onupdated");

		for (int i = 0; i <appWidgetIds.length; i++) {
			System.out.println(appWidgetIds[i]);
			//创建一个Intent对象
			Intent intent = new Intent(context,TargetActivity.class);
			//创建一个PendingIntent(有四种方法获取)
			PendingIntent pendingIntent = PendingIntent.getActivity(context, 0, intent, 0);
			RemoteViews remoteViews = new RemoteViews(context.getPackageName(),R.layout.example_appwidget);
			//为按钮绑定事件处理器
			//第一个参数用来指定被绑定处理器的控件的ID
			//第二个参数用来指定当事件发生时,哪个PendingIntent将会被执行
			remoteViews.setOnClickPendingIntent(R.id.widgetButton, pendingIntent);
			//更新AppWidget
			//第一个参数用于指定被更新AppWidget的ID
			appWidgetManager.updateAppWidget(appWidgetIds[i], remoteViews);
		}
		super.onUpdate(context, appWidgetManager, appWidgetIds);
	}
Called in response to the ACTION_APPWIDGET_DELETED broadcast when one or more AppWidget instances have been deleted. Override this method to implement your own AppWidget functionality.
在实际应用在AppWidget更多的是利用广播机制Action进行处理的;下面我们来看看如何利用广播机制,单击改变AppWidget的内容;在上例 的基础上进行扩展:
1、AppWidget的布局文件:widget01.xml
<?xml version="1.0" encoding="utf-8"?>
<LinearLayout xmlns:android="http://schemas.android.com/apk/res/android"
    android:orientation="vertical"
    android:layout_width="fill_parent"
    android:layout_height="fill_parent"
    >
<Button android:id="@+id/widgetButton"
	android:layout_width="fill_parent"
	android:layout_height="wrap_content"
	android:text="@string/widget_button"/>

<TextView android:id="@+id/test_text"
	android:layout_width="fill_parent"
	android:layout_height="wrap_content"
	android:text="@string/test_text"
	android:gravity="center"
	android:textColor="#fff"/>
</LinearLayout>2、修改AndroidManifest.xml
在Reservi里添加action,注册事件
<receiver android:name="ExampleAppWidgetProvider"><!--如果action匹配成功,就在此类中进行处理-->
	<intent-filter>
		<!--利用广播机制接收,onUpdate会接收广播。查看源码可收得知  Called in response to the ACTION_APPWIDGET_UPDATE
			broadcast when this AppWidget provider is being asked to provide RemoteViews
			for a set of AppWidgets. Override this method to implement your own AppWidget
			functionality. 这个也必须要,不然onRecerve不会调用 。-->
		<!--这是自定义的Action事件--><action android:name="android.appwidget.action.APPWIDGET_UPDATE"/>
		<action android:name="learn.test.UPDATE_APP_WIDGET"/>
	</intent-filter>
	<meta-data android:name="android.appwidget.provider" android:resource="@xml/widget_test" />
</receiver>public class ExampleAppWidgetProvider extends AppWidgetProvider {
//定义一个常量字符串,该常量用于命名Action
private static final String UPDATE_ACTION = "learn.test.UPDATE_APP_WIDGET";
@Override
public void onDeleted(Context context, int[] appWidgetIds) {
// TODO Auto-generated method stub
System.out.println("onDeleted");
super.onDeleted(context, appWidgetIds);
}
@Override
public void onDisabled(Context context) {
// TODO Auto-generated method stub
System.out.println("onDisabled");
super.onDisabled(context);
}
@Override
public void onEnabled(Context context) {
// TODO Auto-generated method stub
System.out.println("onEnabled");
super.onEnabled(context);
}
@Override
public void onReceive(Context context, Intent intent) {
// TODO Auto-generated method stub
System.out.println("onReceive");
String action = intent.getAction();
if (UPDATE_ACTION.equals(action)) {
RemoteViews remoteViews = new RemoteViews(context.getPackageName(),
R.layout.widget01);
remoteViews.setTextViewText(R.id.test_text, "this is OnReceive");
//getInstance(Context context) Get the AppWidgetManager instance to use for the supplied Context object.静态方法。
AppWidgetManager appWidgetManager = AppWidgetManager.getInstance(context);
ComponentName componentName = new ComponentName(context,ExampleAppWidgetProvider.class);
appWidgetManager.updateAppWidget(componentName, remoteViews);
} else {
super.onReceive(context, intent);这里一定要添加,eles部分,不然,onReceive不会去调用其它的方法。但是如果把这条语句放在外面,就会每次运行onUpdate,onDeleted等方法,就会运行两次,因为UPDATE_ACTION.equals(action)配置成功会运行一次,uper.onReceive(context, intent)配置成功又会运行一次,后都是系统自定义的。
}
}
@Override
public void onUpdate(Context context, AppWidgetManager appWidgetManager,
int[] appWidgetIds) {
// TODO Auto-generated method stub
System.out.println("onUpdated");
//创建一个Intent对象
Intent intent = new Intent();
//为Intent对象设置Action
intent.setAction(UPDATE_ACTION);
//使用getBroadcast方法,得到一个PendingIntent对象,当该对象执行时,会发送一个广播
PendingIntent pendingIntent = PendingIntent.getBroadcast(context, 0,
intent, 0);
RemoteViews remoteViews = new RemoteViews(context.getPackageName(),
R.layout.widget01);
remoteViews.setOnClickPendingIntent(R.id.widgetButton, pendingIntent);
appWidgetManager.updateAppWidget(appWidgetIds, remoteViews);
super.onUpdate(context, appWidgetManager, appWidgetIds);
}
}


 528
528

 被折叠的 条评论
为什么被折叠?
被折叠的 条评论
为什么被折叠?
 到【灌水乐园】发言


