


一、前言
最近接触的OS比较多,外加自己想多学点OS的知识,就在网上狂搜教学用的OS。除了Minix用VMware搭建外,看到还有个叫GeekOS的学习用OS,就拿来试试。
![]()
What is it?
GeekOS is a tiny operating system kernel for x86 PCs. Its main purpose is to serve as a simple but realistic example of an OS kernel running on real hardware. (Actually, most of the development is done on the Bochs emulator.)
The goal of GeekOS is to be a tool for learning about operating system kernels. As of version 0.2.0, it comes with a set of projects suitable for use in an undergraduate operating systems course, or for self-directed learning. GeekOS has been used in courses at a number of colleges and universities.
看了下说明,心动了~~呵呵(a tool for learning about operating system kernels)
还得下Bochs来虚拟机。顺便提下Bochs, Virtual PC 和 VMware的区别
摘自《自己动手写操作系统》Bochs vs. Virtual PC vs. VMware
不知道开源给你的感觉是什么,对笔者而言,它总是意味着亲切、清新,身上没有讨厌的商业气息。也许你也有同感,如果是的话,可能你已经对本书到现在才提到Bochs感到不满。实际上笔者对Bochs其实是充满好感的,尤其是它可以对操作系统进行调试,这样方便的特性不能不让我们对它青睐有加。理论上讲,Bochs可以完全取代Virtual PC和VMware,但以笔者个人的体会,从一个操作系统开发者的角度来看,Bochs大致有这么几个缺点:
— Virtual PC有共享文件夹功能,可以方便地读取host上的文件,而Bochs不可以。当我们学习保护模式时,免不了要用到DOS,用Virtual PC可以在Windows下编写代码,通过共享文件夹的方式在DOS下执行,而Bochs就没这么方便。
— 跟Virtual PC和VMware比起来,Bochs的速度要慢得多,笔者曾经试图在Bochs上安装Red Hat 9,但随后就发现这是个愚蠢的决定,太慢了,不久笔者就把它中止掉了。
— Virtual PC的图形化界面要比Bochs好用。
读者可能注意到了上文中“从一个操作系统开发者的角度来看”这一句,之所以这样说,是因为我们这样武断地将Bochs拿来跟Virtual PC或Vmware相比是不公平的。虽然它们模拟同一个操作系统时的输出可能差不多,但从实现机制上讲,它们有巨大的不同。
Bochs是一个模拟器,它完全模拟x86的硬件以及一些外围设备。而VMware除了模拟一些特定的I/O之外,还可以用它的x86运行时引擎来完成其余内容的执行。意思是说,当客户PC试图执行一些动作时,VMware并不是利用自己重造的机制来解释它,而是将它传递给实际的硬件。在这里,VMware的工作更应称为“虚拟(virtualize)”而不是“模拟(emulate)”。Virtual PC的原理介于两者之间,它的一些部分是模拟出来的,另一部分则是虚拟出来的。Virtual PC能够实现共享文件夹也是因为同样的原因。
由于Bochs在模拟一台真正的机器的硬件,所以使得它比VMware和Virtual PC都慢得多。
笔者曾经将Tinix分别用Bochs 2.1.1、Virtual PC 5.0、VMware 3.2.0和真实的机器进行比较测试,发现在Virtual PC上运行的效果跟真实的机器居然差不多,而Bochs和VMware则慢得多,这可能跟它们实现机制的差异以及Tinix自身的特点有关。不过,Virtual PC的确因为速度、操作方便性等特点具备很强的吸引力,以至于本书最终将它而不是开源免费的Bochs作为首选。
二、主要开发工具
Bochs 2.3 http://bochs.sourceforge.net/
geekos-0.3.0 http://geekos.sourceforge.net/
cygwin http://cygwin.com/
cygwin的安装全面已经介绍过了,就不再重复了,只是要注意需要有一下软件:
Thefollowingis a complete list of software needed to compile GeekOS.* gcc< http://gcc.gnu.org/>,version2.95.2orlater,targetinganyi386/ELFplatform,ortargeting
PECOFFunder Cygwin
* Any ANSI-compliant C compiler for the host platform (the computer you are planning to compile
GeekOSon);unlessyouarecross-compiling,thiscanbethesamecompileryouusetocompileGeekOS
* GNUbinutils< http://www.gnu.org/software/binutils/>,targetinganyi386/ELFplatform,
or PECOFF under Cygwin; you probably alreadyhave this if you have gcc
* GNUMake< http://www.gnu.org/software/make/>;theGeekOSmakefilewillnotworkwith
other versions of make
* Perl< http://www.perl.org/>, version5 or later
* egrep< http://www.gnu.org/software/grep/grep.html>
* AWK< http://www.gnu.org/software/gawk/>
* diff3< http://www.gnu.org/software/diffutils/>
* NASM < http://nasm.sourceforge.net/>; on Linux or FreeBSD systems, this is probably the
only required software not already installed
在把GeekOS的压缩包解压在 /home 文件夹下,这样它的路径是 /home/geekos-0.3.0。
可以发现/home/geekos-0.3.0/src 有很多project文件夹,呵呵,不错~~
这些是学习OS内核功能的各个版本,我们先来最简单的project0。
三、开始试验
Project 0 (Chapter 5, “Project 0: Getting Started”) serves as an introduction to modifying, building, and
running GeekOS.You will add akernel thread to read keys from the keyboard and echo them to the screen.
project0实现的功能就是读键盘输入并回显。
运行cygwin,打入命令:
$ cd /home/geekos-0.3.0/src/project0/build
$ make depend
$ make
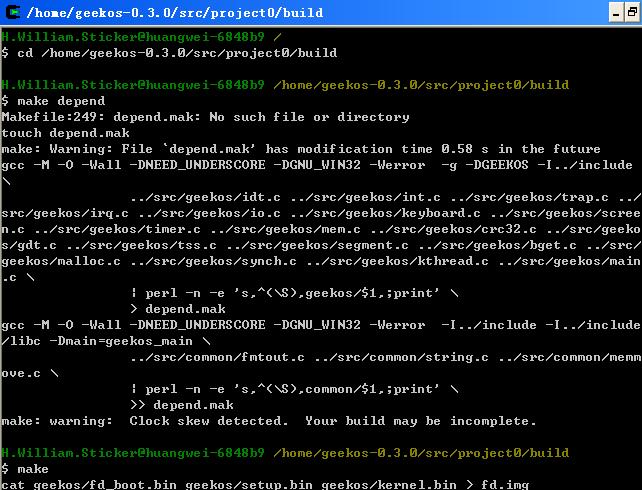
结束后,build文件夹下多了fd.img文件和.bochsrc文件,一个是引导盘的镜像,一个是Bochs的配置文件。
把他们复制到Bochs的安装目录下。
但是这个配置文件好像不是Bochs2.3版本的,不需要newharddrivesupport参数。
幸好Bochs自带了个sample文件,文件名是bochsrc-sample.txt,把名字改成.bochsrc。
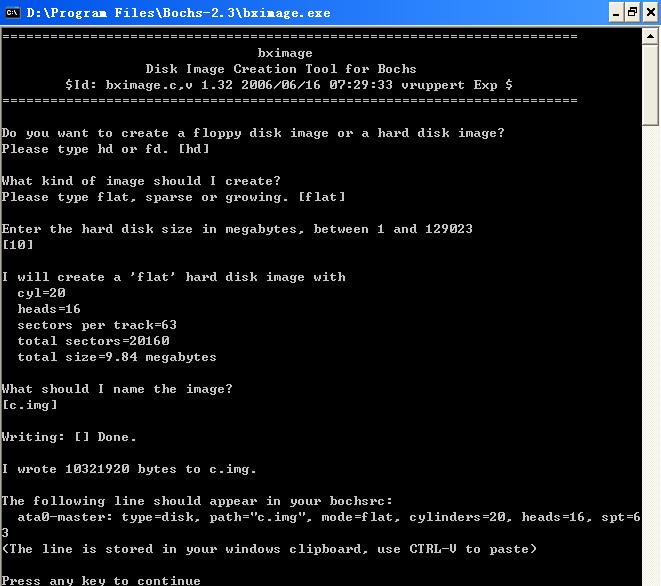
在用自带的bximage.exe作个硬盘镜像,都按Enter就行了
打开编辑.bochsrc
floppya: 1_44=fd.img, status=inserted
ata0-master: type=disk, mode=flat, path="c.img", cylinders=0 # autodetect
boot: a
romimage: file=BIOS-bochs-latest, address=0xf0000
vgaromimage: file=VGABIOS-lgpl-latest
其实不用自己写了的,用 # 就是注释掉,选择其他选项就好了。
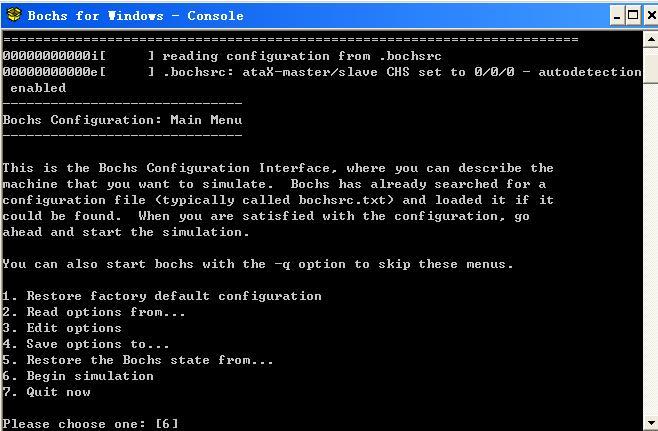
运行Bochs,因为已经配置好了,所以默认选项是[6]Begin Simulation,直接进入。
仔细看的话,会看见以软盘启动了。
Welcome to GeekOS 欢迎词也出现了。第一个project就这样搭建成功了,简单吧。

四、小结
正因为简单,所以可以拿代码来仔细研究下了。源代码在 geekos-0.3.0/src/project0/src 下,呵呵。
一共有7个project,从官方的解释,除了project0,其他project的学习目的是:
For Project 1 (Chapter 6, “Project 1: Loading Executable Files”), you become familiar with the structure
of an executable file. You are provided with code for loading and running executable files, but you need to
first become familiar with the ELF file format, then write code to parse the provided file and pass it to the
loader.
In Project 2 (Chapter 7, “Project 2: Adding Processes”), you will add support for user mode processes.
Rather than using virtual memory to provide separate user address spaces, this project uses segmentation,
which issimpler to understand.
Project 3 (Chapter 8, “Project 3: Scheduling”) improves the GeekOS scheduler and adds support for
semaphores to coordinate multiple processes.
Project4(Chapter9,“Project4: VirtualMemory”)replaces the segmentation based user memory protec-
tion added in Project 1 with paged virtual memory. Pages of memory can be stored on disk in order to free
up RAMwhen the demand for memory exceeds the amountavailable.
Project 5(Chapter10, “Project 5: AFilesystem”) adds a hierarchical read/writefile system to GeekOS.
Project 6 (Chapter 11, “Project 6: ACLs and Inter-process Communication”) adds access control lists
(ACLs)tothefilesystem,and adds interprocess communication using an onymoushalf-duplexpipes. Upon
the completion of this project, GeekOS will resemble a very simple versionof Unix.
以前从来没试过用源代码来编译OS内核,还做成引导盘来引导,看来要好好学罗~~


 1万+
1万+


 被折叠的 条评论
为什么被折叠?
被折叠的 条评论
为什么被折叠?
 到【灌水乐园】发言


