


开始演示
现在您的Oculus Rift已插入,驱动程序已安装,SDK也装上了,您就可以开始使用SDK了。
注释:如果你还没有准备好,花点时间调整Rift头盔,以便您的头和眼睛舒服。关于配置Rift更详细的信息可以在这份手册中的Oculus Rift硬件设置中找到。
硬件配置了之后,下一步就是测试开发工具包。该SDK附带了一组全代码的C++示例,旨在帮助您快速开始。这些包括:
- OculusWorldDemo—一个有视觉吸引力的屏幕上有文本和控件的场景。
- OculusRoomTiny—一个最小的C++示例显示传感器在Rift上的集成和渲染。
开始
Oculus推荐运行预编译的OculusWorldDemo来探索SDK。你可以找到一个链接Oculus SDK安装的根目录中的可执行文件。
以下是OculusWorldDemo应用的截图:
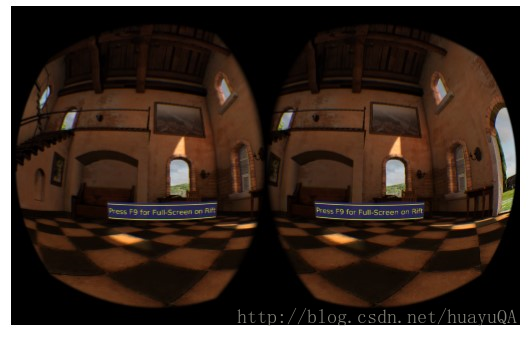
图1:OculusWorldDemo应用
OculusWorldDemo 控制
OculusWorldDemo混合使用标准的和专业的控制。
下表介绍用于移动的键和设备:
| Key or Input | Movement |
|---|---|
| W, S | Move forward, back |
| A, D | Strafe left, right |
| Mouse | Look left, right |
| Left gamepad stick | Move |
| Right gamepad stick | Turn |
表1:移动
下表介绍用于功能的键:
| Key(s) | Function |
|---|---|
| F4 | Multisampling toggle |
| F5 | sRGB toggle |
| F7 | Mono/stereo view mode toggle |
| F9 | Hardware full-screen (low latency) |
| F11 | Performance HUD toggle |
| E | Motion relative to head/body |
| R | Reset sensor orientation |
| Esc | Cancel full-screen |
| -, + | Adjust eye height |
| L | Adjust fourth view value |
| Tab | Options Menu |
| Spacebar | Toggle debug info overlay |
| T | Reset player position |
| Ctrl+Q | Quit |
| G | Cycle grid overlay mode |
| U, J | Adjust second view value |
| I, K | Adjust third view value |
| ; | Cylce rendered scenes |
| +Shift | Adjust values quickly |
| O | Toggle Time-Warp |
| C | Toggle FreezeEyeUpdate |
| V | Toggle Vsync |
表2:功能
OculusWorldDemo用途
一旦你启动了OculusWorldDemo,你应该看到电脑显示器上一个类似之前截图的窗口。
当图像正确显示在Rift上,花一点时间看看VR周围,并反复确认所有的硬件正常工作。如果您使用的是DK2,那么你应该能够看到,物理头转换以及旋转现在也在虚拟世界产生。
重要的:如果你在初始校准后,因为任何理由移动DK2跟踪器,拿着它跟踪视域时,一定要尽量减少HMD的移动,减少到几秒时间。这将给系统调整跟踪器姿态的机会。
如果你想更详细地探索位置跟踪,您可以按分号(;)键取得我们用于调试的多维数据集字段。在这种模式下,多维数据集显示,允许您轻松地观察位置跟踪行为。当头部位置被跟踪时多维数据集显示绿色,当传感器融合回落到头部模型时显示红色。
你第一次体验OculusWorldDemo有许多有趣的事情要注意。首先,等级被成比例设计。因此,一切事物都似乎与在现实世界的高度大致相同。所有事物的大小,包括椅子,桌子,门和天花板,都是基于真实世界的对象测量的。所有的测量单位都是米。
根据您的实际高度,你可能会感到比正常较矮或高。在OculusWorldDemo中玩家默认的眼睛高度为1.61米(大约平均成人眼睛高度),但可以使用 “+”和“-”键调整。或者,你可以在Oculus Configuration Utility中设置高度(通过Oculus系统托盘图标访问)。
OculusWorldDemo包含代码显示了如何在玩家的资料中使用值设置如眼高,IPD,和头部尺寸,以及如何提供给他们SDK来实现针对大范围的玩家的真实的尺度感。世界和玩家的尺度对身临其境的虚拟现实体验至关重要。有关尺度的更多信息,在Oculus最佳实践指南中提供。
下一步
尝试OculusWorldDemo后,还有其他示例和工具。
软件开发人员和集成工程师
如果你要集成Oculus SDK到你的游戏引擎,Oculus建议从示例项目开始。
打开以下项目,编译它们,并用提供的示例代码进行实验:
Samples/Projects/Windows/VSxxxx/Samples.sln
OculusRoomTiny
这是一个很好的开始,因为它的源代码紧密结合了Oculus SDK的所有关键特性。它包含初始化libovr核心的必要逻辑,接入Oculus设备,利用玩家的个人资料,实现头部跟踪,传感器融合,立体3D渲染和变形处理。
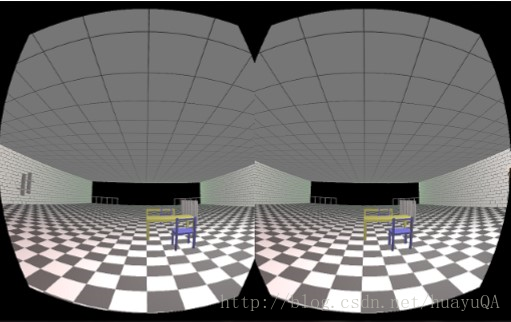
图2:OculusRoomTiny
OculusWorldDemo
这是一个比较复杂的示例。它的目的是便携式和支持更多的功能。这些包括窗口/全屏模式的切换,XML的3D模型和纹理加载,运动的碰撞检测,可调角度的大小和质量控制、2D界面文本重叠,等等。
当你熟悉了Oculus SDK基础后,这是一个很好的应用实验。它还包括和覆盖菜单选项,切换自定义绘制包括FOV的许多方面,渲染目标作用,变速和显示设置。尝试这些选项可以为开发人员提供深入了解相关的数字是什么意思,以及它们如何影响幕后的东西。
除了试验所提供的示例代码,Oculus还推荐阅读本指南的其余部分。它涵盖了libovr初始化,头部跟踪,Rift渲染,减少延迟。
艺术家和游戏设计师
如果你要集成Oculus SDK到你的游戏引擎,Oculus建议从示例项目开始。
如果你是一个不熟悉C ++的艺术家或游戏设计师,我们建议下载UE3 UE4或Unity以及相应的Oculus集成。您可以使用我们的外装即用的集成立即开始构建基于Oculus的内容。
我们也建议通读Oculus的最佳实践指南,里面有提示,建议,以及围绕开发伟大VR经验的研究。主题包括控制方案,用户界面,切割场景,相机功能和玩法。最佳实践指南应该是设计你的Oculus-ready游戏时的及时参考。
除此之外,下一步是开始构建自己的Oculus-ready游戏或应用程序。成千上万的其他开发人员正构建虚拟现实游戏的未来。看他们正在谈论什么,访问forums.oculus.com。看他们在构建什么,访问share.oculus.com。
原文如下
Getting Started with the Demos
Now that the Rift is plugged in, the drivers are installed, and the SDK is installed, you are ready to begin using the SDK.
Note: If you haven’t already, take a moment to adjust the Rift headset so that it’s comfortable for your head and eyes. More detailed information about configuring the Rift can be found in the Oculus Rift Hardware Setup this guide.
After the hardware is configured, the next step is to test the development kit. The SDK comes with a set of fullsource C++ samples designed to help you get started quickly. These include:
- OculusWorldDemo—A visually appealing scene with on-screen text and controls.
- OculusRoomTiny—A minimal C++ sample showing sensor integration and rendering on the Rift.
Getting Started
Oculus recommends running the pre-built OculusWorldDemo to explore the SDK. You can find a link to the executable file in the root of the Oculus SDK installation.
The following is a screenshot of the OculusWorldDemo application:
Figure 1: OculusWorldDemo Application
OculusWorldDemo Controls
The OculusWorldDemo uses a mix of standard and specialized controls.
The following table describes keys and devices that you use for movement:
| Key or Input | Movement |
|---|---|
| W, S | Move forward, back |
| A, D | Strafe left, right |
| Mouse | Look left, right |
| Left gamepad stick | Move |
| Right gamepad stick | Turn |
Table 1: Movement
The following table describes keys that you use for functions:
| Key(s) | Function |
|---|---|
| F4 | Multisampling toggle |
| F5 | sRGB toggle |
| F7 | Mono/stereo view mode toggle |
| F9 | Hardware full-screen (low latency) |
| F11 | Performance HUD toggle |
| E | Motion relative to head/body |
| R | Reset sensor orientation |
| Esc | Cancel full-screen |
| -, + | Adjust eye height |
| L | Adjust fourth view value |
| Tab | Options Menu |
| Spacebar | Toggle debug info overlay |
| T | Reset player position |
| Ctrl+Q | Quit |
| G | Cycle grid overlay mode |
| U, J | Adjust second view value |
| I, K | Adjust third view value |
| ; | Cylce rendered scenes |
| +Shift | Adjust values quickly |
| O | Toggle Time-Warp |
| C | Toggle FreezeEyeUpdate |
| V | Toggle Vsync |
Table 2: Functions
OculusWorldDemo Usage
Once you’ve launched OculusWorldDemo, you should see a window on your PC monitor similar to the previous screenshot.
When the image is correctly displayed inside the Rift then take a moment to look around in VR and doublecheck that all of the hardware is working properly. If you’re using a DK2 then you should be able to see that physical head translation is now also recreated in the virtual word as well as rotation.
Important: If you need to move the DK2 tracker for any reason after initial calibration, be sure to minimize the movement of the HMD for a few seconds while holding it within the tracking frustum. This will give the system chance to recalibrate the tracker pose.
If you would like to explore positional tracking in more detail, you can press the semicolon (;) key to bring the “sea of cubes” field that we use for debugging. In this mode, cubes are displayed that allow you to easily observe positional tracking behavior. Cubes are displayed in green when head position is being tracked and in red when sensor fusion falls back onto the head model.
There are a number of interesting things to take note of the first time you experience OculusWorldDemo. First, the level is designed to scale. Thus, everything appears to be roughly the same height as it would be in the real world. The sizes for everything, including the chairs, tables, doors, and ceiling, are based on measurements from real world objects. All of the units are measured in meters.
Depending on your actual height, you may feel shorter or taller than normal. The default eye height of the player in OculusWorldDemo is 1.61 meters (approximately the average adult eye height), but this can be adjusted using the using the ‘+’ and ‘-’ keys. Alternatively, you can set your height in the Oculus Configuration Utility (accessed through the Oculus System Tray Icon).
OculusWorldDemo includes code that shows how to use values set in the player’s profile such as eye height, IPD, and head dimensions, and how to feed them into the SDK to achieve a realistic sense of scale for a wide range of players. The scale of the world and the player is critical to an immersive VR experience. More information about scale is available in the Oculus Best Practices Guide.
Next Steps
After trying the OculusWorldDemo, there are other samples and tools.
Software Developers and Integration Engineers
If you’re integrating the Oculus SDK into your game engine, Oculus recommend starting with the sample projects.
Open the following projects, build them, and experiment with the provided sample code:
Samples/Projects/Windows/VSxxxx/Samples.sln
OculusRoomTiny
This is a good place to start, because its source code compactly combines all critical features of the Oculus SDK. It contains logic necessary to initialize LibOVR core, access Oculus devices, use the player’s profile, implement head-tracking, sensor fusion, stereoscopic 3D rendering, and distortion processing.
Figure 2:OculusRoomTiny
OculusWorldDemo
This is a more complex sample. It is intended to be portable and support many more features. These include windowed/full-screen mode switching, XML 3D model and texture loading, movement collision detection, adjustable view size and quality controls, 2D UI text overlays, and so on.
This is a good application to experiment with after you are familiar with Oculus SDK basics. It also includes and overlay menu with options and toggles that customize many aspects of rendering including FOV, render target use, timewarp and display settings. Experimenting with these options may provide developers with insight into what the related numbers mean and how they affect things behind the scenes.
Beyond experimenting with the provided sample code, Oculus recommends reading the rest of this guide. It covers LibOVR initialization, head-tracking, rendering for the Rift, and minimizing latency.
Artists and Game Designers
If you’re integrating the Oculus SDK into your game engine, Oculus recommends starting with the sample projects.
If you’re an artist or game designer unfamiliar with C++, we recommend downloading UE3, UE4 or Unity along with the corresponding Oculus integration. You can use our out-of-the-box integrations to begin building Oculus-based content immediately.
We also recommend reading through the Oculus Best Practices Guide, which has tips, suggestions, and research oriented around developing great VR experiences. Topics include control schemes, user interfaces, cut-scenes, camera features, and gameplay. The Best Practices Guide should be a go-to reference when designing your Oculus-ready games.
Aside from that, the next step is to start building your own Oculus-ready game or application. Thousands of other developers are out building the future of virtual reality gaming. To see what they are talking about, go to forums.oculus.com. To see what they are building, go to share.oculus.com.


 2320
2320


 被折叠的 条评论
为什么被折叠?
被折叠的 条评论
为什么被折叠?
 到【灌水乐园】发言


