


1. Caffe训练方法综述
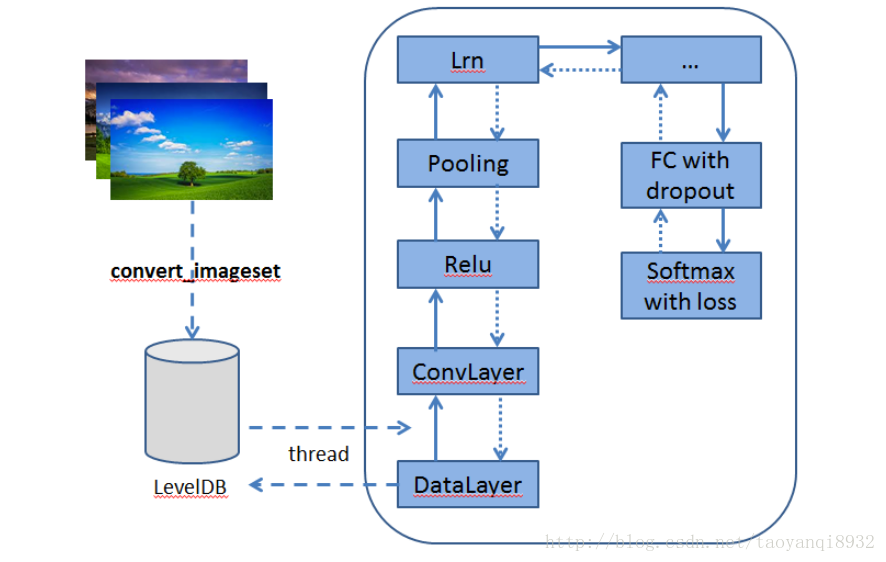
caffe非常简单,训练时只需写prototxt文件即可,其大致的步骤为:
- Resize图片,转换存储格式(LMDB/LevelDB)
- 定义网络结构(编辑prototxt)
- 定义solver(编辑另一个prototxt)
- 一行命令开始训练(可以基于已有的权重赋值)
如下图所示,其训练的过程,关于卷积神经网络(CNN)可以参考:计算机视觉与卷积神经网络
下面对手写数字识别进行训练。
2. MNIST数据集
mnist是一个大型的手写数字库,其包含60000个训练集和10000个测试机,每张图片已经进行了尺度归一化等操作,因此可以直接拿过来使用。
下载
可以在Caffe源码框架的/data/mnist下执行,如果没有安装Caffe,请参考:linux(ubuntu)下安装深度学习框架caffe
cd data/mnist
./get_mnist.sh- 1
- 2
- 1
- 2
下载后可以看到其文件:
yqtao@yqtao:~/caffe/data/mnist$ tree
.
├── get_mnist.sh
├── t10k-images-idx3-ubyte
├── t10k-labels-idx1-ubyte
├── train-images-idx3-ubyte
└── train-labels-idx1-ubyte- 1
- 2
- 3
- 4
- 5
- 6
- 7
- 1
- 2
- 3
- 4
- 5
- 6
- 7
注意:下载后的文件需要转换存储格式为LEVELDB或LMDB,这要做有两个原因:
- 转换成统一的格式可以简化数据读取层的实现
- 提高磁盘I/O的利用率
转换格式
// 执行命令
yqtao@yqtao:~/caffe$ ./examples/mnist/create_mnist.sh- 1
- 2
- 1
- 2
这要会在example/mnist产生 mnist_test_lmdb和mnist_train_lmdb两个目录分别存放测试集和训练集。
3. 定义层次结构
这是非常重要的一步,但是其完全是模板话的定义,如下图所示为LeNet-5模型所定义的CNN:
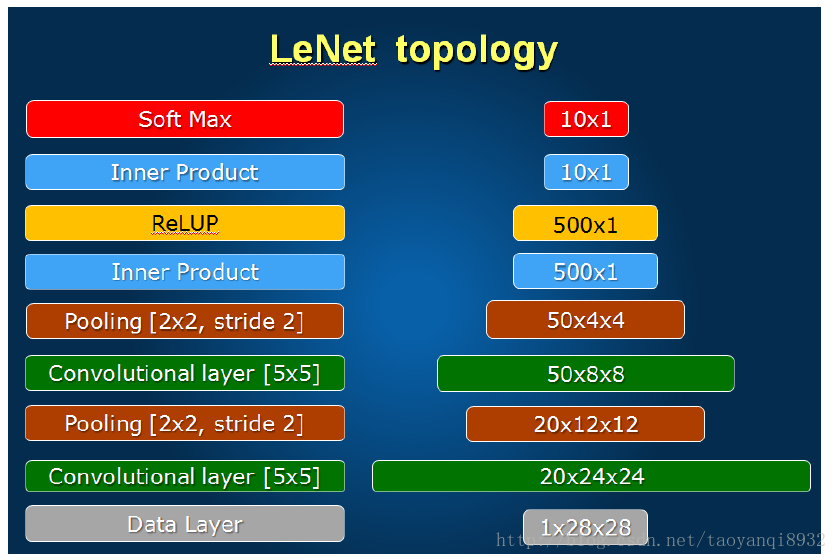
这张图非常的重要,有了它,编写后面的网络结构就好非常的清晰了。
关于上图的结构是写到.prototxt文件中的,其文件描述在 /example/mnist/lenet_train_test.prototxt中。
数据层
数据层的图示:
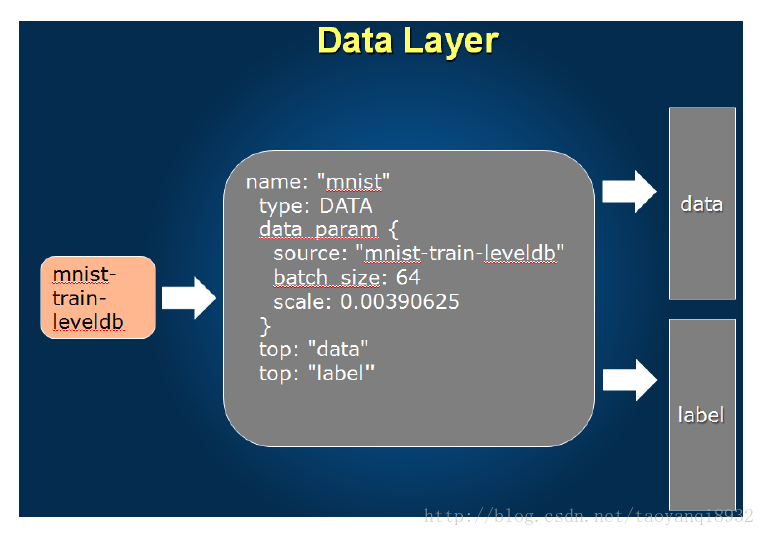
  1 name: "LeNet"                  //Net的名称
  2 layer {
  3   name: "mnist"
  4   type: "Data"                //表明为数据层
  5   top: "data"                 //top,表示输出
  6   top: "label"
  7   include {                   //只在训练时有效
  8     phase: TRAIN
  9   }
 10   transform_param {
 11     scale: 0.00390625        //数据变化缩放因子
 12   }
 13   data_param {               //数据层的参数
 14     source: "examples/mnist/mnist_train_lmdb" //来源
 15     batch_size: 64          //一次读取64张图片
 16     backend: LMDB           //数据格式
 17   }
18 }- 1
- 2
- 3
- 4
- 5
- 6
- 7
- 8
- 9
- 10
- 11
- 12
- 13
- 14
- 15
- 16
- 17
- 18
- 1
- 2
- 3
- 4
- 5
- 6
- 7
- 8
- 9
- 10
- 11
- 12
- 13
- 14
- 15
- 16
- 17
- 18
卷积层
卷积层的图示:
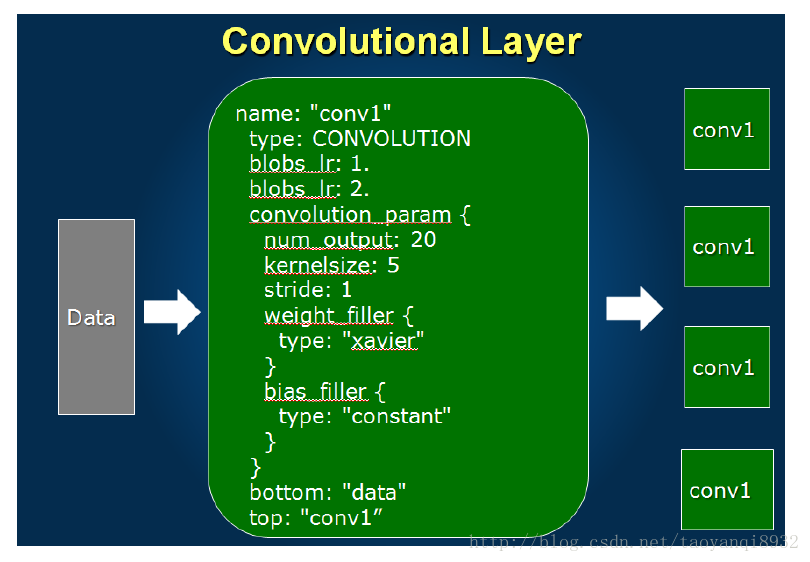
如下卷积层的定义:
 36 layer {
 37   name: "conv1"
 38   type: "Convolution"
 39   bottom: "data"          //上一层的输出,这一层的输入
 40   top: "conv1"            //这一层的输出
 41   param {                 //学习率
 42     lr_mult: 1
 43   }
 44   param {
 45     lr_mult: 2
 46   }
 47   convolution_param {
 48     num_output: 20         //也就是depth
 49     kernel_size: 5         //核的大小5*5
 50     stride: 1              //步长1
 51     weight_filler {        //权值初始方式
 52       type: "xavier"
 53     }
 54     bias_filler {
 55       type: "constant"
 56     }
 57   }
58 }- 1
- 2
- 3
- 4
- 5
- 6
- 7
- 8
- 9
- 10
- 11
- 12
- 13
- 14
- 15
- 16
- 17
- 18
- 19
- 20
- 21
- 22
- 23
- 1
- 2
- 3
- 4
- 5
- 6
- 7
- 8
- 9
- 10
- 11
- 12
- 13
- 14
- 15
- 16
- 17
- 18
- 19
- 20
- 21
- 22
- 23
注意:在top,和bottom中一定不要写错了!
池化层
池化层图示:
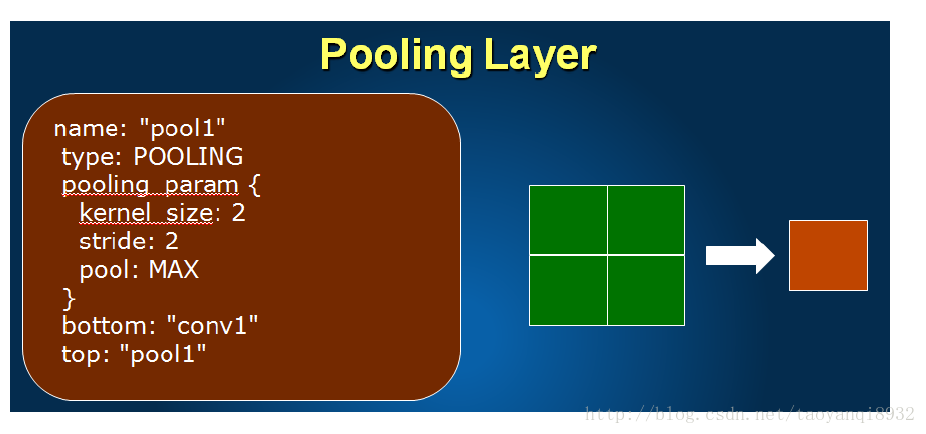
其定义如下:
 59 layer {
 60   name: "pool1"
 61   type: "Pooling"
 62   bottom: "conv1"
 63   top: "pool1"
 64   pooling_param {
 65     pool: MAX           //下采样的方法
 66     kernel_size: 2      //窗口
 67     stride: 2           //步长
 68   }
69 }- 1
- 2
- 3
- 4
- 5
- 6
- 7
- 8
- 9
- 10
- 11
- 1
- 2
- 3
- 4
- 5
- 6
- 7
- 8
- 9
- 10
- 11
全链接层

其定义如下:
104 layer {
105   name: "ip1"
106   type: "InnerProduct"
107   bottom: "pool2"
108   top: "ip1"
109   param {
110     lr_mult: 1
111   }
112   param {
113     lr_mult: 2
114   }
115   inner_product_param {
116     num_output: 500
117     weight_filler {
118       type: "xavier"
119     }
120     bias_filler {
121       type: "constant"
122     }
123   }
124 }- 1
- 2
- 3
- 4
- 5
- 6
- 7
- 8
- 9
- 10
- 11
- 12
- 13
- 14
- 15
- 16
- 17
- 18
- 19
- 20
- 21
- 1
- 2
- 3
- 4
- 5
- 6
- 7
- 8
- 9
- 10
- 11
- 12
- 13
- 14
- 15
- 16
- 17
- 18
- 19
- 20
- 21
激励层
其图示如下:
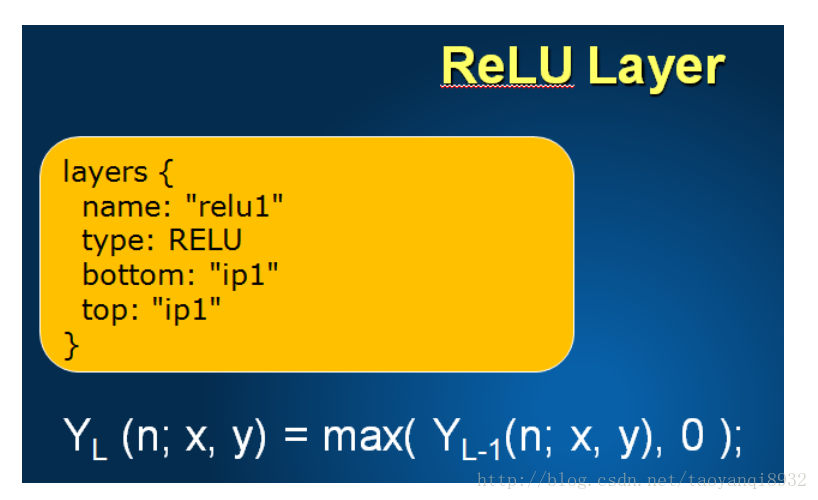
定义如下:
125 layer {
126   name: "relu1"
127   type: "ReLU"
128   bottom: "ip1"
129   top: "ip1"
130 }- 1
- 2
- 3
- 4
- 5
- 6
- 1
- 2
- 3
- 4
- 5
- 6
损失层
定义如下:
162 layer {
163   name: "loss"
164   type: "SoftmaxWithLoss"
165   bottom: "ip2"
166   bottom: "label"
167   top: "loss"
168 }- 1
- 2
- 3
- 4
- 5
- 6
- 7
- 1
- 2
- 3
- 4
- 5
- 6
- 7
注意:计算损失的时候的输入为label为数据层的一个输出,和全连接层的输出ip2,这一层的输出为loss。
4. 定义超参数文件
有了上面的网络结构的文件后还需要一个solver.prototxt的文件,其指定了训练的超参数。
其文件目录在example/mnist/lenet_solver.prototxt,每一项都有详细的解析。
  1 # The train/test net protocol buffer definition
  2 net: "examples/mnist/lenet_train_test.prototxt"
  3 # test_iter specifies how many forward passes the test should carry out.
  4 # In the case of MNIST, we have test batch size 100 and 100 test iterations,
  5 # covering the full 10,000 testing images.
  6 test_iter: 100
  7 # Carry out testing every 500 training iterations.
  8 test_interval: 500
  9 # The base learning rate, momentum and the weight decay of the network.
 10 base_lr: 0.01
 11 momentum: 0.9
 12 weight_decay: 0.0005
 13 # The learning rate policy
 14 lr_policy: "inv"
 15 gamma: 0.0001
 16 power: 0.75
 17 # Display every 100 iterations
 18 display: 100
 19 # The maximum number of iterations
 20 max_iter: 10000
 21 # snapshot intermediate results
 22 snapshot: 5000
 23 snapshot_prefix: "examples/mnist/lenet"
 24 # solver mode: CPU or GPU
25 solver_mode: CPU //这里默认是GPU,但是个人硬件不支持,所以改为CPU。- 1
- 2
- 3
- 4
- 5
- 6
- 7
- 8
- 9
- 10
- 11
- 12
- 13
- 14
- 15
- 16
- 17
- 18
- 19
- 20
- 21
- 22
- 23
- 24
- 25
- 1
- 2
- 3
- 4
- 5
- 6
- 7
- 8
- 9
- 10
- 11
- 12
- 13
- 14
- 15
- 16
- 17
- 18
- 19
- 20
- 21
- 22
- 23
- 24
- 25
5. 训练
首先了解build/tools/caffe.bin的用法,如下所示:
yqtao@yqtao:~/caffe$ ./build/tools/caffe.bin
caffe.bin: command line brew
usage: caffe <command> <args>

commands:
  train           train or fine tune a model
  test            score a model
  device_query    show GPU diagnostic information
  time            benchmark model execution time

  Flags from tools/caffe.cpp:
    -gpu (Optional; run in GPU mode on given device IDs separated by ','.Use
      '-gpu all' to run on all available GPUs. The effective training batch
      size is multiplied by the number of devices.) type: string default: ""
    -iterations (The number of iterations to run.) type: int32 default: 50
    -level (Optional; network level.) type: int32 default: 0
    -model (The model definition protocol buffer text file.) type: string
      default: ""
    -phase (Optional; network phase (TRAIN or TEST). Only used for 'time'.)
      type: string default: ""
    -sighup_effect (Optional; action to take when a SIGHUP signal is received:
      snapshot, stop or none.) type: string default: "snapshot"
    -sigint_effect (Optional; action to take when a SIGINT signal is received:
      snapshot, stop or none.) type: string default: "stop"
    -snapshot (Optional; the snapshot solver state to resume training.)
      type: string default: ""
    -solver (The solver definition protocol buffer text file.) type: string
      default: ""
    -stage (Optional; network stages (not to be confused with phase), separated
      by ','.) type: string default: ""
    -weights (Optional; the pretrained weights to initialize finetuning,
      separated by ','. Cannot be set simultaneously with snapshot.)
type: string default: ""- 1
- 2
- 3
- 4
- 5
- 6
- 7
- 8
- 9
- 10
- 11
- 12
- 13
- 14
- 15
- 16
- 17
- 18
- 19
- 20
- 21
- 22
- 23
- 24
- 25
- 26
- 27
- 28
- 29
- 30
- 31
- 32
- 33
- 1
- 2
- 3
- 4
- 5
- 6
- 7
- 8
- 9
- 10
- 11
- 12
- 13
- 14
- 15
- 16
- 17
- 18
- 19
- 20
- 21
- 22
- 23
- 24
- 25
- 26
- 27
- 28
- 29
- 30
- 31
- 32
- 33
则进行训练的命令为:
//执行命令
./build/tools/caffe train --solver=examples/mnist/lenet_solver.prototxt- 1
- 2
- 1
- 2
其中solver=examples/mnist/lenet_solver.prototxt为指定的超参数文件。
运行部分结果如下:
I0311 17:43:26.273123 16205 sgd_solver.cpp:106] Iteration 9900, lr = 0.00596843
I0311 17:43:34.746616 16205 solver.cpp:454] Snapshotting to binary proto file examples/mnist/lenet_iter_10000.caffemodel
I0311 17:43:34.758142 16205 sgd_solver.cpp:273] Snapshotting solver state to binary proto file examples/mnist/lenet_iter_10000.solverstate
I0311 17:43:34.799706 16205 solver.cpp:317] Iteration 10000, loss = 0.00373883
I0311 17:43:34.799777 16205 solver.cpp:337] Iteration 10000, Testing net (#0)
I0311 17:43:40.162556 16205 solver.cpp:404]     Test net output #0: accuracy = 0.9914
I0311 17:43:40.162638 16205 solver.cpp:404]     Test net output #1: loss = 0.0260208 (* 1 = 0.0260208 loss)
I0311 17:43:40.162645 16205 solver.cpp:322] Optimization Done.
I0311 17:43:40.162649 16205 caffe.cpp:254] Optimization Done.- 1
- 2
- 3
- 4
- 5
- 6
- 7
- 8
- 9
- 1
- 2
- 3
- 4
- 5
- 6
- 7
- 8
- 9
可以看到,最终的训练模型的权值保存在 examples/mnist/lenet_iter_10000.caffemodel
训练的状态保存在 examples/mnist/lenet_iter_10000.solverstate
6. 验证
执行下面的命令,指定命令test,参数网络定义的位置和权值的位置即可。
yqtao@yqtao:~/caffe$ ./build/tools/caffe.bin test \
> -model examples/mnist/lenet_train_test.prototxt \
> -weights examples/mnist/lenet_iter_10000.caffemodel \
> -iterations 100- 1
- 2
- 3
- 4
- 1
- 2
- 3
- 4
运行结果如下:
0311 17:49:28.120023 16423 caffe.cpp:308] Batch 96, accuracy = 0.97
I0311 17:49:28.120096 16423 caffe.cpp:308] Batch 96, loss = 0.0561079
I0311 17:49:28.174964 16423 caffe.cpp:308] Batch 97, accuracy = 0.98
I0311 17:49:28.175036 16423 caffe.cpp:308] Batch 97, loss = 0.0847761
I0311 17:49:28.229038 16423 caffe.cpp:308] Batch 98, accuracy = 1
I0311 17:49:28.229110 16423 caffe.cpp:308] Batch 98, loss = 0.00344597
I0311 17:49:28.286336 16423 caffe.cpp:308] Batch 99, accuracy = 1
I0311 17:49:28.286495 16423 caffe.cpp:308] Batch 99, loss = 0.00835868
I0311 17:49:28.286504 16423 caffe.cpp:313] Loss: 0.0260208
I0311 17:49:28.286516 16423 caffe.cpp:325] accuracy = 0.9914
I0311 17:49:28.286526 16423 caffe.cpp:325] loss = 0.0260208 (* 1 = 0.0260208 loss)- 1
- 2
- 3
- 4
- 5
- 6
- 7
- 8
- 9
- 10
- 11
- 1
- 2
- 3
- 4
- 5
- 6
- 7
- 8
- 9
- 10
- 11
最终的精确度为accuracy = 0.9914.
7. 总结
转换存储格式(
LMDB/LevelDB)定义网络结构(编辑
prototxt)定义
solver(编辑另一个prototxt)学习使用
caffe.bin命令的使用


 5748
5748


 被折叠的 条评论
为什么被折叠?
被折叠的 条评论
为什么被折叠?
 到【灌水乐园】发言


