


http://blog.csdn.net/andylauren/article/details/52204085
1. 子窗体或控件,重写paintEvent事件,画边框、背景、文字、图片效果比较好,因为窗口在创建的时候会自动调用paintEvent事件,所以可以在paintEvent事件中初始化一些自定义效果。用paintEvent 事件画边框,用QPalette设置背景。
// 画边框
QPainter painter(this);
painter.setRenderHint(QPainter::Antialiasing, true);
painter.setPen(QPen(QColor(225,70,56), 2));
// painter.setBrush(QColor(16,62,81)); // 也可设置背景,有时效果不好
painter.drawRoundedRect(rect(), 5.0, 5.0);
// 设置背景
QPalette pal = palette();
pal.setBrush(QPalette::Window, QColor(16,62,81));
setPalette(pal);
setAutoFillBackground(true);
2. QStringList 输出
QStringList m_strLang << "English" << "Chinese";
qDebug("set language: %s", m_strLang.at(0).toLocal8Bit().constData());
3. QStringList 使用注意
QStringList strDateformatList;
strDateformatList
<< m_strMonth + "-" + m_strDay + "-" + m_strYear
<< m_strDay + "-" + m_strMonth + "-" + m_strYear
<< m_strYear + "-" + m_strMonth + "-" + m_strDay;
如果strDateformatList 在生命周期内多次调用,则会多次插入字符串,使得字符串重复,这不是我们想要的。那就定义为局部变量,每次会重新赋值,达到更新的目的。
4.需要动态刷新的页面可以在showEvent函数中刷新。
5. 用paintEvent或用调色板为QWidget填充背景时,需要加上setAutoFillBackground(true);语句,否则没效果。
6. 想使弹出的窗口为圆角,用paintEvent画圆角矩形,但四个直角仍然存在,不美观。可以把背景设为透明,用paintEvent画出想要的背景,因为四个角没有画上背景,是透明的,所以看不见。
// 设置背景为透明 (构造函数中)
QPalette pal = palette();
pal.setBrush(QPalette::Window, QColor(255, 255, 255, 0));
setPalette(pal);
setAutoFillBackground(true);
// 画背景和边框 (paintEvent函数中)
QPainter painter(this);
painter.setRenderHint(QPainter::Antialiasing, true);
painter.setPen(QPen(QColor(225,70,56), 2));
painter.setBrush(QColor(16,62,81));
painter.drawRoundedRect(rect(), 5.0, 5.0);
7. Qt::Key_Enter、Qt::Key_Reture
Qt::Key_Enter对应小键盘的Enter键
Qt::Key_Return对应大键盘的Enter键
8. 事件过滤。窗口部件的事件到达目的地之前提前获取并处理相关事件,实现个性化的处理。
我在QLabel对象中放入两个QPushButton对象和两个QLabel对象,QPushButton实现值的调节,其中一个QLabel对象用于显示值,一个QLabel对象用于显示标题。类似SpinBox。在多个SpinBox上点击实现焦点切换,当鼠标点到QPushButton上时,QPushButton处理了mousePressEvent事件,所以无法实现焦点切换。为两个QPushButton对象安装事件过滤器,然后在其父部件中处理eventFilter函数
m_btnLeft->installEventFilter(this);
m_btnRight->installEventFilter(this);
//安装事件过滤器后,传给m_btnLeft、m_btnRight的事件会首先发送给eventFilter函数
bool ESpinBoxItem::eventFilter(QObject*obj,QEvent*ev)
{
if(obj == m_btnLeft || obj == m_btnRight)
{
if(ev->type() == QEvent::MouseButtonPress)
{
emit sign_spinBoxPressed(m_nItem);
return true; // 不传给目标对象处理
}
}
return false; // 不处理的事件则传给目标对象处理
}
10. 拍照动画
使用QTimeLine和QGraphicsPixmapItem对象,当时间线帧改变时,设置QGraphicsPixmapItem的位置,实现动画效果。
// 在QGraphicsView构造函数中
// take photo animation
m_timerAnimation = new QTimeLine(900);
m_timerAnimation->setCurveShape(QTimeLine::LinearCurve);
m_timerAnimation->setFrameRange(0, 240);
m_pixmapUpAnimation = QPixmap(":/images/animation.png");
m_pixmapDownAnimation = QPixmap(":/images/animation.png");
m_upPixmapItem = new QGraphicsPixmapItem;
m_downPixmapItem = new QGraphicsPixmapItem;
m_upPixmapItem->setZValue(4);
m_downPixmapItem->setZValue(4);
m_upPixmapItem->setPos(0, 0); // 左上角为原点
m_downPixmapItem->setPos(0, 240);
scene()->addItem(m_upPixmapItem);
scene()->addItem(m_downPixmapItem);
m_upPixmapItem->hide();
m_downPixmapItem->hide();
connect(m_timerAnimation, SIGNAL(frameChanged(int)), this, SLOT(slot_playAnimation(int)));
// 槽函数
void EGraphicsView::slot_playAnimation(int nFrame)
{
m_upPixmapItem->show();
m_downPixmapItem->show();
qDebug("nFrame: %d", nFrame);
if(nFrame < 120)
{
m_upPixmapItem->setPixmap(m_pixmapUpAnimation.scaled(320, nFrame));
m_downPixmapItem->setPixmap(m_pixmapDownAnimation.scaled(320, nFrame));
m_downPixmapItem->setPos(0, 240 - nFrame);
}
else
{
m_upPixmapItem->setPixmap(m_pixmapUpAnimation.scaled(320, 240 - nFrame));
m_downPixmapItem->setPixmap(m_pixmapDownAnimation.scaled(320, 240 - nFrame));
m_downPixmapItem->setPos(0, nFrame);
}
}
11.在移动设备上使用渐变或使用渐变的图片时,会出现条纹状,达不到效果。在初始化QApplication对像前调用下面的语句则可以达到效果:
QApplication::setColorSpec(QApplication::ManyColor); //the right choice for applications that use thousands of colors
QApplication app(argc, argv, QApplication::GuiServer );
12.用setStyleSheet设置背景图片
m_labelButton->setStyleSheet("background-image: url(:images/shutdown/slider.png); background-repeat: no-repeat;"); //注意,不加background-repeat: no-repeat可能会出现透视,很丑。QLabel对象可用setPixmap设置象素图。
13.使对话框圆角
//构造函数中
setAutoFillBackground(true);
QPalette pal = palette();
pal.setColor(QPalette::Window, QColor(0, 0, 0, 0));
setPalette(pal);
//paintEvent函数中
QPainter painter(this);
painter.setRenderHint(QPainter::Antialiasing,true);
painter.setPen(QPen(Qt::red,2));
painter.setBrush(QColor(16,62,81));
painter.drawRoundedRect(rect(),5.0,5.0);
// 圆角处有杂色,原因不祥
14. 对某些默认事件的处理修改
正常情况下,按下Tab键,被QWidget看成是去移动键盘焦点,但少数窗口部件需要自行解释。
bool MyClass::event(QEvent *e)
{
if(e->type() == QEvent::KeyPress)
{
QKeyEvent *ke = (QKeyEvent *)e;
if(ke->key() == Qt::Key_Tab)
{
//这里是特定的Tab处理
k->accept();
return TRUE;
}
}
else if(e->type() >= QEvent::User)
{
// 这里是自定义事件处理
return TRUE;
}
QWidget::event(e);
}
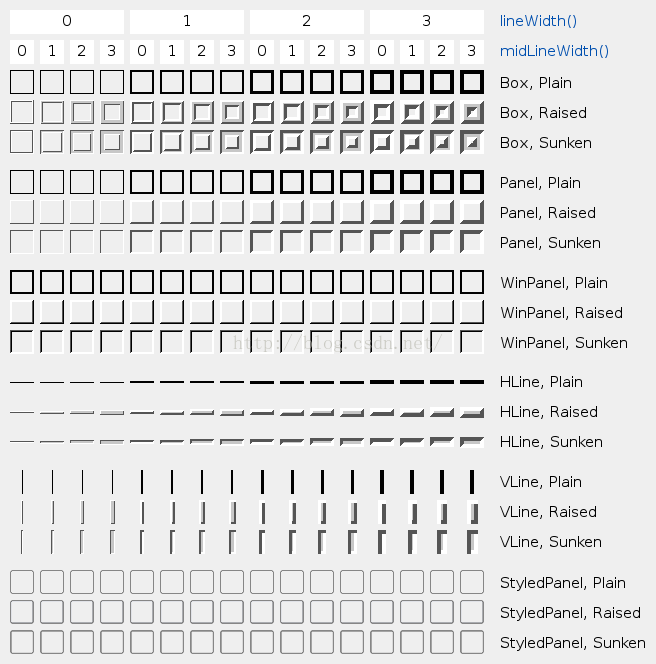
15.QLabel继承QFrame,有QFrame的特性。如setFrameStyle(int)可设置QLabel的FrameStyle(框架类型)
FrameStyle有两种:
a.第一种是frameshape:
有以下几种类型:
Constant
Value
Description
QFrame::NoFrame
0
QFrame draws nothing
QFrame::Box
0x0001
QFrame draws a box around its contents
QFrame::Panel
0x0002
QFrame draws a panel to make the contents appear raised or sunken
QFrame::StyledPanel
0x0006
draws a rectangular panel with a look that depends on the current GUI style. It can be raised or sunken.
QFrame::HLine
0x0004
QFrame draws a horizontal line that frames nothing (useful as separator)
QFrame::VLine
0x0005
QFrame draws a vertical line that frames nothing (useful as separator)
QFrame::WinPanel
0x0003
draws a rectangular panel that can be raised or sunken like those in Windows 95. Specifying this shape sets the line width to 2 pixels. WinPanel is provided for compatibility. For GUI style independence we recommend using StyledPanel instead.
b.第二种是frameshadow
有以下几种类型:
Constant
Value
Description
QFrame::Plain
0x0010
the frame and contents appear level with the surroundings; draws using the paletteQPalette::WindowText color (without any 3D effect)
QFrame::Raised
0x0020
the frame and contents appear raised; draws a 3D raised line using the light and dark colors of the current color group
QFrame::Sunken
0x0030
the frame and contents appear sunken; draws a 3D sunken line using the light and dark colors of the current color group
组合值的效果图:
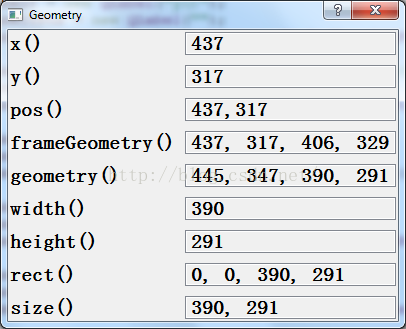
15.几种位置信息
x()、y()、pos()函数都是获得整个窗体左上角的坐标位置。需frameGeometry与geometry相对应,frameGemometry()是获得整个窗体的左上顶点和长、宽值,需geometry()函数获得的是窗体内中央域的左上顶点坐标以及长、宽值。直接调用width()和height()函数获得的是中央区域的长和宽的值。还有两个函数rect()、size(),调用它们获得的结果也都是对于窗体的中央区域而言的。size()获得的是窗体中央区域的长、宽值,rect()与geometry()一样返回一个QRect对象。其中,两个函数获得的长宽、值是一样的,都是窗体中央区域的长、宽值,只是左上顶点的坐标值不一样,geometry()获得的左上角顶点坐标是相对于父窗体而言的坐标,而rect()获得的左上角顶点坐标始终为(0, 0)。
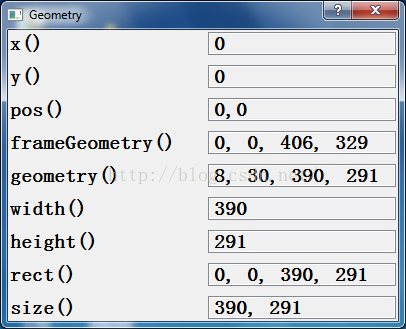
效果图:
窗体在左上角时:
16.几种输入对话框。
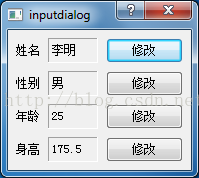
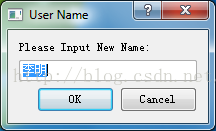
a.获取文本对话框
QString strName =QInputDialog::getText(this,tr("User Name"),tr("Please Input New Name:"),QLineEdit::Normal,m_labelName->text(),&ok);
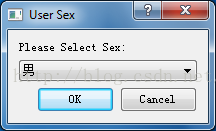
b.获取项对话框
QStringList list;
list<<tr("男")<<tr("女");
QStringstrSex=QInputDialog::getItem(this,tr("User Sex"),tr("Please Select Sex:"),list,0,false,&ok);
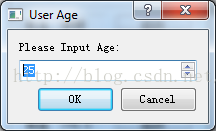
c.获取整数对话框
bool ok;
int nAge = QInputDialog::getInteger(this, tr("User Age"), tr("Please Input Age:"), m_labelAge->text().toInt(), 18, 30, 1, &ok);
if(ok)
{
m_labelAge->setText(QString(tr("%1").arg(nAge)));
}
d.获得双精度对话框
boolok;
double nHeight = QInputDialog::getDouble(this, tr("User Height"), tr("Please Input Height:"), m_labelHeight->text().toDouble(), 160.5, 270.5, 1, &ok);
if(ok)
{
m_labelHeight->setText(QString(tr("%1").arg(nHeight)));
}

17.自定义QMessageBox
QMessageBox customMsgBox;
customMsgBox.setWindowTitle("Custom message box");
QPushButton *lockButton = customMsgBox.addButton(tr("Lock"), QMessageBox::ActionRole);
QPushButton *unlockButton = customMsgBox.addButton(tr("Unlock"), QMessageBox::ActionRole);
QPushButton *cancelButton = customMsgBox.addButton(QMessageBox::Cancel);
customMsgBox.setIconPixmap(QPixmap(":/images/1.png"));
customMsgBox.setText(tr("This is a custom message box"));
customMsgBox.exec();
if(customMsgBox.clickedButton() == lockButton)
{
m_labelMessage->setText("Custom MessageBox button / lock");
}
else if(customMsgBox.clickedButton() == unlockButton)
{
m_labelMessage->setText("Custom MessageBox button / unlock");
}
else if(customMsgBox.clickedButton() == cancelButton)
{
m_labelMessage->setText("Custom MessageBox button / Cancel");
}
效果图:
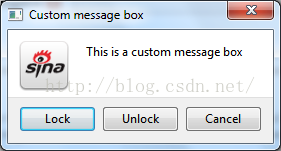
定义好的MessageBox
QMessageBox::question
QMessageBox::information
QMessageBox::warning
QMessageBox::critical
QMessageBox::about
QMessageBox::aboutQt
18.在编写程序时,初始化窗体时最好不要使用setGeometry()函数,而用resize()和move()函数代替,因为使用setGeometry()会导致窗体show()之后在错误的位置上停留很短暂的一段时间,带来闪烁现象。
19.提示错误:E:\vm_shared\study\graphicsview\debug\moc_navibar.cpp:39: error: `staticMetaObject' is not a member of `QGraphicsRectItem'
错误原因:因为QGraphicsRectItem不是QObject的子类,所以在类的声明中不能有Q_OBJECT宏、signal和slot。
20.抓图功能:
// 使用Qt自带的静态函数grabWindow,指定窗体ID,抓图的起启位置和面积大小。
QImage image = QPixmap::grabWindow(QApplication::desktop()->winId(), 0, 0, nDesktopWidth, nDesktopHeight).toImage().scaled(640, 480);
21.视图去掉滚动条
view->setFrameShape(QFrame::NoFrame);
通过布局指定视图的父窗体时,使用上面代码去不掉滚动条。而需要使用view = new QGraphicsView(this);指定父窗体。
最好办法是: view->setHorizontalScrollBarPolicy(Qt::ScrollBarAlwaysOff); view->setVerticalScrollBarPolicy(Qt::ScrollBarAlwaysOff); 一直关掉滚动条
22.QpushButton圆角
QPushButton { border: 2px solid #8f8f91; border-radius: 6px; background-color: qlineargradient(x1: 0, y1: 0, x2: 0, y2: 1, stop: 0 #f6f7fa, stop: 1 #dadbde); min-width: 80px; }
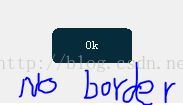
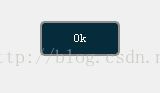
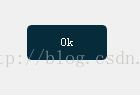
note: 当QPushButton无边框(border: 0px;),有设置背景颜色(background-color: rgb(6,43,58);)时,设置圆角会出现锯齿,因为圆角是边框为圆角,边框大小不能为0px.想让按钮只显示一种颜色(看不见边框颜色),则把边框颜色设为背景色即可。如图:


 8551
8551


 被折叠的 条评论
为什么被折叠?
被折叠的 条评论
为什么被折叠?
 到【灌水乐园】发言


